Table of Contents >> Show >> Hide
- What Is an El Bokeh Wall?
- Why Aluminum Foil Works So Well for Bokeh Backgrounds
- What You Need to Make an El Bokeh Wall
- How To Make the El Bokeh Wall Step by Step
- Best Camera Settings for an El Bokeh Wall
- Lighting Tips That Make the Background Look Expensive
- Common Mistakes To Avoid
- Creative Variations You Should Try
- When the El Bokeh Wall Works Best
- Real-World Experience: What It Is Actually Like Shooting with an El Bokeh Wall
- Conclusion
If you have ever looked at a dreamy portrait and thought, “Wow, that background looks expensive,” I have excellent news: sometimes it is just crinkled aluminum foil having a glamorous moment. That is the charm of the El Bokeh Wall. It is simple, budget-friendly, weirdly satisfying to make, and surprisingly effective when you want a photo background that sparkles without screaming, “I spent my rent money on studio gear.”
The idea is beautifully low-tech. You build a reflective backdrop from wrinkled aluminum foil, place your subject in front of it, add the right light, and use shallow depth of field to turn those tiny reflections into soft, glowing circles and shimmering blur. The result can look festive, polished, romantic, editorial, or artsy, depending on how you light it and how much chaos you allow in the wrinkles.
In this guide, you will learn exactly how to make an El Bokeh Wall, why it works, which camera settings help most, what mistakes to avoid, and how to turn a humble kitchen staple into a background that looks much fancier than its grocery-store origins. Fancy on a budget? We love to see it.
What Is an El Bokeh Wall?
An El Bokeh Wall is a DIY photography backdrop made from crumpled and smoothed aluminum foil attached to a flat surface. When light hits the textured foil, it creates countless tiny highlights. Once those highlights fall out of focus behind your subject, they become creamy bokeh shapes and luminous background blur.
That is the secret: the foil is not supposed to look sharp. In fact, the whole trick depends on making it gloriously out of focus. The foil creates texture, the light creates sparkle, and your lens turns that sparkle into visual magic.
This technique is especially popular for portraits, product photography, beauty shots, still life work, and holiday-themed images. It is affordable, portable, and ideal for small spaces where you want a dramatic effect without building a full studio set.
Why Aluminum Foil Works So Well for Bokeh Backgrounds
Aluminum foil is a tiny chaos machine in the best possible way. Once you crumple it and smooth it back out, it becomes covered in angles, ridges, and reflective planes. Each little crease catches light differently, which means your background suddenly contains dozens or even hundreds of bright points. Those points are exactly what help create strong bokeh.
Foil also reflects light in a lively, uneven way. A plain wall is fine, but it does not sparkle. Foil does. It bounces highlights, adds dimension, and gives your images a polished shimmer that reads as intentional rather than accidental. Or at least that is the dream. If you light it badly, it can also look like a baked potato costume. More on avoiding that later.
Another reason the El Bokeh Wall is so useful is flexibility. You can make it silver and crisp, warm it up with gels, tint it with colored lights, pair it with fairy lights, or use it as a subtle textured backdrop for macro shots. It works whether you are photographing a person, a perfume bottle, cupcakes, or a handmade candle that deserves its own red-carpet entrance.
What You Need to Make an El Bokeh Wall
Basic Materials
- Aluminum foil
- A large piece of cardboard, foam board, plywood, or a wall-safe backing surface
- Tape, glue dots, spray adhesive, or staples depending on the base
- Scissors
- A light source such as window light, continuous light, speedlight, LED panel, or string lights
- Your camera or smartphone with manual or portrait controls
Nice Extras
- A 50mm, 85mm, or telephoto lens for stronger background blur
- A tripod for steady framing
- Reflector to bounce light onto your subject
- Colored gels or RGB lights for creative effects
- Clamps to hold the backdrop upright
You do not need expensive gear. A beginner camera and a lens with a wide aperture can do excellent work here. Even many phones can create a decent version of the effect if you use portrait mode and keep the light interesting.
How To Make the El Bokeh Wall Step by Step
1. Build Your Backdrop Surface
Start with a board or backing large enough for your frame. If you are shooting headshots or products, a modest-sized piece of foam board may be enough. If you want half-body portraits, go bigger. A wider background gives you more freedom when composing and helps avoid awkward edges sneaking into the shot like uninvited party guests.
2. Crumple the Foil
Tear off sheets of aluminum foil and crumple each one into a loose ball. Do not compress it too tightly. You want visible texture, not a tiny foil meteorite. Then gently open each sheet and smooth it just enough so it can lie relatively flat while keeping plenty of wrinkles.
3. Attach the Foil
Cover your surface with the wrinkled foil sheets. Overlap them slightly so gaps do not show through. Tape or glue them down securely. The goal is a textured reflective wall, not a breeze-powered abstract sculpture.
4. Place the Background Behind the Subject
Set the foil wall behind your subject, but do not place your subject right against it. Background separation is one of the most important parts of creating beautiful bokeh. Give your subject several feet of distance from the foil if possible. More distance usually means softer blur and larger bokeh shapes.
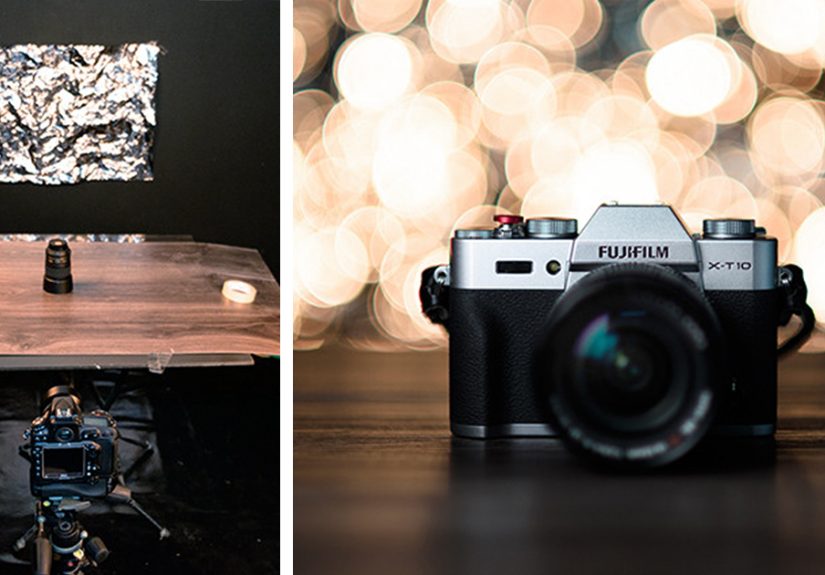
5. Add Light to the Foil
Light is what brings the foil to life. You can use window light, a lamp, a flash, or string lights near the foil. Side light and backlight often work beautifully because they help the textured surface catch little highlights. You are not just illuminating the backdrop; you are giving it a reason to sparkle.
6. Focus on the Subject, Not the Foil
This is the part where the magic happens. Focus sharply on your subject, then use a wide aperture or portrait mode so the foil goes nicely out of focus. If the foil is sharp, the illusion is gone. You are making bokeh, not photographing leftovers.
Best Camera Settings for an El Bokeh Wall
Aperture
Use the widest aperture your lens allows, such as f/1.8, f/2, f/2.8, or something close. A lower f-stop creates a shallower depth of field, which helps turn the foil reflections into soft circles and blur.
Focal Length
Longer focal lengths usually make the effect more dramatic. A 50mm lens is a classic budget-friendly option. An 85mm lens can create a creamier portrait look. If you are using a zoom, try the longer end of the range and step back.
Subject Distance
Move your subject farther from the foil background and closer to the camera when possible. This increases separation and makes the background blur stronger. It is one of the easiest upgrades you can make without spending a dime.
ISO and Shutter Speed
Keep your shutter speed fast enough to avoid blur from camera shake or subject movement. Then raise ISO as needed to maintain good exposure, especially indoors. If your shutter speed drops too low, use a tripod or add more light.
Focus Mode
Use single-point autofocus or carefully tap-focus if you are shooting on a phone. Make sure the eyes or main product detail are sharp. Background magic is fun, but the subject still needs to look like the star of the show.
Lighting Tips That Make the Background Look Expensive
The El Bokeh Wall can look subtle and elegant or bright and flashy depending on your light. Soft daylight from a window gives the foil a refined shimmer. A small direct light can create punchier highlights. String lights nearby can create a festive, whimsical feel. Colored LEDs can transform the whole scene into something moody and cinematic.
If your subject starts blending into the background, add a reflector or a soft key light to the face. The best bokeh backgrounds support the subject rather than stealing every bit of attention like a karaoke machine at a wedding.
Also watch for harsh hotspots. If one area of foil is much brighter than everything else, the frame can feel unbalanced. Adjust the light angle, diffuse the light, or reposition the background until the highlights look pleasing rather than distracting.
Common Mistakes To Avoid
Putting the Subject Too Close to the Background
This is the biggest mistake. If your subject is pressed against the foil wall, you will see texture instead of bokeh. Give them breathing room.
Using Too Deep an Aperture
If you shoot at f/8 or f/11, the foil will stay too defined. That may work for texture-heavy product shots, but it is not ideal if your goal is a dreamy bokeh background.
Lighting Everything Equally
Flat light can make the foil look dull. You want some direction and sparkle. Let the foil catch highlights rather than flooding it with bland light.
Making the Background Brighter Than the Subject
Yes, the backdrop is fun. No, it should not completely overpower the face, eyes, or product. Keep your main subject visually dominant.
Using a Tiny Backdrop for a Wide Frame
If your backdrop is too small, edges will creep into the image and ruin the illusion. Match the size of your background to the framing you actually want to use.
Creative Variations You Should Try
Holiday Portraits
Pair the foil wall with warm fairy lights and cozy styling for festive portraits that look far more elaborate than they are. This setup shines during the holiday season because the glittery background feels cheerful and intentional.
Beauty and Makeup Shots
Foil can add a glossy editorial feel behind close-up beauty portraits. Use soft flattering light on the face and let the background melt into luminous texture.
Product Photography
Small reflective backdrops work wonderfully for jewelry, cosmetics, candles, glassware, and handmade goods. A little foil can create high-end sparkle without renting a studio.
Colored Bokeh
Add colored gels to your light source or use RGB LEDs to shift the mood. Blue and purple can feel cinematic. Gold and amber feel warm and luxurious. Pink can turn the whole setup into a valentine to glamour.
Foreground Foil Effects
You can even use small pieces of foil in the foreground for extra flare and dreamy blur. Just be careful not to block your subject too much unless you are going for a more abstract look.
When the El Bokeh Wall Works Best
This technique works best when you want visual richness without major cost. It is ideal for small indoor shoots, creative social content, DIY studio portraits, craft-business product photos, holiday campaigns, and test shoots when you want to experiment with light and blur.
It is also great for photographers learning how aperture, light direction, and distance affect the look of an image. In that sense, the El Bokeh Wall is not just a backdrop. It is a practical lesson in optics disguised as shiny chaos. Education, but make it sparkly.
Real-World Experience: What It Is Actually Like Shooting with an El Bokeh Wall
The first time many people try an El Bokeh Wall, there is usually a brief moment of doubt. You stand there holding crumpled foil, tape stuck to your fingers, wondering whether this is a photography setup or the start of an extremely low-budget spacecraft. Then you take a test shot, blur the background, and suddenly it clicks. The foil does not look cheap anymore. It looks luminous, textured, and oddly polished.
In real shooting situations, the biggest surprise is how much small adjustments matter. Move your subject forward by one foot and the background gets creamier. Turn the light a few degrees and the foil wakes up with brighter highlights. Switch from a wider lens to a 50mm or 85mm, and the whole setup starts looking far more professional. The effect is not random, but it is wonderfully sensitive. That is part of the fun.
One of the most useful things about the El Bokeh Wall is how forgiving it can be for tiny spaces. You do not need a giant studio to make it work. A corner near a window, a table lamp, a simple board, and a fast lens are often enough. For creators working in apartments, bedrooms, or makeshift home studios, that matters. It turns limited space into creative opportunity instead of frustration.
There is also a nice emotional payoff when using this backdrop for portraits. Subjects often respond well to it because it feels playful. Instead of standing in front of a plain wall, they see a sparkling setup and immediately understand that the photos are meant to feel special. That can change their energy. They relax, get curious, and start participating more naturally. Good backgrounds do not just decorate an image; they help set the mood for the shoot itself.
For product photography, the experience is slightly different but equally rewarding. Foil can bring life to objects that need a little glamour boost. Candles look warmer, jewelry looks shinier, beauty products look more polished, and handmade goods suddenly feel styled rather than simply documented. The trick is restraint. A little shimmer goes a long way. Too much reflection and your background begins demanding top billing.
Of course, there are learning curves. Sometimes the foil reflects too much and creates ugly hotspots. Sometimes the wrinkles are too flat and the background looks boring. Sometimes the subject is too close and the foil stays distractingly sharp. These are normal problems, and the good news is that they are usually solved with small changes rather than expensive purchases. Reposition the light. Increase the distance. Open the aperture. Try again. The setup rewards experimentation.
Another real-world lesson is that this technique encourages you to pay closer attention to light quality. Soft light gives the foil elegance. Harder light gives it punch. Backlight can make it glow. Side light can add dimension. Because the surface reacts so visibly, you begin to understand light in a more tactile, immediate way. That is one reason so many photographers enjoy this project even beyond the final images. It teaches while it dazzles.
Perhaps the best part of the El Bokeh Wall is the balance it strikes between simplicity and payoff. It is cheap to make, easy to customize, and capable of producing images that feel intentional and stylish. It proves that strong photography is not always about buying more gear. Sometimes it is about using humble materials creatively, paying attention to distance and light, and trusting that a roll of foil can have a surprisingly glamorous second career.
Conclusion
The El Bokeh Wall is one of those rare DIY photography ideas that is both accessible and genuinely effective. With nothing more than aluminum foil, a backing surface, and thoughtful lighting, you can create a gorgeous background full of sparkle, blur, and personality. Add a wide aperture, enough separation between your subject and the backdrop, and a bit of experimentation, and you have a setup that looks far more impressive than its cost suggests.
Whether you are shooting portraits, products, holiday content, or creative social media images, this technique gives you a stylish shortcut to rich-looking backgrounds. Best of all, it invites play. And in photography, that matters. Some of the best ideas begin not with a shopping spree, but with curiosity, good light, and a sheet of aluminum foil that finally gets its moment in the spotlight.