Table of Contents >> Show >> Hide
- Why These Little Trees Are So Popular
- What You Need for DIY Mini Lighted Epoxy Christmas Trees
- Before You Start: The Resin Rules That Actually Matter
- How to Make Mini Lighted Epoxy Christmas Trees
- Best Design Ideas for Mini Lighted Epoxy Trees
- Common Mistakes to Avoid
- How to Style and Gift Them
- What the Experience of Making These Trees Is Really Like
- Final Thoughts
- SEO Tags
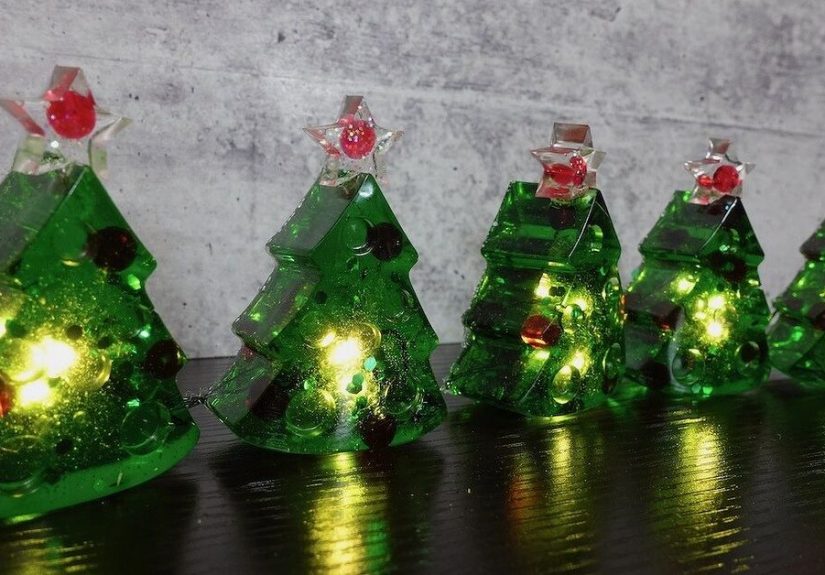
If regular holiday decor feels a little too expected this year, it may be time to shrink the Christmas tree, add some sparkle, and pour a little resin into the situation. DIY mini lighted epoxy Christmas trees are part craft project, part holiday decor, and part excuse to say, “I made that,” while pointing dramatically at a glowing object on your mantel.
These tiny trees are charming because they hit a sweet spot between nostalgic and modern. They can echo the look of vintage ceramic Christmas trees, but they also feel cleaner, glossier, and a little more custom. You can make them frosty white, classic evergreen, candy-cane striped, translucent pink, gold-flecked, snowy, or glam enough to make your tinsel feel underdressed.
Best of all, they do not require a giant budget, a woodworking shop, or the patience level of a saint. You do need some planning, though. Epoxy resin has opinions. It prefers exact measuring, dry materials, warm temperatures, and crafters who do not freestyle the mixing ratio like they are seasoning soup. Treat it right, and you can create mini lighted trees that look gift-worthy, boutique-worthy, and holiday-photo-worthy.
Why These Little Trees Are So Popular
Part of the appeal is nostalgia. Vintage ceramic Christmas trees, especially the tabletop kind with tiny multicolored bulbs, have made a big comeback in recent years. That look instantly feels cozy, familiar, and just a little magical. Epoxy versions tap into the same mood while giving you more freedom with color, transparency, glitter, and finish.
The other reason they are such a hit is that they work almost anywhere. Put one on a bookshelf, nightstand, entry table, office desk, coffee bar, or guest-room dresser. Cluster three together and suddenly your house looks like it has a holiday styling budget instead of a “let’s see what is still in the storage bin” budget.
They also make excellent gifts. A handmade mini epoxy tree feels personal without being overly precious. It is festive, useful as decor, and easy to customize for different tastes. One person gets a clean white tree with a gold star. Another gets a jewel-toned retro tree with bright faux bulbs. Everybody wins, including the person who receives the gift bag and immediately asks, “Wait, you made this?”
What You Need for DIY Mini Lighted Epoxy Christmas Trees
Core Materials
- Craft epoxy or casting epoxy suitable for small molds
- Silicone Christmas tree mold, preferably with a glossy interior for a shiny finish
- Mixing cups, stir sticks, and disposable pipettes
- Nitrile gloves and safety glasses
- Silicone mat, wax paper, parchment paper, or polyethylene sheet to protect your work surface
- Mica powder, resin dye, or alcohol ink made for resin
- Glitter, gold leaf flakes, or other dry decorative inclusions
- Small LED puck light, battery tea light, or LED display base
Optional Extras
- White pigment for snowy effects
- Fine iridescent glitter for icy sparkle
- Mini star topper, bead topper, or metallic charm
- Paint pens or dimensional paint for faux vintage light bulbs after curing
- Micro fairy lights used around the base or behind the tree rather than fully sealed inside
A quick tip on lighting: translucent resin plus an external LED base is usually the easiest and cleanest approach. It lets the light pass through beautifully without turning your project into an electronics experiment gone rogue.
Before You Start: The Resin Rules That Actually Matter
There is no need to be dramatic about resin, but there is a need to be respectful. Work in a ventilated area, wear nitrile gloves, and use eye protection. Keep uncured resin off your skin and clothes. In other words, dress like someone who enjoys holiday crafting but would also prefer not to become part of the project.
Temperature matters more than many beginners realize. Resin usually behaves best in a warm, dry workspace. If the room is chilly, the resin can get thick, cloudy, and bubbly. If your bottles feel cold, warming the sealed bottles in warm water before mixing can help the resin flow better. Not hot water. This is a craft, not a pasta situation.
Also, make sure your mold, tools, glitter, and any decorative add-ins are fully dry. Moisture can cause haziness or curing problems. And measure exactly according to your resin brand’s instructions. Sticky resin is very often the result of under-mixing or getting the ratio wrong, which is resin’s way of saying, “You had one job.”
How to Make Mini Lighted Epoxy Christmas Trees
1. Plan Your Look Before You Mix
Once resin is mixed, the clock starts ticking. So decide on your design first. Are you going for classic green? Frosted white? Swirled red and white? Clear resin with suspended glitter? A retro tree with painted bulb dots after demolding? A little planning saves you from the classic mid-project panic stare.
For the prettiest lighted result, translucent designs usually outperform opaque ones. Deeply opaque pigments can block the glow, while transparent or semi-transparent colors let the light travel through the tree and create that soft lit-from-within effect.
2. Prep the Mold and Workspace
Set your mold on a level surface. This matters. A crooked pour becomes a crooked tree, and while whimsical is charming, lopsided is a different genre. Protect your table with a nonstick surface like parchment paper, wax paper, or polyethylene sheeting.
Lay out your cups, stir sticks, pigments, and decorations in advance. If you plan to add a topper or suspend glitter in layers, have everything within reach before mixing.
3. Measure and Mix Carefully
Follow your resin kit’s instructions exactly. Some formulas are 1:1 by volume, while others are not. Stir slowly and thoroughly, scraping the sides and bottom of the cup. Fast stirring whips in bubbles like you are making holiday meringue, which is festive but unhelpful.
If you want multiple colors, divide the mixed resin into smaller cups and tint each one separately. Add only resin-safe pigments and use them sparingly at first. You can always deepen the color, but rescuing an over-pigmented batch is much less fun.
4. Pour in Layers for a Better Look
If your mold is deep, layered pouring gives you more control. Start with a small amount of resin, then add glitter, faux snow, tiny confetti, or metallic flakes. Pour another layer, then more decorative elements. This keeps everything from sinking straight to the bottom like they missed the assignment.
For a retro ceramic-inspired look, use translucent green resin for the tree body. After curing, you can add colorful bulb dots on the outside with dimensional paint or tiny dabs of acrylic paint sealed with a compatible clear finish. This creates the vintage feel without needing actual inserted plastic bulbs.
5. Remove Bubbles Without Overdoing It
Bubbles are normal. A few small ones can even look snowy and magical. But if you want a glassier finish, tap the mold gently on the table and use the bubble-removal method recommended by your resin brand. Some crafters use a small torch or heat gun depending on the project and formula, but the key is restraint. Too much heat can warp a mold, scorch the surface, or send glitter on an unscheduled road trip.
6. Let It Cure Somewhere Safe
Cover the mold loosely so dust does not settle into the surface while curing. Then leave it alone. This is the hardest step for most people. Resist the urge to poke, prod, tilt, or “just check one tiny corner.” Resin rewards patience and punishes curiosity.
Most projects need a full cure time based on the product directions, often around 24 hours or more before demolding and longer before heavy handling. If your tree still feels tacky, do not panic immediately. Give it the full recommended cure window first.
7. Demold and Finish
Once fully cured, gently peel the mold away from the tree. If the mold has a glossy interior, your tree should come out shiny. If the piece looks slightly matte or you want extra polish, you can add a thin clear topcoat once the initial piece has cured properly.
Now add the finishing details. Attach a tiny topper. Paint on faux light bulbs. Brush a little mica along the edges for a frosty glow. Or keep it simple and let the resin speak for itself. Some trees look best when they are not trying so hard. Honestly, same.
8. Add the Light
The easiest way to light your mini epoxy Christmas tree is to place it on or in front of a small LED base, battery puck, or tea light-style lamp. Because LED lights run cooler and use less energy than incandescent strings, they are a smart choice for this kind of decorative setup. A clear or translucent tree over a warm white LED can look soft and elegant, while multicolor LEDs lean playful and retro.
If you want more drama, display a group of trees together on mirrored trays, acrylic risers, or small wood rounds. A trio of different heights with hidden LED puck lights underneath can look surprisingly upscale, like something you bought from a holiday boutique after telling yourself you were “just browsing.”
Best Design Ideas for Mini Lighted Epoxy Trees
Classic Evergreen Glow
Use transparent green resin with subtle gold glitter and a warm white LED base. This is the dependable, timeless version. It is the little black dress of holiday crafting, except greener and less likely to attend a cocktail party.
Snowy Frost Tree
Mix clear resin with a touch of white pigment and iridescent glitter for a frosted look. Pair it with cool white lighting for an icy winter effect.
Retro Ceramic-Inspired Tree
Create a green or white tree, then add colorful painted dots after curing to mimic those beloved vintage tabletop trees. This style is pure nostalgia and looks especially good on mantels and sideboards.
Pink Holiday Glam
Try blush or translucent rose resin with gold leaf and a star topper. It feels festive without looking traditional, which is perfect if your holiday style lives somewhere between Christmas and chic dessert lounge.
Candy Cane Swirl
Pour alternating ribbons of red and white-tinted resin, then swirl gently with a stick. Keep the swirl light so the tree still glows when lit.
Common Mistakes to Avoid
- Using wet inclusions: Water and resin are not friends. Dry everything completely.
- Working in a cold room: Cold resin traps bubbles and cures poorly.
- Guessing the ratio: Measure exactly. Resin is chemistry, not improv comedy.
- Overloading with pigment: Too much color can interfere with the glow and sometimes the cure.
- Unmolding too soon: Premature demolding can bend edges or leave fingerprints in the finish.
- Choosing hot lights: Stick with LEDs for a cooler, more efficient display.
How to Style and Gift Them
Mini lighted epoxy Christmas trees shine in small spaces, which makes them ideal for apartments, dorm rooms, offices, kitchen counters, and guest rooms. You can group them with bottlebrush trees, mercury glass, candles, or vintage ornaments for a layered holiday vignette. They also pair beautifully with winter decor that stays out past Christmas, especially white, silver, gold, and natural wood accents.
As gifts, they are easy to personalize. Choose colors that match the recipient’s home. Add initials on the base. Make a set for coworkers in coordinated shades. Or create a family trio with different heights and finishes. Wrap one in tissue paper with a tiny note that says, “A tree you never have to water.” That joke alone earns gift-giver points.
What the Experience of Making These Trees Is Really Like
Making DIY mini lighted epoxy Christmas trees has a very specific kind of joy to it. It starts with the planning stage, when you are standing over pigments, glitter, molds, and lights feeling like the creative director of a very tiny holiday movie set. Everything looks full of possibility. You start imagining which tree will be elegant, which one will be playful, and which one will accidentally become the weird experimental cousin that still ends up charming everyone.
The mixing process is oddly satisfying. There is something calming about slow, careful stirring, watching clear resin turn into jewel tones or snowy swirls. It feels part science lab, part holiday magic, and part test of your ability to follow directions without suddenly deciding you know better than the chemistry. Spoiler: the chemistry always wins.
Then comes the decorating stage, which is where the project becomes personal. Maybe you add glitter because you are a maximalist. Maybe you keep it sleek and modern because your holiday aesthetic says “winter gallery installation” more than “North Pole explosion.” Maybe you try to recreate the vintage ceramic tree your grandmother displayed every December. That is one of the best things about this project: it can feel deeply nostalgic, completely modern, or somewhere in between.
There is also a very real thrill in waiting for the cure and demolding the final piece. Few craft moments compare to peeling back a silicone mold and seeing a glossy little tree slide out looking polished and bright. When it works, it feels like a tiny triumph. When it does not work perfectly, you usually still learn something useful for the next round. Maybe your pigment was too opaque. Maybe the room was too cold. Maybe you got impatient. Resin has a way of teaching patience whether you requested that lesson or not.
Lighting the finished tree is the moment the whole project clicks. The colors deepen, the glitter catches, and the details you thought might disappear suddenly come alive. A decent tree becomes a delightful one the second that light turns on. It is the kind of craft reveal that makes you call someone into the room just to say, “Look at this,” even if they were peacefully minding their own business two minutes earlier.
These projects also tend to become memory-makers. They are great for solo crafting with a holiday playlist in the background, but they are just as fun as a seasonal craft night with friends or family. People compare color choices, debate glitter levels, and act shocked when the boldest design somehow turns out to be the prettiest one. By the end, everyone has sticky gloves, strong opinions about mica powder, and a new respect for tiny decorative trees.
And unlike some holiday crafts that look cute for one season and then mysteriously disappear into storage forever, these little epoxy trees often come back year after year. They are durable, compact, and easy to display. Over time, they can become part of your holiday routine. That is what makes the experience special. You are not just making decor. You are making a small tradition with a glow switch.
Final Thoughts
DIY mini lighted epoxy Christmas trees are one of those rare projects that manage to feel fun, stylish, giftable, and genuinely useful as decor. They look impressive without requiring a professional studio, and they are customizable enough to fit almost any holiday style. If you respect the resin process, choose dry materials, use LED lighting, and let the design stay translucent enough to glow, you can create tiny trees with big holiday energy.
Start with one simple mold and one classic color. Once you get the hang of it, you will probably make a second, then a third, then a whole tiny resin forest. That is how it starts. One little glowing tree. Then suddenly your mantel looks magical and you are pricing more molds like this was always the plan.