Table of Contents >> Show >> Hide
- Before You Cut: Set Yourself Up for a Cleaner Fit
- Tool Checklist for Cutting Tile Around a Toilet
- Method 1: Use a Wet Saw for Straight Relief Cuts
- Method 2: Use an Angle Grinder for Curved Cuts
- Method 3: Use a Diamond Hole Saw for a Round Opening
- Method 4: Use Tile Nippers for Fine Shaping and Tight Adjustments
- Which Tile-Cutting Method Should You Choose?
- Common Mistakes When Cutting Tile Around a Toilet
- Final Thoughts
- Experience and Lessons Learned from Cutting Tile Around a Toilet
- SEO Tags
Cutting tile around a toilet is one of those bathroom jobs that sounds simple right up until you’re staring at a round flange, a square tile, and your own reflection in a bucket wondering how life got so geometric. The good news is that it’s absolutely doable. The better news is that you do not need wizard powersjust the right method for the shape you’re dealing with.
Whether you’re laying ceramic tile, porcelain tile, or another bathroom floor tile, the trick is choosing the best cut for the situation. Sometimes you need a straight relief cut. Sometimes you need a curved notch. Sometimes the toilet flange lands right in the middle of a tile like it owns the place. And sometimes your tile only needs a little nibbling and persuasion.
In this guide, you’ll learn four practical ways to cut tile around a toilet, when to use each method, which tools make life easier, and how to avoid the classic DIY disasters: cracked tile, ugly gaps, chipped edges, and a toilet that rocks like it’s at a concert. Let’s make your bathroom floor look intentional, not accidental.
Before You Cut: Set Yourself Up for a Cleaner Fit
Before talking tools, let’s talk strategy. The cleanest tile installation usually happens when the toilet is removed first. That gives you full access to the toilet flange and lets the tile run beneath the toilet base instead of awkwardly around it. In plain English: your cuts stay hidden, your layout looks better, and your future self will thank you.
Measure the right thing
Don’t measure from the wall alone and hope for the best. Bathrooms love surprises. Measure from two fixed reference points, such as the finished wall and the center of the flange, then transfer those measurements to the tile. If the toilet flange intersects more than one tile, dry-lay the surrounding pieces first so you can see exactly where the opening lands.
Make a template if the cut is weird
Cardboard, painter’s tape, or heavy paper can save expensive tile. For curved cuts, trace the flange opening or use a contour tool. A five-minute template is cheaper than a second trip to buy replacement tile while pretending you meant to buy extra all along.
Know your tile
Ceramic tile is usually easier to cut than porcelain tile. Porcelain is tougher and denser, which is great for a bathroom floor and less great for your patience. If you’re working with porcelain, expect a wet saw, angle grinder, or diamond hole saw to do most of the heavy lifting.
Safety is not optional
Tile cutting can throw sharp chips and fine dust. Wear eye protection, hearing protection when needed, gloves for handling sharp edges, and use wet-cutting methods or controlled cleanup whenever possible. A bathroom remodel should not come with bonus lungs full of dust.
Tool Checklist for Cutting Tile Around a Toilet
You won’t need every tool for every method, but these are the usual suspects:
- Wet saw
- Angle grinder with a diamond blade
- Diamond hole saw or tile hole cutter
- Tile nippers
- Manual tile cutter for straight score-and-snap cuts
- Pencil or wax marker
- Tape measure
- Straightedge
- Cardboard or paper template
- Sanding stone or rubbing stone for smoothing edges
Method 1: Use a Wet Saw for Straight Relief Cuts
If your tile needs a U-shaped cut or a large notch near the edge to fit around part of the toilet flange, a wet saw is often the cleanest option. This is the go-to method when the opening is close to the tile edge and you can approach the cut with several straight passes.
Best for
Large notches, edge cuts, and two-piece layouts where the flange opening can be split between adjacent tiles.
How it works
Mark the outline of the section you need to remove. Then make repeated straight cuts from the tile edge toward the curved line, stopping at your mark each time. Think of it like making thin “fingers” in the waste area. Once the cuts are made, snap off the fingers gently and smooth the remaining edge with nippers or a sanding stone.
Why this method works
A wet saw excels at straight, accurate cuts and helps reduce chipping on ceramic and porcelain tile. It’s especially helpful when you can divide the toilet opening between two tiles instead of forcing one dramatic cut into a single piece. That usually gives you cleaner results and less stress.
Pro tip
If the flange falls near the joint between two tiles, split the opening into two half-moon cuts instead of trying to cut one full opening in one tile. That’s not cheating. That’s being smarter than the tile.
Method 2: Use an Angle Grinder for Curved Cuts
When the tile needs a rounded notch or a smooth curve around the toilet flange, the angle grinder is the tool that earns dramatic movie music. It’s fast, versatile, and great for freehand shaping. It is also dusty and a little intimidating, so respect it like the chaotic genius it is.
Best for
Curved cuts, semicircles, tight notches, and shaping a tile to follow the flange outline.
How it works
Mark the curve clearly on the tile. Secure the tile on a stable work surface. Start by lightly scoring the line with the grinder instead of trying to cut all the way through at once. Then make a series of shallow passes, gradually deepening the cut until the waste piece releases. For inside curves, some installers make a few small relief cuts first, then refine the shape.
Why this method works
An angle grinder gives you far more control over curves than a wet saw alone. If you need the tile to wrap neatly around a flange or closet bend, this is often the method that produces the most precise fit.
What to watch out for
Don’t force the blade. Let it do the work. Pushing too hard can chip the glaze, overheat the blade, or crack the tile. Also, keep your cut slightly inside the waste line at first. You can always remove more. You cannot glue tile dust back together and call it confidence.
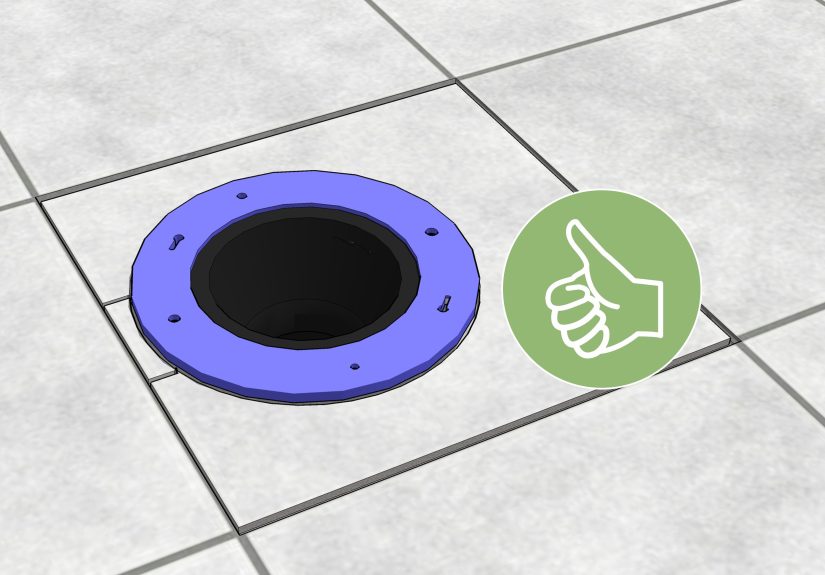
Method 3: Use a Diamond Hole Saw for a Round Opening
If the toilet flange lands mostly inside a single tile, a diamond hole saw can create the cleanest circular cut. This method is ideal when you want a true round opening for the pipe or flange area instead of piecing together multiple straight cuts and hoping nobody notices.
Best for
Round holes for plumbing penetrations and flange openings that fall within one tile.
How it works
Measure and mark the center of the opening on the tile. Apply painter’s tape over the drilling area if you want better traction for the bit. Start the hole saw at a slight angle to keep it from skating across the tile, then level it out once it bites. Use light pressure, keep the bit cool, and be patient. Tile is not impressed by hurry.
When this is the smartest choice
This method shines when appearance matters and the opening is fully or mostly hidden under the toilet base. A hole saw can produce a cleaner, more professional-looking cut than trying to fake a circle with straight lines.
Important caveat
If the circle is too large for your available hole saw, combine methods: drill part of the opening with the hole saw and complete the rest with an angle grinder or tile nippers. That hybrid approach is common and perfectly legitimate.
Method 4: Use Tile Nippers for Fine Shaping and Tight Adjustments
Tile nippers are the unsung heroes of bathroom tile work. They are not glamorous. They are not especially fast. But when you need to shave off tiny bits, refine an odd curve, or rescue a cut that’s almost right, they are incredibly useful.
Best for
Small irregular cuts, detail work, curved refinements, and trimming after a rough cut from another tool.
How it works
Score the tile if needed, then use the nippers to remove small pieces a little at a time. Emphasis on small. If you try to bite off too much material at once, the tile may crack beyond your cut line and turn your project into modern art.
Why this method matters
No matter how carefully you measure, some cuts need tweaking. Tile nippers help you sneak up on the perfect fit. They’re especially useful around curved sections of the flange where a grinder got close but not quite close enough.
Finish the edge
After nipping, smooth the edge with a rubbing stone. The cut will usually sit beneath the toilet base, but a smoother edge still reduces the risk of cracks, sharp points, and regret.
Which Tile-Cutting Method Should You Choose?
The best way to cut tile around a toilet depends on the shape of the cut, the tile material, and where the toilet flange lands.
- Choose a wet saw for straight notches and split cuts across two tiles.
- Choose an angle grinder for curved notches and more custom shaping.
- Choose a diamond hole saw when you need a round opening in one tile.
- Choose tile nippers for detail work, adjustments, and final shaping.
In real life, the best answer is often “a combination of two tools.” A wet saw plus nippers is common. A hole saw plus grinder is common. Bathroom tile work rewards flexibility more than stubborn loyalty to one tool.
Common Mistakes When Cutting Tile Around a Toilet
Cutting around the toilet instead of removing it
Yes, it seems faster. No, it rarely looks better. Removing the toilet usually leads to a cleaner tile installation and a more professional result.
Leaving a giant visible gap
The cut does not need to be beautiful enough for a museum, but it should still be close enough to be hidden by the toilet base. Large gaps can look sloppy and may collect dirt or invite caulk abuse.
Ignoring flange height
New tile raises the finished floor. If the toilet flange ends up too low relative to the tile, you may need a spacer, extender, or a different seal solution before reinstalling the toilet.
Trying to cut the whole shape in one dramatic move
Tile rewards patience. Multiple shallow cuts are safer than one heroic swing that ends in a crack and a long stare into the middle distance.
Final Thoughts
Learning how to cut tile around a toilet is really about learning how to read the cut in front of you. Some layouts want straight relief cuts. Some want a smooth arc. Some practically beg for a hole saw. The best-looking bathroom floor usually comes from matching the tool to the cut instead of forcing one method onto every tile.
If you’re new to tile installation, practice on a scrap piece first. It will calm your nerves, sharpen your technique, and dramatically reduce the chances of turning a perfectly good porcelain tile into an expensive coaster. Once you get the hang of it, cutting tile around a toilet stops feeling like a plumbing puzzle and starts feeling like a normal part of a well-planned bathroom remodel.
Experience and Lessons Learned from Cutting Tile Around a Toilet
The most useful lesson people learn from this job is that the hardest part usually isn’t the cutting itself. It’s the planning. The first time someone tiles a bathroom floor, they often focus on the blade, the saw, the grinder, and all the noisy stuff. But the real win comes from slowing down before the cut. Experienced DIYers tend to dry-fit everything, double-check where the toilet flange sits, and test the tile placement from more than one angle. That small pause can prevent wasted material and save an afternoon of muttering.
Another common experience is discovering that bathrooms are rarely as square as they pretend to be. A wall may be slightly out, the flange may not be perfectly centered, or the tile layout may shift just enough that the original plan stops working. That’s why many people end up using more than one cutting method. They might start with a wet saw for the main notch, switch to an angle grinder for the curve, and finish with tile nippers for tiny corrections. In other words, real-world tile work is less like following a script and more like solving a puzzle with power tools.
People also learn very quickly that porcelain tile has a personality. It looks calm in the box. It looks refined on the floor. But when it’s time to cut it, porcelain suddenly becomes the gym teacher of bathroom materials: tough, demanding, and not impressed by excuses. Many first-timers push too fast and end up with chipped edges. Experienced installers usually make slower passes, keep the blade working steadily, and accept that accuracy beats speed every time.
One especially useful lesson comes from fitting the tile around the toilet base versus around the flange. Beginners often imagine they need a perfect shape that mirrors the visible footprint of the toilet. In practice, once the toilet is removed, most of the cut will be hidden beneath the base when it is reinstalled. That realization changes everything. Instead of chasing impossible perfection, you can aim for a clean, close fit around the flange and let the toilet cover the evidence like the polite bathroom fixture it is.
There’s also the emotional side of the project, which nobody mentions in tool manuals. The first bad cut feels personal. The second bad cut feels expensive. By the third attempt, even confident homeowners start bargaining with the tile. But the people who finish with the best results are usually the ones who stop, reassess, and make a template. A scrap of cardboard can rescue confidence faster than any motivational speech.
Finally, seasoned DIYers almost always mention cleanup and reinstallation as part of the experience. Cutting tile around a toilet isn’t done when the tile fits. You still need smooth edges, proper spacing, a stable finished floor, and a toilet that sits securely without rocking. That last part matters more than most people expect. A beautiful cut means very little if the toilet wobbles afterward and turns every flush into a trust exercise.
So the real experience of cutting tile around a toilet is part measurement, part technique, part patience, and part attitude. The people who get the best-looking result are not always the ones with the fanciest tools. They’re the ones who measure carefully, practice on a scrap, adjust when the room throws a curveball, and accept that tile work rewards calm hands more than big confidence. In a weirdly satisfying way, it’s one of those home improvement tasks that teaches you something useful beyond the bathroom: slow down, make the right cut for the problem, and don’t panic when the first plan needs a better second version.