Table of Contents >> Show >> Hide
- Why Pastel Knobs Work So Well
- Before You Paint: Should You Refinish or Replace?
- What You’ll Need
- Best Types of Knobs for This Project
- How to Choose Pastel Colors That Look Grown-Up
- Step-by-Step: How to Paint Pastel Knobs
- Brush Painting vs. Spray Painting
- Common Mistakes to Avoid
- Design Ideas for Painted Pastel Knobs
- How Long Will Painted Knobs Last?
- Are Painted Pastel Knobs Worth It?
- Extra Notes from Real DIY Experience
If your furniture feels one iced coffee away from becoming “vintage with issues,” painted pastel knobs might be the easiest little glow-up in the room. They’re cheerful, budget-friendly, and weirdly satisfying to make. One minute you’re staring at a tired dresser with knobs that scream “builder-grade blah,” and the next minute you’re holding tiny candy-colored upgrades that make the whole piece feel custom.
This is the beauty of a small DIY project: low risk, high charm, and no need to knock down a wall or learn what a joist actually does. Painted pastel knobs can brighten a nursery, soften a modern dresser, revive thrifted furniture, or give a plain cabinet just enough personality to stop looking like it pays taxes. Better yet, this project works for wood, metal, and some ceramic knobs with a little prep and patience.
In this guide, you’ll learn how to paint pastel knobs the right way, how to choose colors that look intentional instead of accidentally Easter-themed, and how to keep your hard work from chipping the second someone opens a drawer like they’re starting a lawn mower.
Why Pastel Knobs Work So Well
Pastels have range. They can feel sweet, modern, playful, vintage, Scandinavian, cottagecore, or just plain happy depending on what you pair them with. Soft mint, blush pink, powder blue, butter yellow, lilac, and pale peach all bring color without shouting over the rest of the room. Think of them as the polite guests of the color world: they still make an impression, but they don’t monopolize the conversation.
Painted knobs also give you the kind of detail designers love: repetition on a small scale. A dresser with six matching pastel knobs looks intentional. A mix of alternating pastel tones looks curated. A single color repeated across a nightstand, desk, and storage cabinet makes the room feel cohesive without requiring a complete makeover.
Before You Paint: Should You Refinish or Replace?
Let’s have an honest DIY moment. Not every knob wants to be painted. If the hardware is badly rusted, greasy beyond reason, flaking, or gets heavy daily use, replacement may be smarter than refinishing. Some slick, nonporous hardware can chip more easily even with good prep. Translation: if you’re painting knobs on a child’s dresser that gets opened 97 times a day, durability matters more than your pastel dreams.
That said, many knobs can absolutely be painted successfully if you clean them well, dull the surface, use the right primer when needed, and apply light coats. For decorative furniture, side tables, occasional-use cabinets, and budget makeovers, painted knobs are often a fantastic solution.
What You’ll Need
- Existing knobs or unfinished new knobs
- Screwdriver
- Mild degreaser or dish soap
- Warm water and a soft brush or cloth
- Fine- to medium-grit sandpaper
- Tack cloth or lint-free cloth
- Bonding primer or spray primer
- Pastel paint in your chosen finish
- Small craft brush or spray paint
- Cardboard, drop cloth, or a spray box
- Skewers, spare screws, or painter’s pyramids for elevating knobs
- Clear topcoat or sealer for extra protection
- Painter’s tape and small labeled baggies for screws
Best Types of Knobs for This Project
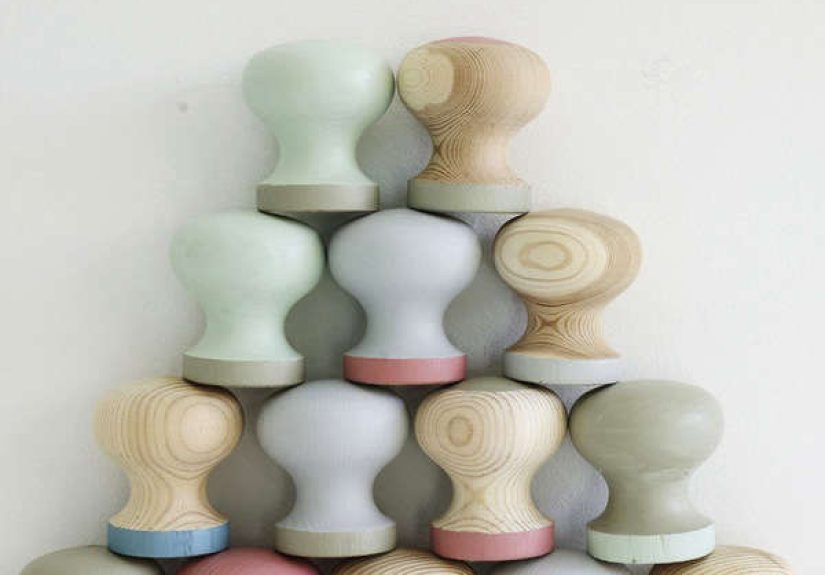
Wood Knobs
These are the easiest. Wood takes primer and paint well, especially unfinished wood. If the knob is already sealed or glossy, a quick scuff-sand helps paint grip better.
Metal Knobs
Totally doable, but prep matters. Metal needs to be clean, dull, and often primed properly. Several light coats work better than one thick coat that dries into a drippy little tragedy.
Ceramic Knobs
Ceramic can look gorgeous in pastels, especially in cottage or vintage-style rooms. Just know that very slick glazed surfaces need careful prep and a good bonding primer to help the finish last.
Plastic or Composite Knobs
These are the wild cards. Some paint beautifully; others chip if you so much as look at them too confidently. Test one first before committing to a full set.
How to Choose Pastel Colors That Look Grown-Up
The trick to sophisticated pastel knobs is balance. Pastels look best when they echo something else in the room: bedding, artwork, wallpaper, a rug, or even the wall color. They don’t need to match exactly, but they should feel invited.
Here are a few foolproof combinations:
- Blush + warm white: soft and elegant
- Mint + light oak: fresh and modern
- Powder blue + navy accents: classic and calm
- Lilac + gray: playful but refined
- Butter yellow + cream: cheerful without becoming a cartoon sun
If you want a mixed set, limit yourself to two or three pastel tones. Five different shades can quickly start looking like a candy aisle had a scheduling conflict with your furniture.
Step-by-Step: How to Paint Pastel Knobs
1. Remove the Knobs and Label Everything
Take off each knob and keep screws in labeled bags. If the knobs came from a dresser or cabinet with slightly different screw lengths, labeling saves you from reassembly rage later.
2. Clean Like You Mean It
Paint hates grease, hand oils, wax, and mystery residue. Wash the knobs with warm water and mild soap or a gentle degreaser. Scrub around grooves and edges with a soft brush. Rinse well and let them dry completely. Completely means actually dry, not “I waved them near a fan and declared victory.”
3. Scuff-Sand the Surface
If the knobs are glossy, finished, or slick, lightly sand them to dull the sheen. You do not need to sand them down to raw material. You just want to create enough tooth for primer and paint to grip. Wipe away all dust with a tack cloth or lint-free cloth.
4. Prime for Better Adhesion
This step is easy to skip and expensive to regret. A bonding primer helps paint stick, especially on metal, sealed wood, ceramic, or plastic. Apply a thin, even coat. Spray primer works especially well for knobs because it reaches curves and edges more smoothly than a brush.
5. Elevate the Knobs
Set each knob on a skewer, spare screw, or small support so you can paint all sides without them sticking to your work surface. This tiny move makes the whole project feel much more professional and much less “arts-and-crafts emergency.”
6. Apply Thin Coats of Pastel Paint
Use either a quality craft brush for control or spray paint for the smoothest finish. Apply thin coats and let each one dry before adding the next. Two to three light coats usually beat one heavy coat every single time. Heavy paint fills detail, drips at the base, and turns cute knobs into gumdrops with plumbing issues.
7. Add a Clear Protective Finish
If the knobs will be touched often, a clear topcoat helps protect against scratches, fingerprints, and tackiness. Choose a finish that suits your look: matte for a soft chalky effect, satin for a subtle glow, or semi-gloss for easier cleaning. Let the painted knobs dry thoroughly before sealing, then apply the clear coat in thin layers.
8. Let Them Cure Fully
Dry is not the same as cured. A knob may feel dry to the touch long before the finish is hard enough for everyday use. Give the paint ample cure time according to the product directions before reinstalling. This is where patience earns its paycheck.
9. Reattach Carefully
Reinstall the knobs gently and avoid overtightening the screws. Too much enthusiasm with a drill can crack paint, damage wood, or turn a five-minute install into a muttered apology to your furniture.
Brush Painting vs. Spray Painting
Brush Painting
Brush painting gives you control and is great for small batches, custom color mixing, or hand-painted details. It also works well if you want a slightly artisanal finish. Use a small, high-quality brush and watch for drips around the base.
Spray Painting
Spray paint gives the most even finish and is usually the easiest way to paint hardware smoothly. It’s especially useful for metal knobs with curves or grooves. The key is multiple light coats, proper ventilation, and not spraying so close that the paint puddles like it’s trying to become modern art.
Common Mistakes to Avoid
- Skipping the cleaning step: paint will not bond well over grime
- Not sanding glossy surfaces: slick finishes need some grip
- Using thick coats: this causes drips, uneven texture, and longer cure time
- Reinstalling too soon: fingerprints and dents love impatient DIYers
- Ignoring high-touch wear: some knobs need a topcoat or replacement instead
Design Ideas for Painted Pastel Knobs
Rainbow Dresser, But Make It Chic
Use six drawers and rotate through three pastel shades, such as blush, mint, and powder blue. Keep the furniture body neutral so the knobs become the feature.
One-Color Minimalism
Paint all knobs a single pale sage or dusty lavender for a refined look that feels custom and calm.
Nursery Storage Upgrade
Pastel knobs are perfect for toy chests, changing tables, and nursery dressers. Soft colors feel playful without going overboard.
Vintage Thrift Flip
Rescue an old side table from a thrift store, keep the wood body warm and natural, and add pastel knobs for a sweet old-meets-new look.
How Long Will Painted Knobs Last?
That depends on the material, prep, paint quality, and how often they’re touched. Decorative knobs on occasional-use furniture can look good for a long time. Daily-use cabinet knobs in kitchens, bathrooms, or kids’ rooms will show wear faster. The more carefully you prep and cure the finish, the better your odds. If durability is your top priority, treat painted knobs as a style upgrade with maintenance, not a magical forever finish.
Are Painted Pastel Knobs Worth It?
Absolutely, if you want a budget-friendly, creative detail that makes furniture feel personal. This project is small enough for a weekend, affordable enough to experiment with, and charming enough to make people ask where you bought the piece. Then you get to say, with the appropriate amount of smug joy, “Oh, I made those.”
Painted pastel knobs won’t solve every design problem, but they can instantly soften a room, revive bland furniture, and add color in a way that feels thoughtful rather than overwhelming. In the grand world of DIY, that’s a pretty excellent return on a tiny piece of hardware.
Extra Notes from Real DIY Experience
The first time I painted pastel knobs, I thought it would be a quick little side quest. Remove knobs, paint knobs, become decorating genius by lunch. Naturally, that is not what happened. I forgot to label the screws, underestimated how greasy old dresser hardware can get, and learned that “almost dry” is a lie furniture tells to hurt your feelings. Still, the project completely changed how I think about small details in a room.
What surprised me most was how much the knobs changed the mood of the furniture. The dresser itself was plain, painted white, and frankly a bit forgettable. But once the knobs were finished in a soft mix of mint and blush, the whole piece looked styled. Not expensive. Not designer. Just intentional. It suddenly felt like something chosen instead of something inherited from the land of hand-me-downs and questionable storage decisions.
I also learned that prep is the difference between “cute DIY” and “why is this peeling like a sunburned tourist?” On my first attempt, I rushed the cleaning step because the knobs looked clean. They were not clean. They were secretly coated in years of hand oils and dust. The paint went on fine, dried fine, and then chipped when I reattached the hardware. That was my villain origin story. Since then, I clean every knob like it has personally offended me, and the results are dramatically better.
Another lesson: pastels are more flexible than people think. I used to assume pastel meant childish, but that really depends on tone and context. A chalky mint can look modern. A dusty lilac can feel elegant. A pale peach can warm up a room without screaming “baby shower.” What matters is pairing the knob color with the furniture finish and the room around it. Soft colors tend to work best when the rest of the piece has some restraint. If the dresser is already bright, patterned, and dramatic, pastel knobs can look confused. If the piece is simple, the knobs shine.
I’ve also found that people notice painted knobs more than you’d expect. Guests rarely comment on drawer slides or cabinet alignment, which is rude because those things take effort, but they absolutely notice soft blue knobs on a vintage nightstand. Small details invite attention because they feel deliberate. They suggest that someone cared enough to go one step beyond functional. That’s really the charm of this project: it’s tiny, but it doesn’t feel minor.
If I were doing a full set again, I’d absolutely set up a better drying station from the start. Balancing knobs on random scraps while hoping they don’t tip over is a thrilling way to ruin your afternoon. Using skewers, spare screws, or a stable scrap board makes the process smoother and the finish neater. I would also always wait longer before reinstalling than I think I need to. Nothing tests your character like leaving a pretty painted knob alone for an extra day.
In the end, painted pastel knobs are one of those DIY projects that punch above their weight. They’re inexpensive, creative, and surprisingly effective. They don’t require advanced tools, but they do reward patience. And maybe that’s why I like them so much. They prove that a room doesn’t always need a giant renovation. Sometimes it just needs six tiny, candy-colored reminders that details matter.