Table of Contents >> Show >> Hide
- Is Olive Oil Good for Shaving?
- How to Shave With Olive Oil: 8 Steps
- Step 1: Choose the Right Olive Oil
- Step 2: Patch Test Before You Shave
- Step 3: Wash the Area First
- Step 4: Soften the Hair With Warm Water
- Step 5: Apply a Thin Layer of Olive Oil
- Step 6: Use a Sharp, Clean Razor
- Step 7: Shave Gently in the Direction of Hair Growth
- Step 8: Rinse, Pat Dry, and Moisturize Wisely
- Benefits of Shaving With Olive Oil
- Risks and Mistakes to Avoid
- Best Areas to Shave With Olive Oil
- Can You Use Olive Oil Instead of Shaving Cream?
- Aftercare Tips for a Smoother Finish
- Personal Experience: What Shaving With Olive Oil Actually Feels Like
- Conclusion
Shaving with olive oil sounds like something your grandmother, a minimalist, and a very confident salad all agreed on. But this simple kitchen staple can actually work as a shaving lubricant when used carefully. Olive oil helps the razor glide over the skin, softens coarse hair, and leaves behind a moisturized feel that many shaving foams promise but do not always deliver.
That said, olive oil is not magic in a bottle. It can feel heavy, clog some razors, make the shower floor slippery, and may not be ideal for acne-prone or very sensitive skin. The trick is to use a tiny amount, prepare the skin properly, shave gently, and clean up like a person who enjoys keeping both legs and bathroom tiles intact.
This guide explains how to shave with olive oil in eight practical steps, when it works best, who should avoid it, and how to turn a slightly messy idea into a smooth, skin-friendly routine.
Is Olive Oil Good for Shaving?
Olive oil can be useful for shaving because it acts as an emollient. In plain English, that means it helps soften and smooth the skin’s surface. When applied to damp skin, it creates a slick layer that allows a razor to move more easily. Less drag can mean less friction, fewer tiny cuts, and a lower chance of that angry red “why did I do this in a rush?” feeling afterward.
Unlike many scented shaving creams, plain olive oil does not contain added fragrance, foam boosters, or strong preservatives. That can be a plus for people who react to heavily perfumed products. However, olive oil is still an oil, and not every skin type loves it. If your skin is oily, acne-prone, eczema-prone, or easily irritated, test it first on a small area before using it on your face, bikini line, underarms, or legs.
How to Shave With Olive Oil: 8 Steps
Step 1: Choose the Right Olive Oil
Start with plain olive oil, preferably extra virgin olive oil, because it is less processed and usually does not contain added ingredients. Avoid flavored oils, infused oils, garlic oil, chili oil, lemon oil, or anything that sounds like it belongs on pasta. Your skin does not need a Mediterranean dinner party.
Look for a clean, fresh bottle that has not been sitting open in the back of the pantry for three years. Old oil can smell rancid, feel unpleasant, and irritate the skin. If the oil smells sour, waxy, musty, or “mysterious,” do not use it for shaving.
Step 2: Patch Test Before You Shave
Before shaving a large area, apply a small amount of olive oil to a discreet patch of skin, such as the inner forearm or a small section of the leg. Wait several hours, or ideally 24 hours, to check for redness, itching, bumps, burning, or clogged pores.
This step is especially important if you have sensitive skin, frequent ingrown hairs, body acne, rosacea, eczema, or a history of contact dermatitis. Natural does not automatically mean non-irritating. Poison ivy is natural too, and nobody is inviting it to skincare night.
Step 3: Wash the Area First
Clean skin shaves better. Before applying olive oil, wash the area with a gentle cleanser and lukewarm water. This helps remove sweat, dirt, dead skin cells, deodorant, sunscreen, and excess oil that could clog your razor or increase irritation.
Avoid harsh scrubs right before shaving. Scrubbing aggressively and then dragging a blade across the skin is like sanding a table and immediately complaining that it looks stressed. If you exfoliate, do it gently and not every time you shave.
Step 4: Soften the Hair With Warm Water
Warm water is one of the most underrated shaving tools. It softens hair, hydrates the skin’s surface, and makes the razor’s job easier. The best time to shave is near the end of a warm shower or after holding a warm, damp washcloth over the area for a few minutes.
Do not use very hot water. Hot water can strip the skin’s natural oils and leave it more vulnerable to dryness and irritation. Warm is helpful. Scalding is dramatic, unnecessary, and rude to your skin barrier.
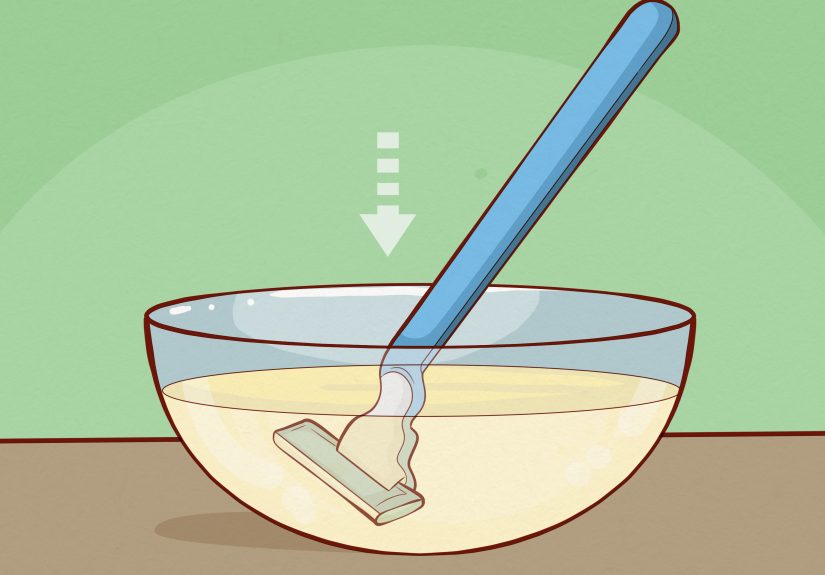
Step 5: Apply a Thin Layer of Olive Oil
Pour a few drops of olive oil into your palm and spread it over damp skin. The key word is thin. You want enough oil to create slip, not so much that the razor starts hydroplaning like a tiny car in a rainstorm.
For the face, use two to four drops. For underarms, a pea-sized amount per side is usually enough. For legs, start with about half a teaspoon per lower leg and add more only if needed. If the skin looks shiny and feels slick, you have enough.
Step 6: Use a Sharp, Clean Razor
Olive oil can reduce friction, but it cannot rescue a dull blade. A dull razor tugs at hair, increases irritation, and makes you press harder, which raises the risk of cuts and razor burn. Use a sharp, clean razor and rinse it often while shaving.
If your razor has been living in the shower for weeks, collecting soap residue and making questionable life choices, replace it. Disposable razors and cartridge blades should be changed regularly, especially when they feel rough, rusty, clogged, or less effective.
Step 7: Shave Gently in the Direction of Hair Growth
Use light, short strokes and shave in the direction your hair grows, especially if you are prone to razor bumps or ingrown hairs. Pressing hard does not create a closer shave; it mostly creates regret.
Rinse the razor after every few strokes because olive oil can build up between the blades. If the razor becomes too clogged, rinse it under warm running water and gently tap it against the sink or shower wall. Do not wipe the blades with your fingers.
For areas with hair growing in different directions, such as underarms or the bikini line, slow down. Reapply a tiny amount of oil if the skin starts to feel dry or the razor begins to drag.
Step 8: Rinse, Pat Dry, and Moisturize Wisely
After shaving, rinse the area with lukewarm water to remove loose hair and excess oil. If the skin still feels too greasy, use a small amount of gentle cleanser. Pat dry with a soft towel instead of rubbing.
You may not need additional moisturizer because olive oil leaves a light film behind. However, if your skin feels dry after rinsing, apply a fragrance-free moisturizer. If your skin feels itchy, hot, or irritated, skip active ingredients like retinol, acids, or strong exfoliants for the rest of the day.
Benefits of Shaving With Olive Oil
It Creates Excellent Razor Slip
The biggest advantage of olive oil is glide. A thin layer helps the blade move smoothly across the skin, which can reduce tugging and friction. This is especially helpful on dry legs or coarse facial hair.
It Helps Skin Feel Soft After Shaving
Olive oil helps seal in moisture, especially when applied to damp skin. Many people like the soft finish it leaves behind, particularly on legs and arms.
It Is Simple and Fragrance-Free
Plain olive oil has one ingredient. For people who dislike strongly scented shaving creams, that simplicity can be appealing. Just make sure the oil is fresh and truly plain.
Risks and Mistakes to Avoid
Using Too Much Oil
More olive oil does not mean a better shave. Too much oil can clog the razor, coat the sink, stain towels, and turn your shower floor into a tiny skating rink. Use less than you think you need.
Shaving Over Irritated or Broken Skin
Do not shave over cuts, sunburn, active rashes, infected bumps, or painful ingrown hairs. Olive oil may feel soothing, but shaving damaged skin can make irritation worse.
Using Olive Oil on Acne-Prone Areas
Olive oil may be too heavy for some acne-prone skin. If you often get breakouts on your face, chest, back, or bikini area, consider using a noncomedogenic shaving gel instead.
Forgetting to Clean the Razor
Oil traps hair and debris between blades. Rinse the razor thoroughly during and after shaving, then store it somewhere dry. A clean razor is a happy razor. A clogged razor is basically a tiny garden rake.
Best Areas to Shave With Olive Oil
Olive oil tends to work best on larger, less acne-prone areas such as legs, arms, and sometimes the scalp. It can also work for facial shaving, but people with oily or breakout-prone skin should be cautious. For underarms and the bikini line, use very little oil and shave gently because these areas are more prone to friction, ingrown hairs, and irritation.
Can You Use Olive Oil Instead of Shaving Cream?
Yes, olive oil can replace shaving cream for some people, but it is not the perfect choice for everyone. Traditional shaving creams and gels are designed to rinse cleanly, lift hair, and cushion the skin. Olive oil offers slip and moisture, but it can be messier and heavier.
If you want the best of both worlds, try using a gentle shaving cream first and adding one or two drops of olive oil on top for extra glide. This works well for very dry legs or coarse hair without making the razor too oily.
Aftercare Tips for a Smoother Finish
After shaving, wear loose clothing for a few hours if possible. Tight waistbands, leggings, or synthetic fabrics can rub freshly shaved skin and encourage bumps. If you shaved your face, avoid heavy makeup, strong fragrance, or exfoliating acids right away.
If razor burn appears, use a cool compress and a gentle, fragrance-free moisturizer. Aloe vera gel may also feel calming for some people. Avoid shaving the irritated area again until the skin has settled.
Personal Experience: What Shaving With Olive Oil Actually Feels Like
The first time you shave with olive oil, the experience can feel oddly luxurious and slightly suspicious. There is no foam, no dramatic cloud of shaving cream, and no “fresh mountain breeze” scent pretending your bathroom is a commercial. Instead, there is just a glossy layer of oil and a razor that suddenly glides with surprising ease.
On legs, olive oil can feel especially satisfying. The razor moves smoothly, and the skin often feels soft immediately afterward. It is a good option when your legs are dry, your regular shaving cream has run out, or you want a slower, more careful shave before an event. The finish can look polished without needing a mountain of lotion afterward.
However, the learning curve is real. The most common beginner mistake is using too much. A heavy pour makes everything slippery: your hands, the razor handle, the shower floor, the bottle, possibly your will to continue. A few drops are enough for small areas, and a thin layer is far better than a shiny puddle.
Another thing you notice quickly is that olive oil does not rinse away like shaving cream. It clings to the razor and skin, so rinsing between strokes matters. If you rush, the blades can become coated with oil and hair, making the shave less effective. Taking short strokes and rinsing often makes the process much smoother.
For facial shaving, the results can vary. People with dry skin may like the cushion and softness. People with oily or acne-prone skin may find it too rich, especially around the chin, jawline, or upper lip. A patch test is not just a polite suggestion here; it is the difference between “nice glow” and “why is my face holding a meeting of bumps?”
Underarms are another area where moderation matters. Olive oil can help the razor glide, but underarm skin is delicate and often exposed to deodorant, sweat, and friction. Use a tiny amount, rinse well afterward, and avoid applying strong deodorant immediately if the skin feels sensitive.
The biggest practical tip is to shave outside the direct stream of water. If water keeps washing the oil away, you will keep reapplying it, and soon the whole shower becomes an olive-oil obstacle course. Wet the skin first, step away from the water, apply a thin layer, shave gently, then rinse.
Cleanup also deserves respect. Rinse the tub or shower floor with warm water and a little soap after shaving. Olive oil residue can be slippery, and no smooth shave is worth performing accidental bathroom gymnastics.
Overall, shaving with olive oil works best when treated like a careful skincare technique, not a chaotic kitchen experiment. Use fresh oil, apply less than you think, keep the razor clean, and listen to your skin. When done correctly, it can be a simple, affordable way to get a close shave with a soft, moisturized finish.
Conclusion
Learning how to shave with olive oil is simple: soften the hair, apply a thin layer, use a sharp razor, shave gently with the grain, and rinse carefully. Olive oil can be a useful shaving alternative for dry skin and larger body areas, especially when you want extra glide and moisture. But it is not ideal for everyone. If you are acne-prone, eczema-prone, highly sensitive, or easily irritated, patch test first and consider a fragrance-free shaving product made for sensitive skin.
The secret is balance. Olive oil should help the razor glide, not turn your bathroom into a salad dressing crime scene. Used wisely, it can make shaving feel smoother, softer, and surprisingly elegant for something that came from the pantry.