Table of Contents >> Show >> Hide
- What Is a Wall Sconce?
- Before You Begin: Decide If This Is a DIY Job
- Tools and Materials You Will Need
- Step 1: Choose the Right Replacement Sconce
- Step 2: Turn Off Power at the Breaker
- Step 3: Remove the Old Wall Sconce
- Step 4: Inspect the Electrical Box and Wires
- Step 5: Install the New Mounting Bracket
- Step 6: Connect the Wires
- Step 7: Tuck the Wires and Mount the Sconce
- Step 8: Install Bulbs, Shades, and Decorative Parts
- Step 9: Restore Power and Test the Fixture
- Special Tips for Bathroom and Outdoor Sconces
- Design Advice: Making the New Sconce Look Intentional
- Maintenance After Replacing a Wall Sconce
- Real-World Experience: Lessons from Replacing Wall Sconces
- Conclusion
Replacing a wall-mounted light fixture sounds like one of those home projects that should require a dramatic toolbox, a suspicious amount of confidence, and maybe a heroic soundtrack. In reality, replacing an existing wall sconce is often a manageable DIY upgrade when the electrical box is already in place, the wiring is in good condition, and you treat electricity with the respect it deserves. That last part is important. A sconce may be small, stylish, and charming, but the wires behind it are not decorative spaghetti.
This guide explains how to replace a wall-mounted light fixture safely, cleanly, and without turning your hallway into a crime scene for loose screws. You will learn how to choose the right replacement sconce, shut off and verify power, remove the old fixture, connect the new one, mount it securely, and troubleshoot common problems. The goal is simple: a better-looking wall light that works properly, sits level, and does not make you whisper, “Is that buzzing normal?” three days later.
Important safety note: This article covers replacing an existing hardwired wall sconce using an existing electrical box. If you need to run new wiring, add a new wall box, work with aluminum wiring, repair damaged wires, install a fixture where no box exists, or deal with missing grounding, hire a licensed electrician. Local electrical codes and manufacturer instructions always come first.
What Is a Wall Sconce?
A wall sconce is a light fixture mounted directly to a wall rather than a ceiling. Sconces can provide ambient lighting in hallways, accent lighting beside artwork, task lighting near a bed, or vanity lighting in bathrooms. Some are hardwired into an electrical box, while others plug into a nearby outlet. This guide focuses on hardwired wall sconces, the type connected directly to household wiring.
Wall-mounted light fixtures come in many styles: modern glass globes, farmhouse lanterns, brass swing-arm lights, shaded bathroom sconces, outdoor wall lanterns, and minimalist LED bars. The replacement process is similar for many fixtures, but details vary depending on the mounting plate, canopy, shade, bulb type, and wiring configuration.
Before You Begin: Decide If This Is a DIY Job
Replacing a wall-mounted light fixture is usually easier than installing one from scratch. If the existing sconce already works, has a secure electrical box, and uses standard copper wiring, you may be able to complete the job with basic tools. However, some situations are better left to a professional.
Call an electrician if you notice any of these issues:
- The wall has no electrical box behind the fixture.
- The old fixture was screwed directly into drywall or wood instead of a box.
- The wires are brittle, burned, cracked, frayed, or too short to connect safely.
- You see aluminum wiring, knob-and-tube wiring, or unfamiliar wire colors.
- There is no visible ground wire or grounding method.
- The fixture is outdoors and the box is not weather-rated.
- The breaker trips after installation.
- You are not completely sure the power is off.
There is no shame in calling a pro. The wall will not judge you. The breaker panel might, but it has no mouth.
Tools and Materials You Will Need
Gather everything before you remove the old sconce. Nothing ruins DIY momentum like holding a half-detached fixture with one hand while searching for wire connectors with the other.
Tools:
- Non-contact voltage tester or voltage meter
- Flathead and Phillips screwdrivers
- Wire stripper
- Needle-nose pliers
- Electrical tape
- Level
- Flashlight or battery work light
- Step stool or ladder, if needed
Materials:
- New wall sconce
- Manufacturer-provided mounting bracket and screws
- UL-listed wire connectors, if not included
- Correct bulbs for the fixture
- Optional: wall patch, paint, or caulk for cosmetic touch-ups
Step 1: Choose the Right Replacement Sconce
Before you fall in love with a gorgeous fixture online, check the practical details. A sconce should fit the existing electrical box, cover old paint marks or wall damage, work with your wiring, and suit the location. A beautiful fixture that leaves a visible rectangle of old wall color around it is less “designer upgrade” and more “oops, archaeology.”
Check the size of the canopy
The canopy is the decorative base that covers the electrical box. Measure the old fixture’s backplate or canopy and compare it with the new one. If the new canopy is smaller, you may need to patch or paint the wall. If it is much larger, confirm it will not hit trim, mirrors, cabinets, or nearby fixtures.
Match the fixture to the room
For bathrooms, choose a fixture rated for damp locations when installed near moisture. For outdoor sconces, use an outdoor-rated fixture designed for wet or damp conditions, depending on exposure. For bedrooms and hallways, standard indoor fixtures are usually fine.
Check bulb type and wattage
Never exceed the fixture’s maximum wattage rating. With LED bulbs, pay attention to the actual wattage used by the bulb, not just the “equivalent” brightness claim. For example, a bulb may be marketed as “60-watt equivalent” while actually using around 8 to 10 watts. The fixture rating is about heat and electrical load, so read the label carefully.
Step 2: Turn Off Power at the Breaker
Do not rely on the wall switch alone. A switch can be wired in ways that leave parts of the box energized, and someone else could accidentally turn it on while you are working. Go to the electrical panel and switch off the breaker that controls the sconce.
If your breakers are not labeled, turn on the existing sconce, then switch breakers off one at a time until the light goes out. Label the correct breaker while you are there. Future you will be grateful, and future you is already tired.
Verify the power is off
After turning off the breaker, use a voltage tester at the fixture before touching any wires. Test the tool on a known live source first, test the sconce wires, then test the tool again on a known live source. This helps confirm the tester is working. If the tester indicates voltage, stop immediately and identify the correct breaker.
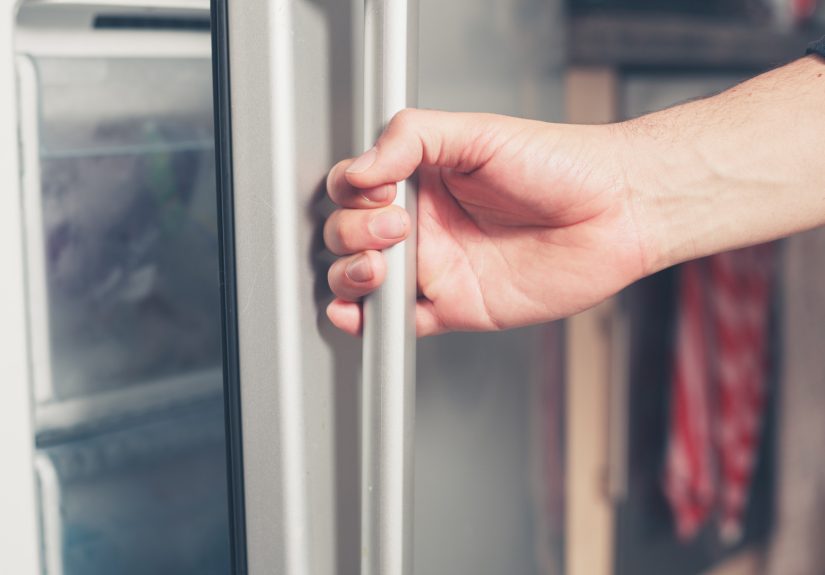
Step 3: Remove the Old Wall Sconce
Start by removing the bulb, shade, globe, or decorative cover from the existing sconce. Set fragile parts somewhere safe. A towel on a table works better than balancing glass on a sink edge like a tiny circus act.
Next, loosen the screws or nuts holding the fixture to the mounting bracket. Carefully pull the fixture away from the wall. Do not yank it. The wires behind the fixture are still connected, and pulling too hard can damage them or loosen connections inside the box.
Take a photo before disconnecting wires
Before removing wire connectors, take a clear picture of the existing wiring. This is especially helpful if the wire colors are not obvious, if there are multiple cables in the box, or if you simply want a reference. Then remove the wire connectors and separate the fixture wires from the house wires.
In many standard U.S. installations, black or red is hot, white is neutral, and bare copper or green is ground. However, older homes and switch-loop wiring can be confusing. If anything looks unusual, stop and call an electrician.
Step 4: Inspect the Electrical Box and Wires
With the old sconce removed, inspect the electrical box. It should be firmly attached and rated to support a light fixture. The new sconce should mount to the box or to the manufacturer’s bracket attached to that box. A light fixture should not be supported only by drywall.
Look for warning signs
- Loose or wobbly electrical box
- Scorched insulation or melted wire connectors
- Cracked, brittle, or cloth-covered wiring
- No ground wire or grounding screw
- Too many wires crowded into a small box
- Moisture, rust, or corrosion
If the box or wires look unsafe, do not continue. A new sconce cannot magically fix bad wiring. It can only make bad wiring better lit.
Step 5: Install the New Mounting Bracket
Most wall sconces include a mounting bracket, crossbar, or circular mounting plate. Remove the old bracket if it does not match the new fixture. Attach the new bracket to the electrical box using the screws provided with the fixture or screws approved for that box.
Before tightening everything fully, use a level to make sure the bracket is straight. Many sconces have visible vertical or horizontal lines, and even a small tilt can look dramatic once the shade is installed. This is especially true for long vanity lights and rectangular backplates.
Adjust the mounting screws
Some fixtures use two long screws that pass through the canopy and secure with decorative cap nuts. Others hook onto a bracket or fasten from the side. Dry-fit the fixture before wiring if needed. Confirm the screws line up and the canopy sits flush against the wall.
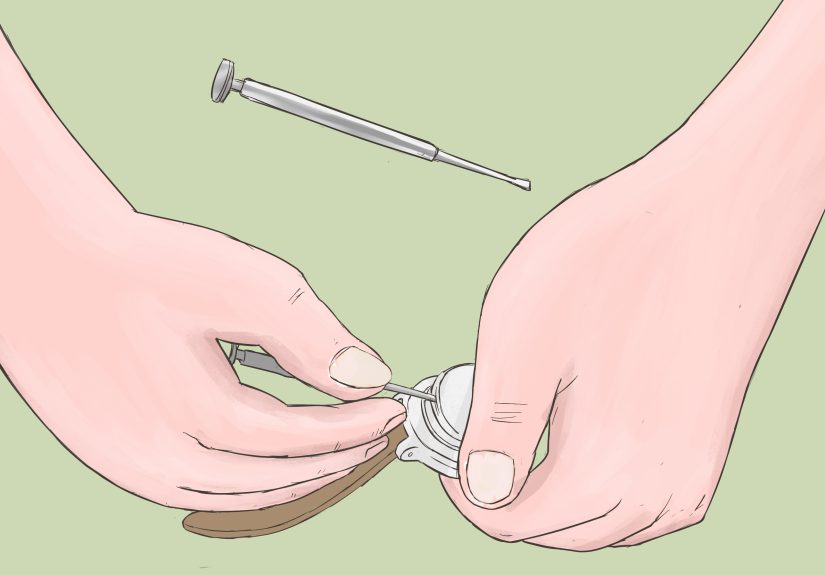
Step 6: Connect the Wires
Now comes the part that makes many DIYers hold their breath. Stay calm, move slowly, and follow the manufacturer’s instructions. In a typical fixture replacement, you will connect the fixture wires to the corresponding house wires:
- Black fixture wire to black or red house wire: hot
- White fixture wire to white house wire: neutral
- Green or bare fixture wire to bare copper or green house wire: ground
If the fixture has stranded wires and the house wiring is solid copper, hold the stripped ends together evenly and twist on an approved wire connector until snug. Tug gently on each wire to confirm the connection is secure. No bare copper should be exposed below the connector except for the ground connection where appropriate.
Grounding matters
The ground wire helps reduce shock risk if a fault occurs. Many fixtures connect the ground wire to a green screw on the mounting bracket, the metal box, or the fixture ground lead. Follow the fixture instructions. If the box has no grounding method, do not guess. Hire a licensed electrician.
Do not mix up hot and neutral
A light may appear to work even when hot and neutral are reversed, but that does not mean it is correct. Proper polarity matters for safety, especially with screw-shell lamp sockets. If the wiring does not match standard colors or the old setup looks strange, stop and get professional help.
Step 7: Tuck the Wires and Mount the Sconce
Carefully fold the connected wires into the electrical box. Avoid sharp bends and do not crush the wire connectors behind the fixture. The goal is neat, gentle folding, not stuffing the wires in like an overpacked suitcase before vacation.
Position the fixture canopy over the mounting bracket and secure it according to the manufacturer’s instructions. Tighten screws firmly, but do not overtighten. Overtightening can crack glass, bend thin metal, strip screws, or pull the fixture out of alignment.
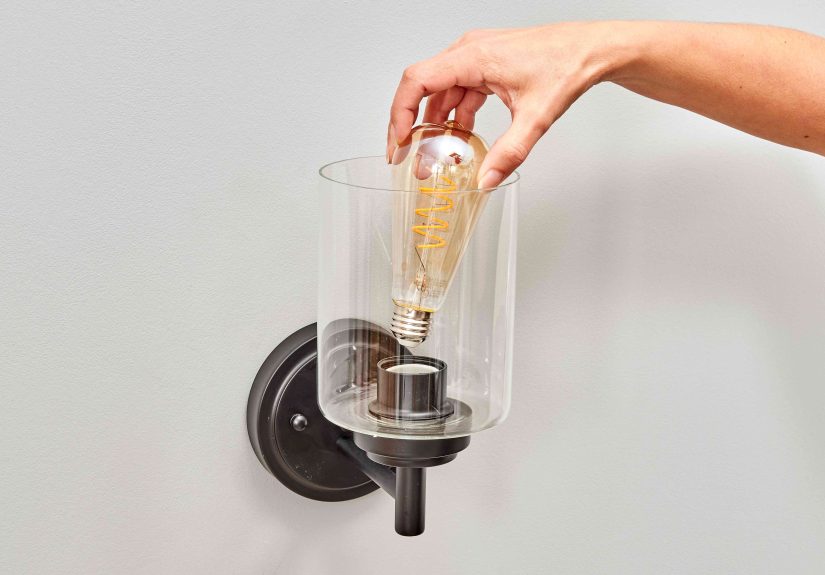
Step 8: Install Bulbs, Shades, and Decorative Parts
Install the recommended bulb type and wattage. If the fixture uses integrated LED lighting, there may be no bulb to install. Attach glass shades, fabric shades, cages, or decorative covers after the fixture is securely mounted.
For fixtures with multiple shades, tighten each retaining ring evenly. Crooked shades can make a new sconce look cheap even when it was not. If a shade sits unevenly, loosen it, reseat it, and tighten again.
Step 9: Restore Power and Test the Fixture
Turn the wall switch off, then restore power at the breaker. Return to the fixture and turn the switch on. The light should come on without flickering, buzzing, sparks, heat, or drama. If the fixture does not work, turn the breaker off before checking anything.
Common problems after installation
- The light does not turn on: Check the bulb, switch position, breaker, and wire connections.
- The breaker trips: Turn it off and call an electrician. There may be a short or wiring error.
- The fixture flickers: Check bulb compatibility, loose bulbs, dimmer compatibility, or loose wiring.
- The fixture sits crooked: Adjust the mounting bracket or canopy screws.
- The canopy does not sit flush: Wires may be crowded, screws may be too long, or the wall surface may be uneven.
Special Tips for Bathroom and Outdoor Sconces
Bathroom and outdoor fixtures need extra attention because moisture changes the rules. For bathroom vanity sconces, choose fixtures rated for the location. Damp-rated fixtures are commonly used in bathrooms where moisture is present but direct water exposure is not expected. Outdoor fixtures should be rated for outdoor use, and fixtures exposed directly to rain should be wet-rated.
For outdoor wall sconces, inspect the gasket and mounting surface. Many outdoor fixtures use a foam gasket behind the backplate. Some installations may require exterior-rated caulk around the top and sides of the fixture to help shed water, while leaving the bottom unsealed so moisture can escape. Always follow the fixture instructions and local code requirements.
Design Advice: Making the New Sconce Look Intentional
A replacement sconce is not just an electrical project. It is also a design decision. The right fixture can make a hallway feel polished, a bedroom feel cozy, or a bathroom feel like someone finally admitted the 1990s are over.
Match finish and style
Coordinate the sconce finish with nearby hardware, mirrors, faucets, or door handles. It does not have to match perfectly, but it should look deliberate. Matte black, aged brass, polished nickel, bronze, and chrome all create different moods.
Think about light direction
Upward-facing sconces create soft ambient light. Downward-facing sconces provide more direct task lighting. Clear glass exposes the bulb, so use attractive bulbs. Frosted glass diffuses glare and is often more forgiving.
Use the right color temperature
Warm white bulbs around 2700K to 3000K are popular for bedrooms, living rooms, and hallways. Cooler bulbs around 3500K to 4000K can work well for bathrooms or task lighting, but avoid making your home feel like a dental office unless that is your design theme, in which case, bold choice.
Maintenance After Replacing a Wall Sconce
After installation, check the fixture again after a few days of normal use. Make sure the canopy is still tight, the shade is secure, and the bulb is not overheating. Dust the fixture regularly, especially if it has glass shades or exposed bulbs. Turn off power before doing anything beyond basic cleaning.
If you notice buzzing, burning smells, discoloration, frequent bulb failure, flickering that does not stop with a new compatible bulb, or a breaker that trips repeatedly, stop using the fixture and call an electrician. Electrical warning signs are not quirky personality traits. They are warnings.
Real-World Experience: Lessons from Replacing Wall Sconces
The first thing most homeowners learn when replacing a wall-mounted light fixture is that the visible sconce is only half the story. The real adventure lives behind the backplate. Sometimes you remove the old fixture and find a perfectly normal electrical box, clean copper wiring, and enough wire length to work comfortably. That is the dream scenario. Other times, you discover paint holding the fixture to the wall like industrial glue, screws from three fixture generations ago, and a backplate outline that looks like a fossil. This is where patience becomes your most valuable tool.
One practical lesson is to take photos at every stage. Take a picture before removing the old sconce, another after exposing the wiring, and another after installing the bracket. These photos help if you need to compare connections, ask for professional advice, or remember which decorative nut belongs where. Small fixture hardware has a magical ability to roll under the nearest appliance, even if the nearest appliance is in another room.
Another common experience is realizing that “universal mounting bracket” does not always mean “effortlessly universal.” Many new sconces include adjustable brackets, but you may still need to rotate the crossbar, change screw positions, or adjust threaded posts so the canopy sits tight to the wall. Dry-fitting the fixture before making wire connections saves frustration. If the bracket is crooked, the finished sconce will be crooked. If the screw posts are too long, the cap nuts may bottom out before the canopy tightens. A few minutes of adjustment can make the final result look professional.
Wall condition matters more than people expect. Old sconces often hide paint ridges, wallpaper gaps, drywall scars, or a different wall color underneath. If the new fixture has a smaller backplate, do cosmetic repairs before final installation. Patch, sand, prime, and paint as needed. It is much easier to fix the wall while the fixture is off than to paint carefully around a brand-new sconce while muttering words not found in polite home improvement magazines.
Lighting quality is another lesson learned after the job is done. A beautiful sconce with the wrong bulb can disappoint quickly. Clear glass fixtures may create glare with exposed LED bulbs. A narrow shade may cast dramatic shadows. A bathroom sconce that points upward may look elegant but provide poor mirror lighting. Before buying bulbs in bulk, test one bulb for brightness, color temperature, dimmer compatibility, and appearance through the shade.
Finally, replacing one sconce often leads to replacing more. Once you upgrade a hallway light, the old fixture across the room suddenly looks like it has been making bad decisions since 2004. That is the hidden danger of successful DIY: confidence. Start with one fixture, work safely, and learn the process. By the second or third sconce, you will move faster, understand the mounting hardware better, and know exactly where your voltage tester is. The best experience is not just ending with a working light; it is ending with a safer, cleaner, better-looking installation and the quiet satisfaction of flipping the switch like you just invented electricity.
Conclusion
Replacing a wall-mounted light fixture is one of the most satisfying small home upgrades because the payoff is immediate. In an hour or two, an outdated sconce can become a stylish focal point, a dim hallway can feel brighter, and a bathroom can look more finished. The key is to respect the electrical side of the job: turn off power at the breaker, verify with a voltage tester, inspect the box and wires, follow the manufacturer’s instructions, and connect hot, neutral, and ground correctly.
If the existing wiring is safe and the electrical box is secure, this project can be a practical DIY win. If anything looks damaged, ungrounded, overloaded, or confusing, bring in a licensed electrician. A beautiful sconce is nice. A safe home is better. Ideally, you get bothand maybe a hallway that finally stops looking like it was lit by a tired flashlight.