Table of Contents >> Show >> Hide
- What Kind of Minecraft Car Do You Want to Build?
- Materials for a Simple Stationary Car
- How to Make a Stationary Car in Minecraft
- How to Make a Moving Car in Minecraft
- How to Make a Minecart-Based Car
- How to Make a Command or Add-On Car
- Troubleshooting: Why Your Minecraft Car Is Not Working
- Design Ideas for Better Minecraft Cars
- Conclusion
- Experience Notes: What Building Minecraft Cars Teaches You
- SEO Tags
Making a car in Minecraft sounds simple until you remember one tiny detail: Minecraft does not exactly hand you a steering wheel, four tires, and a polite little engine that says, “Let’s go.” Instead, the game gives you blocks, redstone, pistons, slime, honey, rails, minecarts, commands, and the dangerous confidence to say, “Yes, I can absolutely build a sports car out of stairs.”
The good news? You can make several types of cars in Minecraft. You can build a stationary decorative car for a city, garage, road, role-play map, or mansion driveway. You can create a moving car using vanilla redstone flying-machine mechanics. You can build a rail-powered car that looks like a vehicle but rides on minecart tracks. And if you are using commands, data packs, mods, or Bedrock add-ons, you can go even further with custom cars, working seats, speed effects, and vehicle models.
This guide walks through the best ways to make a car in Minecraft, from beginner-friendly builds to a moving redstone car that actually travels forward. No driver’s license required. Just bring blocks, patience, and maybe a backup world in case your “car” accidentally becomes a runaway toaster.
What Kind of Minecraft Car Do You Want to Build?
Before placing blocks, decide what “car” means for your build. Minecraft players usually mean one of four things:
- A stationary car: A decorative build that looks like a car but does not move.
- A moving redstone car: A piston, observer, slime, or honey block machine that moves in one direction.
- A rail car: A minecart system hidden under a car-shaped shell or road.
- A modded or add-on car: A custom vehicle added through Marketplace content, mods, commands, or data packs.
If you are building a city, the stationary car is the best starting point. If you want a “wow” project, try the moving redstone car. If you want reliable transportation, rails are still the easiest option. Minecraft may be a sandbox, but physics still likes to peek over your shoulder and laugh.
Materials for a Simple Stationary Car
For a basic decorative car, you can use almost any color palette. Concrete, terracotta, wool, and stairs work well because they create clean shapes. Here is a beginner-friendly material list:
- 8 black concrete blocks or black wool blocks for wheels
- 10 to 16 colored concrete blocks for the body
- 4 slabs for the roof or hood
- 2 stairs for the windshield area
- Glass panes or stained glass for windows
- Buttons, item frames, or trapdoors for details
- Carpet, signs, or banners for trim
- Lanterns, sea lanterns, glowstone, or end rods for headlights
For a modern car, use white, gray, black, or red concrete. For a truck, stretch the body by two or three blocks. For a race car, make it low, long, and dramatic, because apparently every Minecraft road needs at least one vehicle that looks like it was built by a villager with a need for speed.
How to Make a Stationary Car in Minecraft
Step 1: Build the Wheels
Start with four black blocks as wheels. Place two wheels on the left side and two on the right side, leaving two blocks of space between the front and back wheels. A simple layout is three blocks long and two blocks wide, but a larger car can be five or seven blocks long.
For extra detail, place buttons on the outside of the wheel blocks. Stone buttons look like hubcaps, while polished blackstone buttons can give a darker, sportier look. If you are building in Creative mode, item frames with iron nuggets or gray dye can also make convincing wheel centers.
Step 2: Add the Car Body
Place your main body blocks above and between the wheels. A simple car body can be two blocks wide and four blocks long. Use colored concrete for a clean modern look. Red concrete makes a classic sports car, blue concrete works well for city vehicles, and yellow concrete is perfect for taxis.
Keep the lower body low. If your car becomes too tall, it starts looking less like a sedan and more like a refrigerator with ambition.
Step 3: Shape the Hood and Trunk
Add slabs or stairs to the front and back. Stairs are great because they create angled shapes, which help break up the blocky outline. Place stairs facing forward on the hood and backward on the trunk. Smooth quartz stairs, polished deepslate stairs, or colored stairs from wood types can all work depending on your theme.
Step 4: Add Windows and a Roof
Use glass panes, tinted glass, or stained glass blocks for windows. Place them above the middle of the body, then add slabs or stairs on top as the roof. If you want a convertible, skip the roof and use carpet or trapdoors for seats.
A quick interior can include stairs as seats, a button as a steering wheel, and a lever as a gear shifter. Will the lever actually shift gears? No. Will it make your car feel 40 percent more official? Absolutely.
Step 5: Add Headlights, Taillights, and Details
Use end rods, sea lanterns, glow item frames, or white banners for headlights. For taillights, redstone torches, red stained glass, or red banners work well. Add trapdoors to the sides as doors, signs as license plates, and carpets as racing stripes.
Small details make a huge difference. A two-block car with buttons can look cute, but a car with mirrors, lights, trim, a windshield, and a license plate suddenly looks like it belongs in a full Minecraft city.
How to Make a Moving Car in Minecraft
A true moving vanilla Minecraft car is usually a disguised flying machine. It does not drive like a real car, does not turn corners easily, and will not politely stop at traffic lights. But it can move forward using pistons, sticky pistons, observers, and slime or honey blocks.
The basic idea is simple: observers detect block updates and send redstone pulses. Pistons push or pull attached slime or honey blocks. Slime and honey blocks carry nearby movable blocks with them. When arranged correctly, the machine repeatedly pushes itself forward. Congratulations, you have invented a car that is also kind of an insect.
Materials for a Basic Moving Car
- 2 sticky pistons
- 2 observers
- 4 to 6 slime blocks or honey blocks
- 1 block of redstone or temporary activation block
- Lightweight decorative blocks, such as wool, carpet, trapdoors, or buttons
- Optional: a boat, minecart, or seat area for riding
- Optional: obsidian or another immovable block to stop the machine
Important Rule: Keep It Light
Piston machines have movement limits. If your car has too many attached blocks, it will jam. This is why a moving car should be small, light, and simple. Do not attach a giant limousine, a full garage, three villagers, and your emotional support sheep. The machine will probably refuse to move, and honestly, fair enough.
Step-by-Step Moving Car Build
- Build in the air first. Start one or two blocks above the ground so the slime or honey blocks do not stick to the floor.
- Place two slime blocks in a line. These will act as the center of the machine.
- Add a sticky piston facing the direction you want to travel. The piston should push the slime blocks forward.
- Place an observer behind the piston. The observer’s face should detect updates, while the red dot side should send power toward the piston setup.
- Build the second half in reverse. Add another piston and observer so the machine alternates between pushing and pulling.
- Add a small platform. Use slime or honey blocks as the base, then add carpets, trapdoors, or light decoration.
- Test with a temporary block update. Place and break a block near the observer or use a redstone block to start the pulse.
- Stop the car with an immovable block. Place obsidian, crying obsidian, or another piston-resistant block in the path.
The exact placement can vary between Java Edition and Bedrock Edition, so test the machine in Creative mode before building it in Survival. Some redstone timing and piston behavior can differ between editions. If the car does not move, the problem is usually observer direction, piston direction, block limit, or accidental attachment to the ground.
How to Ride the Moving Car
For a rideable version, many players place a boat or minecart on top of the moving platform. Honey blocks are often useful for transport builds because entities can be carried more comfortably in some setups. Slime blocks can bounce entities, which is funny exactly once and then becomes a transportation lawsuit.
Keep the seat simple. A boat on a honey block platform can work for casual travel, while trapdoors and carpets can make the vehicle look more like a car. Avoid heavy blocks unless you have tested the design. A beautiful car that does not move is just modern art with wheels.
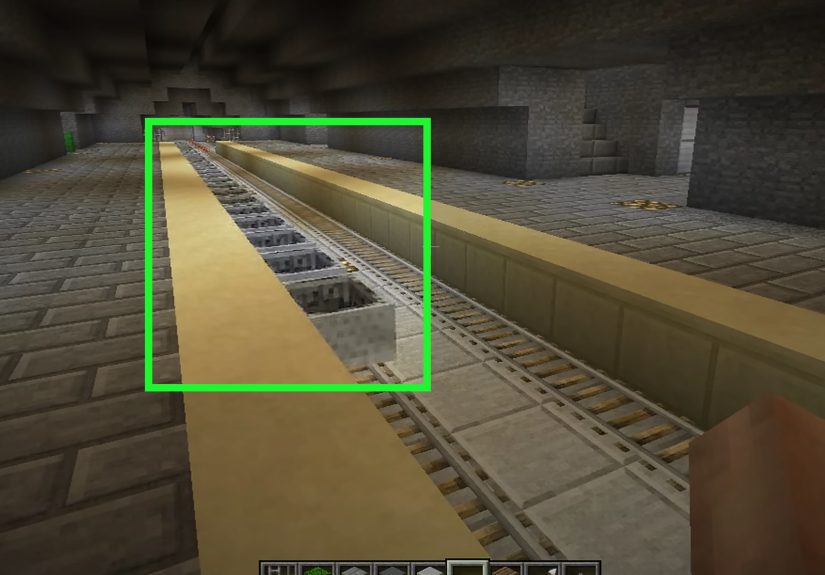
How to Make a Minecart-Based Car
If you want a car that reliably travels along a road, a minecart system is the most practical vanilla option. Build a road with rails hidden under carpet, trapdoors, or slabs, then decorate a minecart station to look like a car stop, garage, or city street.
Basic Rail Car Setup
- Lay down regular rails in the direction you want to travel.
- Add powered rails every few blocks to maintain speed.
- Place redstone torches, levers, or redstone blocks to power the powered rails.
- Put a minecart on the track.
- Build a car-shaped shell around the station or use decorative blocks near the track.
This method is excellent for cities, amusement parks, airports, and role-play maps. The “car” follows the road, stops at stations, and does not require complicated flying-machine timing. It is less flashy than a redstone car, but it is much less likely to escape into the sunset.
How to Make a Command or Add-On Car
For players who want realistic vehicles, commands and add-ons open more possibilities. In Java Edition, command blocks, armor stands, invisible entities, teleport commands, and custom resource packs can create vehicle-like effects. In Bedrock Edition, Marketplace add-ons and creator-made packs may add cars, motorcycles, trucks, and other rideable vehicles.
This is the best route if you want steering, speed, custom models, fuel systems, or multiplayer role-play vehicles. The tradeoff is that command and add-on cars are not pure vanilla survival builds. They may require cheats, downloads, behavior packs, resource packs, or specific game versions.
Troubleshooting: Why Your Minecraft Car Is Not Working
The car will not move
Check the piston direction first. A piston facing the wrong way is the redstone version of putting your shoes on backward. Then check observer direction. The observer face detects updates, while the red dot side outputs power. If the observer is flipped, the machine may do absolutely nothing with great confidence.
The car moves once and stops
This usually means the pulse is not continuing. Recheck the observer and piston arrangement. Also make sure the machine is not touching the ground or another nearby block. Slime and honey blocks can grab adjacent movable blocks, so one accidental block connection can freeze the whole build.
The car breaks apart
Your decorative blocks may not be attached correctly, or you may be using blocks that do not behave the way you expect. Try reducing the decoration and testing the engine by itself. Once the engine works, add details one at a time.
The car is too ugly
This is normal. Most first Minecraft cars look like a couch trying to cosplay as a taxi. Improve the shape with stairs, slabs, trapdoors, buttons, banners, carpets, and glass panes. Good Minecraft vehicle design is all about suggesting details rather than perfectly recreating them.
Design Ideas for Better Minecraft Cars
Once the basic car works, customize it for your world. A survival base might need a rugged pickup truck with barrels in the back. A city map might need taxis, buses, police cars, delivery vans, and tiny compact cars parked along the curb. A futuristic base could use hover cars made with glass, sea lanterns, end rods, and smooth quartz.
For a race car, use a low body, bright color, black wheels, spoiler, and carpet stripe. For a truck, extend the rear and use fences or trapdoors as a cargo rack. For an ambulance, use white concrete, red crosses made from banners, and sea lantern headlights. For a police car, use black and white blocks with blue and red lights on top.
The trick is to exaggerate the most recognizable parts. Wheels should be obvious. Windows should contrast with the body. Headlights should pop. The roofline should communicate the vehicle type. Minecraft has limited shapes, so clarity beats realism every time.
Conclusion
Learning how to make a car in Minecraft is really about choosing the right type of car for your goal. If you want decoration, build a stationary car with concrete, stairs, buttons, glass, and trapdoors. If you want movement, build a compact redstone flying-machine car with pistons, observers, slime blocks, or honey blocks. If you want dependable transport, use minecarts and powered rails. If you want realistic driving, explore commands, data packs, mods, or Bedrock add-ons.
The best Minecraft car is not always the most complicated one. Sometimes a small decorative car brings a city street to life. Sometimes a clunky redstone machine rolling forward at blocky speed feels like a miracle. And sometimes the real victory is building something that does not explode, vanish, or drag half your driveway with it.
Experience Notes: What Building Minecraft Cars Teaches You
After experimenting with Minecraft cars, one lesson becomes obvious: the first version is rarely the final version. A stationary car might look too tall, too flat, too wide, or too much like a toaster with buttons. That is not failure; that is the normal design process. Minecraft building rewards revision. Moving one stair, changing one slab, or swapping wool for concrete can completely improve the shape.
The easiest way to improve a decorative car is to build several versions side by side. Make one two blocks wide, then one three blocks wide. Try black concrete wheels on one and deepslate wheels on another. Use glass panes on one car and full glass blocks on another. When you compare them directly, the better proportions become obvious. A car that looks strange by itself may suddenly make sense once it is parked next to a road, sidewalk, garage, or gas station.
Moving cars teach a different lesson: Minecraft redstone is powerful, but it does not care about your feelings. A tiny mistake in observer direction can stop the whole machine. A decorative block touching the slime can accidentally attach to the engine. A car that worked perfectly in one test may jam when you add “just one more detail.” The best habit is to test the engine first, save the design, and add decorations slowly.
One practical experience tip is to use Creative mode as your workshop, even if the final build is for Survival. Build the car in a flat test world, label your versions with signs, and keep a working copy nearby. When something breaks, compare it to the working copy instead of rebuilding from memory. This saves time and prevents the classic redstone spiral where you fix one thing, break three others, and begin questioning whether pistons have a personal grudge.
For city builders, cars are more than vehicles. They create scale. A street with houses feels empty until you add parked cars, crosswalks, traffic lights, driveways, and small details. A delivery van behind a shop tells a story. A police car outside a station makes the building feel active. A rusty truck near a farm adds character. Even if none of these vehicles move, they make the world feel lived in.
For redstone builders, a moving car is a great beginner-to-intermediate project because it combines several core ideas: block updates, pulses, piston movement, sticky blocks, block limits, and testing. It is not as overwhelming as a massive farm or computer, but it still gives that wonderful “I built a machine” feeling. The moment your car lurches forward for the first time, it is hard not to grin. Sure, it may only go straight. Sure, stopping it may involve a wall of obsidian. But in Minecraft terms, that is basically engineering.
The final experience tip is simple: match the car to the purpose. For looks, build stationary. For reliable travel, use rails. For spectacle, use a moving redstone design. For realistic driving, use add-ons or mods. Minecraft gives you many ways to solve the same creative problem, which is why building a car can be a five-minute decoration or a full weekend project. Either way, when you finally park it in your world, it feels like it belongs there.