Table of Contents >> Show >> Hide
- Can You Use Gmail on a Kindle Fire?
- Method 1: Add Gmail Using the Built-In Email App
- Method 2: Use Gmail in the Silk Browser
- Method 3: Install the Google Play Store and Download Gmail
- Method 4: Use Another Email App That Supports Gmail
- Gmail IMAP Settings for Manual Setup
- What to Do If Gmail Will Not Work on Kindle Fire
- Which Method Should You Choose?
- Security Tips for Using Gmail on Kindle Fire
- Practical Examples: Which Setup Fits Real Life?
- Extra Experience: What It Is Really Like Using Gmail on a Kindle Fire
- Conclusion
Getting Gmail on a Kindle Fire sounds like it should be as simple as tapping an app icon, typing your password, and riding happily into inbox sunset. Then reality taps you on the shoulder and says, “Actually, this is an Amazon tablet, not a standard Google Android tablet.” Fun, right?
The good news: you absolutely can use Gmail on a Kindle Fire or Amazon Fire tablet. The slightly less magical news: the best method depends on what you want. Do you simply want to read and send email? Use the built-in Email app or Silk browser. Do you want the official Gmail app with Google-style notifications, labels, and the familiar red-and-white interface? You may need to install the Google Play Store first.
This complete guide walks you through the safest, easiest, and most practical ways to get Gmail on your Kindle Fire, including setup steps, troubleshooting tips, security notes, and real-world advice from someone who believes tablets should behave nicely before coffee.
Can You Use Gmail on a Kindle Fire?
Yes, you can use Gmail on a Kindle Fire. However, Amazon Fire tablets use Fire OS, Amazon’s customized version of Android. That means they are designed around Amazon services, the Amazon Appstore, Alexa, Prime Video, Kindle books, and Silk Browsernot Google Play Services out of the box.
Because of that, the official Gmail app is usually not available directly from the Amazon Appstore. But don’t panic. You still have several reliable options:
- Use the built-in Fire tablet Email app
- Open Gmail in the Silk browser
- Add a Gmail shortcut to your home screen
- Install the Google Play Store and then download Gmail
- Use another email app that supports Gmail
For most people, the fastest solution is the Silk browser or the built-in Email app. For power users who want the real Gmail app experience, installing Google Play is the more complete route.
Method 1: Add Gmail Using the Built-In Email App
The simplest way to get Gmail on your Kindle Fire is to use the Email app that already comes with the tablet. This option is clean, quick, and does not require downloading anything suspicious from the internet. Your tablet gets to stay tidy, which is more than we can say for most inboxes.
Steps to Add Gmail to the Fire Email App
- Turn on your Kindle Fire or Amazon Fire tablet.
- Connect to a stable Wi-Fi network.
- Open the Email app from the home screen or app library.
- Enter your Gmail address.
- Tap Next.
- Enter your Google account password.
- Follow the sign-in prompts.
- Allow the app to sync your email.
Once setup is complete, your Gmail messages should appear inside the Fire Email app. You can read, send, archive, and delete messages from there. It may not look exactly like the Gmail app, but it gets the job done without drama.
When This Method Works Best
This method is ideal if you want basic Gmail access without installing the Google Play Store. It is especially good for checking messages, replying to family, managing shopping receipts, or finding that one password reset email hiding between promotional newsletters.
However, you may not get every Gmail-specific feature. Labels, category tabs, smart replies, advanced search behavior, and Google Workspace integrations may feel limited compared with the official Gmail app.
Method 2: Use Gmail in the Silk Browser
The most reliable no-install method is to use Gmail through Amazon’s Silk browser. This is often the best answer for users who want Gmail access without changing system settings or sideloading apps.
Steps to Open Gmail in Silk
- Open Silk Browser on your Fire tablet.
- Type gmail.com or mail.google.com into the address bar.
- Sign in with your Gmail address and password.
- Complete any two-step verification prompt if your account uses it.
- Choose the web version if prompted.
Gmail in the browser gives you a more authentic Gmail experience than the Fire Email app. You can use search, labels, folders, starred messages, spam controls, and many familiar Gmail tools. It also avoids the setup headaches that sometimes happen when email clients and Google security settings start arguing like two printers in an office.
Add Gmail to Your Home Screen
To make Gmail feel more like an app, you can create a bookmark or shortcut on your Fire tablet home screen. The exact menu wording may vary by Fire OS version, but the process usually looks like this:
- Open Gmail in Silk Browser.
- Tap the browser menu icon.
- Save the page as a bookmark.
- Open bookmarks.
- Press and hold the Gmail bookmark.
- Select an option such as Add to Home Screen, if available.
Now Gmail is just one tap away. It is not technically the official Gmail app, but it behaves close enough for many users. Think of it as Gmail wearing a Silk jacket.
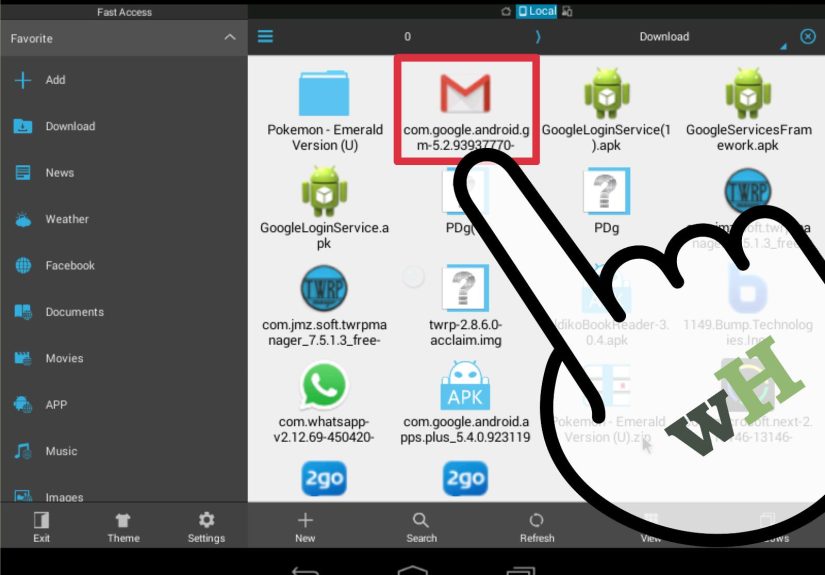
Method 3: Install the Google Play Store and Download Gmail
If you want the official Gmail app on your Kindle Fire, you usually need the Google Play Store. Since Fire tablets do not come with Google Play installed, this method requires sideloading several Google APK files.
This is the most powerful option, but it also requires caution. Download APK files only from trusted sources, check that they match your Fire tablet model and Fire OS version, and avoid random “one-click miracle” websites. The internet is full of helpful people, but it is also full of digital raccoons wearing sunglasses.
Before You Start
Make sure your Fire tablet is charged, connected to Wi-Fi, and updated to the latest available Fire OS version. If you use a microSD card, consider removing it temporarily before installing Google Play components. This helps avoid installation confusion on some Fire tablet models.
You should also understand that installing Google Play is not officially the default Amazon experience. It usually does not require rooting, but it is still a manual workaround. Some Google apps may work perfectly, while others may behave oddly depending on your device generation and software version.
General Steps to Install Google Play
- Open Settings on your Fire tablet.
- Go to Security & Privacy or Security.
- Find Apps from Unknown Sources or Install Unknown Apps.
- Allow Silk Browser or Files to install apps from outside the Amazon Appstore.
- Download the required Google APK files from a trusted APK source.
- Install the files in the correct order.
- Restart your Fire tablet.
- Open the Google Play Store and sign in.
- Search for Gmail and install it.
The common package order is Google Account Manager, Google Services Framework, Google Play Services, and Google Play Store. The exact versions matter, so match them carefully to your Fire OS version and tablet generation. Installing the wrong file can cause crashes, failed sign-ins, or an impressive amount of sighing.
After Installing Gmail
Once Gmail is installed, open the app and sign in to your Google account. If everything works correctly, you should see your inbox, labels, categories, search bar, and notification settings. You can also add multiple accounts, including another Gmail address or certain non-Gmail accounts.
This method is best for users who want a more complete Google experience, including Gmail notifications, Google Calendar integration, Google Drive sharing, and smoother access to other Google apps. It is not necessary for casual email checking, but it is worth considering if your Fire tablet doubles as a school, work, or productivity device.
Method 4: Use Another Email App That Supports Gmail
If the built-in Email app feels too basic and installing Google Play sounds too adventurous, another option is to use a third-party email app available through the Amazon Appstore. Some email clients can connect to Gmail through Google sign-in or IMAP settings.
This approach can be useful if you manage several inboxes at once. For example, you may want Gmail, Outlook, Yahoo Mail, and a custom domain inbox in one place. Just make sure the app is reputable, regularly updated, and clear about privacy practices. Email apps handle sensitive information, so this is not the category where you download “Super Fast Free Mail Pro 9000” from a mystery developer and hope for the best.
Gmail IMAP Settings for Manual Setup
If your Fire tablet asks for manual Gmail settings, use IMAP rather than POP for most situations. IMAP keeps your messages synced across devices, so if you read or delete an email on your Fire tablet, the change also appears when you open Gmail on your phone or computer.
Recommended Gmail IMAP Settings
- Incoming mail server: imap.gmail.com
- Incoming port: 993
- Security: SSL/TLS
- Outgoing mail server: smtp.gmail.com
- Outgoing port: 587 with TLS or 465 with SSL
- Username: Your full Gmail address
- Password: Your Google password or app password
If regular sign-in fails, your Google account may require an app password. App passwords are usually available only when two-step verification is enabled. They are designed for apps or devices that cannot complete modern Google sign-in normally.
What to Do If Gmail Will Not Work on Kindle Fire
Gmail setup problems on Fire tablets usually come down to Wi-Fi, account security, outdated software, incorrect passwords, or app compatibility. Fortunately, most issues are fixable.
Problem: Gmail Says the Password Is Incorrect
First, test your password by signing in to Gmail from a browser. If it works there but not in the Fire Email app, your account may require two-step verification or an app password. Go to your Google Account security settings and check whether app passwords are available.
Problem: Gmail Does Not Sync
Open the Fire tablet settings and check whether sync is enabled for the Email app. Also confirm that your Wi-Fi connection is stable. If your inbox has thousands of messages, syncing may take a while. The tablet is not ignoring you; it may simply be buried under years of newsletters, receipts, and “limited-time offers” that somehow never end.
Problem: The Gmail App Crashes After Installing Google Play
This usually means one of the Google components is missing, outdated, or mismatched. Restart your tablet first. If the problem continues, review the installed Google APK versions and confirm they are compatible with your Fire model and Fire OS version. In some cases, uninstalling and reinstalling the Google components in the correct order solves the problem.
Problem: Notifications Do Not Appear
Check notification permissions for Gmail or the Email app. Also check battery optimization settings, because Fire tablets may restrict background activity to save power. If you use Gmail through Silk browser, notifications may be less reliable than they are in the official Gmail app.
Which Method Should You Choose?
The best way to get Gmail on your Kindle Fire depends on your comfort level and how much functionality you need.
Choose the Fire Email App If…
You want a simple, built-in solution for reading and sending Gmail. This is the best method for beginners, younger students, casual users, or anyone who does not care whether the interface looks exactly like Gmail.
Choose Silk Browser If…
You want Gmail’s familiar web interface without installing anything. This is one of the safest and most flexible methods, especially if you mainly use Gmail at home on Wi-Fi.
Choose Google Play and the Gmail App If…
You want the official Gmail app, push notifications, better integration with Google services, and a more standard Android experience. This is best for advanced users who are comfortable following technical steps carefully.
Security Tips for Using Gmail on Kindle Fire
Your Gmail account may contain private conversations, school documents, banking alerts, receipts, photos, and recovery emails for other services. In other words, protect it like the digital treasure chest it is.
- Use a strong Google account password.
- Turn on two-step verification.
- Do not install APK files from unknown or suspicious websites.
- Keep your Fire tablet software updated.
- Use a screen lock on your tablet.
- Sign out before giving the tablet to someone else.
- Review connected apps in your Google account settings occasionally.
If you install Google Play manually, turn off permission for unknown app installation after you finish. This reduces the chance of accidentally installing something unsafe later.
Practical Examples: Which Setup Fits Real Life?
For Students
If you use Gmail for school, start with the Silk browser. It gives you access to Gmail search, attachments, Google Drive links, and labels. If your school also uses Google Classroom, Docs, or Drive heavily, installing Google Play may be more useful because it allows more Google apps to work together.
For Parents
If you are setting up Gmail for a child or family tablet, use the built-in Email app or browser method first. Avoid unnecessary sideloading unless you truly need the official Gmail app. Also review parental controls and account permissions before handing over the device.
For Work
If your Gmail is part of a Google Workspace account, your organization may enforce security rules. You may need device approval, two-step verification, or admin permission. In that case, the browser method is often the easiest starting point because it follows Google’s normal web sign-in flow.
For Everyday Email
If you just want to read newsletters, track orders, reply to friends, and delete spam pretending to be urgent business opportunities, the Fire Email app is enough. It is not fancy, but it is practical.
Extra Experience: What It Is Really Like Using Gmail on a Kindle Fire
Using Gmail on a Kindle Fire is a little like turning a cozy reading tablet into a mini productivity station. It can absolutely work, but expectations matter. A Fire tablet is excellent for reading, streaming, browsing, shopping, video calls, recipes, and casual email. It is not designed to be a full Google tablet right out of the box.
In daily use, the Silk browser method often feels surprisingly smooth. You open Gmail, check messages, search for an attachment, reply to a note, and move on. For many people, this is the sweet spot. There is no extra installation, no compatibility puzzle, and no need to explain to your tablet why Google Play Services has feelings today.
The built-in Email app is even simpler. It is great for people who want a traditional inbox. The interface is plain, but that can be a strength. Fewer buttons mean fewer chances to tap something mysterious and accidentally archive your dentist appointment reminder. If you are setting up Gmail for an older relative, this is often the method I would choose first. It keeps email separate from the browser and feels familiar.
The official Gmail app, once installed through Google Play, gives the best Gmail experience. Labels are easier to manage, notifications are better, and switching accounts feels natural. If you use Gmail heavily, especially with Google Calendar, Google Drive, or Google Docs, this setup feels much closer to a normal Android tablet. The downside is that the installation process is more technical. It is not impossible, but it does require patience and careful version matching.
Performance also depends on the Fire tablet model. A newer Fire HD 10 or Fire Max model usually handles Gmail and Google Play services better than an older, low-storage Fire 7. On older devices, installing extra Google services can make the tablet feel slower. If your Fire tablet already groans when opening three browser tabs, asking it to run a whole Google ecosystem may be a bit rude.
Storage is another real-world issue. Gmail itself may not seem huge, but app data, cached files, attachments, and Google services can add up. If your tablet has limited internal storage, keep an eye on available space. Clear cache occasionally, delete apps you never use, and avoid downloading every attachment unless you need it offline.
Notifications are the one area where users notice the biggest difference. Browser Gmail may not notify you as consistently as the official Gmail app. The Fire Email app can notify you, but timing may vary depending on sync settings and battery controls. If instant email alerts matter for work or school, the official Gmail app is usually the better experienceassuming Google Play is installed correctly.
My practical recommendation is simple: start with the least complicated method. Try Gmail in Silk first. If you like it, add a shortcut and stop there. If you want a dedicated inbox, try the Fire Email app. Only move to Google Play and the official Gmail app if you need Gmail’s full feature set. This saves time, reduces risk, and keeps your tablet from becoming a weekend tech project with snacks.
In short, Gmail on a Kindle Fire is not only possible; it can be genuinely convenient. The trick is choosing the method that matches your needs instead of chasing the most complicated setup just because it sounds more “complete.” Sometimes the best tech solution is the one that works quietly while you drink coffee and pretend your inbox is under control.
Conclusion
Getting Gmail on your Kindle Fire is easier than it first appears. You can use the built-in Email app for a simple setup, open Gmail through Silk Browser for a familiar web experience, or install Google Play if you want the official Gmail app. Each method has advantages, and the best choice depends on how deeply you rely on Gmail.
For most users, the browser or Email app method is enough. For heavy Gmail users, Google Workspace accounts, or people who want full Google app integration, installing the Play Store may be worth the extra effort. Just remember to protect your account, use trusted downloads, and keep your tablet updated.
Note: This article is based on current public guidance from Amazon Fire tablet support, Google Gmail support, and established U.S. technology publications. Source links are intentionally not included so the content is ready for web publishing without extra reference elements.