Table of Contents >> Show >> Hide
- What Are Inclined Sit Ups?
- Benefits of Inclined Sit Ups
- Before You Start: Safety First
- How to Do Inclined Sit Ups: 10 Steps
- Step 1: Choose the Right Decline Bench
- Step 2: Secure Your Feet Correctly
- Step 3: Position Your Body on the Bench
- Step 4: Choose a Hand Position
- Step 5: Brace Your Core Before Moving
- Step 6: Curl Up With Control
- Step 7: Pause at the Top
- Step 8: Lower Slowly
- Step 9: Keep the Reps Clean
- Step 10: Progress Gradually
- Common Mistakes to Avoid
- Muscles Worked During Inclined Sit Ups
- Beginner-Friendly Modifications
- Advanced Variations
- How Often Should You Do Inclined Sit Ups?
- Sample Inclined Sit Up Workout
- Inclined Sit Ups vs. Crunches
- Do Inclined Sit Ups Burn Belly Fat?
- Real-World Experience: What Inclined Sit Ups Actually Feel Like
- Conclusion
- SEO Tags
Inclined sit ups, also called decline sit ups, are a classic core exercise performed on an angled bench. They look simple: hook your feet, lean back, sit up, repeat, try not to make dramatic gym noises. But like most exercises that seem easy on paper, the magic is in the details.
When done well, inclined sit ups can strengthen the rectus abdominis, challenge the hip flexors, improve trunk control, and add variety to your ab workout. When done poorly, they can turn into a neck-yanking, lower-back-grumbling, momentum-powered circus act. This guide breaks the movement into 10 clear steps so you can train your abs with confidence, control, and a lot less “why does my spine feel personally offended?”
What Are Inclined Sit Ups?
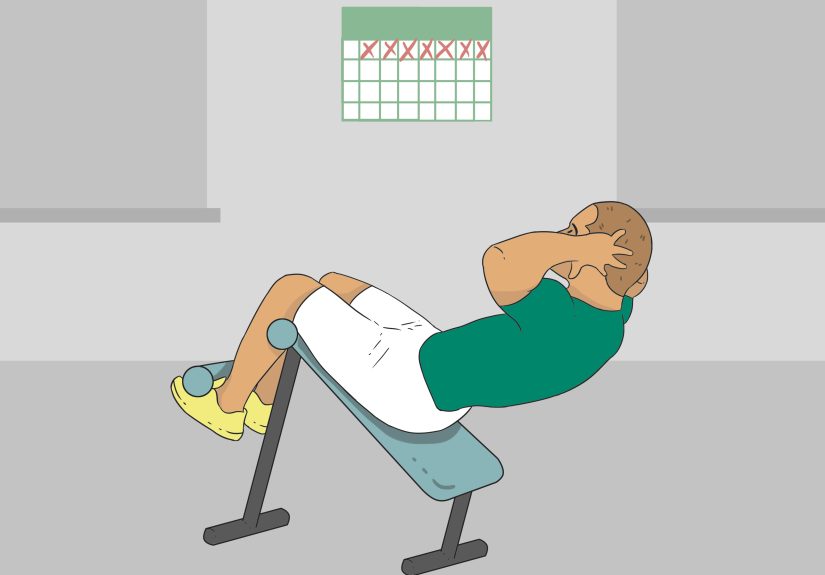
Inclined sit ups are sit ups performed on a decline bench, with your head lower than your hips at the starting position. The angle increases the challenge because your abdominal muscles must work harder to lift your torso against gravity. The steeper the bench, the harder the exercise becomes.
This movement mainly targets the rectus abdominis, the front abdominal muscle often associated with “six-pack” definition. It also involves the hip flexors, obliques, and deeper core muscles that help stabilize your trunk. However, inclined sit ups are not a magic belly-fat eraser. They strengthen muscles; they do not selectively burn fat from your stomach. For visible abdominal definition, you need a complete routine that includes strength training, cardio, nutrition, recovery, and patiencethe least flashy but most reliable fitness ingredient.
Benefits of Inclined Sit Ups
They Make Basic Sit Ups More Challenging
The decline angle increases resistance without requiring equipment beyond a bench. That makes inclined sit ups useful for people who have already mastered floor sit ups and want a tougher bodyweight progression.
They Build Abdominal Strength and Endurance
Because your torso travels through a longer range of motion, inclined sit ups can build endurance in the abdominal wall. This may help with athletic movements, posture support, and exercises that require strong trunk flexion.
They Are Easy to Modify
You can adjust the bench angle, hand position, tempo, range of motion, or resistance. Beginners can start with a low incline and arms crossed over the chest. Advanced exercisers can slow down the lowering phase, pause at the bottom, or hold a light weight once their form is solid.
Before You Start: Safety First
Inclined sit ups are not the best choice for everyone. If you have lower-back pain, a herniated disc, neck problems, recent abdominal surgery, pregnancy-related core concerns, or any medical condition affecting your spine or pelvis, speak with a qualified healthcare professional or trainer before trying them.
Even if you are healthy, remember this rule: your abs should do the work, not your neck, ego, or the poor bench bolts holding on for dear life. Use controlled motion, breathe steadily, and stop if you feel sharp pain, tingling, numbness, or pressure in your lower back.
How to Do Inclined Sit Ups: 10 Steps
Step 1: Choose the Right Decline Bench
Start with a stable decline bench that has padded foot anchors. The bench should not wobble, slide, squeak suspiciously, or look like it retired from a pirate ship. For beginners, set the incline lowaround 10 to 20 degrees. A steep angle is not a badge of honor; it is simply more resistance. Earn it gradually.
Step 2: Secure Your Feet Correctly
Sit at the top of the bench and place your feet under the padded rollers. Your knees should be bent comfortably, and your feet should feel secure but not crushed. The anchor keeps you from sliding down the bench, but do not use it as an excuse to yank yourself upward with your legs. Your abs are the main event.
Step 3: Position Your Body on the Bench
Lie back so your spine rests along the bench. Keep your head, shoulders, and hips aligned. Avoid arching your lower back dramatically. A small natural curve is normal, but your trunk should feel supported and controlled. Think of your ribs and pelvis gently drawing toward each other.
Step 4: Choose a Hand Position
The easiest hand position is arms extended forward. A moderate option is crossing your arms over your chest. A more challenging option is placing your fingertips lightly beside your ears. Avoid locking your hands behind your head and pulling on your neck. Your head is not a suitcase handle.
Step 5: Brace Your Core Before Moving
Before each rep, tighten your abdominal muscles as if you are preparing for a gentle poke in the stomach. Keep breathing normally. This core brace helps stabilize your spine and reduces the chance of turning the exercise into a floppy, momentum-driven roll-up.
Step 6: Curl Up With Control
Exhale as you lift your head, shoulders, and upper back from the bench. Continue curling your torso upward until your chest moves toward your thighs. Focus on shortening the distance between your ribs and pelvis rather than simply sitting straight up as fast as possible.
Step 7: Pause at the Top
At the top of the movement, pause briefly and squeeze your abs. Keep your shoulders relaxed, chest open, and neck neutral. Do not collapse forward like a folding lawn chair. The pause makes the repetition more effective because it removes momentum and increases muscular control.
Step 8: Lower Slowly
Inhale as you lower your torso back down. The lowering phase is where many people lose form, so move slowly. Aim for two to three seconds on the way down. Your back should return to the bench with control, not land with a thud that announces your workout to everyone within a three-treadmill radius.
Step 9: Keep the Reps Clean
Start with 2 to 3 sets of 8 to 12 repetitions. Quality beats quantity. If your neck strains, your lower back arches, or your reps become jerky, stop the set. A clean set of eight is better than twenty chaotic reps performed with the grace of a dropped backpack.
Step 10: Progress Gradually
Once you can perform several sets with excellent form, make the exercise harder by slightly increasing the bench angle, slowing the tempo, adding a pause, or holding a light weight against your chest. Do not add resistance until you can control the bodyweight version. Progress is not about suffering; it is about adapting.
Common Mistakes to Avoid
Using Momentum
If you are swinging your arms, bouncing off the bench, or launching upward like a spring-loaded toaster pastry, slow down. Momentum reduces abdominal tension and increases stress on joints.
Pulling on the Neck
Neck pulling is one of the most common sit-up mistakes. Keep your chin slightly tucked, eyes forward, and hands light. If your neck is sore before your abs are tired, your form needs a reset.
Setting the Bench Too Steep
A steep decline looks impressive, but it can quickly overload your hip flexors and lower back. Start low and build up. The best angle is the one that lets you maintain control from the first rep to the last.
Ignoring Back Discomfort
Muscle fatigue is normal. Sharp lower-back pain is not. If inclined sit ups bother your back, switch to safer core exercises such as dead bugs, planks, bird dogs, modified curl-ups, or Pallof presses.
Muscles Worked During Inclined Sit Ups
The primary muscle worked is the rectus abdominis, which helps flex the spine. Your obliques assist with trunk control, especially if you add a slight rotation variation. The hip flexors also contribute as your torso rises, which is why form matters so much. If the hip flexors dominate, the lower back may feel irritated.
The deeper core muscles, including the transverse abdominis, help create stability. While inclined sit ups are mostly a trunk-flexion exercise, they should still be performed with full-body awareness. Your core is not just the “front abs”; it is a support system connecting your ribs, pelvis, spine, hips, and breathing mechanics.
Beginner-Friendly Modifications
Use a Lower Angle
Set the bench close to flat. A small decline can still challenge your abs without overwhelming your form.
Reduce the Range of Motion
You do not have to sit all the way up at first. Practice controlled partial reps, lifting your shoulders and upper back while keeping tension in your abs.
Place Arms Forward
Reaching your arms forward reduces the load and helps guide your torso upward. This is a smart beginner position, not a “cheat.” Fitness has enough ego already; let us not add hand placement drama.
Advanced Variations
Weighted Inclined Sit Ups
Hold a light plate, dumbbell, or medicine ball against your chest. Start light and keep the motion slow. If the weight causes you to yank, twist, or arch your back, it is too heavy.
Tempo Inclined Sit Ups
Use a three-second lowering phase and a one-second pause at the bottom. This variation increases time under tension and makes even a moderate bench angle feel spicy.
Inclined Sit Up With Rotation
As you rise, rotate slightly toward one knee, then alternate sides. This variation adds oblique involvement. Keep the rotation controlled and avoid twisting aggressively through the lower back.
How Often Should You Do Inclined Sit Ups?
For most people, 2 to 3 times per week is enough. Your abs need recovery like any other muscle group. A simple plan might include 2 to 3 sets of 8 to 12 reps, followed by a stability-based core move such as a plank, dead bug, or bird dog.
A balanced core routine should include more than sit ups. Add exercises that train anti-extension, anti-rotation, lateral stability, and hip control. In plain English: teach your core to resist movement, not just create movement. That is what helps during lifting, running, carrying groceries, and surviving the mysterious lower-shelf reach in the supermarket.
Sample Inclined Sit Up Workout
Beginner Core Session
- Inclined sit ups: 2 sets of 8 reps
- Dead bugs: 2 sets of 8 reps per side
- Modified side plank: 2 sets of 15 to 20 seconds per side
- Glute bridges: 2 sets of 10 reps
Intermediate Core Session
- Inclined sit ups: 3 sets of 10 to 12 reps
- Plank: 3 sets of 30 to 45 seconds
- Bird dog: 3 sets of 8 reps per side
- Pallof press: 2 to 3 sets of 10 reps per side
Advanced Core Session
- Weighted inclined sit ups: 3 sets of 8 to 10 reps
- Slow eccentric inclined sit ups: 2 sets of 6 reps
- Side plank with reach-through: 3 sets of 8 reps per side
- Hollow body hold: 3 sets of 15 to 30 seconds
Inclined Sit Ups vs. Crunches
Crunches use a shorter range of motion and focus on lifting the upper back from the floor. Inclined sit ups use a larger range of motion and involve more hip-flexor contribution. Neither exercise is automatically “better.” The right choice depends on your goals, current strength, spine comfort, and ability to control the movement.
If your goal is abdominal endurance and you can perform sit ups pain-free, inclined sit ups can be useful. If your lower back complains, crunches, curl-ups, planks, and dead bugs may be better options. The smartest exercise is not the hardest one; it is the one you can perform consistently and safely.
Do Inclined Sit Ups Burn Belly Fat?
No exercise can spot-reduce belly fat. Inclined sit ups strengthen your abdominal muscles, but fat loss happens through an overall calorie deficit, regular physical activity, strength training, sleep, stress management, and sustainable eating habits. Doing 500 sit ups while ignoring nutrition is like polishing a car with no engine. Technically something is happening, but it may not get you where you want to go.
Use inclined sit ups as one part of a complete fitness plan. Combine them with compound strength exercises, walking or cardio, protein-rich meals, hydration, and enough rest. That combination is far more powerful than chasing one “secret ab move.”
Real-World Experience: What Inclined Sit Ups Actually Feel Like
The first time many people try inclined sit ups, they make the same mistake: they set the bench too high because it looks more serious. Then rep number one feels heroic, rep number three feels questionable, and rep number six becomes a full-body negotiation. The abs burn, the hip flexors jump in, the neck tries to help, and suddenly the exercise has become a team project nobody approved.
A better experience starts with humility. Lower the bench. Cross your arms. Brace before you move. Perform each rep as if you are trying to prove you control the exercise, not the other way around. The difference is immediate. Instead of feeling like you are wrestling gravity in public, you feel your abdominal muscles working through a clean, focused range of motion.
One useful cue is to imagine your ribs sliding toward your pelvis. This keeps the movement centered on the abs rather than turning it into a hip-flexor pull. Another helpful cue is “quiet reps.” If your body is slamming into the bench, your feet are jerking under the pads, or your breathing sounds like a dramatic movie trailer, slow down. Quiet reps usually mean better control.
Many exercisers also discover that the lowering phase matters more than expected. Going down slowly builds strength, teaches control, and makes the exercise more effective without adding weight. In fact, a slow set of 8 reps can feel more productive than a sloppy set of 20. Your abs do not count numbers; they respond to tension.
Inclined sit ups also teach an important fitness lesson: advanced does not always mean complicated. The movement is basic, but the execution can be refined for years. You can adjust the angle, tempo, pause, range, and resistance. You can pair it with planks for stability or dead bugs for deep core control. You can use it as a finisher after strength training or place it early in a core-focused session.
Another real-world tip: do not train inclined sit ups hard every day. The abs recover quickly, but they still recover. If you are sore when laughing, coughing, or getting out of bed like a Victorian ghost, take a rest day. Train smarter, and your progress will be smoother.
For people who sit at a desk all day, inclined sit ups can feel intense because the hip flexors may already be tight or overactive. Stretching the hip flexors, strengthening the glutes, and adding core stability exercises can make the movement feel better. A balanced program often fixes what endless sit ups cannot.
The best experience with inclined sit ups comes from treating them as a tool, not a test of toughness. Use them when they fit your body and goals. Modify them when needed. Replace them when they cause pain. Fitness is not about forcing one exercise into your routine forever. It is about choosing movements that help you become stronger, more capable, and less likely to make weird noises when standing up from a chair.
Conclusion
Inclined sit ups are a powerful core exercise when performed with proper form, steady breathing, and smart progression. Start with a low bench angle, secure your feet, brace your core, curl up under control, pause at the top, and lower slowly. Avoid pulling on your neck, swinging with momentum, or using a steep decline before you are ready.
Most importantly, remember that inclined sit ups are only one piece of effective core training. A strong core also needs stability work, rotation control, hip strength, and full-body movement. Combine inclined sit ups with exercises such as planks, dead bugs, bird dogs, and glute bridges for a routine that supports both performance and everyday life.
Train with patience. Keep your reps clean. Respect your back. And when in doubt, choose control over chaosyour abs will get the message.