Table of Contents >> Show >> Hide
- Why a Telephone Wall Jack Makes a Great Hiding Spot
- Before You Start: Safety and Common Sense
- Tools and Materials
- Step-by-Step: Convert the Old Phone Jack into a Hidden Compartment
- Step 1: Confirm the jack is truly “old”
- Step 2: Remove the faceplate and inspect what’s behind it
- Step 3: Make the wiring safe and tidy
- Step 4: Clean up (or create) the wall opening
- Step 5: Install a low-voltage “old work” mounting bracket
- Step 6: Choose your compartment style
- Step 7: Mount the compartment inside the wall
- Step 8: Make the cover look “boringly normal”
- Step 9: Test it like you’re trying to break it (gently)
- What Should You Store in a Phone Jack Hiding Spot?
- Placement Tips: Where This Works Best
- Troubleshooting: Common DIY Speed Bumps
- Alternative Ideas If You Don’t Want a Secret Compartment
- Conclusion
- Real-World DIY Experiences (The Stuff People Don’t Mention Until You’re Mid-Project)
If your house still has a few old telephone wall jacks, congratulations: you own a tiny museum exhibit from the ancient era of
“calling someone and hoping they’re home.” The good news is you don’t have to yank them out, patch drywall, sand, prime, paint,
and then discover you still missed a spot. Instead, you can repurpose that outdated jack into a discreet, in-wall hiding spot
that blends in becauselet’s be honestmost people’s eyes slide right past phone jacks like they’re background NPCs.
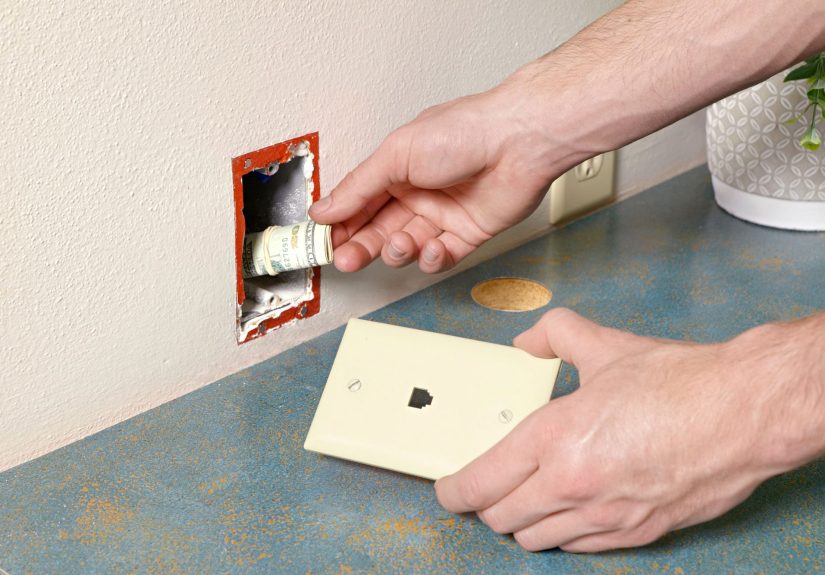
This DIY project is basically a magic trick for your wall: the faceplate looks normal, but behind it is a small compartment for
legal, safe, everyday valuables (think backup cash, a spare house key, a tiny USB drive, or copies of important numbers).
It’s not meant for anything dangerous, illegal, or that could hurt someone. And if you’re a teen, do this only with a parent/guardian’s
permissionbecause surprise wall modifications are a “family meeting” waiting to happen.
Why a Telephone Wall Jack Makes a Great Hiding Spot
A phone jack is the perfect disguise because it’s common, boring, and slightly confusing to younger generations. It’s the
ideal “hiding in plain sight” setup. Many old phone jacks sit on low-voltage wiring and are mounted over a small wall opening,
which means you may already have the beginnings of a compartment. Your mission is to tidy that opening, make the wiring safe,
and install a little storage box that sits behind the plate.
What this DIY is (and isn’t)
- Is: A small, discreet storage nook for harmless items you’d like to keep organized and out of the way.
- Isn’t: A “vault,” a fire safe, or a place to stash anything unsafe, illegal, or age-restricted.
- Also isn’t: A replacement for real home security (locks, alarms, good lighting, and not leaving spare keys in obvious spots).
Before You Start: Safety and Common Sense
Phone wiring is typically low voltage, but you should still treat it with respect. An active landline can surprise you, especially if
someone calls while you’re handling the wires. Also, walls sometimes hide other surprises (like power cables, plumbing, or
“mystery drywall repairs” from a previous owner who believed spackle is a lifestyle).
Quick safety checklist
- If the jack might still be connected to service, disconnect the line at the demarcation point (or ask a pro).
- Never cut or drill blindlyuse a stud finder and proceed slowly.
- Keep your compartment away from wet areas (showers, sinks) and heat sources.
- If you find damaged wiring, scorch marks, or anything that looks like an electrical situation: stop and call a qualified professional.
Tools and Materials
You can go super simple (a small project box and magnets) or more custom (sheet metal or 3D-printed inserts). Here are practical
options that work well for most homes.
Tools
- Phillips and flathead screwdrivers
- Utility knife
- Drywall saw or jab saw
- Stud finder (highly recommended)
- Tape measure and pencil
- Sandpaper (optional, for smoothing cut edges)
Materials (choose the approach that fits your vibe)
- Existing telephone jack faceplate (or a replacement phone-jack style wall plate)
- Low-voltage “old work” mounting bracket (single-gang is common)
- Wire caps/wire nuts or low-voltage insulation caps
- A small storage box: plastic project box, thin metal box, or a custom insert
- Small magnets (rare-earth magnets are popular) or magnetic catch
- Adhesive (CA/super glue or construction adhesiveuse appropriately)
- Optional: thin sheet metal (for a custom box), small springs (for a pop-out feel), paint for touch-ups
Step-by-Step: Convert the Old Phone Jack into a Hidden Compartment
Step 1: Confirm the jack is truly “old”
Check whether your home still has active landline service or if the jack is part of an alarm system or older intercom setup.
If you’re not sure, play it safe and assume it could be connected. The goal is not to become the main character in a
“Why is the phone ringing inside the wall?” story.
Step 2: Remove the faceplate and inspect what’s behind it
- Unscrew the faceplate and gently pull it away from the wall.
- Look for the wiring: phone wires are often thin and may be attached to a small terminal block.
- Check what kind of mounting you have:
- Low-voltage bracket/open ring: Greatthis is easiest to repurpose.
- Electrical-style box: Also workable, but be extra sure it’s not tied to household power.
- Surface-mounted jack: You can still do the project, but you may need to add an in-wall bracket and cut a clean opening.
Step 3: Make the wiring safe and tidy
If you’re removing the jack entirely, disconnect the phone wires from the jack terminals. Then cap the individual conductors
so bare copper isn’t exposed. You’re not trying to “engineer a new phone system”you’re simply making unused wires safe and neat.
- Cap/insulate each conductor (wire nuts or low-voltage caps work well).
- Gently fold the capped wires back so they sit neatly in the cavity.
- If you ever plan to reactivate the line, label the cable with tape before you tuck it away (Future You will write you a thank-you note).
Step 4: Clean up (or create) the wall opening
The cleanest builds start with a clean cut. If the hole is ragged, carefully square it up. If there’s no in-wall opening yet
(common with surface-mounted jacks), you’ll mark and cut one.
- Use a stud finder to avoid cutting into a stud (or worse, something that sprays).
- Trace the outline of your low-voltage bracket on the wall.
- Score the outline with a utility knife, then cut slowly with a drywall saw.
- Test-fit the bracket; widen the hole only as needed.
Step 5: Install a low-voltage “old work” mounting bracket
Low-voltage brackets are designed to clamp to drywall from behind. Insert the bracket, then tighten the screws so the tabs swing
and clamp the drywall. Don’t over-tightendrywall can crush if you go full “gorilla grip.”
Step 6: Choose your compartment style
There are three solid ways to build the “secret” part. Pick one based on your tools, time, and how custom you want to get.
Option A: The simple box (fastest, easiest)
- Use a small plastic project box that fits behind the plate and inside the wall cavity.
- Attach magnets to the box and/or plate so the cover holds snugly without obvious extra hardware.
- Best for: small items, quick installs, minimal fabrication.
Option B: The custom thin box (maximizes space)
- Build a shallow box from thin sheet metal sized to the cavity.
- Use magnets and a simple lip/flange so it sits securely and opens cleanly.
- Best for: getting the most storage in a tight space and a “flush” professional look.
Option C: The slide-in insert (clean and clever)
- Create or buy a sliding insert designed to mount to a low-voltage bracket.
- Some designs use small springs so the compartment gently pops out when released.
- Best for: DIYers who like tidy mechanics and repeatable “open/close” feel.
Step 7: Mount the compartment inside the wall
The compartment should sit securely so it doesn’t rattle, shift, or fall into the abyss (where missing socks and TV remotes
are rumored to form a civilization).
- Dry-fit everything first: bracket, box, and faceplate.
- Make sure the box depth doesn’t press hard against the drywall or bow the plate outward.
- Secure the box:
- Brackets/screws: Great for repeat access and stability.
- Adhesive: Works if you use the right type and allow proper cure time.
- Keep wires tucked away so they don’t interfere with the compartment.
Step 8: Make the cover look “boringly normal”
The disguise is the whole point. Your faceplate should sit flat and look like it has always been there.
- If you’re using magnets: ensure alignment so the plate snaps into the same position every time.
- If you’re using screws: consider decorative screw heads or a standard look that matches nearby plates.
- Touch up paint around the opening if needed.
- Keep it subtle: the more “special” it looks, the less it looks like a phone jack and the more it looks like a magic door.
Step 9: Test it like you’re trying to break it (gently)
- Open and close it 10–15 times.
- Walk past it and see if it catches your eye (it shouldn’t).
- Put a small item inside and confirm nothing binds or makes the plate bulge.
- Listen for rattlesadd thin foam tape if needed.
What Should You Store in a Phone Jack Hiding Spot?
Keep it small, safe, and boring (in a good way). Your wall is not a climate-controlled vault, and your project should not create
any safety risks.
- Emergency cash (small bills)
- A spare key (if it’s safe/legal in your situation)
- A tiny USB drive (encrypted if it matters)
- Copies of important phone numbers or account recovery codes (stored responsibly)
- Small jewelry items you don’t wear daily
Avoid anything that can melt, leak, spoil, attract pests, or cause harm. And yes, that includes “mystery candy,” because
melted chocolate in a wall compartment is basically an ant invitation with a wax seal.
Placement Tips: Where This Works Best
Great locations
- Hallways or transition areas where wall plates are common
- Home office walls with other low-voltage plates nearby
- Bedrooms (away from bathrooms) if it blends with the room layout
- Behind furniture that doesn’t rub or knock the plate
Locations to avoid
- Directly next to sinks, showers, or steamy bathrooms
- Exterior walls with heavy insulation where space is tight
- Walls you know contain plumbing runs
- Anywhere a door slams into the plate
Troubleshooting: Common DIY Speed Bumps
“My wall cavity is too shallow.”
Some walls have blocking, insulation, or studs exactly where you don’t want them. Use a shallower box, reduce the depth of what
you store, or choose a different location. This is a DIY project, not a battle of wills with your framing.
“The faceplate doesn’t sit flush.”
Usually this means something is pushing it out: wires, a box lip, magnets that are too thick, or misaligned hardware.
Re-fit and trim as needed, and make sure your bracket is snug and level.
“My magnets are either too weak or too strong.”
If they’re weak, the plate shifts. If they’re too strong, you’ll feel like you’re opening a bank vault with your fingernails.
Aim for “secure but reasonable.” A small pull tab on the back edge (hidden) can help without looking suspicious.
“The drywall cut looks rough.”
Score first, cut slowly, and sand lightly. Minor imperfections often disappear once the bracket and plate are installed.
If the hole is oversized, you may need a larger plate or a repair ring.
Alternative Ideas If You Don’t Want a Secret Compartment
Not everyone wants a hidden stash (or they have cats who treat wall plates like puzzle toys). If that’s you, old phone jacks can still
be handled cleanly:
- Replace the jack with a blank plate for a clean look.
- Convert it to a modern data plate (Ethernet) if the wiring supports it or if you re-run cable.
- Use a pass-through plate for neatly routed low-voltage cords (TV, speakers, etc.).
Conclusion
Turning an old telephone wall jack into a secret hiding spot is one of those rare DIY projects that’s equal parts practical and
delightfully sneakywithout needing a full remodel. If you take your time with safety, make a clean opening, and mount a simple
compartment securely, you’ll end up with a discreet storage nook that looks totally normal… which is exactly what makes it brilliant.
Keep it safe, keep it legal, and enjoy having the world’s least exciting wall plate become your quiet little superhero gadget.
Real-World DIY Experiences (The Stuff People Don’t Mention Until You’re Mid-Project)
Let’s talk about the “experience layer”the part of DIY that never fits neatly into bullet points. Because in real life, converting
a phone jack into a hiding spot often begins with confidence and ends with you holding a tiny drywall square like it’s a priceless
artifact. Here are some common, very real moments DIYers run into, plus what they learn from them.
First: the wall surprises. People expect a neat little cavity. Sometimes they get one! Other times they pull the faceplate off and
discover a tangled bundle of low-voltage wires that looks like it was installed during a power outage… by candlelight… in a hurry.
The win here is that low-voltage wiring is usually forgiving: once you cap the conductors and fold everything back neatly, the chaos
becomes calm. The “lesson learned” is that neatness is not automaticyou create it with patience and a few wire caps.
Second: drywall is a drama queen. You score a perfect rectangle, start cutting, and suddenly the paper face tears in a way that makes
you question your life choices. This is extremely normal. The best recovery move is also extremely unglamorous: slow down, use a sharp
blade, and clean the edges with a utility knife. Many DIYers report that once the bracket and plate are installed, the scary-looking
cut edge basically disappears. Drywall loves to look worse than it is.
Third: the magnet “Goldilocks problem.” A lot of people try tiny magnets and find the plate shifts if you brush it. Then they upgrade
to stronger magnets and discover they’ve created a new kind of finger workout. The sweet spot is “snaps closed with confidence, opens
without a wrestling match.” A common trick is to use two smaller magnets instead of one big onebetter alignment, less tug-of-war.
Another real-world detail: magnets can make the plate click when it closes. If that bothers you, a thin foam pad or felt dot is the
easiest “why didn’t I do that earlier” fix.
Fourth: location regret is real. DIYers often choose a spot that seems perfectuntil they realize the cavity is blocked by a stud, fire
block, or thick insulation. This is why experienced folks keep the plan flexible: if the first jack location is cramped, they shift to
a nearby plate position or accept a shallower compartment. In many homes, interior walls are easier than exterior walls, and hallways
are often friendlier than bathrooms or kitchens. The “experience takeaway” is that walls have opinions, and your job is to negotiate.
Fifth: the “blending in” moment. The funniest part is how proud people feel when the plate finally sits flush and looks boring.
It’s a weird pridelike cooking a perfect bowl of plain rice. But boring is the goal! DIYers who get the cleanest result tend to match
plate color to existing plates, keep screw heads consistent, and avoid adding anything that screams “touch me.” When it looks like it’s
always been there, you’ve nailed it.
Finally: the practical habit that forms. After installing a hidden phone-jack compartment, many people start using it less like a
“secret lair” and more like a “tiny emergency drawer.” A couple of bills, a backup key, a list of account recovery codes, maybe a spare
SIM card for travelsmall, sensible things that are annoying to misplace. The compartment becomes that quiet little safety net you
forget about until you really need it. And that’s the best kind of DIY success: not flashy, not fragile, just useful.