Table of Contents >> Show >> Hide
- Why Your Old Tablecloth Deserves a Second Life
- What Makes a Good Tablecloth-to-Pillow Candidate?
- Tools and Materials You’ll Need
- Step-by-Step: Sew an Envelope-Style Pillow Cover
- No-Sew Option for Non-Sewers (or No-Machine Days)
- Styling Ideas for Your Upcycled Pillow
- Care Tips for Tablecloth Pillows
- Common Mistakes (and Easy Fixes)
- Real-Life Upcycling Experiences & Helpful Lessons
- Wrap-Up: Small Project, Big Impact
Have a lonely old tablecloth hiding in the back of your linen closet? Maybe it’s the floral one your grandma used every holiday, or a trendy print you loved five years ago that doesn’t quite fit your current vibe. Instead of letting it wrinkle in storage (or worse, tossing it), you can transform that fabric into a modern throw pillow that looks like it came straight from a boutique home store.
This project is budget-friendly, beginner-friendly, and a surprisingly sentimental way to keep a favorite textile in your daily life. Whether you sew regularly or haven’t touched a machine since home ec, you can absolutely tackle this makeover. Think of it as a classic Hometalk-style DIY: simple steps, smart shortcuts, and a big “wow” moment at the end.
Why Your Old Tablecloth Deserves a Second Life
Before we start cutting, let’s talk about why a tablecloth makes such a good throw pillow:
- Great fabric for cheap (or free): Many older tablecloths are made of sturdy cotton or linen blends, perfect for everyday pillows.
- Generous yardage: Even a small tablecloth gives you enough fabric for at least one cover; a large one can yield several.
- Built-in pattern placement: Borders, center medallions, or repeated motifs can become intentional design details on your pillow front.
- Sentimental value: Turning a holiday or family tablecloth into a pillow keeps those memories visible instead of boxed up.
- Sustainability bonus: Upcycling what you already own keeps fabric out of landfills and gives your home decor a greener twist.
In other words, that “dated” tablecloth might be just a few seams away from becoming your favorite new accent pillow.
What Makes a Good Tablecloth-to-Pillow Candidate?
Check the Fabric
For a modern throw pillow that holds its shape, look for:
- Medium-weight woven fabric (cotton, linen, or a blend).
- Minimal stretch so the cover doesn’t sag or distort.
- Non-sheer fabric, unless you intentionally want a soft, layered or romantic look with a colored insert beneath.
Avoid super slick polyester or anything so thin it feels like a dress lining. Those can work, but they’re fussier and may need interfacing to feel substantial.
Look at the Pattern and Color
Ask yourself:
- Does the print still match your style if you isolate just one square of it?
- Is there a gorgeous border or central motif you’d like to feature?
- Would it mix well with other pillows on your sofa or bed?
Sometimes a pattern that feels “too much” spread across a whole table actually looks perfect when cropped to pillow size.
Inspect for Stains and Damage
Old tablecloths often have stains in the center where dishes sat. That’s not a dealbreaker; it just means you’ll cut around them. Use the clean corners or borders and skip any threadbare or torn sections. If there’s a small mark you can’t avoid, position it on the back of the pillow or in an area that will be less noticeable.
Tools and Materials You’ll Need
- Old tablecloth (washed, dried, and pressed)
- Pillow insert (commonly 16″ x 16″, 18″ x 18″, or 20″ x 20″)
- Fabric scissors or rotary cutter and mat
- Measuring tape or clear ruler
- Pins or fabric clips
- Sewing machine with matching thread (or fabric glue/iron-on hemming tape for a no-sew version)
- Iron and ironing board
- Fabric marker or chalk (optional but helpful for marking cut lines)
Step-by-Step: Sew an Envelope-Style Pillow Cover
We’re going to make an envelope pillow coverthe kind with two overlapping flaps on the back. It’s one of the easiest, most forgiving styles: no zipper, no buttons, just a neat opening that lets you slip the insert in and out.
1. Measure Your Pillow Insert
Lay your pillow insert flat and measure both width and height. If the tag says 18″ x 18″, measure anyway to confirm; some inserts are a bit plumper or shorter than advertised.
For this example, let’s assume your insert is 18″ x 18″.
2. Do a Little Math (But Not Scary Math)
For a snug, modern look (not a saggy, sleepy pillow), many DIYers cut the front piece the same size as the insert or just slightly larger to allow for seam allowance. A common formula:
- Front piece: insert width x insert height, plus 1″ total (½” seam on each side). For an 18″ pillow, cut 19″ x 19″.
- Back pieces: same height as the front, but split the width into two overlapping panels. A typical setup:
- Width of each back piece: (front width ÷ 2) + 3″ (for overlap and hemming).
- For a 19″ front: 19 ÷ 2 = 9.5 + 3 ≈ 12.5″ x 19″ for each back piece.
If you prefer a very plump pillow, you can even cut the front at the exact insert size (18″ x 18″) and keep your seam allowance tiny (¼”) so the cover “squeezes” the insert slightly.
3. Cut the Tablecloth
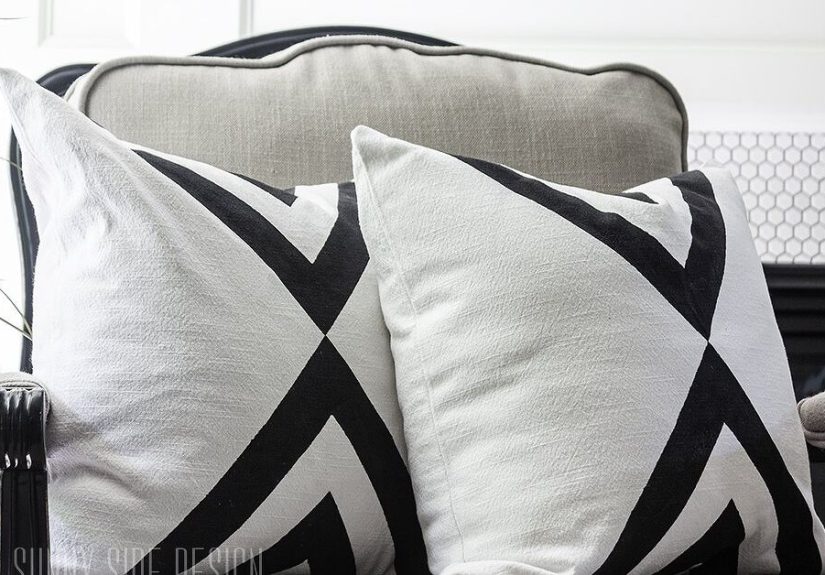
Spread your tablecloth on a flat surface and smooth out any wrinkles. Decide which part of the pattern you want on the front:
- Center a floral bouquet or medallion for a bold focal point.
- Use a border stripe for a cool, graphic frame effect.
- Angle a plaid or stripe on the diagonal for a more dynamic look.
Mark and cut your front square first. Then cut the two back rectangles from remaining fabric, making sure the pattern alignment feels intentional (even if it’s just “looks balanced enough to make me happy”).
4. Hem the Back Pieces
Each back piece needs a clean finished edge where it will overlap:
- On one long side of each back rectangle, fold the edge toward the wrong side of the fabric by ½” and press.
- Fold again by another ½” to enclose the raw edge and press.
- Stitch along the inner folded edge to secure the hem.
If you don’t sew, you can use iron-on hemming tape or fabric glue here; just make sure the hem is firmly bonded before assembling the pillow.
5. Assemble the Pillow Sandwich
Now the fun partputting it all together:
- Lay the front piece right side up on your work surface.
- Place one back piece right side down on top of the front, aligning raw edges with the top and sides. The hemmed edge should point toward the center.
- Place the second back piece right side down, aligning raw edges with the bottom and sides. Again, the hemmed edge should point toward the center and overlap the first back piece.
- Pin or clip all the way around the edges, especially where the back pieces overlap.
6. Sew, Trim, and Turn
Sew all the way around the perimeter with a ½” seam allowance, backstitching at the beginning and end to secure the stitches. Pivot at each corner by leaving the needle down, lifting the presser foot, turning the fabric, and continuing.
Once sewn:
- Trim the corners diagonally (without cutting through the stitches) to reduce bulk.
- Turn the cover right side out through the envelope opening.
- Use a blunt point (like a chopstick) to gently push out the corners.
- Give the whole cover a good press with the iron.
Slide in your pillow insert through the back opening, fluff, and admire your very chic, very affordable “new” decor piece.
No-Sew Option for Non-Sewers (or No-Machine Days)
If you’d rather not sew at all, you can still turn your tablecloth into a pillow cover using fabric glue or fusible bonding tape:
- Cut your pieces using the same measurements as above.
- Instead of stitching the hems on the back pieces, use hemming tape or fabric glue along the folded edges.
- Assemble the pillow sandwich and “sew” the perimeter with a strong line of fabric glue or bonding tape, leaving adequate time and heat (if using fusible tape) for it to set.
This version is best for decorative pillows that won’t see rough daily use, but it’s perfect if you’re in a rental, dorm, or simply don’t own a sewing machine.
Styling Ideas for Your Upcycled Pillow
Play With Scale
Use a small, tight pattern on a larger pillow to create an almost textured look, or choose a big, bold motif and center it on a smaller pillow for a graphic, modern statement. If your tablecloth is busy, pair it with solid-colored pillows so it becomes the star.
Mix and Match Textures
A smooth cotton or linen pillow cover from a tablecloth pairs beautifully with:
- Chunky knit pillows
- Faux fur or sherpa cushions
- Leather or faux leather accents
That mix of textures feels curated and modern, not matchy-matchy.
Seasonal Switch-Ups
Got a holiday tablecloth you only use once a year? Turn it into seasonal pillow covers you can slip over your regular cushions. Think:
- Pastel florals for spring
- Fourth of July stripes or stars
- Plaid or snowflake prints for winter
When the season ends, remove the covers, fold them, and store them with your decorations.
Care Tips for Tablecloth Pillows
- Check the original care tag if it’s still attached. Follow those instructions whenever possible.
- Wash on gentle if the fabric is older or delicate.
- Use a mild detergent to protect colors and fibers.
- Air dry or tumble dry low to avoid shrinkage.
- Spot clean stains promptly with a gentle fabric cleaner.
If you’re working with a sentimental heirloom (like a grandmother’s hand-embroidered piece), consider using that fabric only for the pillow front and reinforcing it with a sturdier lining behind. This keeps it decorative but gives it a bit more strength.
Common Mistakes (and Easy Fixes)
The Cover Is Too Loose
If your pillow looks slouchy:
- Turn it inside out and resew the seams with a slightly larger seam allowance.
- Or size down your insertsometimes a 20″ insert in an 18″ cover gives that plump, designer look.
The Insert Keeps Peeking Out the Back
That means the overlap on your envelope back isn’t deep enough. Next time, add an extra inch or two to each back panel. For now, you can:
- Add a small strip of Velcro inside the overlap.
- Hand-sew a snap or two to help keep it closed.
Fraying Edges
Some tablecloths fray more than others. If you notice loose threads:
- Finish raw edges with a zigzag stitch or overlock stitch.
- Use pinking shears for an easy, no-fuss finish on fabrics that fray moderately.
Real-Life Upcycling Experiences & Helpful Lessons
Once you’ve made one tablecloth pillow, you start seeing potential in every piece of fabric you own. Many DIYers report that their first project starts with a sentimental tablecloth that feels “too special” to use but “too special” to give away. Turning it into a pillow becomes a way to honor the memories without worrying about spilled gravy or candle wax ruining it again.
One common story goes like this: someone inherits a floral or lace tablecloth from a relative. It’s stained right in the middle from decades of family dinners. At first glance, it looks ruined. But when they spread it out, they realize the edges are still beautiful. By cutting out two or four pillow fronts from the corners, they preserve the prettiest sections and dodge the damaged area. Suddenly that “ruined” textile becomes a set of heirloom pillows on the sofa, quietly holding a whole family history.
Another frequent experience involves thrift-store treasure hunting. Tablecloths in secondhand shops are often incredibly affordable, especially if they’re slightly stained or labeled as “as is.” Clever makers go straight to the linens section, looking for:
- Bold graphic prints from the ‘70s for a retro-modern vibe
- Classic checks or stripes that work in farmhouse or coastal schemes
- Subtle tone-on-tone damask for a more traditional, luxe look
With just one thrifted tablecloth, they can often get multiple pillow coverssometimes enough to give a whole living room or guest room a coordinated refresh.
Many beginners share that this project helped them finally get comfortable with their sewing machine. Because the seams are straight and the measurements are simple, it’s a low-pressure way to practice. If a line wobbles a bit, nobody will notice once the pillow is stuffed. And if you’re really nervous, you can start with a small lumbar pillowless fabric, less commitment, same satisfaction.
A surprisingly powerful takeaway from people who’ve done several tablecloth-to-pillow transformations is that it changes how they see “old” items in their home. Instead of thinking, “I should declutter this,” they start thinking, “What could this become?” A worn duvet cover might turn into pillow shams, a dated curtain panel might become a bench cushion, or a stained napkin set might become patchwork accents. The project becomes more than a single pillow; it’s a mindset shift toward creative reuse.
There’s also the joy factor. Swapping out pillow covers has a bigger effect on a space than you’d expect. People describe walking back into the room after adding their new, tablecloth-turned throw pillow and feeling like the whole space suddenly looks styled and intentional. The best part? Every time they catch a glimpse of that pillow, they know the story behind it. It’s not just decor; it’s a conversation piece and a quiet reminder that a little creativity goes a long way.
If you share your projects online (especially in communities like Hometalk-style DIY groups), you’ll quickly notice how inspiring this simple idea is to others. One person’s “old tablecloth” becomes someone else’s “Waitwhy didn’t I think of that?” moment. And when they post their own versionmaybe with a totally different pattern or color paletteyou get even more ideas for your next upcycle.
Wrap-Up: Small Project, Big Impact
Turning an old tablecloth into a modern throw pillow is one of those rare DIYs that hits all the sweet spots: it’s inexpensive, fairly quick, customizable to your style, and rich with potential meaning. You’re not just sewing straight lines; you’re giving a forgotten fabric a starring role in your home.
So open that linen closet, dig out the tablecloth you haven’t used in ages, and picture it as a crisp, tailored pillow on your sofa or bed. With a little measuring, a few seams (or some trusty fabric glue), and a dash of creativity, you’ll have a “new” piece of decor that tells a story every time you walk into the room.