Table of Contents >> Show >> Hide
- From Accidental Paint Smudges to Living Canvas
- Step 1: Pick Your Artwork Persona
- Step 2: Prepping the Canvas (Hi, It’s Your Face)
- Step 3: Blocking, Shaping, and Building the Illusion
- Step 4: Adding Story and Emotion to the Artwork
- Step 5: Capturing the Artwork Before It Washes Away
- Why Turning Yourself Into an Artwork Feels So Powerful
- of Hard-Earned Experience: What I’ve Learned by Becoming My Own Art Project
Some people do a quick eyeliner and call it a day. I accidentally turn myself into a walking art installation,
confuse my neighbors, and stain every towel I own with acrylic fingerprints. If you’ve ever looked at a Bored Panda
gallery of body-paint artists and thought, “Okay but… how do you actually do that?” this is the behind-the-scenes
tour of how I transform myself into an artworkwithout completely losing my sanity (or my eyebrows).
Over the last few years, illusion makeup and body painting have exploded online. Artists like Mimi Choi and Dain Yoon
have turned their own faces into surreal optical illusions that make you question reality, while other creators
spend 6–12 hours painting full bodies for contests, festivals, and jaw-dropping photo shoots. It’s not just
“makeup,” it’s performance art, trompe-l’œil, and cosplay rolled into one. And yes, you can start this journey
from your bedroom with a cheap mirror and a very patient sense of humor.
From Accidental Paint Smudges to Living Canvas
My transformation routine started accidentally: I was painting canvases and somehow ended up wearing half the color
palette on my arms, cheeks, and hairline. At some point I realized the mess looked… actually pretty cool. Think:
Jackson Pollock meets “I lost the fight with my paintbrush.”
From there, I started deliberately treating my body as a canvas. This isn’t a new ideabody painting has been used
in rituals and ceremonies for thousands of yearsbut modern body art is more about creative self-expression,
social media storytelling, and stunning visuals. Many artists treat each look as a temporary performance: you paint,
pose, photograph, and then wash it all away so the next idea can begin.
So how do you go from “Oops, I spilled paint” to “Wow, I turned myself into a living artwork worthy of a Bored Panda
feature”? The process is surprisingly structured, even if the end result looks wild and chaotic.
Step 1: Pick Your Artwork Persona
First, I decide what kind of “artwork” I’m becoming. This is where the fun starts. Am I a surreal double-faced
illusion? A comic-book character exploding off my skin? A Renaissance painting that escaped the frame?
Gathering inspiration like a magpie
I collect ideas from everywhere:
- Illusion makeup artists who multiply eyes, distort features, or turn faces into shattered glass.
- Body painters who cover entire torsos in galaxies, landscapes, or animal designs.
- Classic art techniques like trompe-l’œil, which literally means “deceive the eye” and creates realistic three-dimensional illusions on a flat surface.
- Personal storiesanxiety, joy, burnout, creativitytranslated into shapes, color palettes, and symbols.
For example, on days I feel scattered and overstimulated, I might paint my face as if it’s glitchingduplicated eyes,
staggered outlines, broken pixels. On calmer days, I’ll create soft clouds, floral motifs, or watercolor streaks that
wrap around my neck and shoulders.
Turning concepts into a quick sketch
Before any paint touches my skin, I sketch the idea on paper or a tablet. It doesn’t have to be pretty; it just needs
to answer a few questions:
- Where will the “focus” of the artwork beeyes, mouth, hands, or full body?
- Which features will I exaggerate, hide, or duplicate?
- Where do shadows and highlights go to sell the illusion?
- How will this look in photos, not just in the mirror?
Think of this like storyboarding a tiny movie that plays on your own skin.
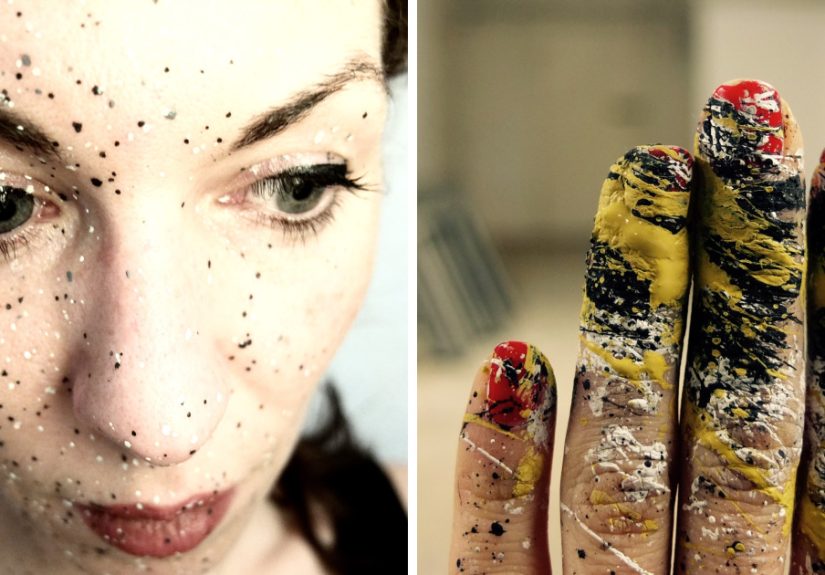
Step 2: Prepping the Canvas (Hi, It’s Your Face)
Transforming yourself into an artwork starts with treating your face and body like a precious canvasnot a random
wall for testing markers.
Skin prep: boring but critical
My process usually looks like this:
- Cleanse to remove oil, sunscreen, and makeup so the products actually stick.
- Moisturize with a lightweight, non-greasy formula so the paint layers smoothly.
- Prime with a silicone-free primer or a barrier product designed for body paint to help it last and prevent smudging.
Professional body artists often use water-based or cosmetic-grade paints designed for the skin instead of craft
acrylics. These are safer, easier to remove, and less likely to cause irritation, especially for long sessions.
Barrier sprays and setting sprays can make the look last through sweat, heat, and stage lights.
Safety first, always
If you’re transforming yourself into art regularly, your skin becomes your collaborator. I always:
- Patch test new products on a small area to check for reactions.
- Avoid painting directly on irritated or broken skin.
- Use cosmetic glues and safe adhesives for add-ons, never random hardware-store glue.
- Plan breaks for long sessions so I can stretch, drink water, and move around.
A finished look might last only a few hours, but you’d like your skin to last a lifetime. Priorities.
Step 3: Blocking, Shaping, and Building the Illusion
Once my canvas is prepped, I start the painting process. This is where the “I’m turning myself into an artwork” magic
kicks inand where I also genuinely question my life choices around hour three.
Blocking in color and structure
First, I block out the big shapes:
- A rough outline of duplicated eyes or misaligned facial features.
- Big color areaslike a galaxy background, comic-book halftone dots, or a fake “frame” around my face.
- Zoned regions where I know I’ll add details later, like cracks, stitches, ribbons, or floating pieces.
I use a combination of brushes, sponges, and sometimes airbrush tools if I’m doing full-body work. Many body painters
spend 6–8 hours on a single look, and full-day sessions aren’t unusual for detailed designs and competitions, so I
plan snacks, breaks, and stretch time like it’s a marathon, not a sprint.
Shadows, highlights, and optical trickery
This is the part that makes people say, “Wait, where’s your real eye?” I rely heavily on:
- Strong shadows to create fake depthunder painted “cut-outs,” around faux cracks, beneath drawn objects.
- Bright highlights (usually white or very pale tones) to simulate glossy surfaces, glass, or metallic shine.
- Careful line work to define edges of the illusion so the brain reads them as “real.”
In illusion makeup, placement is everything. A fake eye painted one centimeter too high goes from “hauntingly surreal”
to “someone dropped a sticker.” So I keep checking my work in a selfie camera, not just the mirror, because that’s how
people will actually see it online.
Step 4: Adding Story and Emotion to the Artwork
A cool illusion is impressive. A cool illusion with a story is unforgettable.
When I transform myself into an artwork, I ask: what emotion or message is this look carrying? Am I expressing
burnout by painting myself as a cracked statue leaking color from the inside? Am I playing with identity by layering
multiple faces? Am I just a walking neon doodle because it’s Friday and I needed serotonin?
Props, textures, and small chaotic details
To push the look even further, I’ll sometimes add:
- 3D elements like small sculpted pieces, faux flowers, or plastic jewels glued strategically to the design.
- Texture overlays such as splatter, dripping lines, or tiny cross-hatching to mimic brushstrokes and fabric.
- Contrasting areasone side realistic, the other side glitchy or abstractto highlight transformation.
These details turn a makeup look into a narrative piece, something that feels like it belongs in a surreal art gallery
instead of just a “before and after” Instagram reel.
Step 5: Capturing the Artwork Before It Washes Away
Here’s the bittersweet part: your masterpiece is temporary. After a few hours, it’s going down the drain. That’s why
photos and videos are a huge part of transforming yourself into an artwork.
Lighting, angles, and the “illusion sweet spot”
Many illusions only work from specific angles. I test a few poses in front of the camera to find:
- The angle where painted features align perfectly with real ones.
- The distance where the illusion reads clearly, without zooming in too far.
- Lighting that’s bright and even enough to show detail but still dramatic enough to fit the mood.
Natural light near a window is usually my best friend, but ring lights and softboxes are helpful when I’m working
late and my only other light source is “fridge door at 2 a.m.”
Turning transformation into a story
Instead of just posting a single final image, I like to share:
- Before shotsmy regular face, in all its unpainted glory.
- In-progress photos showing the blocks of color, weird halfway stages, and “uh oh” moments.
- The final look, edited lightly for exposure and contrast but not warped or reshaped.
This progression makes people feel like they’re watching a time-lapse painting come to lifeexcept the canvas keeps
blinking back at them.
Why Turning Yourself Into an Artwork Feels So Powerful
On the surface, transforming yourself into an artwork is about aesthetics: colors, shapes, wow-factor illusions.
But underneath, it’s deeply emotional. You’re choosing how you want to be seenand sometimes, how you want to process
what you’re feeling.
For some artists, body painting is a way to reclaim their bodies after illness, disability, or trauma, turning scars
or limitations into part of the composition. For others, it’s pure escapism: for a few hours, you’re not just a person
doing chores and answering emails; you’re a galaxy, a mythological creature, or a walking painting.
The temporary nature of the art actually makes it more meaningful. You spend hours creating something that will only
exist for one day. It’s a strange mixture of discipline and letting golike performance art, but with a lot more
makeup wipes at the end.
of Hard-Earned Experience: What I’ve Learned by Becoming My Own Art Project
After countless sessions of transforming myself into an artwork, I’ve learned a few things that don’t always show up
in the polished final photos. Consider this the “emotionally honest, slightly paint-stained bonus section.”
The first 30 minutes always look terrible
I used to panic in the early stages because the design looked clumsy and chaotic. The colors were flat, the shapes
were wrong, and I looked less like “surreal artwork” and more like a highlighter had attacked me. At some point,
I accepted a universal truth of creative work: the ugly phase is not a sign of failure; it’s a checkpoint.
Now, when I hit that “this is awful” stage, I take a breath, grab a snack, and keep going. Almost every look turns a
corner once shadows and highlights go in. It’s wild how quickly a painted circle becomes a convincing “extra eye”
once you add one sharp shadow and one bright highlight.
Comfort is part of the art
There’s a romantic fantasy of artists stoically enduring discomfort for the sake of creation. In reality, if your
back hurts, your legs are numb, and your contact lenses are drying out, your lines will get shaky and your patience
will vanish. I’ve had sessions where I didn’t plan breaks and ended up rushing the final details simply because I
was starving and my feet were pins and needles.
These days, I build comfort into the process: I use a chair that supports my back, sit near a table so my elbows
can rest while I paint, keep water within reach, and set a timer every 45–60 minutes to stand, stretch, and reset.
The artwork benefits as much as my body does.
It changes how you see your own face
When you spend hours staring at your own face while transforming it, something shifts. At first, I obsessed over
symmetry, pores, and perceived flaws. But once I started treating my features as design elements instead of problems,
I softened. A slightly crooked nose? Great, that adds character to the illusion. Deep-set eyes? Perfect, more space
for shadow play. Sharp jawline? Excellent structural edge for painted shapes.
The more I painted, the less my face felt like something to criticize and the more it felt like a versatile, expressive
canvas. I still have insecure days, of course, but transforming myself into an artwork helped mute the mean internal
commentary. It’s hard to hate the canvas when you’re busy creating on it.
Community turns transformation into connection
One of the best parts of this whole experience is how communal it is. Artists share behind-the-scenes looks, tips
about paint brands, and candid posts about failed experiments. People who don’t paint still show up in the comments
to say things like, “This made my day,” or “This is exactly how my anxiety feels, but prettier.”
Whenever I post a new transformation, I remind myself that someone on the other side of the screen might see it
right when they need a dose of weird, beautiful distraction. Maybe they won’t ever paint their own face, but they’ll
see a human being turning into living art and think, “Wow, we’re allowed to be this creative with ourselves?”
The best part is washing it all off
This might sound strange, but the removal ritual is one of my favorite moments. After hours of painting, posing, and
photographing, I stand at the sink and slowly erase the artwork. Colors run together, streak down the drain, and
my regular face reappears, slightly red, slightly tired, but oddly calm.
It’s a reminder that I’m not frozen in any single version of myselfpainted or otherwise. I can be an artwork today,
a sleepy human in sweatpants tomorrow, and something totally different next week. Transformation doesn’t have to be
permanent to be real.
So if you’ve been tempted to pick up a brush, a sponge, or a pot of face paint and turn yourself into something
wild, dramatic, and wonderfully unnecessary, consider this your sign. You don’t have to be perfect. You just have
to be willing to look strange in your bathroom mirror for a while. The artwork is temporary, but the experience of
turning yourself into it? That stays with you long after the last streak of color is gone.