Table of Contents >> Show >> Hide
- Is Your Shed a Good Candidate?
- Before You Swing a Hammer: Rules, Neighbors, and Chicken Math
- Design Goals: Dry, Draft-Free, and Easy to Clean
- Ventilation: The Difference Between “Cozy” and “Eau de Ammonia”
- Flooring and Bedding: Your “Clean Coop” Strategy
- Roosts and Nest Boxes: Sleep High, Lay Low
- Predator-Proofing: Lock It Like You Mean It
- The Run and the Pop Door: Chicken Traffic Engineering
- Lighting, Power, and Water: Convenience Without Chaos
- Health and Biosecurity: The Part That’s Not Cute (But Matters)
- Step-by-Step: A Smart Order of Operations
- Common Mistakes (So You Don’t Learn Them the Hard Way)
- Experiences and Lessons Learned From Shed-to-Coop Conversions (Extra )
- Conclusion
If you’ve got a backyard shed that’s currently storing three rakes, a mystery bucket, and the ghost of “I’ll organize this later,”
you’re sitting on prime real estate for a shed converted to chicken coop project. A shed already has the hardest parts handled:
walls, roof, and a structure that (hopefully) doesn’t wobble when you sneeze. Your job is to turn it into a space that’s dry,
safe, easy to clean, and pleasant enough that your hens don’t file a complaint with the Neighborhood Association of Very Loud Birds.
This guide walks through planning, layout, ventilation, predator-proofing, and the must-haves (roosts, nesting boxes, run access),
with practical examples and the kind of “learned the hard way” lessons that keep your coop from turning into a damp, smelly,
egg-hiding escape room.
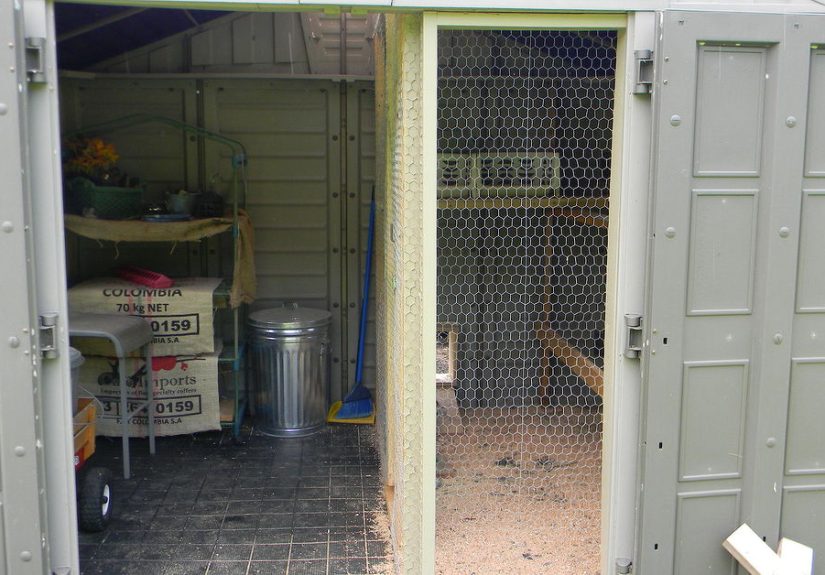
Is Your Shed a Good Candidate?
Before you start daydreaming about pastel nesting boxes and adorable chicken names, do a quick shed reality check. A good shed for
conversion is structurally sound, dry, and easy to secure. If the roof leaks, the floor is rotting,
or the door doesn’t close without a running start, fix those firstor choose a different shed.
Quick “Yes/No” checklist
- Roof: No active leaks, no soft spots, no daylight shining through where daylight shouldn’t.
- Walls: Solid framing, no major rot, no large gaps at corners or eaves.
- Floor: Sturdy enough to support you, a wheelbarrow, and a full clean-out without collapsing into a surprise basement.
- Door: Can be latched securely (predators love flimsy latches the way chickens love forbidden garden beds).
- Location: Preferably on higher ground so rainwater doesn’t turn the entry into a seasonal swamp.
Before You Swing a Hammer: Rules, Neighbors, and Chicken Math
Backyard chickens are common in many U.S. communities, but rules vary wildly: some places allow a few hens with basic setbacks,
others require permits, and some HOAs treat a single chicken feather like a zoning emergency. Check local ordinances and any HOA rules
before you invest in materialsbecause “I already bought six pullets” is not a legal strategy.
Then do the “chicken math” early. People often convert a shed, get excited, and accidentally build a luxury coop for more birds than
the space can comfortably support. The result? Stress, dirty bedding, and hens that pick fights like they’re training for a tiny-feathered boxing match.
How much space do chickens need?
Common backyard guidance is about 3–4 square feet per laying hen inside the coop and about 10 square feet per hen outdoors
in a run (more is better if your birds are run-confined most of the time). Treat these as a starting point, not a challenge. If your shed is
“technically big enough,” ask whether it’s still easy to clean, ventilate, and manage without turning into a daily mud-and-manure situation.
Example: an 8×10 shed conversion
An 8×10 shed has 80 square feet. If you reserve space for a human walkway, feed storage, and a clean-out area, you might dedicate
~60 square feet to bird living space. Using 3–4 square feet per hen, that’s roughly 15–20 hens on paperbut many keepers find
comfort and cleanliness improve dramatically when they plan for fewer birds, especially if bad weather keeps the flock indoors.
Design Goals: Dry, Draft-Free, and Easy to Clean
A shed chicken coop conversion works best when you design around three realities:
chickens produce moisture, manure produces ammonia, and predators are motivated, patient, and weirdly athletic.
Good design means air exchange without drafts, manageable bedding, and secure openings everywhere.
Ventilation: The Difference Between “Cozy” and “Eau de Ammonia”
Ventilation is where many shed-to-coop projects win or lose. A coop needs air movement throughout the structure without blasting birds
with a cold draft. If moisture builds up, you’ll see condensation and smell ammoniatwo big warning signs that air exchange isn’t keeping up.
Some extension guidance literally recommends using your nose: if the coop smells like ammonia, improve ventilation and clean up manure.
How to ventilate a converted shed (without creating drafts)
- Vent high: Place vents near the roof peak so warm, moist air can escape and air exchange happens above bird level.
- Bring air in low, let it out high: A height difference helps natural airflow (cooler air in, warmer air out).
- Use roof vents or gable vents: These help stale air leave naturally, especially in winter when windows stay mostly closed.
- Add a fan only if needed: In hot climates or still air, a fan can help, but avoid blowing directly on birds.
- Screen every opening: Cover vents and windows with hardware cloth, not chicken wire, so ventilation doesn’t become an invitation.
In winter, you’re balancing two things: remove moisture and ammonia, but keep birds dry and out of drafts. Condensation plus cold can
raise frostbite risk, so keep air exchange going even when temperatures drop. Deep bedding can help manage moisture, but it’s not a substitute
for ventilationthink of it as a sponge, not a magic trick.
Flooring and Bedding: Your “Clean Coop” Strategy
Shed floors vary: wood, concrete, or even dirt. Each can work, but each changes how you manage moisture and cleanup.
Your goal is a floor that stays dry, drains well (or can be scraped), and doesn’t become a rodent hotel.
Common flooring options for a shed converted to chicken coop
- Concrete: Easy to scrape and disinfect. Add bedding for comfort and moisture control.
- Wood: Works fine if solid. Seal or protect it so it doesn’t soak up moisture and odors over time.
- Dirt: Possible, but harder to keep dry and harder to predator-proof. Many keepers add a barrier layer and bedding.
Bedding that actually behaves
Dry, absorbent litter (often pine shavings) helps control moisture. In cold months, some keepers use a deep bedding approach:
start with several inches of bedding, stir it as it soils, and top it off. This can reduce odor and add a bit of natural warmth as it breaks down,
but it requires a full clean-out later. If you go deep-bedding, add a kickboard at the doorway so your bedding doesn’t migrate into the yard like it’s escaping.
Roosts and Nest Boxes: Sleep High, Lay Low
Chickens want to sleep off the floor. They also want to lay eggs in a quiet, darker spot that feels safe. If you set this up wrong,
you’ll get a coop full of “floor eggs” and hens sleeping in nesting boxes (which is about as clean as it sounds).
Roost design (the “sleeping perch”)
- Perch material: Wood is ideal. Many guides suggest a board that supports the foot comfortablyoften a 2×4 set wide-side up with edges rounded.
- Space per bird: Plan for roughly 6–10 inches of roost length per chicken, depending on breed size and how cozy your flock likes to be.
- Height and spacing: Place roosts about 2 feet off the floor (breed and mobility matter) and keep spacing between multiple roosts so birds aren’t stacked like bunk beds over a poop zone.
- Poop management: Consider a droppings board/tray beneath roosts for fast daily cleanup.
Nesting boxes (the “egg station”)
- Size: A common standard is about 12x12x12 inches for average hens; some guidance uses a slightly taller box (for example ~12x12x14).
- Quantity: Plan roughly one nest box per 3–5 hens. More boxes can reduce traffic jams and cracked eggs.
- Placement: Keep nests off the ground, away from roosts, and not below roost height. This helps keep nests cleaner and discourages sleeping in them.
- Comfort: Add clean, dry bedding (straw or shavings) and keep it refreshed so eggs stay clean.
Bonus behavioral win: adequate nesting space and good placement can help reduce issues like egg breakage and egg-eating habits.
If your hens start “sampling the product,” it spreads fastlike gossip, but with more yolk.
Predator-Proofing: Lock It Like You Mean It
Predators are not impressed by your DIY skills. They are impressed by gaps, weak latches, and chicken wire. For a shed chicken coop conversion,
assume that if there’s an opening, something will test itespecially at night.
Predator-proof essentials
- Cover openings with hardware cloth: Use small-mesh, sturdy material on windows, vents, and any run walls.
- Upgrade latches: Use secure locks or predator-resistant latches (raccoons are famously “handsy”).
- Stop digging: Bury hardware cloth (or welded wire) around the run perimeter, or install a predator “apron” so digging predators hit a barrier.
- Cover the run: Overhead netting/wire helps deter aerial predators and climbers.
- Night routine: Most predation happens after dark, so locking birds inside a secure coop before dusk is a simple, powerful habit.
The Run and the Pop Door: Chicken Traffic Engineering
Your shed is the coop (sleeping + laying). The run is the outdoor exercise yard. The transition between them is the pop door
basically the chicken-sized doorway that makes your flock feel like they have a dedicated entrance to their tiny suburban home.
Run design tips that save your sanity
- Drainage matters: Choose a well-drained area or add gravel/base layers so you’re not managing mud year-round.
- Shade and weather cover: Add shade cloth or a solid section of roof so birds have relief from sun and rain.
- Plan for humans: Make at least part of the run accessible for cleaning and maintenance. If you can’t reach it, you can’t keep it healthy.
- Space: More run space reduces boredom, feather-picking, and “everyone fights over the same square foot” drama.
Lighting, Power, and Water: Convenience Without Chaos
A shed converted to chicken coop becomes much easier to manage with thoughtful utilitiesespecially lighting and safe power.
Some guidance for layers notes that adequate light exposure supports egg production, and timers can help maintain a consistent routine.
If you add electricity, use outdoor-rated components, protect cords from pecking, and keep everything dry and well-mounted.
Practical utility upgrades
- Light: A simple LED fixture on a timer can help with visibility and routine management.
- Water: Place waterers where they won’t be fouled constantly (chickens love redecorating with bedding).
- Feed storage: Use sealed metal containers to reduce rodents and moisture problems.
Health and Biosecurity: The Part That’s Not Cute (But Matters)
Backyard chickens are fun, but they’re still livestock. Cleanliness, pest control, and basic biosecurity protect your birds and your neighbors.
Practical recommendations often include keeping spilled feed cleaned up (rodents love free snacks), quarantining new birds before introducing them,
and minimizing contact with wild birds when possible.
Simple habits that prevent big problems
- Daily: Refresh water, quick poop-board scrape, collect eggs.
- Weekly: Stir/refresh bedding, clean nest boxes, check latches and fencing for “mysterious new gaps.”
- Seasonally: Deep clean, inspect wood for rot, reseal where needed, refresh predator barriers.
- New birds: Quarantine before mixing flocks; observe for respiratory signs and overall health.
Step-by-Step: A Smart Order of Operations
- Patch and seal: Fix roof leaks, repair rot, close gaps.
- Plan the layout: Roost area, nesting zone, walkway, storage corner, pop door placement.
- Ventilate safely: Add high vents/roof vents; cover all openings with hardware cloth.
- Secure the door: Reinforce and upgrade latches/locks.
- Build roosts + droppings board: Make cleaning easy from day one.
- Install nesting boxes: Correct size/height; keep them darker and away from roosts.
- Floor + bedding plan: Protect floor; choose bedding; consider a kickboard if deep-bedding.
- Attach the run: Predator-proof walls and perimeter; cover overhead if needed.
- Test like a predator: Tug, shake, pryif you can open it, something else will too.
- Move birds in: Start with a routine and adjust based on moisture, smell, and flock behavior.
Common Mistakes (So You Don’t Learn Them the Hard Way)
- Not enough ventilation: A sealed shed becomes a moisture trap; ammonia builds up fast.
- Using chicken wire for security: It keeps chickens in, but it’s not reliable predator protection on its own.
- Nests lower than roosts: You’ll get sleeping hens in nests and dirty eggs.
- Ignoring drainage: Muddy runs create constant odor, pests, and foot problems.
- Underbuilding latches: Weak closures are basically an RSVP for raccoons.
- Making the coop hard to clean: If cleaning is miserable, it won’t happen often enoughdesign for future you.
Experiences and Lessons Learned From Shed-to-Coop Conversions (Extra )
Ask ten backyard keepers about a shed converted to chicken coop, and you’ll hear ten different “I can’t believe I didn’t think of that”
storiesusually told while pointing at a vent, a latch, or a suspiciously mud-free corner of a run. One of the most common early lessons is that
sheds feel “tight” faster than you expect. On paper, a shed might have plenty of square footage, but once you add nesting boxes, roosts, a walkway,
and a place to store feed safely, the usable bird space shrinks. Keepers who plan a cleaning path (even just a 2-foot-wide lane where a person can
stand and turn around) tend to stick with maintenance longerbecause nobody wants to do yoga with a shovel while chickens critique their form.
Ventilation is the second big “aha.” Many people start by thinking, “It’s a shedso it’s sturdyso it must be cozy.” Then the first cold snap hits,
and the inside smells sharp, windows fog, and the bedding gets damp. That’s when the concept of ventilation without drafts becomes real.
Experienced converters often add high vents and roof venting, then adjust seasonally: more open in summer, controlled airflow in winter. A frequent
winter discovery is that bedding management and ventilation are a team sport. Deep bedding can help absorb moisture, but if airflow is too low,
the coop still feels damp. When keepers dial in the balance, they describe the coop as smelling like “wood shavings” instead of “regret.”
Predator-proofing stories tend to be the most dramaticbecause the “test event” often happens at 2:13 a.m. Some keepers recall finding scratch marks
on a door or a bent corner of mesh, and realizing their latch system was more “suggestion” than “lock.” After upgrading to sturdier mesh over openings,
reinforcing doors, and adding a buried barrier or apron at the run perimeter, they report a noticeable drop in nighttime stress (theirs and the flock’s).
Another widely shared lesson: if you build a run that you can’t comfortably walk into, you’ll hate cleaning it, and a dirty run invites rodents.
People who include at least one full-height access door and a reachable corner for raking usually say it was the best decision they made.
Nest box placement brings its own comedy. New hens sometimes ignore the beautiful nesting boxes and lay eggs in the most inconvenient spot possible:
behind a feed bin, under a ramp, or in the one shadowy corner that requires a headlamp and a commitment to crawling. Keepers often solve this by making
nesting boxes darker and more inviting than the alternatives, keeping bedding fresh, and collecting eggs regularly. Over time, many say the shed conversion
becomes easier than a small prefab coop because there’s room to stand, clean, and adjust layouts. The biggest “experienced keeper” takeaway is simple:
build for airflow, build for cleaning, and build like something is trying to break inbecause eventually, something will try. When those basics are right,
a converted shed can feel less like a project and more like a smooth-running little backyard system that reliably produces clean eggs and calmer birds.
Conclusion
Turning a shed into a chicken coop is one of the most practical DIY upgrades for backyard poultry: you get solid weather protection, space to work,
and flexibility to customize. The difference between a “cute coop” and a great coop comes down to fundamentals: right-sized space, smart ventilation,
dry bedding management, proper roost and nesting setup, and serious predator-proofing. Nail those, and your shed chicken coop conversion can stay clean,
low-stress, and productive for yearswithout turning you into a full-time poop concierge.