Table of Contents >> Show >> Hide
- Why Add Sand to Paint for Non-Slip Surfaces?
- What Kind of Sand Should You Use?
- Choosing the Right Paint for Sand Additives
- How Much Sand to Add to Paint?
- Step-by-Step: How to Add Sand to Paint for Non-Slip Surfaces
- Using Pre-Mixed Non-Skid Paints and Additives
- Safety Tips and Common Mistakes to Avoid
- Where Sand-in-Paint Non-Slip Surfaces Work Best
- Real-World Experiences with Sand in Paint
- Final Thoughts
Slick steps. Shiny decks. Garage floors that turn into ice rinks every time it rains. If you’ve ever
done the cartoon-style slip where your feet fly up and your dignity goes down, you already know why
non-slip surfaces matter. The good news? You don’t need fancy industrial coatings to tame those
slippery spots. A simple trickadding sand to paintcan give you a tough, textured, non-slip finish
with materials you can grab at almost any home center.
In this guide, we’ll walk through why sand in paint works, what kind of sand and paint to use, how
to mix it correctly, where it makes the most sense, and how it compares to modern non-skid additives.
We’ll also wrap up with real-world experiences and “wish I’d known that earlier” lessons from
DIY-style projects so you can skip the mistakes and go straight to the safe, grippy finish.
Why Add Sand to Paint for Non-Slip Surfaces?
Paint alone is basically a smooth film. It might look beautiful, but smooth plus moisture equals
slip hazard. When you add sand or another gritty material into the paint, you introduce texture,
which increases friction underfoot. That extra grip helps reduce the chances of slips, especially
in wet, muddy, or high-traffic areas.
You’ll commonly see sand-in-paint or non-skid coatings used on:
- Exterior steps and porch landings
- Wood and composite decks
- Concrete patios and walkways
- Garage floors and workshop areas
- Pool decks and changing areas
- Ramps and sloped paths
While you can buy dedicated non-skid paints, adding sand to paint is one of the most affordable,
flexible ways to get traction right where you need it. You choose the color, the finish, and how
aggressive you want the texture.
What Kind of Sand Should You Use?
Not all sand is created equal when it’s going into your paint. Grab a random scoop from the beach,
and you’ll likely bring home salt, organic debris, and uneven grains that don’t bond well. For a
safe, consistent texture, stick with clean, dry sand products intended for home and construction use.
Good options for sand in paint
-
Play sand: Washed, relatively uniform, and easy to find in home centers. It’s
often used by DIYers for steps and decks because it’s cheap and coarse enough to add traction. -
Sand specifically sold as “texture” or “non-slip” additive: Some brands offer
silica-based sand graded for mixing into coatings. It tends to be more consistent and clean,
which can help your finish last longer. -
Coarse over fine: Coarser grains usually offer better grip than very fine sand,
which can disappear into the paint film and barely change the surface feel.
What you want to avoid is damp, dirty, or contaminated sand. Any moisture or organic material can
interfere with adhesion or cause the paint to cure unevenly. Always use sand that’s bone dry and
stored in a clean container before mixing.
Beyond sand: modern non-skid additives
Traditional sand works, but it isn’t your only option. Many modern products use
lightweight plastic or polymer beads instead of mineral sand. These additives are designed to:
- Stay suspended in the paint longer instead of sinking to the bottom of the can
- Provide a more uniform texture with less clumping
- Offer good traction without looking as harsh or “sandy”
- Minimize changes to the paint color and sheen
These proprietary non-skid additives are widely sold right next to floor and porch paints. If you
want a cleaner, more uniform look than traditional sand, they’re worth considering. But the basic
techniquemixing grit into paintis the same.
Choosing the Right Paint for Sand Additives
Before you start dumping sand into whatever half-used paint can is in the garage, check that the
paint itself is up to the job. For non-slip surfaces, you’ll usually get the best results with:
-
Floor and porch paints: These formulas are built to handle foot traffic, mild
chemicals, and abrasion. They’re the go-to for steps, decks, and concrete slabs. -
Concrete and garage coatings: One-part epoxies, urethanes, or acrylic concrete
paints are commonly used for garages and basements. Many are compatible with non-slip additives. -
Exterior-grade acrylic or latex paints: For wood steps, ramps, and porches,
a quality exterior floor paint or deck paint is usually the safest choice.
Always check the label: some clear sealers, waterproofers, or specialty coatings don’t work well
with sand or texture additives. When in doubt, test a small patch or contact the manufacturer.
How Much Sand to Add to Paint?
There’s no one magic number for every situation, but a very common starting point is roughly:
About 4 parts paint to 1 part sand by volume.
That ratio is usually enough to give you noticeable texture and good traction without turning the
paint into a chunky paste that’s impossible to roll out. For areas where you want a more subtle
texturelike a covered porch you might walk barefoot onyou can use less sand. For very slick
surfaces or steep ramps, you might edge a bit higher, as long as the paint still applies smoothly.
The smarter approach is to start small: mix a test batch, roll out a small patch, and let it dry.
Then walk on it with the type of footwear you actually use (barefoot, sneakers, work boots).
Adjust the sand level based on how that test feels.
Step-by-Step: How to Add Sand to Paint for Non-Slip Surfaces
1. Prep the surface properly
Non-slip paint is only as good as the surface underneath it. If the existing paint is peeling or
the concrete is dusty, your gritty coating may flake off quickly. Take your time with prep:
- Scrape away any loose or peeling paint with a scraper or stiff brush.
- Sand glossy surfaces so the new paint can bite into them.
- Clean off dirt, grease, mildew, and dust with appropriate cleaners.
- Rinse thoroughly and let the surface dry completelythis part matters.
Skipping prep is the fastest way to end up repainting your “non-slip” surface six months later.
Prep isn’t glamorous, but it’s what makes the finish last.
2. Portion the paint into a separate container
Don’t pour sand straight into your main paint can. Instead:
- Pour a workable amount of paintsay, half a galloninto a clean bucket or tray.
- Leave the original can untouched so you have clean paint for later coats or touch-ups.
This gives you better control over the sand ratio and keeps your “plain” paint available if you
decide to topcoat without texture for appearance.
3. Add sand and mix thoroughly
Slowly add your sand or non-skid additive to the paint while stirring. Aim for that approximate
4-to-1 starting ratio, then:
- Stir until the sand is evenly distributed and you don’t see big clumps.
- Let the mixture sit for a minute, then stir again to catch any settling sand.
- During application, stir occasionally to keep the texture suspended.
If the paint feels like wet beach sand and doesn’t want to spread, you’ve gone too far. Add more
paint to thin the mix until you can roll it out smoothly but still feel the grit.
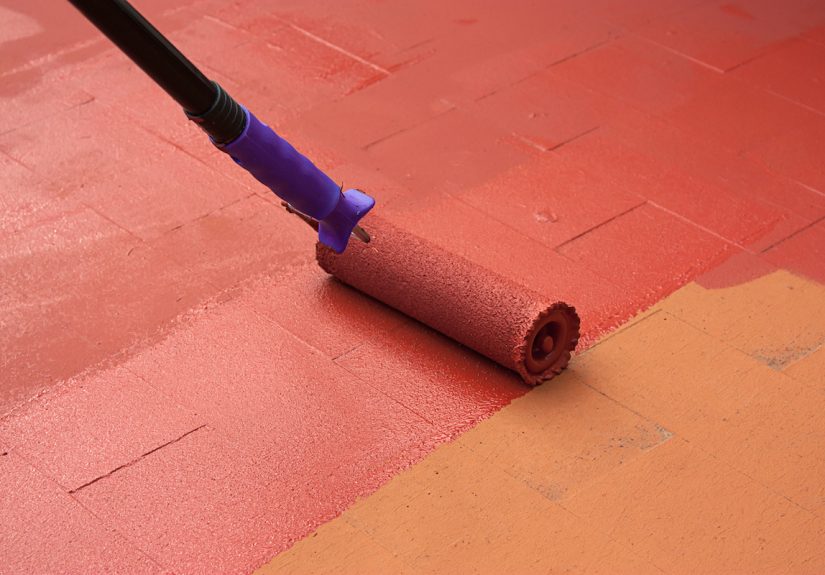
4. Apply the first textured coat
Use a roller or brush to apply the sanded paint in even strokes:
- Work in manageable sections, especially on large patios or decks.
- Maintain a wet edge to avoid lap marks.
- Watch out for clumps of sand and spread them out before the paint sets.
Once the first coat is down, allow it to dry fully according to the paint instructions. Cooler or
more humid conditions may stretch the dry time, so don’t rush itwalking or recoating too soon can
flatten the texture or leave marks.
5. Lock it in with a second coat (optional but recommended)
Many pros like to finish with a second coat of regular, sand-free paint over the textured base.
This helps:
- Encapsulate the sand so it doesn’t shed as easily
- Reduce the appearance of dark specks, especially with lighter colors
- Even out the sheen for a cleaner overall look
The traction comes mainly from the first textured coat, so the thin smooth coat on top doesn’t
erase the non-slip effectthink of it more as a protective glaze over a rough base.
Using Pre-Mixed Non-Skid Paints and Additives
If you’d rather not measure and mix sand yourself, you can get almost the same result (sometimes
better) with commercial non-skid systems:
-
Non-skid paint additives: Supplied in small bags or bottles, these are designed
to be poured into a gallon of compatible floor or deck paint. Instructions typically specify
how much additive to use per quart or gallon. -
Dedicated anti-slip coatings: Some products come pre-loaded with grit. You just
stir and apply. They’re popular for garages, workshops, and pool decks.
These options cost more than a bag of sandbox sand, but they save time and messy experimenting.
They’re especially handy when you want a finer, more refined texture or you’re coating a large,
high-visibility area where consistency matters.
Safety Tips and Common Mistakes to Avoid
Don’t overdo the sand
More sand doesn’t always mean more safety. Too much grit can create:
- A paint mix that’s hard to apply and prone to clumping
- Sharp, uncomfortable surfaces (ouch for bare feet or kids)
- Edges that snag mops, shovels, or snow blowers
Aim for enough texture to feel solid underfoot, not like walking on broken glass.
Respect curing time
Even when the paint feels dry to the touch, it may not be fully cured. Heavy traffic, dragging
furniture, or parking cars on the coating too soon can crush the texture and wear away the grit.
Follow the manufacturer’s recommendations for light foot traffic, full use, and vehicle traffic.
Consider cleaning and maintenance
Non-slip surfaces naturally collect more dirt in all those little bumps and valleys. That’s the
tradeoff for safety. Plan for:
- Occasional scrubbing with a stiff brush and mild detergent
- Rinsing away de-icing salts, chlorine, or chemicals that might damage the finish
- Repainting or recoating after a few years in harsh climates
Think of textured paint as a safety feature that may need periodic refreshing, especially in areas
with snow, ice, or constant moisture.
Where Sand-in-Paint Non-Slip Surfaces Work Best
1. Porch steps and exterior stairways
This is one of the most popular uses for sand in paint. Wooden steps that get rained on can be
treacherous, especially when leaves, mud, or snow get involved. A non-slip coating on the treads
gives visitors and family members a safer path into the house.
2. Decks and landings
On decks, you’ve got a balance to strike: enough texture for safety, but not so much that you hate
it when you’re barefoot. Many homeowners use sand or non-skid additives only on the key traffic
zonesnear doors, stairs, and gatesand stick with smoother finishes on the rest.
3. Concrete patios and walkways
Smooth concrete can be fine when dry but turn slick when algae, moss, or ice enter the picture.
A sanded paint or stain helps, especially on sloped sections or transition points like door
thresholds, ramps, or garage entries.
4. Garage floors and workshops
Garages see oil drips, melted snow, and spilled drinksbasically a slip festival waiting to happen.
Adding a grit additive to garage floor paint is a smart move in front of the workbench, at the
entry door, and where you frequently step when getting in and out of vehicles.
Real-World Experiences with Sand in Paint
The theory of “sand in paint” is straightforward, but the real learning happens when people use it
in their homes and report back what went right (and wrong). Here are some experience-based insights
that can help you dial in your own project.
Lesson 1: Test patches save you from regret
Many DIYers admit they wish they’d done a small test square before committing to a full flight of
stairs or a whole deck. In a test area, you can experiment with:
- Different sand amountslight texture vs. aggressive grip
- Application toolssome people prefer a thicker nap roller, others a brush
- Footwear feeltry it barefoot, in sandals, and in everyday shoes
It’s much easier to adjust your mix after one test patch than after you’ve coated every step and
your family complains that it feels like walking on sandpaper.
Lesson 2: Sprinkling vs. mixing
There are two main approaches to adding grit:
-
Mixing sand into the paint: Better for consistent texture over large areas. Once
dialed in, you just roll and go. -
Sprinkling sand onto wet paint: Handy for small zones like step treads. You paint
a smooth base coat, sprinkle sand while it’s wet, let it dry, then sweep off the excess and topcoat.
People who use the sprinkle method often like that they can concentrate the grit only where their
feet landon the front edge of steps, for examplewhile leaving risers or rail areas smoother and
easier to clean.
Lesson 3: Color and appearance tradeoffs
Sand and non-skid additives will change the look of your finish. With traditional sand, you may see
tiny dark specks in light-colored paint and a slightly flatter sheen. That’s not necessarily bad,
but it’s something to plan for, especially on front steps or highly visible porches.
If appearance is a big concern, consider:
- Using a tinted floor paint that’s a shade darker to disguise speckling
- Applying a final smooth topcoat over the textured base
- Using clear plastic or polymer additives that blend more seamlessly
In most cases, homeowners report that once they get used to the textured look, they stop noticing it
and appreciate the peace of mind more than the lost “perfectly smooth” finish.
Lesson 4: Comfort vs. safety
There’s always a balance between comfort and safety. Aggressive grit is great for work boots on a
wet ramp, but it’s less fun for bare feet coming in from the pool. That’s why many experienced users:
- Use heavier texture where safety is criticalramps, steep stairs, garage entries
- Use milder texture or no texture on lounging areasdeck seating zones, pool surrounds
- Divide surfaces into “pathways” and “relax zones” and coat them differently
Thinking about how you actually move through and use the space helps you decide where extra grip is
worth a little roughness.
Lesson 5: Long-term durability and touch-ups
Over time, high-traffic areas will polish down a bit, especially on edges where your heel lands or
where shovels, snow blowers, or furniture legs scrape the surface. Many people find that:
- The first year or two offers maximum grip, especially outdoors in harsh climates.
- After several seasons, a quick clean and a fresh textured coat on the worst spots restores traction.
-
Keeping a small container of leftover paint and sand (or additive) labeled with the exact ratio
makes spot repairs much easier.
In other words, think of your non-slip coating like tires: they wear over time. Refreshing the
surface every so often is normal and far cheaper than medical bills from a bad fall.
Final Thoughts
Adding sand to paint is a simple, budget-friendly way to turn slippery surfaces into safer ones.
With the right sand, compatible paint, smart mixing, and good prep, you can create a durable
non-slip finish on steps, decks, patios, and garages without hiring a pro or buying specialty
coatings. Start with test patches, adjust the texture to your comfort level, and don’t forget
regular cleaning and eventual touch-ups. Your future selfand your tailbonewill be grateful.