Table of Contents >> Show >> Hide
- What This Episode Actually Teaches (Beyond “Buy More 2x4s”)
- Part 1: Planting Arborvitaes for Privacy, Texture, and a Fence That’s Less… Fence-y
- Why Arborvitae Is a Privacy MVP
- Pick the Right Variety: Narrow and Neat vs. Big and Bold
- Spacing Isn’t a VibeIt’s a Health Decision
- Site Prep: Sun, Drainage, and the “Don’t Plant a Tree in a Swimming Pool” Rule
- Planting Technique: The Boring Steps That Decide Whether Your Hedge Thrives
- Watering: Your Hedge Needs Consistency, Not Occasional Panicked Flooding
- Winter Burn, Snow Load, and Deer: The Three Villains of the Evergreen Storyline
- Part 2: The Tote Storage Rack That Makes Every Bin Easy to Access
- Putting Both Projects Together: A Weekend Plan That Actually Makes Sense
- Quick FAQs
- Experiences From the Real World (What Homeowners Commonly Notice After Doing These Projects)
Some home-improvement episodes feel like a buffet: you show up for one thing and leave with three takeaways, a new shopping list,
and the sudden urge to label everything you own. Season 24, Episode 5 delivers that exact energypairing a backyard privacy upgrade
(planting a row of arborvitaes) with a shop/garage sanity-saver (a rolling tote storage rack). In other words: fix the outside view,
then fix the inside chaos. Balanced living.
What This Episode Actually Teaches (Beyond “Buy More 2x4s”)
The “Planting Arborvitaes, Tote Storage Rack” episode follows a simple, practical arc: create a greener, softer boundary along a fence,
then build storage that makes your bins usable instead of stackable regrets. The arborvitae segment focuses on choosing the right variety
for the yard and planting for long-term health, while the rack segment shows a tote-specific build with cleats and casters so every bin is
accessibleno more excavating the “winter decorations” tote from the bottom of Mount Plastic.
There’s also a quick detour into fireplace tools (tongs, pokers, screens, etc.). It’s the sort of reminder that homeownership is basically
a long-running series where each episode ends with: “Greatnow maintain it.”
Part 1: Planting Arborvitaes for Privacy, Texture, and a Fence That’s Less… Fence-y
Why Arborvitae Is a Privacy MVP
Arborvitae (often “Thuja”) is popular for one main reason: it’s an evergreen that naturally forms a dense wall of green. You get privacy
year-round, plus wind buffering and a softer backdrop for everything else in your yard. But the real secret is that arborvitae wins when
you match the variety to the space you actually havenot the space you wish you had.
Pick the Right Variety: Narrow and Neat vs. Big and Bold
The episode highlights a few common options homeowners compare:
-
‘Emerald Green’: A narrower, columnar option that’s often used when you want a tidy screen without sacrificing a ton
of yard width. -
American arborvitae types: Often fuller and potentially wider, depending on cultivargreat if you have room, less fun
if you’re trying to keep a walkway. - ‘Green Giant’: The “go big” choicefast-growing and tall, best when you’ve got the space for its mature footprint.
Here’s the practical way to choose: stand where you’ll actually livepatio, deck, kitchen sink windowand decide what you want to block:
neighbors’ patio? street headlights? the world? Then measure how much width you can spare for a living wall. Mature width matters as much
as height, especially if you want a hedge that stays healthy instead of becoming a cramped, brown, airless green traffic jam.
Spacing Isn’t a VibeIt’s a Health Decision
You’ll find different spacing advice depending on species and goal. Some guidance for hedge-style planting is in the 3–4 foot range for
narrower varieties, while wider, larger growers may be spaced farther apart. A solid rule of thumb from extension experts: don’t plant
closer than the tree’s mature width if you want a healthy shape and better airflow. For example, if a cultivar is expected to reach about
3–4 feet wide, planting at ~3 feet apart is often a reasonable minimum, and wider spacing can reduce disease risk over time.
The episode’s planting guidance also points out that for a thick hedge, some homeowners choose wider spacing (like 5–6 feet) depending on
the arborvitae type and the look they want as it fills in. The key is to match spacing to the cultivar’s mature size and your patience level:
tighter spacing fills faster but can create long-term crowding; wider spacing is healthier but asks you to wait a little longer.
Site Prep: Sun, Drainage, and the “Don’t Plant a Tree in a Swimming Pool” Rule
Arborvitae generally does best with good light (full sun is ideal for dense growth) and soil that holds moisture without staying soggy.
If your yard holds water after rain, fix drainage first or choose a better spot. Many arborvitae problems people blame on “bad luck” are
really “the roots were drowning quietly for months.”
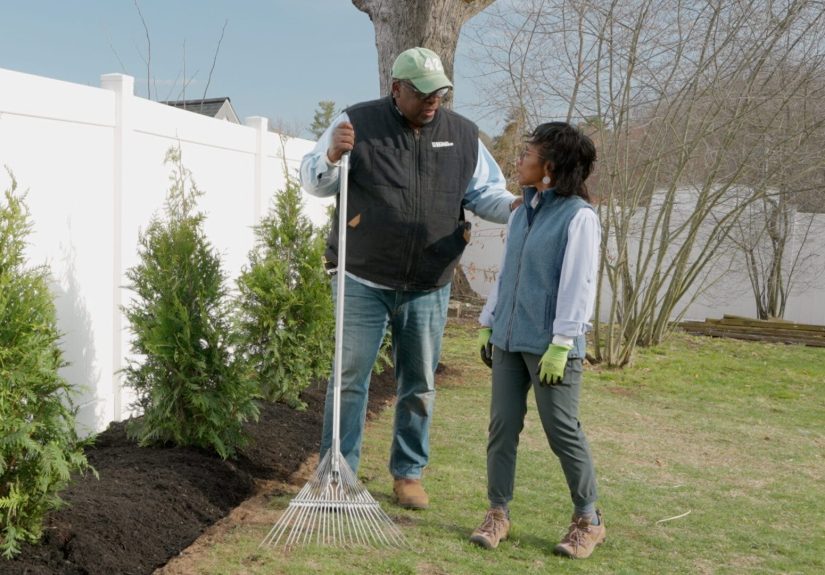
If you’re planting along a fence, also think about maintenance access. A hedge that’s jammed against a fence can be hard to prune, hard to
water evenly, and hard to inspect for pests. Leave yourself enough room to walk behind (if possible) or at least to direct water to the root zone.
Planting Technique: The Boring Steps That Decide Whether Your Hedge Thrives
Planting isn’t complicated, but it’s very specific. Most reliable guidance follows the same pattern:
- Lay out the row with a tape measure or string line so the spacing stays consistent (your eyes will lie to you by tree #4).
-
Dig wide, not deep. A common recommendation is a hole about twice as wide as the root ball, with depth set so the top of
the root ball sits slightly above the surrounding soil grade (often around an inch or two). - Loosen circling roots if the plant came from a containergently teasing or scratching the sides can help roots grow outward.
- Backfill and water in stages. Add soil, water to settle air pockets, finish backfilling, then water deeply again.
-
Mulch like a pro: a 2–3 inch layer helps conserve moisture, but keep mulch a few inches away from the trunk so you don’t
invite rot or pests.
One episode-style pro move: prep the bed first. Cutting sod, loosening soil, and mixing in compost can make planting easier and help young
trees establish. Think of it as setting up the “welcome packet” for roots.
Watering: Your Hedge Needs Consistency, Not Occasional Panicked Flooding
New plantings typically need steady moisture while roots establish. Some how-to guidance suggests daily watering for a short initial period
(like the first couple of weeks), followed by a slower, deeper routine. The goal isn’t to keep the surface wetit’s to keep the soil moist
deeper down. Extension guidance often emphasizes watering enough that moisture reaches well below the surface (around a foot deep), and
distributing water beyond the narrow canopy footprint since upright evergreens can have root zones that extend wider than they look.
If you want an easy mental model: shallow sprinkles train shallow roots; slow, deep watering encourages roots to explore. Soaker hoses and
slow trickle watering are popular because they reduce runoff and actually soak the root zone instead of the air.
Winter Burn, Snow Load, and Deer: The Three Villains of the Evergreen Storyline
Arborvitae can brown in winter for a few reasons, and one common culprit is winter burn: foliage loses moisture through transpiration when
the ground is frozen and roots can’t replace the water fast enoughespecially on windy or sunny exposures. University extension advice
repeatedly points to the same prevention basics: go into winter well-watered, mulch appropriately, and consider wind protection (like burlap
barriers) in harsh sites.
Snow and ice are another issue, especially for columnar arborvitae. Heavy loads can bend or split them. Some extension guidance recommends
wrapping or tying trees at the beginning of winter to keep branches together, then removing wraps when the season passes.
And then there’s deer. In many regions, arborvitae is basically a salad bar with excellent landscaping benefits. Fencing is consistently
described as the most reliable protection; repellents can be inconsistent and require frequent reapplication. If deer pressure is high,
plan protection from day onebecause the trees won’t grow back the parts that got eaten while you were inside making cocoa.
Part 2: The Tote Storage Rack That Makes Every Bin Easy to Access
Why “Just Stack Them” Fails in Real Life
Stacked totes are a classic organizational fantasy: tidy, uniform, and theoretically accessible. In practice, the bottom tote becomes a
sealed time capsule. You don’t open ityou eventually discover it during a move and learn you’ve been storing three identical extension cords
and a Halloween wig you don’t even remember buying.
The episode’s rack solves that by making each tote slide in and out on its own supports. No unstacking. No leaning tower of seasonal decor.
Just grab-and-go storage on wheels.
The Core Design: Cleats + Uprights + Casters = A Rolling Bin Library
The build is intentionally simple: 2×4 uprights form the frame, horizontal cleats support the tote lip, diagonal braces keep the rack square,
and casters let you roll it around a crowded garage or workshop. The “custom” part is sizing the cleat spacing to your actual totes, which
is exactly what makes it work so well.
Episode-Style Measurements (Example) You Can Adapt
One published set of example board measurements for the rack includes:
- (4) long boards around 67-1/2 inches
- (8) vertical boards around 33-1/2 inches
- (12) horizontal boards around 30 inches
- (4) diagonal braces around 17-1/2 inches with 45-degree miters
Don’t treat these numbers like sacred text. Treat them like a friendly starting point. The real “correct” measurement is: “fits your bins,
fits your space, and doesn’t wobble like a baby giraffe.”
How the Rack Gets Its “Perfect Fit”
The most useful technique in the build is the template board:
- Measure from the bottom of the tote to the underside of the tote lip, then add about 1 inch for breathing room.
- Mark those cleat positions on one upright 2×4 as your guide, then transfer marks to the rest so every row matches.
- Cut cleats based on tote depth (front to back) plus a little extra, then screw them to the uprights at each marked row.
This approach avoids the classic DIY trap of “measuring each side separately” (also known as “building a rack that only fits in one parallel universe”).
Once you have a template, you’re building consistentlyfast, square, and repeatable.
Stability and Safety: Make It Strong, Make It Square
A rolling rack needs three things: a square frame, solid fasteners, and a low center of gravity. The diagonal braces are what keep the rack from
racking (twisting out of square). Casters should be installed securely, and it’s smart to keep heavier totes on lower rows so the rack doesn’t
get top-heavy.
If your garage floor is uneven or you’ll be rolling over thresholds, consider locking castersbecause a storage rack that drifts away on its own
is less “organization win” and more “poltergeist documentary.”
Small Upgrades That Make the Rack Even Better
- Label consistently: big text on two sides so you can read it from any angle.
- Standardize bin sizes: the rack works best when totes are the same model.
- Zone your storage: holidays, camping, sports, toolskeep categories together so retrieval stays easy.
- Leave a “landing tote” space: a top surface or nearby shelf for sorting items in/out.
Putting Both Projects Together: A Weekend Plan That Actually Makes Sense
If you’re doing both projects in the same general season, here’s a surprisingly realistic sequence:
- Start outdoors: mark spacing, prep the bed, plant, water. Your future hedge gets established while you move to the next task.
- Switch indoors: build the rack while the mulch settles and your back gets a break from digging.
- End with organization: load the rack with the very bins you used to store garden supplies, holiday lights, and “mystery stuff.”
The nice part is the psychological loop: the arborvitaes make the yard feel more finished, while the rack makes the garage feel less chaotic.
That combination is a rare DIY double winvisible progress and functional progress.
Quick FAQs
When is the best time to plant arborvitae?
Many gardening references recommend early spring (after the last frost) or late fall, with the goal of giving roots time to establish without
extreme heat stress. Local climate matters, so choose a window when you can reliably water.
How far apart should I plant arborvitae for a privacy screen?
It depends on the cultivar’s mature width and how fast you want it to fill in. Narrow varieties are often planted closer (for example, around
3–4 feet for a hedge), while larger growers may be spaced farther apart (for example, 5–6 feet) to match their eventual size and reduce crowding.
Why are my arborvitae turning brown in winter?
Browning can be normal seasonal bronzing for some types, but one-sided or windward browning can indicate winter burnmoisture loss when roots
can’t replace water in frozen ground. Deep watering before freeze-up, mulching, and wind protection can help.
Can I cut arborvitae back hard if it gets too wide?
Be cautious. Some extension guidance notes that arborvitae won’t reliably push new growth from bare stems, so severe cutbacks can leave permanent
thin spots. Aim for light pruning and hinting the shape rather than “resetting” it.
How do I size the tote rack if my bins are different?
Use the template method: measure bottom-to-lip clearance on your tote, add a little space, mark those positions, and build every row to that exact
spacing. The bins decide the geometry, not your guess.
Do I need fancy tools for the tote rack?
Not really. A miter saw (or circular saw with a guide), drill/driver, square, tape measure, and clamps make it easier. The project is designed to
be straightforwardand forgivingas long as you keep measurements consistent.
Experiences From the Real World (What Homeowners Commonly Notice After Doing These Projects)
People who plant arborvitae for the first time often describe the same emotional arc: week one is pure optimism (“Look! A hedge!”), week three is
mild anxiety (“Why does that one look… moodier?”), and month three is the first real sigh of relief when the trees stop looking like temporary
guests and start looking like they belong. The most common “wish I’d known” is that the planting is the easy partconsistent watering is what
makes the difference. Homeowners who set up a soaker hose early tend to report fewer stress symptoms, fewer brown patches, and fewer late-night
panic searches for “arborvitae sadness causes.”
Another frequent experience is learning that spacing is a long game. Folks who plant tighter spacing for instant privacy love the early fullness,
but a few seasons later they sometimes notice thinning in the interior or increased need for careful pruning to maintain airflow. Meanwhile, the
people who spaced wider often complain at first that the row looks “too sparse”… and then, a couple of growing seasons later, they’re the ones
casually saying, “It filled in nicely,” like they weren’t measuring growth in millimeters while sipping coffee on the porch.
Winter protection stories are surprisingly consistent too. In windy or sunny exposures, some homeowners notice browning on the side facing the
harshest conditions, and they swear the trees look personally offended by February. The folks who water well going into freeze-up and add a simple
burlap windbreak tend to report better spring recovery. In snowy regions, people often learn the hard way that “columnar” doesn’t mean “invincible.”
Wrapping or tying trees before heavy snow becomes one of those habits that feels unnecessaryuntil the year it isn’t.
On the tote rack side, the most common reaction is immediate: “Why didn’t I do this sooner?” Because the first time you roll the rack out, slide a
bin, and access what you need without unstacking anything, it feels like you just unlocked a hidden level in adult life. People who previously used
tall stacks of bins often describe how their storage was technically organized but practically unusable. The rack changes that by making each tote
its own drawer.
DIYers also tend to get a little “extra” once the rack exists. Labels become bigger. Categories become more logical. Suddenly there’s a dedicated tote
for “cords and chargers,” another for “painting supplies,” and a third for “seasonal stuff I promise I’ll sort later.” Many homeowners mention that
the rack doesn’t just store binsit forces decisions. If a tote doesn’t fit a category, it either gets a new label or gets donated, tossed, or recycled.
That’s the sneaky power of a well-built storage system: it makes clutter visible, and then it politely dares you to do something about it.