Table of Contents >> Show >> Hide
- Why LED Filaments Look Like Movie Props
- The Core Trick: Your Brass Ring Is the Wiring
- Materials That Make It Work (and Still Feel Like a Ring)
- How to Build It (High-Level Steps, Maker-Level Tips)
- Electronics Reality Check (So It Glows, Not Smokes)
- Design Upgrades That Keep the “Artifact” Look
- Troubleshooting Checklist (Fast, Practical, No Drama)
- Conclusion: Small Build, Big Sci-Fi Energy
- Maker Notes: The Experience of Building a Retro-Futuristic LED Filament Ring (About )
- SEO Tags
Some DIY projects scream “science fair.” This one whispers “ancient space relic,” like you dug it out of a sand dune
next to a half-buried starship door. The secret sauce is LED filamentsthose eerie, even-glowing
strips you’ve seen inside “Edison-style” LED bulbscombined with a clever trick: the ring itself becomes the circuit.
No bulky LED strip. No pixel animation drama. Just a warm, mysterious glow that looks expensive, even if your budget
is “coin cell and courage.”
In this guide, we’ll break down how a retro-futuristic LED filament ring works, what materials make it wearable (and not
irritating), and how to build one with clean solder joints and fewer “why is it flickering?” moments. We’ll also cover
practical upgradesbecause every maker has that one voice in their head saying, “What if it had a dimmer?”
Why LED Filaments Look Like Movie Props
A typical LED looks like a dot. A filament LED looks like a line of lightmore like a tiny neon tube than a diode.
That’s the vibe: soft, continuous glow instead of “three bright points and sadness.” Filament-style LEDs are commonly
built from many tiny LED dies mounted along a rigid backing and sealed under a silicone-like coating. The result is a
uniform light bar that reads as “futuristic” even when it’s powered by something as humble as a 3V battery.
Filament LEDs vs. LED Strips vs. “Neon” Flex
- LED strips are flexible and easy, but they look… like LED strips. Great for under-cabinet lighting, less great for “found artifact.”
- Addressable pixels (like NeoPixels) can animate, but they require a controller and add bulk.
- LED filaments create a clean line of light with minimal hardwareperfect for jewelry-scale projects.
If you’re going for that “soft glow from a mysterious device” aesthetic, filaments get you there fast. You’re basically
borrowing the lighting language of modern sci-fi props: warm, organic tones; gold/brass accents; and illumination that
feels like it’s coming from inside the object rather than pasted on.
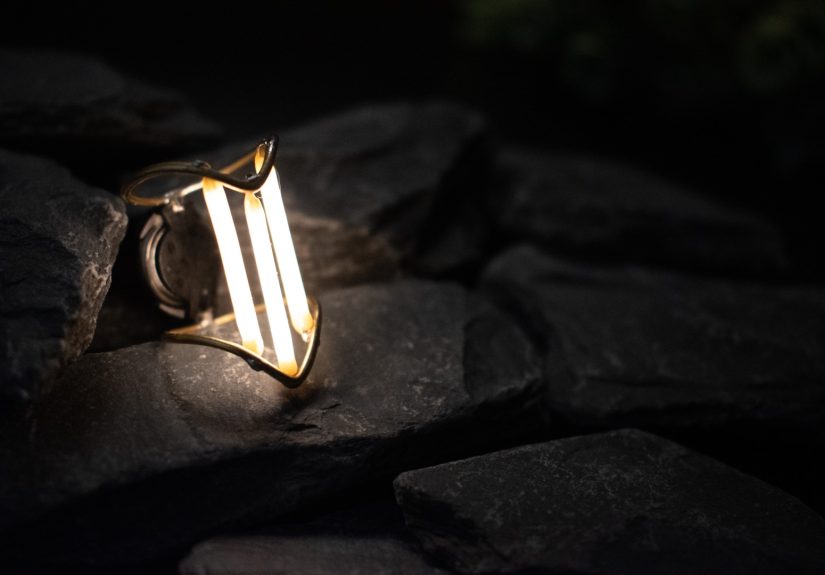
The Core Trick: Your Brass Ring Is the Wiring
The coolest engineering detail of this ring is also the simplest: brass conducts electricity, so you can use
the metal band as the positive and negative rails. Instead of hiding wires, you hide the circuit in plain sight.
Conceptually, the ring is two stacked metal loops (often shaped with a stylized “V” in front). LED filaments bridge the gap
between the loops at the front, and a small coin cell holder bridges them at the back. When the battery is in place,
current flows through the top loop, through the filaments, into the bottom loop, and back to the battery.
Translation: It’s jewelry and circuitry doing a buddy-cop movie together. One’s stylish. One’s responsible. Both glow.
Materials That Make It Work (and Still Feel Like a Ring)
You can build this in different ways, but the classic retro-futuristic version uses three short, rigid 3V LED filaments and a small
coin cell holder. Here’s what matters when choosing parts.
LED Filaments (3V, rigid, jewelry-friendly length)
Look for short filaments that can run from low voltage (around 3V). Many “bulb filaments” are designed for high-voltage bulb assemblies,
so you want the maker-friendly kind intended for small projects. Warm white gives the most “artifact” vibe; colored filaments can look
like cyberpunk candy (also valid).
Coin cell holder and battery
A low-profile SMD coin cell holder keeps the ring from turning into a knuckle-mounted brick. A thin coin cell (like the CR1220 size)
can work well for wearables, though it won’t deliver the same runtime or current as a thicker CR2032. That’s finethis is a ring, not
a lighthouse.
Brass rod (shapeable, solderable, looks expensive)
Brass is easy to form, easy to polish, and looks like it belongs in a sci-fi museum exhibit. Rod stock is sturdier than soft wire, which
helps the ring hold its shape. It also solders nicely with flux and a little patience.
Tools you’ll actually be glad you used
- Needlenose pliers for sharp bends and fine positioning.
- Round/loop forming pliers (or wrapper pliers) for consistent curves.
- Flush cutters so your ends aren’t tiny brass spears.
- Flux (water-soluble is convenient) for clean joints on brass and pads.
- Fume control (a small extractor or fan) because solder smoke should not be part of your “signature scent.”
- Fine sandpaper + steel wool to de-burr and bring out that warm brass shine.
How to Build It (High-Level Steps, Maker-Level Tips)
The build is straightforward, but it rewards careful alignment. LED filaments are fragile, and jewelry-scale soldering is basically
soldering on hard modelike regular soldering, but your parts can launch themselves into another dimension if you sneeze.
1) Form two matching “V” rings
Cut your brass rod long enough to size to your finger. Bend a clean “V” for the front profile, then curve each side into a ring shape.
Use a ring mandrel if you have one; if you don’t, a smooth marker barrel can stand in. Size slightly larger than your usual fit to account
for the thickness of the filaments and solder joints.
Make a second ring that matches the first as closely as possible. If they’re slightly different, don’t panichandmade objects are allowed
to look handmade. (That’s why we call it “craft” and not “mass manufacturing.”)
2) Attach the top ring to the battery holder
Position one ring so it solders to the coin cell holder pad that corresponds to one battery terminal. Use a third-hand tool to hold it steady.
Add a tiny bit of flux, heat the joint, then feed solder into the joint (not onto the iron like you’re icing a cupcake). Aim for a solid fillet
of solder that grips both the brass and the pad.
3) Solder the LED filaments (and respect their feelings)
LED filaments often have polarity markings on their solder pads. Identify which end is positive and which is negative before you commit.
Plan the orientation so all filaments are consistent and the solder pads tuck neatly behind the brass where possible.
Align the first filament at the center of the “V” so it sits roughly parallel to the battery holder. Add flux, heat gently, and solder quickly.
Repeat for the two side filaments, creating a three-bar “cage” of light. If alignment is fighting you, use heat-resistant tape as a temporary
“third hand.”
Testing tip: Before closing the circuit, test each filament with a 3V source using alligator clips. You’ll catch polarity issues and
weak joints earlywhen fixing them is still emotionally affordable.
4) Add the bottom ring to complete the circuit
This is the slightly tricky part: you’re soldering the second ring so it contacts the remaining ends of the filaments at the front and solders to the
other battery holder terminal at the back. Take your time. Small gaps can be filled with solder, but large misalignment usually becomes a “rebuild”
problem.
5) Clean, smooth, polish
Smooth any sharp solder points or cut ends with fine sandpaper. Then polish the brass with steel wool to bring back the glow of the metal itself.
Clean flux residue thoroughlyespecially if you used water-soluble fluxso it doesn’t keep reacting with the metal over time.
Electronics Reality Check (So It Glows, Not Smokes)
LEDs are current-driven devices. That’s why you’ll often see advice to use constant-current drivers for stable brightness and LED longevity.
In small wearable builds, you can sometimes lean on the internal resistance and limited current capability of a coin cell batteryespecially with low-power
filamentsso the circuit stays within a safe-ish operating range.
Do you need a resistor?
Best practice is to limit LED current intentionally, usually with a resistor or a constant-current circuit. Some 3V LED filament products recommend
current limiting to keep current below a specified maximum. If your ring is bright enough without a resistor (common with coin cells), you may choose to
keep the build minimal. If you want more control, longer LED life, or you’re using a beefier battery than a coin cell, add current limiting.
Why coin cells behave “nice” in tiny LED projects
Coin cells are great for compact wearables because they’re small and simple, but they also have limits: they don’t love delivering high current.
That limitation often acts like an invisible “safety leash” for small LED loads. The tradeoff is that voltage can sag as the battery drains, so brightness
gradually fadesless “sudden failure,” more “dying spaceship dashboard.”
Flicker and weird brightness: what it usually means
- Flicker when you move the ring: cracked filament or a marginal solder joint.
- Only one filament lights: polarity mismatch, broken connection, or a short bypassing the others.
- It lights, then goes out: battery contact issue or a near-short pulling the voltage down.
Design Upgrades That Keep the “Artifact” Look
Once you’ve built one working ring, you’ll immediately want to build the “director’s cut.” Here are upgrades that add function without ruining the aesthetic.
Add a stealthy on/off switch
A micro slide switch can be hidden near the battery holder or integrated into a small decorative element on the back. Your battery will thank you.
Your future self will also thank you when you don’t have to pop out a tiny coin cell with your fingernails like you’re defusing a miniature bomb.
Use a dimmer (without turning it into a gadget watch)
A simple series resistor can reduce brightness and extend runtime. If you want adjustable dimming, a tiny constant-current driver or a small PWM controller
can workthough that’s where the project starts drifting from “minimal jewelry” into “wearable electronics device.” Not bad, just a different vibe.
Swap materials for different moods
- Brass: warm, antique, Dune-adjacent.
- Copper: dramatic patina potential, more “ancient tech.”
- Stainless steel: sleeker, harder to solder, more “clean future.”
Protect and diffuse
Filaments are delicate. If you want extra durability, consider a clear protective coating over the solder joints (used carefully) or a mechanical guard
design where the brass slightly shields the filament edges. If you want a softer glow, a subtle diffuser element (clear resin, frosted sleeve, or a thin
translucent layer) can make it look even more “prop department.”
Troubleshooting Checklist (Fast, Practical, No Drama)
- Check battery orientation in the holder. (Yes, really. Half of electronics is “is it plugged in?”)
- Confirm polarity of each filament and that all are oriented consistently.
- Inspect solder joints for dull, grainy “cold joints.” Reflow with flux if needed.
- Look for accidental shorts where solder bridges between the two brass rings or across a battery pad.
- Test filaments individually with a known 3V source before reassembling.
- Replace the battery if brightness is weakcoin cells can look fine and still be tired.
Conclusion: Small Build, Big Sci-Fi Energy
A retro-futuristic LED filament ring hits a sweet spot: it’s wearable, it’s visually striking, and it teaches real electronics skillspolarity, soldering,
mechanical design, and the slightly spiritual practice of aligning tiny parts while staying calm.
The end result can feel shockingly “produced” for a DIY build. A warm glow framed by polished brass doesn’t read as a hobby projectit reads as a thing
with a backstory. And honestly, that’s the best kind of maker magic: you build it on your desk, then it looks like it belongs on screen.
Maker Notes: The Experience of Building a Retro-Futuristic LED Filament Ring (About )
The first time you hold an LED filament in tweezers, you’ll understand why makers talk to inanimate objects. You’ll say things like,
“Okay, buddy… just stay right there,” as if the filament can hear you and is choosing to misbehave out of spite. It’s delicate, lightweight,
and just rigid enough to feel confidentuntil it isn’t. The trick is to treat it like a tiny piece of stained glass: support it, don’t flex it,
and don’t assume it will forgive you for rushing.
Shaping the brass is the surprisingly satisfying part. There’s a moment where the rod stops being “hardware store material” and starts becoming
“jewelry.” You make one bend, then another, and suddenly you’re staring at a form that looks intentional. You’ll probably resize it twice:
once because it’s too small, and again because you remembered solder blobs and filament thickness aren’t imaginary. If you’re using a mandrel,
it feels like cheating in the best waylike using a jig in woodworking. If you’re using your finger, it feels like an ancient tradition:
“We measure by vibes now.”
Then comes alignmentthe stage where time becomes soup. Getting the first filament to sit neatly in the “V” is a little victory that deserves
applause from a tiny audience of your own self-respect. Adding the side filaments is where you learn patience, because they want to tilt,
drift, or hover a millimeter away from where solder would actually help. This is also where you discover the real value of flux: without it,
solder behaves like a stubborn cat. With it, solder flows where you need it, and you briefly feel like a wizard.
The best moment is the first test. You touch power to the circuit and the filaments light up instantlyno warmup, no apologyjust a clean,
buttery glow. The brass catches the light and looks warmer, richer, almost gold. It’s hard not to grin. You will absolutely turn off the room
lights to see it properly. You will absolutely hold it at different angles and pretend you’re inspecting a “recovered device.” This is normal.
Wearing it is its own weird joy. People notice it, but not in the “blinky toy” waymore like, “Wait, what is that?” It reads as fashion first,
electronics second. It also changes how you move your hand: you become careful, like you’re carrying a tiny secret. And at some pointmaybe
while you’re washing your hands (don’t do that with the ring on), or pulling a jacket sleeve downyou’ll catch yourself thinking about version two:
cleaner joints, tighter symmetry, maybe a switch, maybe a different filament color. That’s the maker cycle. The project ends… and immediately begins again.