Table of Contents >> Show >> Hide
- What Makes Red Velvet… Red Velvet?
- Ingredients You’ll Need
- Tools That Make This Easier
- Step-by-Step: Classic Red Velvet Cake
- Frosting Options (Choose Your Fighter)
- Assembling the Cake (Clean Layers, No Panic)
- Common Mistakes (And How to Fix Them)
- Variations You Can Pull Off Without Summoning Baking Chaos
- Storage and Make-Ahead Tips
- FAQ: Quick Answers for Busy Bakers
- Conclusion: Your Red Velvet Era Starts Now
- Real-World Experiences: What Baking Red Velvet Is Actually Like (500-ish Words of Truth)
Red velvet cake is the kind of dessert that walks into a room wearing a red blazer and somehow pulls it off. It’s not “just chocolate cake with dye” (rude), and it’s not “vanilla cake pretending to be dramatic” (also rude). It’s its own thing: tender, tangy, lightly cocoa-kissed, and usually wearing a cloud of frosting like it pays rent there.
This guide gives you a classic, bakery-style red velvet cake recipe with a velvety crumb, a vibrant (not neon) red color, and your choice of frostingcream cheese frosting (modern favorite) or ermine frosting (old-school icon). Along the way, you’ll get the “why” behind the ingredients, the “how” behind the technique, and the “help” for when a cake decides to be moody.
What Makes Red Velvet… Red Velvet?
Flavor: cocoa + vanilla + tang
A good red velvet tastes like a very mild chocolate cake that went to finishing school: subtle cocoa, sweet vanilla, and a gentle tang from buttermilk and a splash of vinegar. The goal isn’t chocolate overload it’s balance and softness.
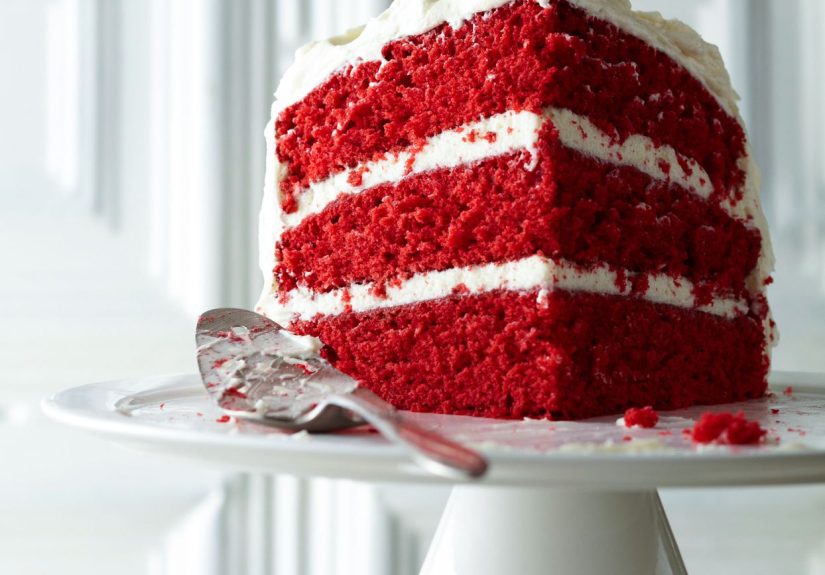
Texture: the “velvet” part is real
The signature crumb comes from a few factors working together: acidic ingredients that tenderize the batter, careful mixing (less is more), and the right flour-to-fat-to-liquid balance. The result should slice cleanly and feel plushnot dense, not dry, not bouncy like a trampoline.
Color: chemistry + a little help
Historically, the reddish tint came partly from a reaction between natural cocoa and acidic ingredients. Modern recipes typically use red food coloring for reliable color. If you prefer natural options, you can use beet-based coloring, but expect a deeper burgundy and slightly different shade (still gorgeous, still edible, still not a crime).
Ingredients You’ll Need
This recipe makes two 8-inch layers (or two 9-inch layers, slightly thinner). Serves about 10–12 generous slices. For best results, use a kitchen scalebecause flour has a long history of lying in measuring cups.
For the Red Velvet Cake
- Cake flour 2 1/2 cups (300g) (see swap below if you only have all-purpose)
- Natural unsweetened cocoa powder 2 tablespoons (10g) (not Dutch-processed if you can help it)
- Baking soda 1 teaspoon
- Fine salt 1/2 teaspoon
- Unsalted butter (room temp) 1/2 cup (113g)
- Neutral oil (canola/vegetable) 1/2 cup (120ml)
- Granulated sugar 1 1/2 cups (300g)
- Eggs (room temp) 2 large
- Vanilla extract 2 teaspoons
- White vinegar 1 tablespoon
- Buttermilk (room temp) 1 cup (240ml)
- Red food coloring gel preferred (1 to 2 teaspoons) or liquid (2 to 3 tablespoons)
Quick swaps (because real life happens)
- No cake flour? Use 2 1/2 cups all-purpose flour, and for a softer crumb, replace 5 tablespoons of that flour with 5 tablespoons cornstarch (then whisk well).
- No buttermilk? Add 1 tablespoon lemon juice or vinegar to 1 cup milk, stir, and wait 5–10 minutes. It’s not identical, but it’s a solid backup singer.
- Want extra moisture? Add 1/4 cup sour cream (60g) and reduce buttermilk to 3/4 cup (180ml).
Tools That Make This Easier
- Two 8-inch (or 9-inch) round cake pans
- Parchment paper rounds
- Stand mixer or hand mixer
- Whisk + rubber spatula
- Kitchen scale (strongly recommended)
- Cooling racks
Step-by-Step: Classic Red Velvet Cake
1) Prep the pans and oven
- Preheat oven to 350°F (177°C).
- Grease two round cake pans, line with parchment, then lightly grease the parchment.
- If you have cake strips, soak and wrap them for flatter layers (optional but nice).
2) Mix the dry ingredients
In a bowl, whisk together the cake flour, cocoa powder, baking soda, and salt. Set aside. (Whisking is basically sifting with confidence.)
3) Cream butter, sugar, then add oil
In a large mixing bowl, beat the butter and sugar until light and fluffy, about 2–3 minutes. Add the oil and beat 30 seconds more. This butter+oil combo helps you get both flavor and moisture.
4) Add eggs, vanilla, vinegar, and color
Beat in eggs one at a time. Add vanilla and vinegar. Then add your red coloring. Gel coloring gives strong color without watering down the batter; start with 1 teaspoon, then increase if you want deeper red.
5) Alternate dry ingredients and buttermilk
With the mixer on low, add the dry mixture in three additions, alternating with the buttermilk in two additions. Start and end with dry. Mix only until just combined. Overmixing is how you accidentally invent “red velvet brick.”
6) Bake
Divide batter evenly between pans. Bake 24–30 minutes for 8-inch pans (slightly less for 9-inch), or until a toothpick comes out with a few moist crumbs (not wet batter).
7) Cool completely
Cool in pans 10–15 minutes, then turn out onto racks. Let layers cool completely before frosting, unless you enjoy watching frosting melt in real time like a tiny dairy avalanche.
Frosting Options (Choose Your Fighter)
Option A: Classic Cream Cheese Frosting (Most Popular)
This is the modern classic: tangy, creamy, and perfect with that subtle cocoa flavor. Use brick-style cream cheese (not spreadable tub cream cheese) for structure.
Ingredients
- Cream cheese (brick-style) 16 oz (452g), cool room temp
- Unsalted butter 1 cup (226g), room temp
- Powdered sugar 4 1/2 cups (about 540g), sifted
- Vanilla extract 2 teaspoons
- Fine salt 1/4 teaspoon
Instructions
- Beat butter until smooth, then add cream cheese and beat until combined (don’t overbeat).
- Add powdered sugar gradually on low speed, then vanilla and salt.
- If it feels too soft to pipe, chill 15–20 minutes, then re-whip briefly.
Option B: Ermine Frosting (The “Original” Vibe)
Ermine frosting (also called flour frosting) is lighter and less sweet than many buttercreams. It’s silky, old-fashioned, and wildly underratedlike your friend who brings snacks and never asks for credit.
Ingredients
- Whole milk 1 cup (240ml)
- Granulated sugar 1 cup (200g), divided
- All-purpose flour 5 tablespoons (40g)
- Unsalted butter 1 cup (226g), room temp
- Vanilla extract 2 teaspoons
- Pinch of salt
Instructions
- In a saucepan, whisk flour with about half the sugar. Gradually whisk in milk.
- Cook over medium heat, whisking constantly, until thick like pudding. Remove from heat.
- Press plastic wrap directly onto the surface and cool completely (room temp).
- Beat butter with remaining sugar until fluffy, then beat in the cooled milk paste a spoonful at a time.
- Add vanilla and salt. Beat until airy and smooth.
Assembling the Cake (Clean Layers, No Panic)
- Level the cakes if they domed (a serrated knife works).
- Place one layer on a plate or stand. Add a generous layer of frosting.
- Top with the second layer, then do a thin crumb coat.
- Chill 15–20 minutes, then frost the final coat.
- Optional but cute: press cake crumbs or red velvet crumbs onto the sides, pipe borders, or add berries. (No one has ever been mad at cake wearing accessories.)
Common Mistakes (And How to Fix Them)
“My cake is dry.”
- Most common cause: overbaking. Pull the layers when a tester has moist crumbs.
- Measure flour by weight if possible; too much flour dries cakes fast.
- Don’t skip the oilit helps moisture stay longer than butter alone.
“My frosting is runny.”
- Cream cheese frosting softens quickly if overbeaten or too warm. Chill it briefly, then re-whip.
- Use brick-style cream cheese. Tub versions contain more water and can get loose.
- In warm kitchens, chill the cake between steps and keep frosting cool.
“The color is brownish, not red.”
- Use natural cocoa instead of Dutch-process if you want brighter red.
- Gel coloring is more concentrated and less likely to dilute the batter.
- Don’t add too much cocoa. Red velvet is subtlesave the cocoa fireworks for brownies.
“It tastes like nothing.”
- Use real buttermilk, a good vanilla extract, and don’t skip the salt.
- Make sure your cocoa isn’t ancient. Old cocoa tastes like dusty regret.
- Let the frosted cake sit 30–60 minutes before serving so flavors settle.
Variations You Can Pull Off Without Summoning Baking Chaos
Sheet cake
Pour batter into a greased and lined 9×13 pan and bake about 28–35 minutes. Great for parties, potlucks, or any event where you’d rather not transport a layered masterpiece like it’s a newborn.
Cupcakes
Fill liners 2/3 full and bake around 18–22 minutes. Frost after fully cool. Cupcakes are basically cake’s portable formlike a snack with a diploma.
Natural red velvet
If you want to skip artificial dyes, use beet-based powder or natural red coloring. Expect a deeper burgundy shade. Flavor can change slightly depending on the coloringkeep cocoa subtle and let vanilla and tang lead.
Storage and Make-Ahead Tips
- Room temperature: Unfrosted layers can sit (wrapped) for 1 day. If using cream cheese frosting, keep the finished cake cool and don’t leave it out for long stretches.
- Refrigerator: Store frosted cake covered for up to 4–5 days. For best texture, let slices sit at room temp 30–60 minutes before eating.
- Freezer: Freeze unfrosted layers tightly wrapped up to 2 months. Thaw overnight in the fridge, then bring to room temp before frosting.
FAQ: Quick Answers for Busy Bakers
Is red velvet cake chocolate cake?
Kind of… but not really. It has cocoa, but it’s mild. Red velvet is more about a tender crumb and tangy notes than a bold chocolate punch.
Do I really need vinegar?
It’s a small amount, but it helps with tenderness and works with baking soda for lift. You won’t taste “salad,” promise.
Can I use Dutch-process cocoa?
You can, but the color and acidity balance may shift. If you want that classic bright red look, natural cocoa is the safer bet.
What frosting is “traditional”?
Many older versions used ermine frosting; cream cheese frosting became the modern mainstream favorite. The good news: both are excellent, and cake is not a court of law.
Conclusion: Your Red Velvet Era Starts Now
A truly great red velvet cake recipe is about more than color. It’s tender crumb, gentle cocoa, a tangy edge, and frosting that makes every slice feel like a celebrationeven if the celebration is “I survived Tuesday.” Whether you go classic with cream cheese frosting or lean vintage with ermine, the key is simple: measure well, don’t overmix, cool completely, and let the cake be the velvet star it was born to be.
Real-World Experiences: What Baking Red Velvet Is Actually Like (500-ish Words of Truth)
Let’s talk about the part recipes don’t always say out loud: red velvet cake has a personality. Not a bad onemore like a charming friend who shows up fashionably late and still looks amazing. The first “experience” many bakers have is realizing that the batter is ridiculously smooth and pretty. It’s also the moment you discover red food coloring has the stealth skills of a secret agent. One tiny smear on your finger becomes a crime scene reenactment on your apron, your phone screen, and somehow your forehead. Pro tip: gloves, or at least a strong commitment to hand soap.
Another common experience: the “Is it done yet?” stare-down. Red velvet layers can look finished on top while the center is still deciding what it wants to be when it grows up. The toothpick test matters. Pull the cake when you see moist crumbsif you wait for a totally clean pick, you might be waiting until it’s a tad overbaked. And overbaked red velvet is heartbreak in HD because the crumb should be plush. If you’ve ever had a slice that felt a little dry, it’s usually not because the recipe is cursedit’s just time and temperature being dramatic.
Frosting brings its own set of “character-building moments.” Cream cheese frosting is delicious, but it can go soft if your kitchen is warm. Bakers often learn (sometimes the hard way) that chilling is not failure; it’s strategy. If the frosting feels loose, you chill it and suddenly you’re a calm, capable adult again. Ermine frosting, on the other hand, feels like wizardry the first time you make it: you cook flour and milk into a paste, cool it down, whip it into butter, andsomehowend up with a frosting that’s airy and smooth. The experience is equal parts “I am a pastry genius” and “How is this legal?”
Then there’s the color journey. Some bakers want deep ruby red; others want a more natural burgundy. The experience here is learning that cocoa and coloring are a balancing act. Add too much cocoa and your red leans brown. Add too much liquid coloring and you risk thinning the batter. That’s why so many people end up switching to gel coloring after a few tries: it’s concentrated, predictable, and doesn’t ask you to sacrifice texture for aesthetics. If you go the natural route with beet-based color, the experience is usually “This is gorgeous… and slightly more muted than the photos online.” That’s normal. Natural colors are more vintage postcard than neon billboard.
Finally, the most universal experience: serving it. Red velvet cake tends to get a reaction. People see the slice, then the frosting, then they suddenly remember a birthday, a holiday, or a movie scene involving an absurdly themed cake. And even if you’re not baking it for a big occasion, it has that “special event” energy. The best part? Once you’ve made it once, you’ll start tweaking itslightly more tang, a little less sweetness, a different frosting, maybe cupcakes for a party. Red velvet becomes less of a recipe you follow and more of a dessert you own. And honestly, that’s the whole point.