Table of Contents >> Show >> Hide
- What “Eco-Friendly” Means in Plush-Making (Without the Fairy Dust)
- A Quick Reality Check: How to Avoid “Greenwashing” When Buying Materials
- Materials: My Eco-Friendly Plush Deer Shopping List
- Toy Safety Basics (Yes, Even for “Just a Gift”)
- Designing Your Deer: Simple Pattern Pieces That Look Fancy
- Step-by-Step: How I Sew a Cuddly Eco-Friendly Stuffed Deer
- Step 1: Pre-wash and prep your fabric
- Step 2: Cut efficiently (save scraps on purpose)
- Step 3: Build the head first (it sets the “aww” factor)
- Step 4: Add the face (embroidered features are the eco-hero move)
- Step 5: Make ears (and let them flop like a real woodland cutie)
- Step 6: Optional antlers (soft, safe, and still deer-ish)
- Step 7: Assemble the body
- Step 8: Attach head and ears
- Step 9: Stuff strategically (the secret is “small amounts, often”)
- Step 10: Close the opening with a ladder stitch
- Eco-Friendly Finishing Touches That Make the Deer Look “Pro”
- Care and Repair: The Most Sustainable Deer Is the One You Can Fix
- Conclusion: Your Deer, Your Values, Your Best Next Step
- Studio Experiences: of Real-Life Lessons From Making Eco-Friendly Stuffed Deer
There are two kinds of stuffed animals: the ones you lovingly hand to a kid (or a very lucky adult) and the ones that
immediately become “the emotional support deer” and get dragged through car seats, couch cushions, and at least one
suspicious puddle. This guide is for making the second kindsoft, durable, washable, and thoughtfully made with
eco-friendly materials that actually hold up to real life.
I’m going to show you how I build a cuddly stuffed deer using sustainable fabric choices, safer notions, and
practical construction tricks. We’ll talk greenwashing (because “eco” isn’t a magic spell), toy safety basics, and
how to choose stuffing that’s kinder to the planet and still gives you that perfect squish.
What “Eco-Friendly” Means in Plush-Making (Without the Fairy Dust)
Eco-friendly plush is less about being perfect and more about being intentional. In practice, that usually means:
- Lower-impact fibers (organic, recycled, or responsibly sourced)
- Safer chemistry (choosing certified textiles and gentler cleaners/dyes when possible)
- Longer life (strong seams and repair-friendly design so the toy doesn’t become landfill confetti)
- Less waste (upcycling fabric, efficient pattern layout, and using scraps creatively)
The most sustainable stuffed deer is the one that lasts. If you make a toy that survives years of hugs, you’ve already
done something meaningfulno halo required.
A Quick Reality Check: How to Avoid “Greenwashing” When Buying Materials
If a product claims it’s “green,” “eco,” or “earth friendly” but can’t explain why, treat it like a cat
pretending it didn’t knock your water glass off the table: suspicious until proven otherwise.
Look for specific, verifiable claims
- Organic textiles: Look for recognized standards (for example, GOTS) and clear fiber percentages
rather than vague “made with organic materials.” - Recycled content: Favor labeling that states how much recycled content is included and
whether it refers to the product itself or packaging. - Textile safety: Certifications that test for harmful substances can be especially helpful for items
intended for lots of skin contact.
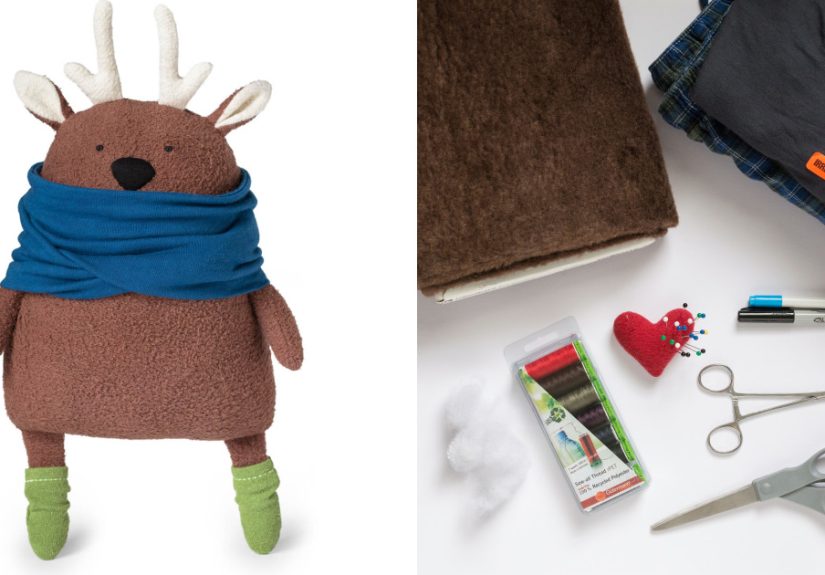
Materials: My Eco-Friendly Plush Deer Shopping List
You can make a deer from many fabrics (fleece, minky, felt, flannel, sweater knit). The eco-friendly approach is about
choosing the best available option for your budget and access.
Fabric options (outer shell)
- Upcycled sweaters (wool or cotton): cozy texture, forgiving stretch, and a great way to reuse a
“too-itchy-to-wear” knit. Bonus: your deer can look like it came straight from a storybook. - Organic cotton fleece or flannel: soft, breathable, and widely available. Great for baby-safe
plushies when paired with embroidered features. - Linen/cotton blends or hemp blends: durable and charmingly rustic. Works well for a “woodland
heirloom deer” vibe (especially with a softer lining or a brushed finish). - Wool felt (or felted wool): excellent for sculpted shapes (ears, antlers), clean edges, and less
fraying. Choose quality felt so it doesn’t pill after three hugs.
Stuffing options (choose your squish personality)
- Recycled polyester fiberfill: widely available, washable, and great for a classic plush feel.
- Wool stuffing/batting: springy and breathable; gives a slightly firmer, “heirloom” feel.
- Kapok fiber: a plant-based fill that’s lightweight and fluffy. It can feel a bit “buoyant” and may
shift if understuffed, so it benefits from careful packing. - Scrap stuffing (fabric scraps, thread ends, clean old T-shirts): best for small accent areas or
firm parts (like antlers), not for the whole body unless you’re making a more sculptural toy.
Notions and tools
- Thread: high-quality polyester thread or strong cotton-wrapped poly for durability
- Needles: universal or ballpoint (for knits), plus hand-sewing needles for ladder stitch
- Stuffing tools: chopstick, hemostats, or a stuffing fork (aka “the magical snack tongs of plush-making”)
- Eyes/nose: embroidered (safest), or safety eyes only for older age groups and with proper installation
- Optional: fabric marker/chalk, pinking shears, small embroidery hoop
Toy Safety Basics (Yes, Even for “Just a Gift”)
If a child will use the toyespecially under age 3design choices matter. Small parts (like buttons, loose bows,
poorly attached eyes) can pose hazards if they detach. Strong seams and embroidered features are your best friends.
- For babies and toddlers: embroider eyes and nose; avoid detachable parts and long cords/ribbons.
- Reinforce seams: short stitch length, backstitch at stress points, and consider double stitching in high-tug zones.
- Choose washable materials: because life happens, and sometimes life happens with jam.
Designing Your Deer: Simple Pattern Pieces That Look Fancy
A deer looks “deer-like” thanks to a few signature shapes: a tapered face, long ears, and (optionally) antlers.
The good news is you don’t need a complicated pattern to get a charming result.
Basic pattern pieces
- Body: two mirrored body pieces (like a rounded teardrop with a neck)
- Gusset (optional): a belly strip that adds a 3D shape (recommended for a plumper deer)
- Head: two side panels + a center strip (gives you a lovely rounded snout)
- Ears: two ear shapes (outer + inner contrast)
- Legs: simple tubes (or “bean legs” if you want a floppier deer)
- Antlers: felt or fabric (optional; easiest as a soft applique style)
Pro tip: Keep your first deer pattern chunky. Tiny ankles and delicate antlers are adorable…
until you’re turning them right-side-out and negotiating with the laws of physics.
Step-by-Step: How I Sew a Cuddly Eco-Friendly Stuffed Deer
Step 1: Pre-wash and prep your fabric
Wash your fabric the way you expect the finished toy to be washed. This helps remove residual manufacturing finishes,
shrinks the fabric before sewing, and reduces surprises later. For upcycled sweaters, wash and dry first, then test
for pilling. If it pills easily, reserve it for accents (ears, belly patch) rather than the whole body.
Step 2: Cut efficiently (save scraps on purpose)
Layout your pieces so you waste less fabric. Keep small offcutsfelt scraps become antlers, tiny fabric bits become
cheeks, and narrow strips become decorative scarf details. Your scrap bin is basically a buffet for future projects.
Step 3: Build the head first (it sets the “aww” factor)
- Sew the center head strip to one side panel (right sides together), easing curves gently.
- Sew the other side panel to the center strip, forming a rounded head “shell.”
- Clip curves (carefully) so seams lie smoothly when turned.
If you’re working with a knit sweater fabric, use a slightly longer stitch and a ballpoint needle to reduce skipped
stitches and avoid popping seams.
Step 4: Add the face (embroidered features are the eco-hero move)
Embroidered eyes and noses are durable and baby-friendly. Here’s an easy approach:
- Eyes: satin stitch ovals or simple sleepy arcs (backstitch works too)
- Nose: a small triangle or rounded “button” nose in dark brown/charcoal thread
- Mouth: a short stitched line with a tiny “Y” split
Want extra personality? Add blush spots using a small scrap of pink fabric as applique (stitched down) instead of
makeup or chalk that may rub off.
Step 5: Make ears (and let them flop like a real woodland cutie)
- Place inner ear on outer ear piece (right side up) and stitch around the edge for a clean framed look.
- Put two ear pieces right sides together; sew around, leaving the base open.
- Turn right-side-out, press lightly, and fold a small pleat at the base for dimension.
Step 6: Optional antlers (soft, safe, and still deer-ish)
For younger kids, skip antlers or make them as soft felt shapes stitched securely to the head (no stuffing, no points).
For older recipients, you can lightly stuff antlers for dimensionjust keep the shape rounded.
Step 7: Assemble the body
If you’re using a belly gusset, sew it to one body side first, then attach the second body side. If not, just sew the
two mirrored body pieces together, leaving an opening for turning and stuffing (usually along the back or base).
Step 8: Attach head and ears
Baste ears in place on the head (inside the seam allowance) so they don’t shift. Then attach the head to the body,
matching center points: chin to chest, back of head to back seam. Go slowcurves are where plushies either glow or
become abstract art.
Step 9: Stuff strategically (the secret is “small amounts, often”)
Stuffing is where you sculpt. Use small tufts and pack gradually:
- Snout: firm (so the face holds shape)
- Neck: medium-firm (prevents wobble)
- Belly: soft (for max cuddle factor)
- Hips: slightly firm (helps it sit)
If you’re using kapok, break up clumps and “tease” it like you’re fluffing a cloud. If you’re using wool, it can be
a bit springypack it in layers so it doesn’t create hollow pockets.
Step 10: Close the opening with a ladder stitch
A neat ladder stitch disappears and holds up well. Use strong thread, take small bites, and knot securely inside the
seam. If you expect the toy to be machine washed, double-knot like you mean it.
Eco-Friendly Finishing Touches That Make the Deer Look “Pro”
Add a contrast belly or spots (scrap-powered charm)
Use an oval scrap patch for the belly, or tiny dot appliques on the back for a fawn look. Stitch them down firmly so
they don’t peel after washing.
Choose low-fuss accessories
If you want a scarf, keep it short and stitched at the back of the neck to prevent it from becoming a tug toy. For
older kids/adults, a removable scarf is finejust be honest about the intended age group.
Label or note materials (a simple “ingredient list” goes a long way)
If you’re gifting or selling, include a small card: shell fabric type (upcycled sweater, organic cotton), stuffing
type, and basic care instructions. It’s like a recipe card, but for hugs.
Care and Repair: The Most Sustainable Deer Is the One You Can Fix
Plan for maintenance like a responsible plush parent:
- Spot clean first: mild soap and water on a cloth; air dry thoroughly.
- Machine wash (if appropriate): gentle cycle, cold or warm, inside a pillowcase; air dry or low heat as suitable for materials.
- Repair kit: matching thread + needle + a pinch of stuffing stored in a small bag. Five-minute fixes prevent “tragic seam events.”
Conclusion: Your Deer, Your Values, Your Best Next Step
Making a cuddly stuffed deer from eco-friendly materials is a blend of craft and common sense: choose fibers with more
transparency, build for durability, and avoid the easy pitfalls (like loose parts and vague “eco” labels). Start with
what you can accessan upcycled sweater, certified cotton, recycled filland focus on strong construction. The goal
isn’t perfection. The goal is a deer that gets hugged for years and can be repaired when life inevitably happens.
And if your first deer looks a little… surprised? Congratulations. You’ve made art. Deer are allowed to have feelings.
Studio Experiences: of Real-Life Lessons From Making Eco-Friendly Stuffed Deer
The first time I tried to “go fully eco” on a plush deer, I learned a humbling truth: sustainability doesn’t magically
fix geometry. I used an upcycled sweater with a loose knit, skipped stabilizing the seams, and ended up with a deer
whose head slowly migrated south like it was searching for warmer weather. The repair was easy (open a back seam,
add more stuffing to the neck, reinforce with a second seam line), but it taught me my favorite rule: durability
is sustainability. If a toy falls apart quickly, even the greenest fabric becomes waste.
Lesson two came from stuffing experiments. Recycled polyester fiberfill is reliable and washable, but I wanted to try
more plant-based options. Kapok was the most “storybook fluffy” of the bunchlight, airy, and oddly buoyant. The
challenge was control. If I stuffed too loosely, the deer felt lumpy. If I packed too hard, the kapok sprang back and
created a firm, pillow-like resistance (great for cushions, less cuddly for a plush). What finally worked was a hybrid
approach: kapok in the belly for softness, and a firmer fill (or tighter packing) in the neck and snout so the face
held its shape. The deer stopped looking like it was perpetually asking, “Do you have snacks?”
Upcycling has its own learning curve. Sweater plushies are charming because the fabric has historytexture, warmth,
sometimes tiny variations that make each toy unique. But sweaters can also be sneaky. Some pill fast. Some stretch
unevenly. Some have seams that are thicker than your patience. Now I test a small swatch first: pull it gently in two
directions, rub it between my fingers, and see if it fuzzes. If it pills immediately, I use it for ears, patches, or a
decorative belly instead of the main body. That way I still honor the material without building the whole toy on fabric
that can’t handle daily love.
The biggest “aha” moment? Embroidery changes everything. I used to rely on plastic safety eyes for that glossy, cute
look, but switching to embroidered eyes made my plush deer feel more timelessand more giftablebecause the toy instantly
became safer for younger kids and more washable. I also discovered that embroidered faces photograph beautifully (helpful
if you ever sell your work). A simple sleepy-eye curve can make a deer look calm and cozy, while a round eye makes it
playful. Same pattern, totally different personality.
Finally, the most meaningful part of eco-friendly plush-making is what happens after the sewing. I’ve had people message
me months later saying the deer became a bedtime buddy, a hospital companion, or a “must-pack” travel item. That’s the
point. Eco-friendly materials matterbut what really reduces waste is a toy that becomes irreplaceable. When a stuffed
deer is loved enough to be repaired instead of replaced, you’ve made something that’s both sweet and quietly powerful.