Table of Contents >> Show >> Hide
- Why Pickled Cherry Tomatoes Are So Good
- Safety First: Quick Pickles vs. Canning
- Equipment You’ll Need
- Ingredients and What They Do
- Foolproof Pickled Cherry Tomatoes Recipe
- Flavor Variations You’ll Want to Try
- Serving Ideas for Pickled Cherry Tomatoes
- Storage and Shelf Life
- Extra Tips & Real-World Experiences with Pickled Cherry Tomatoes
- Conclusion
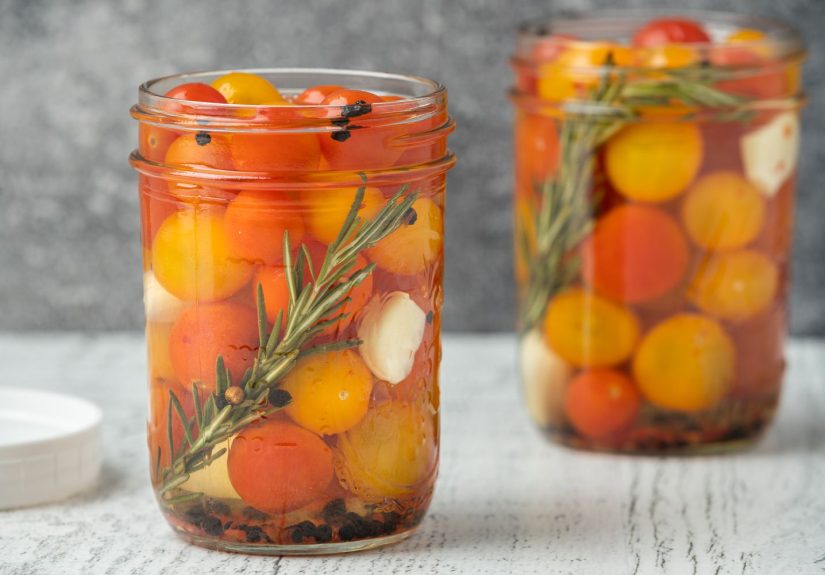
If your counter is covered in cherry tomatoes and you’re tired of pretending
you’ll eat them all in salads, it’s time to bring out the brine. Pickled
cherry tomatoes are bright, tangy, slightly sweet, and just firm enough to
pop when you bite into them. They’re also one of the easiest “fancy” things
you can stash in your fridge – instant upgrade for cheese boards, sandwiches,
and Tuesday-night leftovers.
This quick refrigerator pickled cherry tomatoes recipe walks
you through the gear you need, the science of a safe brine, and a flexible
base recipe you can customize with herbs, garlic, or a little heat. No
pressure canner, no drama – just crisp, flavorful tomatoes waiting to be
snacked on.
Why Pickled Cherry Tomatoes Are So Good
Cherry tomatoes are already little flavor bombs. Pickling them takes all
that sweetness and acidity and cranks it up a notch. Here’s why they’re worth
the 20 minutes of effort:
- They save your harvest. When every plant decides to ripen
at once, you can pack a whole bowl of tomatoes into a couple of jars. - They’re incredibly versatile. Use them on salads, grain
bowls, pizza, charcuterie boards, burgers, and sandwiches – or eat them
straight from the jar like pickled candy. - They’re fast. This is a refrigerator pickle. You mix a
simple vinegar brine, pour, chill, and let time do the rest. - They feel fancy. Put out a small bowl of jewel-like
pickled cherry tomatoes and everyone assumes you’re the kind of person who
has a “house brine.”
Safety First: Quick Pickles vs. Canning
Before we get into the recipe, one important note: this is a
refrigerator pickled cherry tomatoes recipe. The tomatoes
are made with a properly acidic vinegar brine and kept cold in the fridge.
That’s why the method is simple and very forgiving.
If you want shelf-stable canned pickled cherry tomatoes,
you must use a tested recipe from a trusted source and follow the
processing times and ingredient ratios exactly. Tomatoes sit right on the
edge between high-acid and low-acid foods, so tested vinegar and acid levels
are essential for safety. For this article, we’ll stick to the simple, safe,
and delicious refrigerator version.
Equipment You’ll Need
Basic Gear
- 2 pint-size glass jars with lids (or one quart jar), preferably Mason jars
- Small saucepan for the brine
- Measuring cups and spoons
- Clean funnel (optional but helps with pouring)
- Toothpick or skewer for piercing tomatoes
You don’t need specialty canning equipment for refrigerator pickles. Just
clean jars and a reasonably tidy kitchen. Wash the jars in hot, soapy water
and rinse well. If they’re fresh from the dishwasher, even better.
Ingredients and What They Do
Core Ingredients
- Cherry tomatoes: About 1 to 1 1/4 pounds for 2 pint jars.
Use firm, ripe tomatoes with no mold or soft spots. - Vinegar (5% acidity): White vinegar or apple cider vinegar
gives a bright, clean tang. Stick with vinegar that clearly states 5%
acidity on the label. - Water: Dilutes the vinegar so the flavor isn’t too harsh,
while keeping the overall brine acidic enough for refrigerator pickles. - Salt: Use pickling salt or kosher salt without additives.
Iodized salt can cloud the brine and affect flavor. - Sugar: Balances the acidity and enhances the tomato
sweetness. You can adjust the amount to taste.
Flavor Boosters (Pick and Mix)
- Garlic cloves
- Whole black peppercorns
- Fresh dill, basil, thyme, or rosemary
- Red pepper flakes or a sliced fresh chili for heat
- Mustard seeds or coriander seeds for a more complex flavor
- Bay leaf or a strip of lemon peel for extra aroma
One of the best things about making quick pickled cherry tomatoes
is how easy it is to customize: same base brine, different flavor add-ins.
Foolproof Pickled Cherry Tomatoes Recipe
This recipe makes about 2 pint jars of refrigerator pickled cherry tomatoes.
You can double or triple it as long as you keep the vinegar-to-water
ratio the same.
Ingredients (for About 2 Pints)
- 1 to 1 1/4 pounds cherry tomatoes, rinsed and dried
- 2–4 garlic cloves, peeled
- 2 teaspoons whole black peppercorns
- 2 small sprigs fresh dill (or basil, thyme, or rosemary)
- 1 teaspoon red pepper flakes (optional, for heat)
For the brine:
- 1 cup 5% vinegar (white or apple cider)
- 1 cup water
- 1 1/2 tablespoons pickling salt or kosher salt
- 1–2 tablespoons sugar (start with 1, add more if you like it sweeter)
Step-by-Step Instructions
- Prep the jars.
Wash your jars and lids in hot, soapy water, rinse well, and let them air
dry. They don’t have to be sterile for refrigerator pickles, but they
should be very clean. - Pierce the tomatoes.
Use a toothpick or skewer to poke each cherry tomato once or twice. This
helps the brine penetrate so the tomatoes pickle more evenly and don’t
burst randomly in the jar later. - Pack the jars.
Divide the garlic, peppercorns, dill (or other herbs), and red pepper
flakes between the jars. Add the pierced cherry tomatoes, packing them
fairly snugly but without crushing them. Leave about 1/2 inch of space at
the top. - Make the brine.
In a small saucepan, combine the vinegar, water, salt, and sugar. Bring to
a gentle simmer, stirring until the salt and sugar dissolve. Once it
reaches a light boil and everything is dissolved, turn off the heat. - Pour the brine.
Carefully pour the hot brine over the tomatoes in each jar, covering them
completely and leaving a little headspace (about 1/4 to 1/2 inch). If
needed, tap the jar gently on the counter or use a clean spoon to release
any trapped air bubbles. - Close and cool.
Wipe the rims of the jars with a clean cloth, screw on the lids, and let
them cool on the counter until they reach room temperature. - Chill and wait.
Once cooled, move the jars to the refrigerator. The pickled cherry
tomatoes will start to taste good after about 24 hours, but they’re at
their best after 2–3 days. - Enjoy and store.
Keep the jars refrigerated. For best quality, enjoy them within 3–4 weeks.
Always use a clean utensil to remove tomatoes from the jar.
Flavor Variations You’ll Want to Try
Once you’ve made one batch of refrigerator pickled cherry
tomatoes, it’s hard not to start experimenting. Here are some
reliable flavor combos that work well with this base brine:
Italian Herb Pickled Cherry Tomatoes
- Swap the dill for a small sprig of rosemary and a few fresh thyme sprigs.
- Add a strip of lemon peel (just the yellow part, no bitter white pith).
- Great with mozzarella, burrata, or antipasto platters.
Spicy Garlic Pickled Cherry Tomatoes
- Increase garlic to 3–4 cloves per jar.
- Add more red pepper flakes or a couple of slices of fresh jalapeño.
- Perfect as a garnish for Bloody Marys or alongside grilled meats.
Balsamic-Twist Pickled Cherry Tomatoes
- Replace 2–3 tablespoons of the white vinegar with balsamic vinegar (keep
the total vinegar amount the same). - Add a pinch more sugar to balance the deeper balsamic flavor.
- Serve over roasted vegetables or grain bowls for extra depth.
Serving Ideas for Pickled Cherry Tomatoes
Wondering what to do with your jars besides sneaking tomatoes from the
fridge at midnight? Try these ideas:
- Charcuterie and cheese boards: Their bright acidity cuts
through rich cheeses and cured meats. - Salads: Toss a few onto a simple green salad instead of
raw tomatoes for more zing. - Pasta and grain bowls: Add them just before serving.
They’re especially good with farro, quinoa, or couscous. - Burgers and sandwiches: Smash a couple lightly and use
them like a relish on burgers, grilled cheese, or turkey sandwiches. - Breakfast: Pair with scrambled eggs, frittatas, or an
avocado toast upgrade.
Storage and Shelf Life
Because these are refrigerator pickles, they rely on both the acidic brine
and the cold temperature to stay fresh. A few simple guidelines:
- Always store in the fridge. Do not keep these jars at
room temperature. - Use a clean utensil. Don’t fish around with fingers or a
dirty fork – that can introduce bacteria and shorten the shelf life. - Watch for off smells or mold. If the brine looks cloudy
in a strange way, or anything smells off, it’s better to discard and
start over. - Best quality: Within about 3–4 weeks. They’ll usually
keep safely a bit longer, but the texture may soften over time.
Extra Tips & Real-World Experiences with Pickled Cherry Tomatoes
The first time most people make pickled cherry tomatoes, a few of the same
questions pop up. Here are some experience-based tips and “wish I’d known
that sooner” moments that can save you a test batch or two.
1. Piercing vs. Not Piercing the Tomatoes
Technically, you can pickle cherry tomatoes without piercing them, but in
practice, you’ll get better results if you do. Piercing each tomato allows
the brine to seep in faster and more evenly. The pickle flavor reaches the
center instead of staying on the skin, and you’re less likely to have
tomatoes that split open randomly in the jar after a few days.
If you’re making a big batch, line the tomatoes up in a shallow dish and
work through them while you’re watching TV or chatting. It’s oddly
satisfying – like bubble wrap, but edible.
2. Balancing Sweetness and Acidity
Everyone’s “perfect” pickle is a little different. Some people love a sharp,
puckery brine with almost no sweetness; others prefer something closer to a
bread-and-butter pickle. Start with the middle-of-the-road sugar amount in
the recipe, then adjust your next batch based on your taste.
A good rule of thumb: if you plan to serve the pickled cherry tomatoes with
rich foods (like cured meats, cheese, or fatty roasts), a brighter, more
acidic brine works well. If you’re using them in salads or grain bowls, a
touch more sweetness often tastes better.
3. Texture: How Firm Should They Be?
Cherry tomatoes are softer than cucumbers, so they’ll never be as crunchy as
classic pickles – and that’s okay. The goal is a juicy pop, not a loud
crunch. To keep them from getting too soft:
- Start with firm, freshly picked tomatoes when possible.
- Avoid overripe or bruised tomatoes – those go into sauce, not jars.
- Don’t cook the tomatoes; only the brine gets heated.
Over a few weeks in the fridge, they’ll gradually soften. If you like them
firmer, eat them in the first 1–2 weeks and make smaller, more frequent
batches.
4. Small-Batch Strategy: Don’t Overcommit
It’s tempting to pickle every cherry tomato in sight at once, but it’s often
smarter to start small. Make one or two pints the first time. See how you
feel about the vinegar you used, the sugar level, and the spices. Then adjust
your next batch.
Think of the first round as a “baseline house brine.” Once you dial it in,
you can effortlessly scale up when your garden goes wild or when cherry
tomatoes hit a great sale at the grocery store.
5. Using the Brine (Don’t Throw It Away!)
When the jar is almost empty, don’t rush to pour the leftover brine down the
drain. That tomato-infused liquid is full of flavor. A few smart uses:
- Whisk into vinaigrettes for salads or grain bowls.
- Use a splash to brighten soups, stews, or braises at the end of cooking.
- Marinate sliced cucumbers, onion, or radishes in the leftover brine.
Just don’t reuse the brine to pickle a brand-new batch of tomatoes – it
won’t have the same acidity and salt balance after being used once.
6. Gift-Worthy, Low-Effort “Wow” Factor
If you like gifting homemade food but don’t always have the time – or the
patience – for all-day projects, pickled cherry tomatoes are a great
solution. Pile them into a clean jar, tie on a label with serving ideas, and
you’ve got a host gift that looks thoughtful but only took you 20 minutes
and a bit of fridge space.
They pair beautifully with a small wedge of cheese and a baguette. If you
ever want to be remembered as “the person who brought that amazing little
jar of tomatoes,” this is your move.
7. When Things Go Wrong (And How to Fix Them Next Time)
Even a “simple” recipe can go sideways occasionally. If your pickled cherry
tomatoes came out too salty, too sharp, or too bland, treat it like a taste
experiment instead of a failure:
- Too salty: Next time, reduce the salt slightly and keep
everything else the same. - Too sharp: Add a little more sugar to the brine or swap in
a milder vinegar like apple cider. - Too mild: Increase the herbs, garlic, or spices, or let
the jar sit an extra day or two before serving.
As long as you maintain a good vinegar-to-water ratio and keep the jars in
the refrigerator, you have plenty of freedom to tweak flavors until the
recipe feels uniquely yours.
Conclusion
Pickled cherry tomatoes are the kind of project that looks impressive but
fits easily into real-life cooking. With a safe, simple brine and a handful
of fresh tomatoes, you can create jars of tangy, jewel-like bites that turn
ordinary meals into something memorable. Once you’ve made one batch, don’t
be surprised if a permanent “pickled cherry tomatoes” spot appears on your
fridge shelf – and in your weekly cooking routine.