Table of Contents >> Show >> Hide
- What Is a Penny Accent Wall (and Why It Works So Well)?
- Where a Penny Wall Looks Amazing
- Planning Your Penny Accent Wall: The “Math Before the Madness” Stage
- Materials & Tools You’ll Actually Use
- Prep Work: The Boring Part That Makes the Wall Look Expensive
- How to Build a Penny Accent Wall: Step-by-Step
- Finishing Options: Matte Mosaic vs. “Copper Under Glass”
- Design Tips That Make It Look Professional
- Budget, Time, and Realistic Expectations
- Common Mistakes (So You Don’t Become a Penny-Wall Cautionary Tale)
- FAQ: Quick Answers People Always Ask
- Conclusion: Is a Penny Accent Wall Worth It?
- Experiences & Lessons Learned from Penny Accent Wall Projects (Extra 500+ Words)
- You’ll underestimate the time… at least once
- The first row is everythingtreat it like royalty
- Coin color sorting can be fun… until it isn’t
- Cleanliness matters more than people expect
- Edges make or break the “custom” look
- The finish is where people either fall in love or swear off pennies forever
- Most people would do it again… just smaller (and smarter)
If you’ve ever stared at a blank wall and thought, “This space needs more personality,” you’re already halfway to
a penny accent wall. The idea is exactly what it sounds like: thousands of pennies arranged like a shiny mosaic to create a
statement wall with warm, metallic sparkle. It’s equal parts DIY flex, conversation starter, and “Yes, I really did glue
actual coins to my wallthanks for asking.”
A penny wall sits in a sweet spot between rustic and modern. It can read like copper tile, industrial metal paneling,
or a playful “found object” art installationdepending on how you arrange the coins and how you finish the surface.
Done well, it looks intentional and high-end. Done poorly… it looks like you lost a very specific bet with your bank.
Let’s make sure you land in the first category.
What Is a Penny Accent Wall (and Why It Works So Well)?
An accent wall is a single wall designed to draw attentionthrough color, texture, pattern, or materialwithout overwhelming
the whole room. A penny accent wall adds texture (raised coin edges), pattern (your layout),
and metallic warmth (copper tones) all at once. The result is a “statement wall” that can anchor a room the
same way a bold wallpaper mural or wood slat feature mightonly shinier and far more likely to make guests lean in and squint.
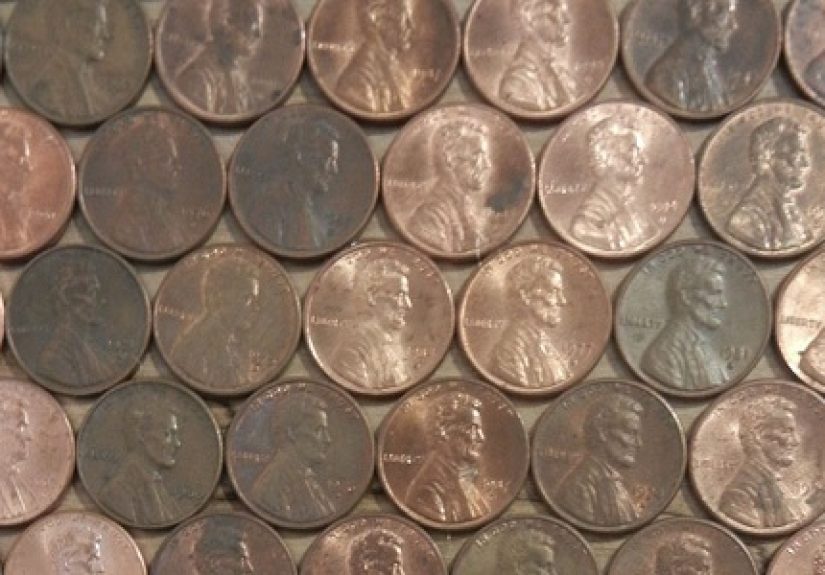
The best part: pennies are a uniform size, easy to source, and naturally varied in color from bright copper to deep brown.
That natural variation creates depth without you needing to paint elaborate patterns (unless you want to, in which case:
welcome, fellow chaos artist).
Where a Penny Wall Looks Amazing
Penny walls are bold, so they shine most in spaces where you want a “moment.” Here are popular placements that tend to look
intentional instead of accidental:
- Bar nook or home lounge: pennies + warm lighting = instant speakeasy vibe.
- Kitchen backsplash area: especially behind open shelving or a coffee bar.
- Powder room: small room, big impactlike jewelry for your house.
- Entryway or hallway feature: perfect for a narrow wall that needs drama.
- Office or creative studio: a textured backdrop that still feels “clean” and modern.
One tip from designers: a metallic accent wall often pairs best with neutralswhite, warm gray, charcoal, or deep green
because it lets the copper tones read rich instead of busy.
Planning Your Penny Accent Wall: The “Math Before the Madness” Stage
1) Measure your wall (and decide your coverage area)
You don’t have to cover a whole wall. A framed panel, a half-wall, or a vertical strip behind shelving can be just as
effectiveand far less time-consuming.
2) Estimate how many pennies you’ll need
A modern U.S. penny is about 0.75 inches in diameter. In a tight layout, you’ll typically need roughly
300–330 pennies per square foot (spacing and pattern can change this). That means:
- 10 sq ft (small feature area): ~3,000–3,300 pennies
- 20 sq ft (medium accent section): ~6,000–6,600 pennies
- 40 sq ft (large accent wall): ~12,000–13,200 pennies
The pennies themselves are surprisingly affordable in face value. The real cost is typically your adhesive, grout,
and finishespecially if you use a clear epoxy coating for that glassy, “copper-under-glass” look.
3) Pick your pattern (this is where the personality happens)
Your layout can look sleek and modern or intentionally eclectic. Popular options include:
- All heads, same direction: clean, graphic, and surprisingly “designed.”
- Random heads/tails mix: more relaxed, like a copper confetti wall.
- Ombre or gradient: dark coins at the bottom fading lighter toward the top.
- Year-based design: spell initials, a date, or a subtle pattern using certain years.
- Ring patterns: place pennies in circles like ripplesgreat behind a mirror.
If you want a polished, architectural feel, stick to consistent orientation and spacing. If you want artsy and organic,
mix finishes and embrace irregularityjust keep your edges crisp so it looks intentional.
Materials & Tools You’ll Actually Use
You can build a penny accent wall a few ways, but most successful DIY versions share the same fundamentals: a stable surface,
a strong adhesive, and a protective finish.
Common materials
- Pennies: avoid collectible or rare coinsuse everyday circulation coins.
- Substrate (recommended): plywood panel or tile backer board if you’re creating a removable “art panel.”
- Adhesive: a construction adhesive or strong bonding adhesive suitable for wall materials.
- Spacers (optional): small tile spacers or DIY spacing guides for uniform gaps.
- Grout (optional): if you want a “mosaic tile” look rather than a glossy sealed surface.
- Clear finish: epoxy resin for a glassy topcoat, or a clear protective coating for a more natural feel.
- Trim or molding (optional): to frame the panel and make edges look finished.
Tools
- Measuring tape, level, and pencil
- Notched spreader or small trowel (depending on adhesive)
- Disposable gloves and a drop cloth
- Soft cloths for cleaning coins
- Painter’s tape (for borders and layout lines)
Prep Work: The Boring Part That Makes the Wall Look Expensive
Penny walls fail for predictable reasons: dirty surfaces, weak bonding, and moisture sneaking in. Good prep prevents
all three.
Step 1: Decide if you’re building on the wall or on a panel
If this is your forever home and you’re confident, installing directly on a wall is doable. But if you want an easier install,
cleaner edges, or a future exit strategy, build it on a panel and mount the finished panel like wall art. A panel also lets you
work horizontally (which is kinder to your back and your sanity).
Step 2: Clean and lightly scuff the surface
Adhesives hate dust, grease, and glossy paint. Clean the surface thoroughly, let it dry, and lightly scuff glossy paint so the
adhesive has something to grip. This is especially important for kitchen areas where cooking residue can hang around like an
uninvited party guest.
Step 3: Clean your pennies (optional, but often worth it)
You don’t have to make every penny shinyvariation is part of the charm. But you do want them free of oils and gunk so your
adhesive bonds well. Many DIYers use mild soap and water for basic cleaning. If you want brighter copper tones, a short soak
using common household ingredients can remove tarnishjust rinse thoroughly and dry completely before installation.
One more coin nerd note: modern pennies are typically copper-plated zinc. If moisture gets under a poorly sealed finish,
zinc can corrode and create issues over time. That’s why sealing matters, especially in kitchens and bathrooms.
How to Build a Penny Accent Wall: Step-by-Step
There are two popular looks: (A) grout-and-seal (like penny tile) and (B) glossy epoxy topcoat
(like a penny countertop). Both look greatyour choice depends on the vibe you want and how reflective you’re willing to go.
Step 1: Create layout lines
Use a level and pencil to mark a straight baseline and vertical reference line. Even if your house is older (and your walls are
slightly rebellious), your penny layout should look straight to the eye.
Step 2: Dry-fit a small section
Before gluing anything, arrange a few rows to confirm spacing and pattern. This is where you catch issues like:
“Why do these coins suddenly look crooked?” (Answer: because the first row wasn’t level.)
Step 3: Apply adhesive in workable sections
Work in small areas so the adhesive doesn’t skin over before you place the coins. Press each penny firmly into place.
If you’re doing consistent spacing, use spacers or a simple template (even a thin strip of cardboard can help guide gaps).
Step 4: Keep edges crisp
The edge is where DIY projects either look custom… or like a craft project that got loose in your home. If the wall has a visible
edge, consider framing it with trim, a metal edge profile, or a clean painted border.
Step 5: Let it cure fully
Rushing is how coins slide, gaps drift, and your beautiful pattern turns into a copper avalanche. Follow the adhesive label for
cure time. When in doubt, wait longerpatience is cheaper than redoing a thousand coins.
Finishing Options: Matte Mosaic vs. “Copper Under Glass”
Option A: Grout-and-seal finish (penny tile look)
This finish looks more like a classic mosaic wall. You’ll apply grout over the pennies, push it into the gaps, wipe excess, then
let it cure. After curing, you can seal the grout if needed for moisture resistanceespecially in kitchens and bathrooms.
Best for: backsplashes, vintage-inspired rooms, and anyone who wants texture without mirror-level shine.
Watch out for: grout hazewipe carefully, and don’t rush cleanup.
Option B: Epoxy resin topcoat (high-gloss finish)
Epoxy creates a smooth, glassy surface that magnifies the copper tones and makes the wall easier to wipe clean.
The tradeoff is that epoxy can show imperfections (dust, bubbles, uneven pours), so you’ll want a clean workspace,
stable temperature, and proper safety gear.
Best for: bar walls, statement panels, and modern spaces that want a showpiece.
Watch out for: bubbles and dust. Mix gently, let bubbles rise, and keep the surface protected while it cures.
Safety reminder: follow the product label and SDS recommendations, work in a well-ventilated area, and wear appropriate PPE.
If you’re younger or new to resins, have a knowledgeable adult helpthis is not the moment for “I saw it in a 12-second clip,
how hard can it be?”
Design Tips That Make It Look Professional
Use lighting to your advantage
Penny walls love warm light. Under-cabinet lighting, picture lights, or a sconce placed nearby can make the copper glow instead
of looking flat.
Control the chaos with a border
Even if your pennies are random, your border should be crisp. A painted frame, trim, or clean edge line makes the wall look
intentionallike it belongs in the room.
Choose a grout color (if grouting) like you’d choose lipstick
It changes everything. Dark grout increases contrast and hides dirt. Light grout creates a brighter, patterned look but can show
stains faster in kitchens.
Budget, Time, and Realistic Expectations
Let’s be honest: this project is more time than money. The pennies themselves might be the cheapest part. What you’re “paying”
with is your patience and your willingness to place tiny circles in a neat pattern for hours.
A small panel can be a weekend project. A full wall can stretch into multiple weekendsespecially if you’re sorting coins by
tone or building patterns. The good news: it’s a satisfying project because progress is visible. The bad news: you will start
noticing pennies everywhere you go, like your brain has installed a coin-detection software update.
Common Mistakes (So You Don’t Become a Penny-Wall Cautionary Tale)
- Skipping surface prep: adhesion problems usually start with dust, grease, or glossy paint.
- Not checking level early: a crooked first row haunts every row after it.
- Rushing cure time: coins drift, patterns warp, and your wall looks “wavy.”
- Ignoring moisture risk: kitchens and bathrooms need sealing and good ventilation.
- Using collectible coins: please don’t epoxy a rare coin to drywall. Someone will cry.
FAQ: Quick Answers People Always Ask
Is it heavy?
It can be. Thousands of pennies add weight, especially if you add grout or epoxy. That’s one reason panels can be usefulyou can
mount them securely and control the structure behind the feature.
Is it legal to use pennies for wall art?
U.S. law focuses on fraudulent alteration of coins. Craft and décor projects are typically not aimed at fraud, but laws
can be nuanced. If you have concerns, review the relevant statute or consult a qualified professional.
Can I do this in a rental?
A full wall installation is not renter-friendly. But a framed penny panel hung like artwork? That’s a much safer approach for
rentalsand you can take it with you when you move.
Conclusion: Is a Penny Accent Wall Worth It?
A penny accent wall is not the fastest DIY, but it’s one of the most memorable. It combines texture, shine, and storytelling in
a way paint can’t. And because you control the layout, tone, and finish, you can make it sleek and modern, warm and rustic, or
somewhere in between. The secret is simple: plan carefully, prep thoroughly, and seal properlyso your wall looks like a design
decision, not a coin-related incident.
If you want a dramatic, budget-friendly statement wall with serious “How did you even do that?” energy, pennies can absolutely
deliver. Just bring patience. And maybe snacks. Lots of snacks.
Experiences & Lessons Learned from Penny Accent Wall Projects (Extra 500+ Words)
Most people start a penny accent wall for the same reason they start any bold DIY: inspiration strikes, confidence spikes,
and suddenly you’re Googling “How many pennies are in a roll?” at midnight. The good news is that penny walls are incredibly
forgiving visuallysmall color differences can look intentional and artistic. The tricky part is that they’re not always
forgiving logistically. Here are some of the most common real-world experiences DIYers report (and how to use them to your
advantage).
You’ll underestimate the time… at least once
A penny wall is repetitive work. Even if you’re fast, you’re placing coins one at a time, keeping spacing consistent, and making
small decisions constantly (heads or tails? rotate or align? do I love this section or am I just hungry?). A lot of DIYers say the
turning point is when they stop thinking of it as a “project” and start thinking of it as a “series.” Like a TV show.
You don’t binge it in one sitting unless you enjoy chaos.
The first row is everythingtreat it like royalty
People who end up with a professional-looking penny wall almost always mention the same thing: they obsessed over the first row.
They leveled it, dry-fitted it, and checked it again. Meanwhile, the “slightly crooked” first row crowd tends to spend the rest of
the project nudging coins and whispering threats at gravity. If you want the wall to look clean, don’t rush the baseline.
Coin color sorting can be fun… until it isn’t
Sorting pennies by tone sounds like a relaxing craft moment. And sometimes it is! DIYers often say the first hour feels like
playing with “copper paint chips.” Then the sorting piles multiply, and you realize you have invented a new part-time job for
yourself called “Coin Curator.” If you’re doing a gradient or pattern, consider sorting only a portion (like the darkest and
lightest groups) and letting the middle tones be more mixed. You’ll still get the effect without needing a museum-grade
classification system.
Cleanliness matters more than people expect
Many penny-wall builders mention they didn’t think cleaning would matteruntil they noticed oils, smudges, or dull spots under a
glossy finish. If you’re planning a high-gloss resin topcoat, you’ll want the coins dry and clean before they go up. Otherwise,
you can end up sealing in fingerprints like you’re preserving evidence for a detective show. On grout-style walls, slight grime is
less visible, but a quick wipe-down still helps adhesion.
Edges make or break the “custom” look
This is a big one. DIYers who love their final result nearly always mention the finishing details: trim, a clean border, or a tidy
transition to the rest of the wall. Penny walls are busy by nature; crisp edges make them look designed instead of improvised.
Even a simple painted frame line can elevate the whole wall.
The finish is where people either fall in love or swear off pennies forever
Whether you grout or use a clear finish, the top layer can feel like the “final boss” of the project. People often say the wall
looks amazing before finishing, then briefly looks terrible during finishing (haze, bubbles, uneven shine), and finally looks great
again once everything cures and is cleaned up properly. The lesson: don’t judge the project mid-finish. That’s like judging a cake
when it’s still batter. Nobody looks cute as batter.
Most people would do it again… just smaller (and smarter)
A common reflection: “I love it, but next time I’d do a panel instead of a whole wall.” Panels let you work flat, reduce mess, and
allow a cleaner install. People also mention they’d plan patterns earlier, buy a bit more adhesive than they thought, and protect
the curing surface from dust like it’s a sacred artifact. Because once the finish goes on, every floating speck in your house
suddenly believes it deserves a permanent place in your décor.
Bottom line: a penny accent wall is the kind of project that rewards patience and punishes shortcuts. But if you take your time,
keep your lines straight, and finish it carefully, you end up with a wall that looks expensive, feels personal, and makes people
smileexactly what an accent wall is supposed to do.