Table of Contents >> Show >> Hide
- Why a Red Paper Rose Works for Almost Anything
- Pick Your Paper Like You Mean It
- Tools and Supplies Checklist
- Three Ways to Make a Red Paper Rose
- Make It Look Real: Small Details That Matter
- Common Paper Rose Problems (and Fixes That Don’t Require Crying)
- What to Do With Red Paper Roses
- Storage and Care (Yes, Paper Roses Deserve Respect)
- Conclusion: Your Red Rose, Your Rules
- My Paper-Rose Era: From the Glue-Gun Trenches
A red rose is the craft world’s little black dress: classic, dramatic, and somehow appropriate for
everything from weddings to “I forgot our anniversary and I am panicking.” The difference is that a
red paper rose won’t wilt, won’t drop petals in your car, and definitely won’t judge you for
using a glue gun like it’s a hot-glue-powered wand of destiny.
In this guide, you’ll learn how to make paper flowersspecifically a paper rose with rich,
romantic colorusing methods that range from “I can do this during a movie” to “I might start an Etsy shop.”
We’ll cover materials, shaping tricks for realistic petals, multiple construction styles (crepe, cardstock,
and giant backdrop roses), and the small details that make your bloom look like a rosenot a fancy red cabbage.
Why a Red Paper Rose Works for Almost Anything
The red rose carries instant meaning: love, celebration, admiration, and sometimes “I’m sorry.” In paper form,
it adds bonus superpowers:
- It lasts forever (or at least until a curious toddler or pet discovers it).
- It’s allergy-friendlyno sneezing, just crafting.
- It’s customizable: shade, size, petal count, stem length, even “freshly opened” vs. “full bloom.”
- It’s budget-flexible: use premium Italian crepe, or use the cardstock you already own.
Pick Your Paper Like You Mean It
The best paper for your red rose depends on the vibe you want: realistic and soft, crisp and graphic, or
big-and-bold like event decor.
Crepe Paper
If you want a rose that looks almost alive (and makes people lean in to check for scent), crepe paper is your best friend.
Crepe has stretch and texture, so you can cup petals, curl edges, and create that gentle, natural ruffle roses are famous for.
Bonus: it hides tiny mistakes the way good lighting hides pores.
- Best for: realistic roses, bouquets, long-stem arrangements, keepsakes.
- Tip: Choose a red that isn’t flatslight tonal variation makes petals look more natural.
Cardstock
Cardstock creates clean, sculptural rosesespecially the popular “rolled rose” style. It’s also cutting-machine friendly,
which means you can let a Cricut (or similar) do the heavy lifting while you focus on assembly.
- Best for: quick projects, cards, shadow boxes, wall decor, gift toppers.
- Tip: Medium-weight cardstock curls better than super-thick cover stock.
Tissue and Lightweight Paper
Tissue paper can create airy, romantic roses, especially if you like a soft, painterly look. It’s also fantastic for mass-making
flowers for parties. Tissue can be delicate, so it rewards a lighter touch (and a little patience).
Tools and Supplies Checklist
You don’t need a craft room the size of a garage. You need a few basicsand permission to improvise.
Must-Haves
- Scissors (sharp enough that they don’t chew the paper like a bored puppy)
- Adhesive: tacky glue, hot glue, or strong craft glue
- Pencil + ruler (for quick templates and clean cuts)
Nice-to-Haves (a.k.a. “This Makes It Look Fancy”)
- Floral wire (for stems)
- Floral tape (to wrap stems and attach leaves neatly)
- A dowel, skewer, or round pen (for curling petal edges)
- Optional: cutting machine + SVG template for cardstock roses
- Optional: pastel/chalk/marker for shading and depth
No floral tape? Wrap green paper strips around wire with glue. No wire? Roll paper into a tight stem.
Crafting is basically solving tiny problems with confidence.
Three Ways to Make a Red Paper Rose
Consider this your choose-your-own-adventure. All roads lead to a lovely red rosejust with different levels of realism and effort.
Method 1: Realistic Crepe Paper Red Rose (The “Wow, That’s Paper?!” Rose)
This style focuses on lifelike shaping: cupped petals, curled edges, and a center that looks like it’s still unfurling.
Crepe paper’s stretch is what makes the magic happen.
Step-by-step
-
Create the center:
Cut a small strip of red crepe and roll it tightly to form a bud. Secure with glue.
If you want extra realism, make the bud slightly tapered at the top. -
Cut petals in sizes:
Make a small set of petals and a larger set. Petal variety is what prevents the “cookie cutter” look.
Think: a few smaller inner petals and more outer petals. -
Cup each petal:
Gently stretch the crepe in the center of the petal using your thumbs to create a natural curve.
Keep the base less stretched so it stays strong. -
Curl the top edges:
Use a dowel or pen to curl the upper edge outward (or slightly inward for inner petals).
Roses are not uniformmix it up. -
Attach petals in rings:
Glue smaller petals tightly around the bud, overlapping slightly. As you add larger petals, raise them a bit
higher on the bud to mimic a rose opening. -
Build the base (sepal):
Cut a small green star-like sepal shape and glue it under the petals.
This hides construction and instantly makes the flower look more “real.” -
Add a stem:
Attach the bloom to floral wire. Wrap with floral tape, stretching as you wrap so it grips.
Add leaves along the stem for a finished look.
Pro realism trick: lightly shade the petal bases with a deeper red (or even a whisper of burgundy)
and soften the outer edges with a tiny touch of lighter red. Nature loves gradients.
Method 2: Rolled Cardstock Paper Rose (Fast, Clean, and Very Satisfying)
Rolled roses are popular because they’re efficient and consistent. They work beautifully for bouquets, wreaths,
gift toppers, and wall clusters. This is the method where you cut a spiral and roll it into a bloom.
Step-by-step
- Cut a spiral: draw or print a spiral with a scalloped edge (or use an SVG template).
- Start rolling from the outside: keep the roll snug at first, then slightly loosen as you go.
- Let the center form naturally: the spiral shape creates layers automaticallytrust the process.
-
Glue the base:
most spiral templates include a small circle at the endthis becomes the “seat” you glue the rose onto.
Hold for a few seconds until it sets. - Shape lightly: curl a few outer edges with a pen to add softness.
Style upgrade: Use two redsone slightly darker for the spiral and one brighter for a few extra
“petals” glued on the outside. It adds depth without adding much work.
Method 3: Giant Paper Rose (The Statement Piece)
Giant paper roses are the drama queens of the paper flower worldin a good way. They’re perfect for party backdrops,
photo walls, nurseries, store displays, and “I need this space to feel like a romantic movie scene” moments.
Step-by-step
- Choose your size: decide the final diameter first so your petals scale correctly.
- Cut big petals: use a template (or draw your own teardrop/petal shapes in multiple sizes).
-
Shape each petal:
curl the top edges and give the base a slight fold or pinch so it stands up instead of flopping. -
Build the center:
roll a tight inner bud from a smaller piece of paper, then attach small petals around it. -
Layer outward:
add medium petals, then large petals, overlapping like shingles on a roof.
(Your rose should look like it’s opening, not like it’s stacked.) - Finish the back: cover with a green circle base and add mounting support if needed.
Giant roses love sturdy paper (or sturdy crepe). If your petals droop, your paper is either too thin
or your petal base needs a firmer fold.
Make It Look Real: Small Details That Matter
Petal Variation (a.k.a. “Stop Making Identical Petals”)
Real roses are imperfect. Some petals curl more. Some are slightly wider. Some have tiny bends from wind and life.
When you craft, vary:
- Petal size (small, medium, large)
- Edge curl direction (some outward, some slightly inward)
- Overlap (tight inside, looser outside)
Depth Through Color
A flat red rose can look a little “construction paper Valentine.” A realistic one has dimension.
Try any of these:
- Shade the base of petals with burgundy or deep red pastel.
- Dry-brush a hint of lighter red on edges for a soft highlight.
- Add a tiny touch of green near the sepal area (very subtle) to mimic natural transition.
Don’t Over-Curl
Curled petals are lovelyuntil every petal looks like it’s auditioning for a pasta commercial.
For a natural rose, keep the strongest curl on outer petals and gentle shaping in the center.
Common Paper Rose Problems (and Fixes That Don’t Require Crying)
“My rose looks like a pinecone.”
You’re stacking petals too evenly or rolling too tightly for too long. Loosen the outer layers, stagger overlaps,
and add a few wider petals near the outside.
“The petals won’t stay attached.”
Use less glue than you thinkbut put it in the right spot: at the petal base and where layers overlap.
If you’re using crepe, make sure you’re attaching to a solid center (bud) and wrapping/anchoring well at the base.
“My stem looks messy.”
Wrap slowly. If using floral tape, stretch it slightly as you wrap to activate the tackiness.
If using paper strips, keep the strip tension consistent and glue as you go.
“The red looks dull in photos.”
Add contrast: deeper red in the center, slightly lighter edges. Also, matte papers photograph differently than shiny ones.
If your rose is very matte, a hint of highlight on edges helps it pop.
What to Do With Red Paper Roses
Once you make one rose, you’ll immediately want to make seven more. That’s normal. Here are some fun ways to use them:
Romantic Gift Topper
Attach a small rolled cardstock rose to a gift box, then add a paper leaf and a simple tag. It looks boutique-level,
and you didn’t even have to leave the house.
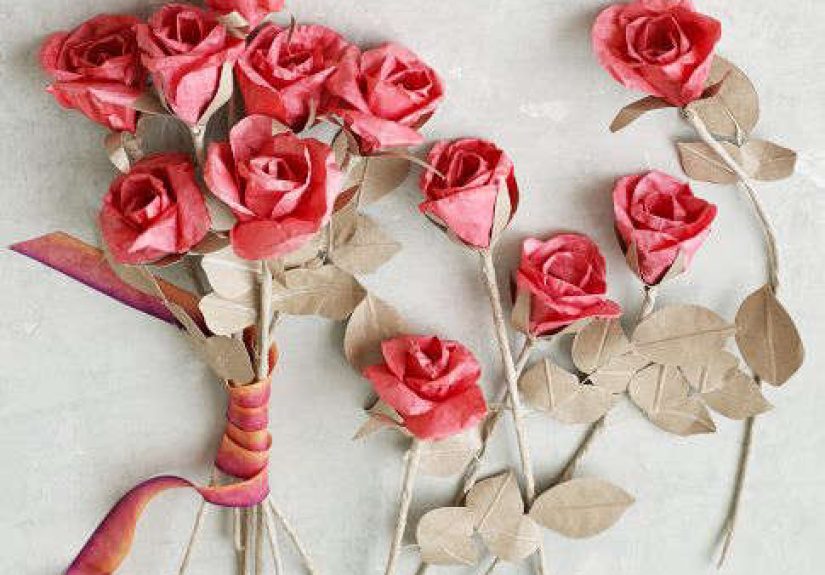
Everlasting Bouquet
Mix red paper roses with paper greenery (eucalyptus-style leaves are a crowd-pleaser) and wrap the stems with ribbon.
Great for anniversaries, graduations, or “just because.”
Wall Art or Shadow Box
Frame a single red rose with a few petals scattered around it. Add a short quote or date. Suddenly you’re sentimental
and stylish.
Party Backdrop
Giant red roses make a bold photo wall. Use a mix of sizes to create depth, and space them unevenly for a more natural,
less “grid wallpaper” look.
Storage and Care (Yes, Paper Roses Deserve Respect)
- Keep out of direct sunlight: reds can fade over time, especially lighter papers.
- Dust gently: a soft brush or cool hair dryer setting works well.
- Store in a box: if you’re making many, layer tissue between blooms so edges don’t crush.
- Humidity check: paper can soften in humid environmentsstoring in a dry area helps it keep shape.
Conclusion: Your Red Rose, Your Rules
A red paper rose is one of those crafts that feels fancy but is absolutely learnable. Start with the method that matches
your patience level todaycrepe for realism, cardstock for speed, giant petals for dramaand let your skills build from there.
The real secret is repetition: the second rose is better than the first, the fifth is impressive, and by the tenth you’ll be
casually saying things like, “Oh this? Just a little DIY paper rose I made.”
My Paper-Rose Era: From the Glue-Gun Trenches
My first red paper rose was… brave. Not “award-winning,” not “lifelike,” just brave. I was convinced I could eyeball the petals
like a crafting prodigy, which is the paper-flower version of thinking you can cut your own bangs before picture day. The result
looked less like a rose and more like a decorative snack. But here’s the funny thing: it still made me ridiculously happy.
Because the moment you roll, curl, and shape paper into something that resembles a flower, you realize you’re basically doing
a magic trick with office supplies.
The second rose taught me the value of petal variety. I made every petal the same size, same curve, same everythinglike
I was cloning petals in a laboratory. The bloom came out stiff and a little suspicious, like it was reporting back to a manager
somewhere. So I started mixing sizes: smaller petals tight around the center, larger petals toward the outside, and suddenly the
flower looked like it had a life story. (Or at least a personality.)
Then came the “red is red” phase, where I used one flat shade and wondered why it looked like a school Valentine. That’s when I discovered
shadingjust a little deeper color near the base, and a touch of lighter red along the edges. The rose immediately leveled up. It’s wild how
a tiny smudge of color can make paper look dimensional, like it’s catching real light. It also made me feel like a tiny art wizard, which is
always a plus.
The biggest lesson, though, came from stems. I used to treat stems like a boring afterthought, as if the flower would float by sheer charm.
But a neatly wrapped stem changes everything. The first time I wrapped floral tape properlystretching it slightly as I went, keeping the wrap
smooth, placing leaves at different heightsI actually held the rose at arm’s length and nodded like I was judging a cooking show. “Yes,” I
thought. “This is acceptable.”
And here’s the secret nobody tells you: paper roses are not just a craft, they’re a mood. They’re the kind of project you make when you want
your hands busy and your brain calm. There’s a rhythm to itcut, curl, shape, assemblethat makes time pass in a satisfying way. You can make
one rose and feel accomplished, or make a dozen and feel unstoppable. And every time someone says, “Wait… that’s paper?” you get to enjoy the
most delightful flex: “Yep. I made it.”