Table of Contents >> Show >> Hide
- What “Picks by Bob Vila” Means Here
- Must-Have Outdoor Kitchen Essentials (The Core Lineup)
- 1) A Grill That Matches How You Actually Cook
- 2) A Second Heat Source (Because One Trick Is for Ponies)
- 3) Weather-Resistant Cabinets (Your Storage Shouldn’t Panic in a Thunderstorm)
- 4) Proper Venting and Clearances (The Unsexy Essential That Matters Most)
- 5) A Countertop That Can Take Heat, Sun, and Spills
- 6) Outdoor-Rated Refrigeration (Cold Drinks: The Universal Love Language)
- 7) A Sink and Handwashing Plan (Yes, Even Outdoors)
- 8) Power Where You Need It (GFCI-Protected and Thoughtfully Placed)
- 9) Task Lighting + Ambience Lighting (Because “Is This Pink Yet?” Is Not a Cooking Strategy)
- 10) Trash, Recycling, and Grease Management (The Clean-Up System You’ll Actually Use)
- 11) The Tool Kit: Fewer, Better, Always Ready
- 12) Covers, Cleaning, and Maintenance (Protect the Investment)
- 13) A Basic Safety Kit (Small, Cheap, Non-Negotiable)
- Design Smarts Bob Vila Would Approve Of
- Conclusion: Build the Outdoor Kitchen You’ll Use
- Backyard Lessons Learned (Real Experiences, Real Results)
If your current “outdoor kitchen” is a wobbly grill next to a folding chair (no judgmentfolding chairs have
fed nations), you’re one smart upgrade away from backyard greatness. A good outdoor kitchen isn’t about
turning your patio into a reality show set. It’s about building a setup that’s durable, safe, and actually
pleasant to cook inwithout sprinting inside every six minutes like you’re training for a sitcom marathon.
Below is a practical, Bob Vila–style checklist of outdoor kitchen essentialsmeaning: solid, sensible,
built-to-last picks that earn their keep. We’ll cover the big-ticket anchors (grill, counters, cabinets),
the quality-of-life game changers (sink, fridge, lighting), and the little things that separate “I cook
outside sometimes” from “Why would I ever cook inside again?”
What “Picks by Bob Vila” Means Here
This isn’t a “buy 37 gadgets and become a different person” list. It’s a Bob Vila–inspired approach:
start with structure, prioritize safety, choose weather-ready materials, and invest in tools that make
outdoor cooking easiernot more complicated. Think “measure twice, grill once.” (Okay, that’s not a real
saying. Yet.)
Must-Have Outdoor Kitchen Essentials (The Core Lineup)
1) A Grill That Matches How You Actually Cook
The grill is the engine of your outdoor kitchen. Choose it based on your real habits, not the fantasy
version of you who smokes brisket every other Tuesday while casually learning jazz piano.
-
Built-in gas grill: Best for a permanent island setup and frequent weeknight use. Look
for quality stainless construction and a layout that’s easy to clean (future-you will care deeply). -
Freestanding gas grill: Perfect if you want flexibility, renters’ sanity, or the ability
to rearrange your patio like you’re playing outdoor Tetris. -
Charcoal: Flavor hero, patience required. Great if you love the ritual and don’t mind
a little extra time. -
Pellet grill/smoker: Excellent for low-and-slow and smoke flavor with less babysitting.
Just remember it needs electricity and dry pellet storage.
Bob Vila logic: buy the grill you’ll use twice a week, not the one that photographs well twice a year.
2) A Second Heat Source (Because One Trick Is for Ponies)
The easiest way to “level up” an outdoor kitchen is adding a second cooking method. This creates options
and reduces grill traffic when you’re hosting.
-
High-heat pizza oven: For fast, fun cooking and “accidentally invited the whole
neighborhood” vibes. Many models reach pizzeria temps and cook a pizza in about a minute once preheated. -
Griddle/plancha insert: Smash burgers, breakfast, fajitaswithout sacrificing half your
grill real estate to a skillet. - Side burner: Boil corn, simmer sauce, fry onionskeep the smells outside where they belong.
3) Weather-Resistant Cabinets (Your Storage Shouldn’t Panic in a Thunderstorm)
Outdoor kitchens live in the elements, so indoor cabinets outdoors are basically a slow-motion
“before-and-after” projectexcept the after is mostly regret. For cabinets and frames, prioritize
weather-ready materials like 304 stainless steel or purpose-built outdoor cabinetry designed for moisture,
sun, and temperature swings.
Practical win: cabinets aren’t just for looksthey keep tools, trays, and supplies close so you aren’t
carrying armfuls of gear like you’re moving out every Saturday.
4) Proper Venting and Clearances (The Unsexy Essential That Matters Most)
If you’re building an island for a grill, venting isn’t optional “nice to have”it’s a safety requirement
that’s often tied to your fuel type and appliance instructions. Proper vent panels help prevent dangerous
gas buildup and keep heat from turning your island into a surprise science experiment.
Also: build with non-combustible materials around hot zones, follow manufacturer clearance specs, and
keep the grill positioned with fire safety in mind (away from structures, railings, and overhangs).
5) A Countertop That Can Take Heat, Sun, and Spills
Your outdoor countertop has a harder life than your indoor one. It sees UV, temperature swings, wet
towels, raw meat packages, hot trays, and the occasional “Oops, I set that down for just a second.”
Choose something that doesn’t mind.
-
Porcelain slab: Popular for outdoor use because it’s UV-stable, non-porous, and highly
resistant to heat and stainsplus it can mimic stone looks without constant babying. -
Granite/quartzite: Classic, durable natural stone choices for outdoors; sealing needs
depend on the stone and finish. -
Concrete: Custom and cool-looking, but typically requires sealing and ongoing care to
avoid stains and water issues.
Bob Vila note: if you want a low-maintenance life, pick a low-maintenance surface. Your future self would
like weekends back.
6) Outdoor-Rated Refrigeration (Cold Drinks: The Universal Love Language)
An outdoor-rated refrigerator is the ultimate host upgrade: drinks stay outside, ingredients stay close,
and you stop opening the back door like it’s a revolving restaurant entrance. The key phrase is
outdoor-ratedunits built for outdoor environments typically use more weather-resistant
construction and ventilation designs suited to exterior conditions.
Shopping tips:
- Ventilation style: If it’s built-in under a counter, it usually needs front ventilation.
- Materials: Look for corrosion-resistant stainless and outdoor-safe finishes.
- Capacity: Bigger isn’t always betteropt for the size that matches your hosting style.
7) A Sink and Handwashing Plan (Yes, Even Outdoors)
If you cook outside often, a sink quickly becomes the “How did I live without this?” feature. It keeps
prep sanitary, makes cleanup easier, and prevents you from running inside with sticky hands like a
raccoon that discovered barbecue sauce.
Options range from a full plumbed sink (best) to smart portable handwashing solutions (useful for
DIY setups or early-phase builds). Whichever route you choose, the goal is the same: quick rinse, quick
wash, fewer indoor trips.
8) Power Where You Need It (GFCI-Protected and Thoughtfully Placed)
Outdoor kitchens and extension cords have a complicated relationship. Plan outlets where you’ll actually
plug things in: near prep space for blenders, along the island for warmers, and by the dining zone for
string lights or speakers. Outdoor electrical work should follow code requirements and use GFCI
protection where appropriateespecially around water and weather.
Bonus comfort: add USB charging near seating so guests stop “borrowing” your indoor outlets.
9) Task Lighting + Ambience Lighting (Because “Is This Pink Yet?” Is Not a Cooking Strategy)
Great outdoor kitchens work after sunset. You want bright, focused task lighting at the grill and prep
station, plus softer ambient light for eating and hanging out. The right lighting improves safety and
makes your space feel intentionallike you planned this, not like you accidentally hosted a cookout.
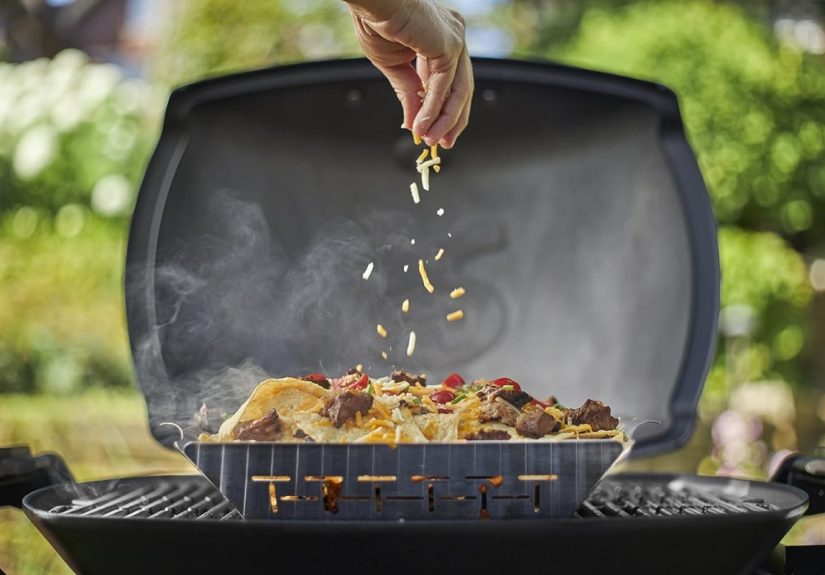
10) Trash, Recycling, and Grease Management (The Clean-Up System You’ll Actually Use)
Outdoor cooking creates wrappers, paper towels, and grease. If you don’t plan for it, trash piles up on
counters, guests “help” by stacking things in creative ways, and you end up carrying a leaky bag through
the house like a suspense film.
- Built-in or tucked-away bins: Keep them close to the prep zone.
- Grease can + drip management: Essential for grills and griddles.
- Paper towel holder: Simple, but it changes everything.
11) The Tool Kit: Fewer, Better, Always Ready
Skip the 25-piece “grill briefcase” unless you enjoy rummaging. A tight set of quality tools is faster,
safer, and less annoying.
- Long tongs + sturdy spatula: Your everyday workhorses.
- Instant-read thermometer: The fastest way to stop guessing and start nailing doneness.
- Heat-resistant gloves: For grates, pizza stones, hot pans, and general confidence.
- Grill brush/scraper: Choose a design you’ll actually use regularly.
- Cutting board: Prefer non-porous and easy to sanitize.
Pro move: store tools in a dedicated drawer or weatherproof bin near the grill. If tools live inside,
you’ll always be missing the one you need. It’s a law of backyard physics.
12) Covers, Cleaning, and Maintenance (Protect the Investment)
Rain, sun, dust, and pollen love your outdoor kitchen. Covers help appliances last longer, and regular
wipe-downs prevent corrosion and grime buildup. If you live near salt air or deal with harsh winters,
step up your maintenance routine and consider more corrosion-resistant materials.
13) A Basic Safety Kit (Small, Cheap, Non-Negotiable)
Outdoor cooking involves flame, hot metal, and occasionally someone saying “Watch this!” (ominous).
Keep a small safety kit nearby:
- Fire extinguisher rated for common household fires (mounted where you can reach it fast).
- First-aid kit (bandages, burn gel, antiseptic wipes).
- Clear zone around the grill (no clutter, no loose paper, no surprise decorations).
Design Smarts Bob Vila Would Approve Of
Create Work Zones (Not a Maze)
The most enjoyable outdoor kitchens have a simple flow:
cold storage → prep → cook → serve. If your fridge is behind the grill and your prep area is
across the patio, you’ll spend more time walking than cooking. Keep the “work triangle” compact, even outdoors.
Plan for Venting and Utilities First
The glamorous stuffstone finishes, fancy handlescomes after the fundamentals: gas line planning (or propane
storage), water supply and drainage, and electrical capacity. Do it right once, and your outdoor kitchen feels
effortless. Do it wrong, and your “dream build” becomes a weekly workaround.
Choose Materials Like You Choose Shoes
Flip-flops are great… until you hike a mountain. Same with materials. Outdoor kitchens need outdoor-ready
cabinets, countertops that can handle sun and heat, and hardware that won’t corrode the first time it rains.
Pick the stuff built for the job and you’ll spend more time cookingand less time Googling “why is my drawer
handle turning green?”
Conclusion: Build the Outdoor Kitchen You’ll Use
The best outdoor kitchen essentials aren’t the flashiestthey’re the most useful. Start with a grill that fits
your cooking style, add a second heat source for flexibility, build on weather-resistant cabinets and a durable
countertop, and make life easier with outdoor-rated refrigeration, a sink, and well-placed power and lighting.
Then lock it in with smart storage, a lean tool kit, routine maintenance, and a basic safety setup.
Do that, and your backyard stops being “the place where the grill lives” and becomes the place where everyone
gathersbecause it works.
Backyard Lessons Learned (Real Experiences, Real Results)
Here’s the part nobody tells you until you’ve hosted exactly one big cookout: an outdoor kitchen is less about
cooking equipment and more about traffic control. The first time I cooked for a crowd outside, I had a nice
grill, decent food, and the confidence of someone who had never tried to toast buns while answering three
questions at once. That confidence lasted right up until I realized the buns were inside, the serving tray was
inside, the tongs had vanished (inside?), and I was doing so many laps through the back door that my fitness
tracker tried to congratulate me for “a successful marathon.”
The single biggest upgrade wasn’t a fancy applianceit was a prep zone that stayed outdoors:
a stable counter, a cutting board, a drawer for tools, and a dedicated bin for trash. Suddenly, I wasn’t setting
raw chicken packaging next to clean plates because “there’s nowhere else.” Everything had a home, and the entire
cook felt calmer. It’s wild how quickly your stress level drops when you aren’t playing the game
Where Did I Put the Spatula? every four minutes.
Second lesson: lighting is confidence. I used to think, “It’s outdoorsthere’s plenty of light.”
That statement is true right up until the sun goes down and you’re squinting at chicken like it’s a magic-eye
poster. Once I added bright task lighting over the grill and prep area, I stopped overcooking food “just in case”
and started hitting consistent results. Also: guests stopped offering unhelpful commentary like, “I think it’s done?”
(Thanks, Kyle. Very scientific.)
Third lesson: an outdoor fridge changes hosting dynamics. When drinks and condiments live outside,
guests stop migrating into your indoor kitchen, opening every cabinet, and accidentally forming a line in front of
the one drawer you need. It’s not just convenienceit’s flow. The patio becomes the party, and the indoor kitchen
becomes… blissfully irrelevant. Add a small beverage fridge and you’ll wonder why you waited.
Fourth lesson: the thermometer is the great equalizer. I love the romance of “knowing by feel,” but
I love perfectly cooked steak more. The first time I used a great instant-read thermometer, I realized half my
previous “perfect” burgers were actually “optimistic.” It also helps when you’re cooking chicken for a group and
would prefer not to reenact a food safety training video.
Fifth lesson: outdoor materials are not a place to bargain-hunt blindly. I once tried to “save money”
on storage with something that wasn’t truly outdoor-rated. It looked fine for a month, then the drawer started
sticking, the hardware dulled, and the whole unit developed the vibe of a beach car that’s seen too many summers.
Weather-resistant cabinetry and corrosion-resistant metals aren’t luxury upgradesthey’re the difference between a
kitchen and a weekend chore.
Finally: plan for cleanup as part of cooking. When you have a trash bin nearby, paper towels handy,
and a quick rinse option (sink or wash station), the end of the night doesn’t feel like punishment. You can wipe
down surfaces while food rests, scrape grates while they’re warm, and wrap up without dragging chaos indoors. The
outdoor kitchen becomes a systemcook, serve, cleanrather than a scattered collection of stuff that you avoid
dealing with until tomorrow.
If you’re building your own, here’s my honest best advice: start with the essentials that reduce steps and friction.
Convenience is what makes you use the space again and again. And if you’re ever unsure whether something matters,
ask yourself: “Will this prevent me from running inside with messy hands?” If the answer is yes, it’s probably a
must-have.