Table of Contents >> Show >> Hide
- What Makes a “Weekend Bathroom Makeover” Actually Work
- Friday Night Game Plan: Set Yourself Up for a Saturday Win
- 10 Incredible Weekend Bathroom Makeovers (With Realistic Examples)
- 1) Paint That Changes the Mood Instantly
- 2) The Vanity Glow-Up: Paint + Hardware = New Personality
- 3) Mirror Makeover: Swap It or “Frame” It
- 4) Lighting That Makes the Whole Room Look More Expensive
- 5) Peel-and-Stick (or Floating) Flooring for a Quick New Base
- 6) Grout & Caulk Refresh: The “Why Does It Look So Clean?” Trick
- 7) Faucet Swap: Small Part, Big Visual Upgrade
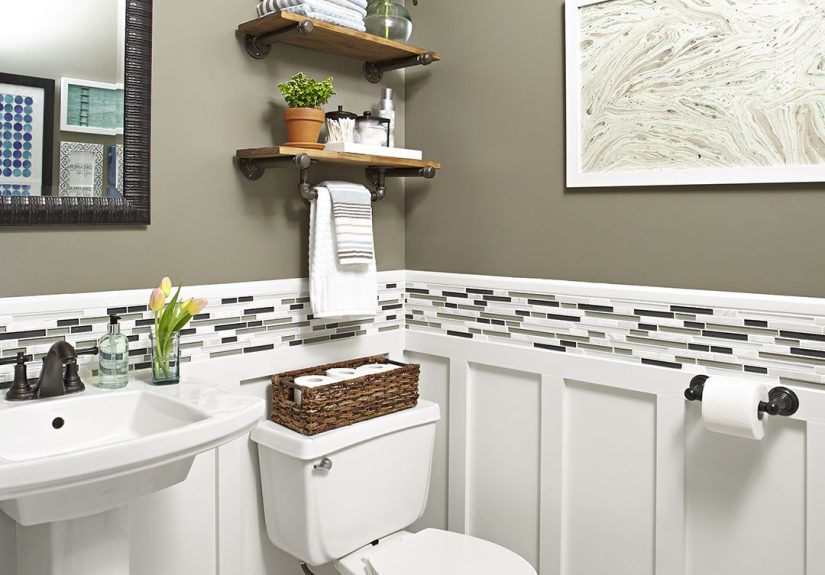
- 8) Storage That Looks Like Decor (Instead of “Chaos Shelving”)
- 9) Fixture Refinishing: High Impact, High Respect for Safety
- 10) Ventilation Upgrade: The Makeover That Protects Your Makeover
- Design Tricks That Make Weekend Upgrades Look Like a Real Remodel
- Common Weekend Pitfalls (So You Don’t Spend Sunday Re-Doing Saturday)
- A Simple 2-Day Weekend Schedule You Can Steal
- Experience Notes: What Weekend Bathroom Makeovers Feel Like (The Honest Version)
- Conclusion
Your bathroom doesn’t need a full-blown demolition derby to look like it got a glow-up. In fact, some of the most jaw-dropping “before-and-after”
results happen when people stay laser-focused on high-impact changes they can finish in a weekendno moving plumbing, no surprise holes in the wall
that look back at you like, “So… we’re doing this now?”
This guide pulls together what weekend DIYers and home-improvement pros repeatedly emphasize: prep like a grown-up, pick the right projects, and let
drying/curing times be the boss (because paint and caulk do not care about your brunch reservation). You’ll get makeover ideas, realistic timelines,
and specific examples you can copywithout turning your home into a construction site for six months.
What Makes a “Weekend Bathroom Makeover” Actually Work
A true weekend bathroom makeover has one goal: maximum visual change with minimal structural change. Translation: you can absolutely swap
finishes, paint, lighting, storage, and accessorieswhile leaving your tub, toilet, and major plumbing where they are.
- Keep the footprint. No relocating fixtures. If it involves re-routing plumbing, it’s not a weekend project.
- Pick 2–4 upgrades that “talk to each other.” Example: paint + mirror + lighting + hardware = instant style coherence.
- Plan around cure time. The makeover isn’t hardit’s the waiting that tests your character.
- Define “done.” A weekend makeover finishes. A “weekend start” becomes a hallway of regret.
Friday Night Game Plan: Set Yourself Up for a Saturday Win
The secret weapon of fast makeovers is not talent. It’s not even coffee. It’s pre-work. Spend 45–90 minutes on Friday doing these:
1) Measure (Yes, Really)
Measure your mirror width, vanity-light bar spacing, faucet hole configuration, and any tight clearances. Bathrooms love “almost fits” surprises.
2) Shop Smart
Buy everything before you start: paint, primer, rollers, drop cloths, new hardware, silicone caulk, painter’s tape, spackle, sandpaper, and any
replacement fixtures. If you’re swapping lighting or a fan, confirm you have the right electrical box and mounting method.
3) Stage the Space
Clear counters and the top of the toilet tank. Put daily essentials in a basket you can move in and out. Your bathroom should look like a hotel room
that’s about to be renovatedbecause it is.
10 Incredible Weekend Bathroom Makeovers (With Realistic Examples)
1) Paint That Changes the Mood Instantly
If your bathroom is “builder beige,” paint is the fastest way to make it feel intentional. The trick is using bathroom-friendly paint and doing the
prep that prevents peeling and streaks.
Example makeover: A small powder room goes from bland to boutique with a deep blue-gray on the walls, crisp white trim, and one warm
brass mirror. It looks designedbecause it is, and your “designer” is… you.
- Clean walls (bathrooms collect invisible grime).
- Patch holes, sand smooth, and remove dust.
- Use quality primer if you’re covering stains, glossy surfaces, or dramatic color changes.
- Paint in a logical order (ceiling, trim, walls) to reduce touch-ups.
2) The Vanity Glow-Up: Paint + Hardware = New Personality
Painting a vanity is a classic weekend winespecially when the cabinet is structurally fine but visually stuck in 2007. Proper sanding and a bonding
primer are your best friends here.
Example makeover: A dated oak vanity becomes a matte charcoal statement piece with brushed nickel pulls and a clean white countertop.
The whole bathroom reads “updated,” even if nothing else moved.
- Label doors/drawers so you don’t play “Where does this go?” at 10 p.m.
- Lightly sand to scuff (especially glossy finishes).
- Prime, then use thin coats of paint for a smoother finish.
- Upgrade hardware (and consider using a template so everything aligns).
3) Mirror Makeover: Swap It or “Frame” It
A big, builder-grade mirror can make your bathroom feel like a rentaleven if you own the place. Swapping to a framed mirror is immediate impact.
If removal is a pain, framing the existing mirror can be a clever shortcut.
Example makeover: A plain wall mirror becomes a black metal frame focal point, instantly making the vanity area feel modern and
“finished.” Bonus: you stop staring at exposed mirror clips like they’re part of the decor.
4) Lighting That Makes the Whole Room Look More Expensive
If you do one “wow” upgrade, make it lighting. A new vanity light (or a pair of sconces) changes the vibe fast. Just respect electricity: turn off
power at the breaker and confirm it’s off before touching anything.
Example makeover: Replace a dated frosted-bar fixture with a cleaner modern light and warm LED bulbs. Suddenly the mirror area looks
crisp, and the bathroom doesn’t feel like it’s auditioning for a “before” photo.
- Pick bulbs with flattering color temperature (many people prefer warm-to-neutral).
- Size matters: the fixture should match the vanity width and mirror scale.
- When in doubt, hire a licensed electricianespecially in older homes.
5) Peel-and-Stick (or Floating) Flooring for a Quick New Base
Flooring is a dramatic change, but it’s also the upgrade most likely to fail if moisture isn’t handled. Peel-and-stick can be great for quick refreshes
when the subfloor is smooth and dry, and when you’re realistic about longevity. Floating vinyl planks can be another DIY-friendly option, depending on
your layout.
Example makeover: A tired vinyl sheet floor becomes a crisp patterned look using DIY-friendly flooring. Paired with fresh paint and a
new light, it reads like a mini-renovation.
- Prep is everything: clean, level, and dry the surface.
- Seal edges near tubs/showers with appropriate bathroom-safe caulk.
- Choose products intended for the moisture level you’ll have.
6) Grout & Caulk Refresh: The “Why Does It Look So Clean?” Trick
Old caulk and stained grout can make a bathroom feel dirty even when it’s spotless. Recaulking a tub or shower and refreshing grout lines can be a
high-impact weekend project with a surprisingly dramatic payoff.
Example makeover: A shower goes from “meh” to “fresh” by removing the yellowed caulk, cleaning mildew, reapplying smooth bright caulk,
and touching up grout. It’s not glamorous workbut the results look like a pro cleaning plus a small renovation.
- Remove old caulk thoroughly (half-removal = future mold party).
- Let everything dry before reapplying new caulk.
- Follow cure times before using the shower again.
7) Faucet Swap: Small Part, Big Visual Upgrade
Swapping a faucet can modernize the entire vanity zone. It also helps if yours has hard-water buildup or persistent leaks. Turn off water supplies,
protect the sink surface, and take a photo before you disconnect anything so reassembly isn’t a scavenger hunt.
Example makeover: Replace an older chrome faucet with a streamlined brushed nickel or matte black style, match the towel bar finish,
and the room suddenly looks coordinated.
8) Storage That Looks Like Decor (Instead of “Chaos Shelving”)
Bathrooms are small, and small rooms punish clutter. Adding smart storage can feel like a makeover even when nothing “pretty” changesbecause the
bathroom becomes easier to live in.
- Install a simple shelf above the toilet (anchored properly).
- Use matching containers for cotton balls, Q-tips, and soaps.
- Swap a towel bar for hooks if you need faster drying and easier use.
- Choose a slim rolling cart for tight spaces if cabinetry is limited.
9) Fixture Refinishing: High Impact, High Respect for Safety
Refinishing a tub or refinishing certain fixtures can be a powerful makeover movebut it’s not a casual craft project. Products can have strong fumes,
and ventilation is non-negotiable. Some homeowners choose to hire this out so the finish lasts and the process is safer.
Example makeover: A dingy tub becomes bright again, paired with new caulk lines and a fresh shower curtain. The bathroom suddenly feels
“cleaner,” because visually, it is.
- Ventilate aggressively (fan + open window + exhaust strategy).
- Use proper respiratory protection if required by the product.
- Follow cure times exactly before using water on the surface.
10) Ventilation Upgrade: The Makeover That Protects Your Makeover
Want your bathroom updates to last? Control moisture. Better ventilation helps reduce mold risk, protects paint, and keeps your new caulk lines from
turning into a science experiment.
Example makeover: Replace a noisy, weak fan with a quieter, more effective model. Add a simple habit: run the fan during showers and for
a bit afterward. Your bathroom stays drier, and everything you just refreshed lasts longer.
Design Tricks That Make Weekend Upgrades Look Like a Real Remodel
- Pick one “hero” finish. Example: matte black or warm brass, then repeat it in 2–3 spots (faucet, mirror frame, hooks).
- Go bigger on the mirror. A larger mirror adds light and makes small bathrooms feel larger.
- Use contrast intentionally. Light walls + darker vanity feels custom; darker walls + bright trim feels dramatic and polished.
- Make lighting flattering. Good lighting makes everything look betterskin, paint color, and your confidence.
- Declutter like it’s part of the renovation. Fewer items on the counter = “new bathroom” energy.
Common Weekend Pitfalls (So You Don’t Spend Sunday Re-Doing Saturday)
Rushing prep
Skipping cleaning and sanding is like putting lipstick on a wet dog. It won’t stick, and everyone will be upset.
Ignoring cure times
Paint and caulk need time. If you shower too soon, your fresh work can fail and you’ll be back to square onewith extra frustration seasoning.
Doing too much at once
Pick a tight scope. A great weekend makeover is focused. A chaotic weekend makeover is a “Why is the vanity in the hallway?” situation.
A Simple 2-Day Weekend Schedule You Can Steal
Friday night (1–2 hours)
- Measure, shop check, stage tools and materials.
- Clear the room, clean surfaces, remove hardware.
Saturday
- Morning: Patch/sand, tape, prime if needed.
- Afternoon: First coat paint; start vanity paint if included.
- Evening: Second coat as needed; let surfaces dry.
Sunday
- Morning: Install mirror, hardware, faucet (if swapping).
- Afternoon: Install lighting (or schedule electrician); caulk touch-ups.
- Evening: Style and reset the space; follow cure rules before showering.
Experience Notes: What Weekend Bathroom Makeovers Feel Like (The Honest Version)
Weekend bathroom makeovers have a very specific emotional timeline, and it goes something like this: Friday night optimism, Saturday morning ambition,
Saturday afternoon reality, Saturday evening bargaining, and Sunday triumph (or at least “good enough for guests”). The good news? That rollercoaster is
normaland you can plan for it.
The first thing people notice is how much time disappears into “invisible work.” Cleaning walls, scraping old caulk, sanding glossy cabinet doors,
vacuuming dustnone of it looks impressive in a progress photo, but it’s the difference between a makeover that lasts and one that chips the first time
someone aggressively opens a drawer. If you’ve ever wondered why a pro’s paint looks smoother, it’s not magic. It’s prep, patience, and a refusal to
paint over mystery residue.
Another common experience: the bathroom starts to look worse before it looks better. The mirror is off the wall, the vanity doors are leaning against a
hallway chair, and your sink looks like it’s wearing plumbing as jewelry. This is the moment when people typically question their life choices. The trick
is to have a “temporary functional setup”: keep a small basket with toothpaste, soap, and essentials, and accept that for 24–48 hours, you’re basically
living in a home improvement montage.
By Saturday afternoon, most DIYers discover the second boss battle: drying and cure times. Paint may feel dry to the touch, but it’s still vulnerable.
Caulk can look perfect and still need time before it’s ready for water. This is where planning pays off. If you know you need the shower Sunday night,
skip any step that requires long cure timesor do it last and use a backup bathroom if you have one. Many weekend warriors also learn to embrace
“overnight wins”: paint on Saturday, install hardware and a new mirror Sunday. That sequencing reduces smudges, fingerprints, and the urge to scream.
The best part of the weekend makeover experience is how quickly your brain recalibrates once the room is coherent. A painted vanity plus modern hardware
can make an old countertop feel newly intentional. A new vanity light can make the wall color look richer and the mirror area feel “designed.”
Fresh caulk lines can make tile look like it was cleaned by angels. It’s not that each upgrade is hugeit’s that they stack. The bathroom stops feeling
like a random assortment of parts and starts feeling like one idea.
Finally, there’s the “Sunday evening satisfaction” moment: you turn on the new light, the mirror looks crisp, the towels are folded, and the space feels
calmer. It’s a small room, but it changes your daily routinemornings feel less frantic, evenings feel more spa-like, and you quietly become the kind of
person who says things like, “We just refreshed it over the weekend,” as if you didn’t spend two hours negotiating with a stubborn caulk line. That’s the
charm of a weekend bathroom makeover: it’s not about perfectionit’s about momentum, confidence, and a bathroom that finally feels like it belongs to you.
Conclusion
The most inspiring weekend bathroom makeovers aren’t the ones with the biggest budgetsthey’re the ones with the smartest choices. Pick upgrades that
visually transform the space (paint, lighting, mirrors, hardware, caulk/grout refresh), respect moisture and cure times, and keep your scope tight.
Do that, and by Sunday night you’ll have a bathroom that looks fresh, intentional, and genuinely nicer to usewithout the pain of a full renovation.