Table of Contents >> Show >> Hide
- Why Beads and Buttons Make a Shockingly Good Leopard
- Materials and Tools
- Design Planning: Make It Look Like a Leopard (Not a Spotted Potato)
- Step-by-Step: Building the Bead-and-Button Leopard
- Step 1: Build the body form
- Step 2: Create a “beadable” surface
- Step 3: Lay down the base coat with beads
- Step 4: Add contour and muscle definition
- Step 5: Build rosettes with buttons (and keep them believable)
- Step 6: Face details that sell the whole piece
- Step 7: Tail and pawstiny areas, big impact
- Step 8: Secure, seal, and finish
- Troubleshooting: Common Problems and How to Fix Them
- Display, Care, and Longevity
- Creative Variations: Same Technique, Different Big Cat Energy
- Time, Cost, and the “Bead Budget” Reality Check
- Final Thoughts: The Leopard Is the Point (But So Is the Process)
- My Beads-and-Buttons Leopard: of Real-World Crafting Experience
The first time I dumped a jar of seed beads onto my worktable, I learned two things: (1) beads obey the laws of physics
the way toddlers obey bedtime, and (2) a leopard is basically the perfect excuse to use every “mystery brown” button you’ve
ever saved in a coffee tin. Leopards are all about texture and patternwarm tawny fur, shadowy rosettes, and that
sleek, ready-to-pounce silhouette. Beads and buttons just happen to be tiny, shiny, delightfully stubborn building blocks
that love showing off texture.
This post is a practical (and slightly chaotic) guide to making a bead-and-button leopardfrom planning the pose to
placing rosettes that look intentional instead of “oops, I sneezed near the glue.” You’ll get material suggestions,
step-by-step construction ideas, design tricks based on real leopard coat patterns, and a big dose of “what I wish I’d
known before I tried to bead an ear at midnight.”
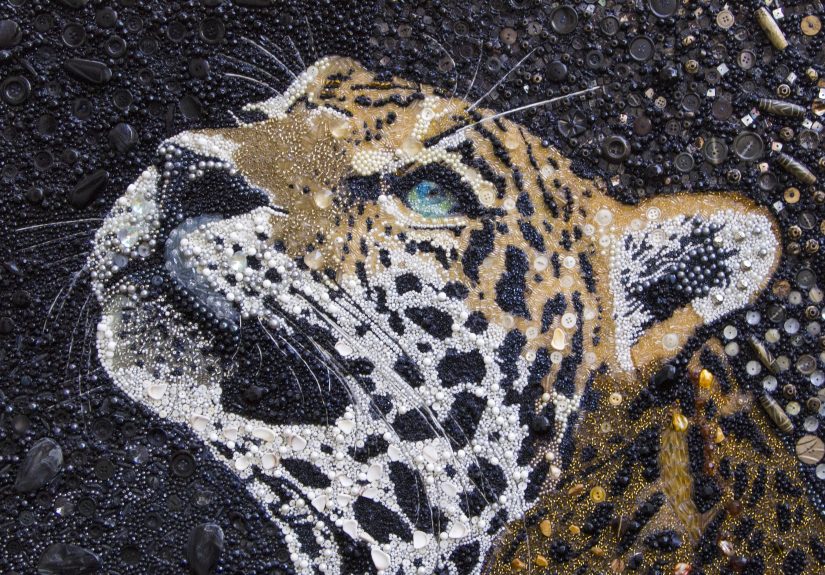
Why Beads and Buttons Make a Shockingly Good Leopard
A leopard’s coat reads as three things at once: a base color, a layered pattern, and a soft-but-structured surface. Beads
can mimic the “grain” of furespecially matte seed beads that scatter light like fuzzwhile buttons create raised, tactile
“rosettes” that pop in a way paint can’t. You’re basically building a miniature topographic map of leopard camouflage.
Bonus: leopard rosettes aren’t identical. In real life, the coat pattern is a mix of spots and rose-like rings that break
up the animal’s outline in brush and forest. That natural irregularity is a gift. If two rosettes don’t match, you can
shrug and say, “Nature did it first.”
Materials and Tools
Beads: your “fur” ingredient
Start with a small palette: a warm tan, a medium brown, a dark brown/black, and a creamy off-white for the belly and inner
legs. Seed beads create smooth coverage; bugle beads can add directional “fur” lines or highlight contours (like shoulder
blades or the tail ridge). Mixing finishes helps: matte for the base coat, a few glossy or metallic beads for subtle
highlights so your leopard doesn’t look like a flat cookie.
Buttons: rosettes, muscles, and personality
Buttons are your instant dimension. Flat buttons work for low-profile rosettes; shank buttons (with a loop on the back)
are great for raised texture and can be stitched down securely without visible thread on top. A mix of 2–4 sizes will make
your coat pattern feel organic. And yesthis is where the lonely button from a coat you threw away in 2013 finally gets
its moment.
Base structure: pick your leopard “skeleton”
You have three beginner-friendly options:
- Wire armature + padding: best for a free-standing sculpture with a pose (walking, crouching, lounging).
- Foam form: easiest for a solid, lightweight body; great if your leopard is sitting or lying down.
- Canvas/board silhouette: best for wall artbutton rosettes on a leopard outline.
If you want the “wow, it stands up!” effect, go wire armature. If you want “I finished this in a weekend,” go foam or wall art.
Attachment methods: stitching beats glue… until glue saves your sanity
For anything meant to last, stitching is the MVP: nylon beading thread, strong polyester thread, or gel-spun thread for
strength. Use beading needles sized to your bead holes. Glue is still usefulespecially for anchoring buttons on hard
surfaces, sealing edges, or stabilizing tricky areas. If you use industrial adhesives or epoxy, work in a well-ventilated
area and follow safety guidance. (Your leopard should be wildyour lungs should not.)
Design Planning: Make It Look Like a Leopard (Not a Spotted Potato)
Before you attach a single bead, decide three things: pose, scale, and pattern map.
Leopards are compact, muscular cats with long tails and a “low, fluid” posture. Even a small sculpture looks more lifelike
if the back slopes gently from shoulders to hips and the tail has a natural curve.
Rosettes 101: what you’re actually trying to copy
Leopard markings are called rosettesflower-like rings that often lack a central dot (unlike jaguars, which
commonly have a dot inside the rosette). The head, legs, and neck tend to have smaller, more solid spots, while the body
features larger rosettes. Translating that to craft form means: tighter, smaller button clusters on the face and limbs;
larger ring-like groupings on the torso.
Quick pattern sketch that saves hours later
Draw (or print) a simple leopard outline from the side and top view. Then lightly pencil where you want:
(1) lighter belly and inner legs, (2) denser spots on shoulders/neck, (3) larger rosettes on ribs and hips, (4) a darker
tail tip. This is your roadmap. Without it, you’ll keep “fixing one spot,” and suddenly it’s 2 a.m. and you’re negotiating
with a button like it owes you money.
Step-by-Step: Building the Bead-and-Button Leopard
Step 1: Build the body form
Wire armature method: Twist aluminum or steel wire into a spine with four legs, leaving extra wire for the tail.
Bulk the body with foil, batting, or strips of fabric tape. The goal is a firm, lightweight shape you can stitch through.
Wrap with felt or a sturdy fabric “skin” so beads and buttons have something to grip.
Foam method: Carve a leopard body from high-density foam (craft foam or upholstery foam). Sand or trim smooth,
then wrap in felt. Foam is forgiving: if your leopard looks too chunky, you can literally shave it down like a topiary.
Step 2: Create a “beadable” surface
Bead embroidery foundations and stiff felt-like materials work well because they hold stitches without puckering. If your
base is smooth (foam or board), consider a fabric layer that you can stitch through. For wall art, a canvas or wood panel
can be used; buttons can be glued and beads can be stitched onto a fabric overlay that’s attached to the panel.
Step 3: Lay down the base coat with beads
Start with the belly and inner legs in lighter beads, then move outward to the tawny coat. Use a simple bead embroidery
approach: stitch down a short line of beads, then reinforce by passing back through them. Work in small sections so the
surface stays smooth and you can control curves (shoulders, haunches, cheeks).
Pro tip: Slightly vary your tan shades every few rows. Real fur isn’t one flat color, and this tiny change
makes your leopard look “alive” even before you add rosettes.
Step 4: Add contour and muscle definition
Leopards have strong shoulders and powerful hindquarters. To suggest that anatomy:
- Use darker tan/brown beads along the underside of the ribcage and inner thigh to create shadow.
- Add a subtle “ridge” line of slightly darker beads along the spine (not a stripejust a whisper).
- Use bugle beads sparingly to create directional fur lines around joints (shoulders, elbows, hips).
Step 5: Build rosettes with buttons (and keep them believable)
This is the signature move. You can create rosettes in two main ways:
-
Button-ring rosettes: Arrange 4–7 small dark buttons in a loose ring, leaving the center mostly the base
coat color. This echoes the “open rosette” look. -
Button + bead rosettes: Stitch or glue a central button, then surround it with a ring of darker beads or
smaller buttons to create a more complex marking.
Keep rosettes irregular. Rotate button sizes. Let some rings “break” on one side. Real leopard patterns are
not perfectly stamped.
Step 6: Face details that sell the whole piece
If the body is the outfit, the face is the handshake. Spend time here.
- Eyes: Use two matching buttons or cabochons. Surround with small beads to shape eyelids.
- Nose: A small dark button or bead cluster works well. Define the muzzle with lighter beads.
- Whisker pads: Build two raised ovals with beads; add a few darker bead “freckles.”
- Ears: Keep them small and rounded. Add lighter beads on the inner ear and darker beads on the rim.
Step 7: Tail and pawstiny areas, big impact
Tail: taper it gradually and finish with a darker tip. Paws: define toes with a few darker beads and keep the underside
slightly darker to suggest shadow. If your leopard is standing, make sure paws are stablenothing ruins majestic feline
energy like a craft that faceplants in front of guests.
Step 8: Secure, seal, and finish
Reinforce high-stress areas (neck, legs, tail base) with extra passes of thread. If you used glue for buttons, allow full
cure time before handling. For wall art, a clear sealer can help reduce dust and protect surface elementstest first on a
small section so you don’t cloud shiny beads.
Troubleshooting: Common Problems and How to Fix Them
“My rosettes look like polka dots.”
Make them larger and more ring-like on the torso. Use multiple buttons to form a loose circle rather than a single dot.
Add a few bead “breaks” so the ring isn’t too perfect.
“My surface is lumpy.”
Work in smaller sections and keep bead lines short around curves. If you’re stitching, keep tension consistent; if you’re
gluing, apply adhesive sparingly and press buttons flat while curing.
“Buttons keep popping off.”
Stitch through buttonholes or shanks whenever possible. For hard bases, use an adhesive designed for the material and rough
up slick surfaces slightly so the bond has something to grab.
“The leopard looks… surprised.”
That’s an eye placement issue. Move eyes slightly closer together and add bead “lids” to soften the stare. Also, a slightly
larger muzzle area makes the face feel more cat-like and less cartoonish.
Display, Care, and Longevity
Beads and buttons are durable, but they’re not immune to gravity, dust, or enthusiastic toddlers. For sculptures, display
away from direct sunlight to prevent fading and keep them dusted with a soft brush. For wall art, secure the piece firmly
and avoid humid areas if you used water-based glues.
If you ever need to transport your leopard, wrap it like it’s a museum artifact (because emotionally, it is). Buttons love
snagging on bubble wrap, so use soft cloth layers first.
Creative Variations: Same Technique, Different Big Cat Energy
- Snow leopard: pale gray base beads with larger, smokier rosettes; add extra fluff texture with matte beads.
- Jaguar-inspired: larger rosettes with inner dots (bead or tiny button) on the torso.
- Black leopard (melanistic): deep black beads with slightly glossier rosettes so the pattern shows in light.
- Pop-art leopard: neon beads, mismatched vintage buttons, and a shamelessly dramatic pose.
Time, Cost, and the “Bead Budget” Reality Check
A small wall piece can be done in a weekend; a free-standing sculpture usually takes longer because structure and stability
matter. Cost depends on your stash. If you’re buying everything new, seed beads and specialty buttons can add up fast. If
you thrift buttons, repurpose broken jewelry for beads, and keep your palette tight, you can build something impressive
without turning your wallet into a tragic cautionary tale.
Final Thoughts: The Leopard Is the Point (But So Is the Process)
The best part of making a leopard from beads and buttons isn’t just the final shimmerthough yes, it’s wildly satisfying
when the rosettes finally “click.” It’s the way the project turns tiny, ordinary objects into something that feels alive.
A button becomes a shoulder muscle. A line of beads becomes a curve of fur. And suddenly your craft table is hosting a
small, glamorous predator who absolutely refuses to pay rent.
My Beads-and-Buttons Leopard: of Real-World Crafting Experience
I thought I was being efficient when I poured all my tan and brown beads into a single tray. “One tray, one leopard,” I
told myself, like a person who has never met static electricity. Five minutes later, my elbow clipped the tray, and the
beads did what beads do best: they fled in every direction like they’d heard a rumor about a 90% off sale. I spent the
next half hour picking them out of my cutting mat grooves with tweezers, questioning my life choices, and learning that
bead organization is not a personality traitit’s a survival skill.
The button phase was even more emotional. I have a tin of “sentimental buttons,” which is a fancy way of saying I can’t
throw away anything with four holes. Some were from thrifted coats, some were from an old cardigan, and a few were
suspiciously glamorous and probably belonged to a relative who dressed like a jazz singer. I started arranging rosettes
and immediately discovered the first rule of button art: the cutest button is always the wrong size for the spot you want
it to fit. I tried to force one anyway (because I am stubborn), and the rosette turned into a lopsided blob that looked
less “stealth predator” and more “cookie with raisins.”
The breakthrough came when I stopped trying to make every rosette identical. I’d been chasing symmetry like it was going to
pay my bills. Once I switched to building rosettes as loose ringsthree small buttons, one medium button, a tiny bead gap,
then another buttonit suddenly looked natural. I also started clustering smaller spots on the legs and face, which made
the body rosettes feel appropriately larger by comparison. That little scale trick was the difference between “spotted
craft” and “recognizable leopard.”
The face took the longest because faces are rude like that. I changed the eyes twice. The first set was too big and gave my
leopard an expression that said, “I have seen your browser history.” The second set was too small and made it look
permanently sleepy. The third attempt finally worked: medium buttons for eyes, a narrow bead outline for eyelids, and a
lighter bead muzzle to soften the look. It was also the moment I learned that eyelids are not optional. Eyelids are the
difference between “majestic cat” and “animated sticker that’s judging you.”
By the end, my fingers were a little sore, my floor sparkled, and I had a new respect for anyone who does detailed beadwork
for a living. But when I stepped back and saw the finished leopard catching the lightbeads creating the warm base coat,
buttons lifting the rosettes into real textureit felt like the whole mess was worth it. Not because it was perfect, but
because it was unmistakably mine: a leopard built out of tiny leftovers, patience, and the kind of stubborn joy that keeps
crafters coming back even after the Great Bead Spill of Tuesday.