Table of Contents >> Show >> Hide
- Table of Contents
- What “Waterproof” Wood Really Means
- Choose Your Finish: Oils vs. Stains vs. Sealants
- Prep Work That Makes or Breaks the Job
- Method 1: Waterproof Wood with Oils
- Method 2: Waterproof Wood with Exterior Stains
- Method 3: Waterproof Wood with Clear Sealants
- Method 4: Paint Systems (Maximum Coverage, Not Maximum Grain)
- Method 5: Epoxy Encapsulation (The “Boat-Building” Approach)
- Bonus: Waterproofing Starts with Design
- Maintenance: Keep Water Out for the Long Haul
- FAQ
- Field Notes: of Real-World Waterproofing Experiences
Wood is basically nature’s sponge with great hair. It soaks up moisture, swells, dries out, shrinks, and then acts surprised when it cracks.
If you want your deck, fence, outdoor furniture, or bathroom shelf to survive real life (rain, sun, spilled drinks, and that one plant you
“definitely water responsibly”), you need a finish that slows water down and helps the wood handle the outdoors without throwing a tantrum.
This guide breaks down the best ways to waterproof (a.k.a. seriously water-resist) wood: penetrating oils, stains, film-building sealants
like polyurethane and spar urethane, plus heavy-duty options like epoxy and paint systems. You’ll also learn how to prep correctly, what to
use for different projects, and how to maintain your finish so you’re not redoing everything every other weekend.
What “Waterproof” Wood Really Means
Let’s clear up a myth before it grows legs and moves into your garage: most finishes don’t make wood truly waterproof forever.
Wood still exchanges moisture with the air. What a good finish does is slow the rate of water absorption and help the surface shed water
instead of gulping it down like it’s the last cup at the office.
In practice, “waterproofing wood” means you’re doing three things:
- Blocking liquid water (rain, splashes, condensation) from soaking in quickly.
- Protecting against UV so sun doesn’t destroy the finish and bleach the wood.
- Reducing mildew and rot risk by keeping wood drier, longer.
The best waterproof wood finish depends on where the wood lives (indoors vs. outdoors), how it’s used (deck traffic vs. decorative trim),
and the look you want (natural grain vs. solid color).
Choose Your Finish: Oils vs. Stains vs. Sealants
Think of wood finishes like rain gear. Some soak in like a water-repellent fabric treatment. Others form a full-on rain jacket shell.
Here’s the simple breakdown:
Quick Decision Guide
| Option | Best For | Look | Water Protection | UV Protection | Maintenance |
|---|---|---|---|---|---|
| Penetrating oils (tung, linseed, oil blends) | Furniture, doors (sheltered), rustic pieces | Natural, warm, “hand-rubbed” | Moderate | Low unless tinted/topcoated | Frequent refresh |
| Exterior stains (transparent to solid) | Decks, fences, siding, pergolas | From “see grain” to opaque | Good to excellent | Good (pigment helps) | 1–3+ years typical |
| Clear sealants (spar urethane, exterior varnish) | Outdoor furniture, trim, doors (not high-traffic floors) | Clear film: satin to gloss | Excellent (when intact) | Good (spar/exterior formulas) | Recoat before cracking/peeling |
| Paint systems (primer + paint) | Maximum weather protection on trim/siding | Solid color | Excellent | Excellent | Touch-ups when chipped |
| Epoxy + UV topcoat | Boats, outdoor counters, extreme moisture exposure | Sealed “encapsulated” base + clear/paint topcoat | Extreme | Depends on topcoat | Maintain UV layer |
Related keywords you’ll run into
While shopping, you’ll see phrases like wood sealer, water-repellent preservative, deck sealer,
spar varnish, exterior polyurethane, and stain and sealer in one.
They’re not identicalread the label for “exterior,” “UV protection,” and what surfaces are recommended (decks are their own beast).
Prep Work That Makes or Breaks the Job
Waterproofing fails for one main reason: the finish can’t bond well. And it can’t bond well because the surface is dirty, glossy, wet,
or already wearing a half-failed mystery coating from 2009.
Step-by-step prep checklist
-
Make sure the wood is dry. If the board feels cool/damp, or water darkens it instantly, wait.
Pressure-treated lumber especially needs time to dry before sealing or staining. -
Clean thoroughly. Remove dirt, mildew, sunscreen residue (yes, it happens), and old flaking finish.
A dedicated wood cleaner can help on decks and fences. -
Sand for adhesion. For most clear coats and oils, sand smooth and remove dust. For epoxy and many topcoats,
a slightly rougher “tooth” (think medium grit) improves bonding. -
Seal end grain like your project depends on it. End grain is a bundle of tiny straws. It drinks water first and causes
swelling, checking, and rot faster than the face grain. Pay extra attention to board ends, joints, and screw holes. -
Remove dust. Vacuum, tack cloth, or a clean damp rag (compatible with your finish). Dust left behind becomes
“texture,” and not the cool kind.
Prep isn’t glamorous, but neither is peeling finish. Choose your hard: sanding today, or scraping later.
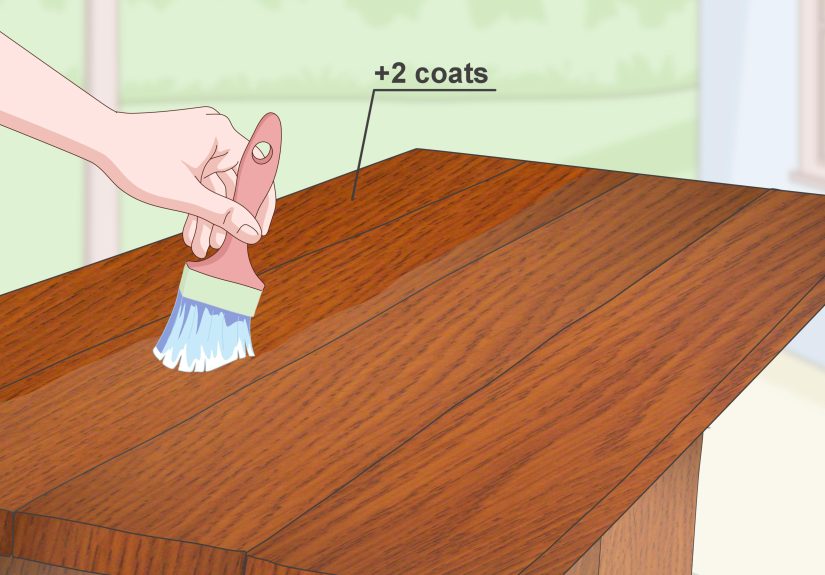
Method 1: Waterproof Wood with Oils
Penetrating oils sink into the wood fibers and help repel water from within. They’re easy to apply, easy to repair, and they make wood look
like it just came back from a relaxing vacation. The trade-off: oils usually need more frequent maintenance than thicker film finishes.
Best oil choices for water resistance
- Tung oil: Hardens more than many oils and offers good water resistance when fully cured.
- Boiled linseed oil (BLO): Common and beginner-friendly, but typically needs a topcoat or frequent refresh outdoors.
- Danish oil / oil-varnish blends: A mix that penetrates like oil but leaves some resin behind for extra protection.
How to apply oil (the “wipe-on, wipe-off” dance)
- Sand the wood (especially if it’s rough), then remove dust.
- Flood the surface with oil using a rag or brush. Keep it wet for several minutes so it can penetrate.
- Wipe off every bit of excess. Any oil left sitting on top can turn sticky or uneven.
- Let it cure fully, then repeat coats as needed.
Where oils shine (and where they don’t)
Oils are great for outdoor furniture under a covered patio, doors in mild exposure, and projects where you want a natural look with simple
touch-ups. But for full-sun, full-weather decks? Oils alone often lose the fight to UV and foot traffic. A pigmented stain or a deck-specific
product usually performs better there.
Pro tip: If you want an oil look with more durability, consider an exterior oil + compatible topcoat strategyjust make sure
the layers are designed to play nicely together.
Method 2: Waterproof Wood with Exterior Stains
Exterior stains are the sweet spot for a lot of outdoor projects because they do two jobs at once: they add pigment (which helps with UV) and
they add water repellency. For decks and fences, stains often outperform clear finishes because they age more gracefully and are easier to
recoat without stripping everything down to bare wood.
Types of exterior wood stain (and what they mean)
- Transparent / clear: Shows the most grain. Least pigment. Needs the most frequent reapplication.
- Semi-transparent: Still shows grain, but adds more UV-blocking pigment and usually lasts longer.
- Semi-solid: More color, less visible grain, more protection.
- Solid stain: Looks like paint but behaves more like a stain system. Great for older wood and strong UV defense.
How to stain and seal outdoor wood properly
- Pick the right day. Avoid rainy windows and extreme heat. Mild, dry weather is your friend.
- Stir, don’t shake. Shaking traps bubbles (and bubbles are basically tiny finish potholes).
- Work in sections. Keep a wet edge to avoid lap marks.
- Brush/roll and back-brush. Even if you spray, back-brushing helps push stain into the grain.
- Follow recoat timing. Too soon can trap solvents; too late can reduce bonding.
Best use cases
If you’re waterproofing a wooden deck, fence, pergola, gazebo, or siding, stains are often the most practical choice.
They repel water, slow mildew growth (many formulas include mildewcides), and handle wood movement better than brittle films.
Method 3: Waterproof Wood with Clear Sealants
Clear sealants create a film on top of the woodlike a protective shell. When intact, they offer excellent water resistance. The catch is that
outdoors, wood expands and contracts, UV breaks finishes down, and once a film cracks, water can sneak underneath and cause peeling.
So your real job is keeping the film healthy with smart application and timely maintenance.
Polyurethane vs. spar urethane vs. varnish
-
Interior polyurethane: Tough and scratch-resistant, great for indoor furniture and floors. Outdoors, it may fail faster because it’s
not always formulated for UV and weather swings. - Spar urethane / exterior polyurethane: Designed for sunlight, moisture, and temperature changes. Typically more flexible and contains UV blockers.
- Exterior varnish (marine varnish / spar varnish): Often built for flexibility and UV exposure; a classic choice for brightwork and outdoor pieces.
How to apply clear sealant without losing your mind
- Sand smooth and clean. Dust is the enemy of clarity.
- Apply thin coats. Thick coats sag, trap bubbles, and take forever to cure.
- Sand lightly between coats. This helps adhesion and smoothness (check the product directions).
- Build enough film. Outdoors typically needs multiple coats for meaningful protection.
- Pay attention to edges and end grain. Coat them like they’re the front door of your projectbecause they are.
Where clear sealants are perfect
Clear exterior finishes are great for outdoor doors, trim, patio furniture, and decorative pieces where you want the wood grain to shine.
For high-traffic horizontal surfaces (like decks), many clear films get worn down quickly. Deck-specific stains and sealers usually win that matchup.
Method 4: Paint Systems (Maximum Coverage, Not Maximum Grain)
Paint is the “umbrella and raincoat and waterproof boots” option. A quality exterior primer + paint system blocks liquid water extremely well and
provides excellent UV protection. If you don’t mind covering the grain, paint can be one of the best ways to weatherproof wood on trim, siding,
and outdoor structures.
Paint waterproofing tips that actually matter
- Prime everythingespecially end grain. Bare end grain wicks moisture behind paint and speeds peeling.
- Back-prime when possible. Coating all sides reduces moisture imbalance and helps prevent cupping/warping.
- Caulk smart. Seal joints where water enters, but don’t caulk places that should drain or ventilate.
- Maintain chips fast. A small chip is an invitation for water to get behind the coating.
Paint isn’t “set and forget,” but it’s closeespecially when the wood is well-designed to shed water.
Method 5: Epoxy Encapsulation (The “Boat-Building” Approach)
If you need serious moisture protectionthink outdoor countertops, boats, exterior wood that sees constant wettingepoxy sealing can be a game-changer.
Penetrating epoxies soak into wood, harden fibers, and create a stable, waterproof base layer.
Here’s the critical detail many DIYers miss: epoxy needs UV protection. Sunlight can degrade epoxy, so you typically topcoat it
with a UV-resistant varnish, spar urethane, or paint system.
When epoxy makes sense
- Rot-prone areas where water exposure is unavoidable (but you can still improve drainage).
- Boats and marine projects (with proper UV topcoats).
- Wood repairs that need stabilization before finishing.
High-level epoxy workflow
- Prep the surface. Clean, dry, sanded to promote adhesion.
- Mix accurately. Two-part systems need correct ratios for full cure.
- Apply in manageable batches. Epoxy has a working time; don’t mix a gallon if you can only spread a cup.
- Topcoat for UV. Use a UV-resistant finish once epoxy cures as directed.
Epoxy is not the “easy button,” but it is the “I refuse to rebuild this again” button.
Bonus: Waterproofing Starts with Design
The best waterproof wood finish can’t fix bad design. If your project traps water, it will eventually lose.
Want wood to last longer? Give water fewer places to sit.
Design tweaks that dramatically improve longevity
- Slope horizontal surfaces slightly so water runs off.
- Round over sharp edges. Finishes cling better to softened edges than knife-like corners.
- Keep wood off the ground. Use feet, spacers, or stone bases to reduce constant moisture wicking.
- Ventilation matters. Airflow helps wood dry faster after rain.
- Seal joints and fastener holes. Water loves sneaking in where boards meet.
Maintenance: Keep Water Out for the Long Haul
Waterproofing isn’t a one-time event. It’s more like brushing your teeth: skip it long enough and things get expensive.
The goal is to refresh your finish before it fails.
What to watch for
- Loss of water beading: If water stops beading and starts soaking, protection is fading.
- Dullness or chalking: UV is breaking down the surface.
- Cracking or peeling: Film finishes need attention fast to prevent water intrusion underneath.
- Black spots or green haze: Mildew/algaeclean promptly and reassess your product choice.
Maintenance rhythm by finish type
- Oils: Refresh when the surface looks dry or water stops beading (often the most frequent).
- Deck stains: Many homeowners recoat every 1–3 years depending on sun exposure and traffic.
- Clear exterior coats: Recoat when the finish starts to thin or lose glossbefore it cracks.
- Paint: Touch up chips quickly and repaint when widespread wear appears.
FAQ
What’s the best waterproofing for wood outdoors?
For most outdoor projects, a high-quality exterior stain or a deck sealer/stain combination offers the best balance of water repellency,
UV protection, and easy maintenance. For outdoor furniture and trim where you want visible grain, spar urethane or exterior varnish is a common
choice. For extreme moisture environments, epoxy plus a UV-resistant topcoat can provide heavy-duty protection.
Can I put a sealer over stain?
Sometimesbut compatibility matters. Many exterior stains are designed to be the final system, and adding a clear coat on top can lead to peeling
if the layers don’t bond well or the wood moves. If you want extra protection, choose a product system designed for layering (or use a stain-and-sealer
formulated together).
How do I waterproof wood for kitchens and bathrooms?
For interior wet areas, a durable clear film finish (often polyurethane) is common on cabinets, vanities, and trim. The keys are full coverage
(including edges) and adequate cure time before exposure to steam and splashes.
How do I waterproof a cutting board?
Use food-safe options like mineral oil, or mineral oil + beeswax blends, applied regularly. These create a water-repellent barrier but require
ongoing maintenanceespecially with frequent washing.
Field Notes: of Real-World Waterproofing Experiences
The funniest thing about waterproofing wood is that everyone starts with the same confident energy: “I’ve got a brush, a Saturday, and optimism.”
Then reality shows upusually as surprise rain, surprise sap, or surprise “why is it still sticky?” Here are five realistic scenarios DIYers and
homeowners commonly run into, plus what they learn the hard way (so you don’t have to).
1) The Deck That Looked Great… for One Month
A common story: someone applies a clear coat to a sunny deck because they want “natural wood vibes.” It looks incredibleuntil foot traffic
sandpapers the finish, UV cooks it, and water starts slipping into micro-cracks. The lesson: decks are brutal. Horizontal surfaces in full sun
do better with deck-specific stains and sealers that are designed to wear gradually and be recoated without a full strip-down. If you insist on
clear, plan for frequent maintenance and keep furniture pads and rugs from trapping moisture.
2) The Patio Chair That Turned into a Peeling Croissant
Another classic: outdoor furniture gets an interior polyurethane because “poly is poly, right?” The chair survives a couple storms, then starts
peeling where water sitsarm tops, seat edges, and joints. The fix usually involves sanding back failure spots and switching to an exterior-rated
spar urethane or marine varnish with UV inhibitors and flexibility. The lesson: exterior formulas exist for a reason, and edges/end grain need extra
coats because they’re moisture magnets.
3) The Fence That Grew a Science Project
Fences tend to fail from the bottom up. Moisture splashes from the ground, sprinklers do their thing, and shaded areas never fully dry. People often
learn that “waterproofing” is also “cleaning and airflow.” They switch to a stain with mildewcide, trim vegetation back for ventilation, and make sure
the fence boards aren’t buried in soil or mulch. The lesson: the best finish can’t outwork constant wetnessdrying time is part of the system.
4) The Bathroom Shelf That Felt Dry… Until It Didn’t
Interior projects fail when a finish isn’t fully cured or when the wood wasn’t sealed on all sides. A shelf might be coated on the top but left raw
underneath, and steam turns that imbalance into cupping or warping. The lesson: seal all surfaces (yes, even the “hidden” ones), allow proper cure
time, and don’t install the piece the same day you finish it unless you enjoy redoing work for character development.
5) The “I’m Never Rebuilding This Boat Trim Again” Upgrade
In high-moisture environments, some builders move to penetrating epoxy as a base coat to stabilize and waterproof the woodthen topcoat with a UV-resistant
varnish. The lesson: epoxy is powerful, but sunlight is ruthless. If you use epoxy outdoors, your UV topcoat is not optional; it’s the bodyguard that keeps
your epoxy from breaking down. Also: mixing small batches saves you from the sad moment when a cup of epoxy becomes a warm, solid souvenir.
The big takeaway from all these experiences is surprisingly comforting: most failures aren’t because you’re “bad at finishing.”
They happen because the product didn’t match the job, prep was rushed, or maintenance got ignored. Match the finish to the environment, prep like you mean
it, and refresh before failureand your wood will stop acting like it’s auditioning for a disaster movie.