Table of Contents >> Show >> Hide
- What You’ll Learn
- How Self-Watering Pots Work (No Engineering Degree Required)
- Choosing the Right Self-Watering Planter (and Avoiding Regret)
- The Potting Mix Rule: Your Soil Is the Wicking Engine
- How to Set Up a Self-Watering Pot (Step by Step)
- How to Water and Refill Without Overthinking It
- Fertilizing in Self-Watering Pots (Because Water Alone Isn’t a Meal Plan)
- Troubleshooting: Fix the Most Common Self-Watering Pot Problems
- Quick FAQ
- Real-World Experiences: Lessons Gardeners Learn the “Fun” Way (About )
- Conclusion
If you’ve ever looked at a droopy plant and whispered, “I swear I watered you… recently-ish,” you’re not alone. Self-watering pots (also called sub-irrigated planters or reservoir planters) are basically a tiny life-support system for container plants: they store water in a bottom reservoir and let the plant sip when it’s ready. Done right, they can cut down daily watering drama, reduce waste, and keep plants steadier through hot afternoons, busy workweeks, and “I’ll be back Sunday” weekends.
Done wrong, though? A self-watering pot can turn into a swampy root spa that nobody asked for. The good news: once you understand how the reservoir, wick, and potting mix work together, self-watering planters become one of the easiest ways to grow happier houseplants and patio veggies with less guesswork.
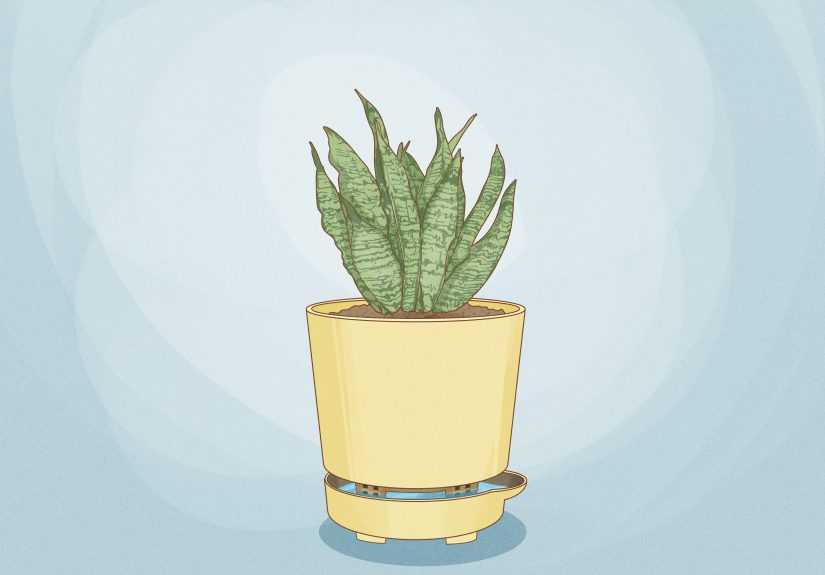
How Self-Watering Pots Work (No Engineering Degree Required)
Most self-watering pots have three main parts:
- A water reservoir at the bottom that holds a supply of water.
- A growing area above it where potting mix and roots live.
- A wicking system (soil columns, fabric wicks, or a perforated platform) that moves water upward by capillary action.
The secret sauce is capillary actionthe same “paper towel drinks a spill” phenomenon. Moisture moves upward through the wick or soil column and lightly hydrates the potting mix. The plant takes what it needs, and ideally the upper part of the mix stays a bit drier than the bottomhelpful for oxygen at the roots and fewer fungus gnat parties.
Most designs also include an overflow hole. This is the planter’s “nope” button: if you overfill or it rains hard, excess water drains out instead of drowning roots.
What Self-Watering Pots Are Great For
- Keeping moisture consistent for thirsty plants (herbs, leafy greens, many tropical houseplants)
- Reducing how often you water (especially in warm weather)
- Helping avoid “bone-dry then flood” cycles that stress roots
- Making patio gardening less of a daily chore
What They’re Not
- Not a “set it and forget it forever” gadget (you still refill the reservoir)
- Not a great fit for plants that want the mix to dry out fully (many succulents/cacti)
- Not a replacement for light, airflow, or decent potting mix (plants remain delightfully demanding)
Choosing the Right Self-Watering Planter (and Avoiding Regret)
Self-watering planters come in a few common styles. Choosing the right one depends on what you’re growing and where it’ll live.
Common Types
- All-in-one reservoir pots (often for houseplants): sleek, smaller reservoir, sometimes a water-level window.
- Insert-based planters (often for patios): a reservoir insert sits inside a decorative outer pot.
- Grow-box / SIP style (great for veggies): larger reservoir and strong wicking columns for big, thirsty plants.
- DIY self-watering containers: totes, buckets, or planters converted with a false bottom and fill tube.
Features Worth Having
- Overflow outlet (non-negotiable outdoors; very useful indoors too)
- Fill tube so you can refill the reservoir without disturbing the plant
- Water level indicator (nice, not mandatoryyour plant will still judge you either way)
- Removable plug for outdoor rain (some planters let you open drainage in wet weather)
Pick Plants That Match the System
Self-watering pots shine with plants that like evenly moist conditions. A few strong matches:
- Indoor: pothos, philodendron, peace lily, spider plant, many ferns (depending on humidity)
- Edibles: basil, mint (watch it!), parsley, lettuce, arugula, peppers, tomatoes (in larger SIP-style planters)
- Flowers: impatiens, petunias, calibrachoa (again, in appropriately sized planters)
Plants that often dislike constant moisture at the root zone include many cacti, succulents, and some Mediterranean herbs (think lavender) unless the planter is managed carefully with a very gritty mix and a “let the reservoir run dry” rhythm.
The Potting Mix Rule: Your Soil Is the Wicking Engine
If you take only one thing from this guide, let it be this: Use a high-quality potting mix (not garden soil) and make sure it can wick and breathe.
What Works Best
- Soilless potting mix designed for containers (typically blends of peat/coir, bark, perlite/vermiculite, and amendments)
- A mix that stays light and airy while still holding moisture
- For many plants, adding a little extra perlite can improve oxygen and reduce sogginess
What to Avoid
- Garden soil (too heavy; compacts; poor aeration; can clog the wicking action)
- Overly fine compost-only blends (can become dense and waterlogged)
- Rocks at the bottom “for drainage” (they don’t improve drainage in containers; they often just create a perched water zone higher up)
Bonus tip: If your potting mix is bone-dry, it can become water-repellent. That’s why pre-moistening the mix matters in self-watering pots you’re trying to help capillary action start strong.
How to Set Up a Self-Watering Pot (Step by Step)
The first setup is where most people accidentally invent new ways to disappoint themselves. Follow this sequence and you’ll avoid 90% of the classic issues.
Step 1: Assemble and Check the “Plumbing”
- Rinse the reservoir and inner pot (dust and manufacturing residue happen).
- Find the overflow hole and make sure it’s not blocked.
- If there’s a drainage plug, decide: indoors = usually plugged; outdoors = often unplugged or seasonally adjusted.
Step 2: Install the Wick (If Your Planter Uses One)
- Thread the wick through the designated channel/holes.
- Make sure the wick reaches the reservoir and has good contact with the potting mix area.
- Some systems wick through soil columns insteadsame idea: water must be able to travel upward.
Step 3: Pre-Moisten the Potting Mix
In a bucket or tub, add water to your potting mix and stir until it’s evenly damplike a wrung-out sponge. Not dripping. Not dusty. Think “moist brownie crumbs,” not “swamp pudding.”
Step 4: Fill, Plant, and Settle
- Add potting mix to the growing chamber, lightly firming as you go (don’t pack it like concrete).
- Plant at the same depth the plant was growing before.
- Backfill and gently press to remove big air pockets.
Step 5: Top-Water Thoroughly (Yes, Even Though It’s ‘Self-Watering’)
This is the “charge the system” step. Water from the top until the mix is fully saturated and excess begins to drain as designed. This helps the wick start pulling moisture upward and encourages roots to grow down toward the steady water source.
Step 6: Fill the Reservoir
- Use the fill tube or reservoir opening.
- Stop at the recommended line/indicator, or when you see overflow begin (outdoor designs).
- Cap the fill tube if your planter has a cap (less debris, fewer mosquitoes outdoors).
Example: If you’re growing basil on a sunny balcony, you’ll typically notice faster reservoir use once it’s actively growing. If you’re growing a tomato in a large SIP planter, expect the plant to “level up” its water demand once it starts flowering and fruiting.
How to Water and Refill Without Overthinking It
Refill Rhythm: Let the Reservoir Do Its Job
Instead of watering the soil surface daily, you’ll mostly be refilling the reservoir. How often depends on: planter size, plant size, temperature, sunlight, wind, and how aggressively your plant is living its best life.
- Small indoor self-watering pots: often need refills every few days to a week.
- Medium patio planters: commonly weekly, sometimes more in heat.
- Large veggie SIP planters: can stretch longer early on, then may need frequent refills in peak summer.
Two Best Practices
- Don’t keep it “topped off” 24/7 if your plant prefers some breathing room. Many growers do well letting the reservoir get low (or even empty for a day) before refillingespecially indoors.
- Check the mix, not just the indicator. Water level indicators help, but your fingers and eyes still matter. If the top inch is constantly soggy, adjust.
When to Still Water from the Top
- During initial setup (charging the wick and settling soil)
- If the mix has become hydrophobic and won’t wick well
- To flush salts (more on that in fertilizing)
Fertilizing in Self-Watering Pots (Because Water Alone Isn’t a Meal Plan)
Container plants burn through nutrients faster than in-ground gardens. And in self-watering planters, constant moisture can gradually move nutrients through the mix. Translation: your plant may look amazing for a while, then suddenly act like it’s on a hunger strike.
A Simple Fertilizer Strategy
- At planting: Mix in a slow-release fertilizer (optional but helpful, especially for patio containers).
- After establishment: Begin light, regular feedingoften every 2–4 weeks for many container plants (adjust based on growth and label directions).
- For heavy feeders: Tomatoes, peppers, and flowering annuals typically want more consistent nutrition than a pothos on a bookshelf.
How to Avoid Fertilizer Problems
- Don’t fertilize bone-dry potting mixmoist mix is gentler on roots.
- When in doubt, use a weaker solution more often rather than a strong dose occasionally.
- Flush monthly-ish (or as needed): water from the top until excess drains out. This helps reduce salt buildup that can show up as a crust or leaf-tip browning.
Troubleshooting: Fix the Most Common Self-Watering Pot Problems
Problem: The Soil Is Always Wet (aka “Accidental Bog Garden”)
Likely causes: mix too dense, wick too aggressive, planter too large for the plant, cool/low-light conditions slowing water use.
Fixes:
- Let the reservoir run low before refilling (build in “dry-down” time).
- Improve aeration by adding perlite next repot, or switching to a lighter potting mix.
- Confirm the overflow hole works (outdoors and in rain-prone spots).
- Move to brighter light if appropriate (plants drink more when they grow more).
Problem: The Plant Wilts Even Though the Reservoir Is Full
Likely causes: wick not contacting soil, potting mix became water-repellent, roots haven’t reached the wicking zone yet.
Fixes:
- Top-water thoroughly to rehydrate the entire mix and restart wicking.
- Check wick placement; ensure it’s snug against the potting mix.
- For new plants, keep the mix evenly moist for the first couple of weeks while roots establish.
Problem: Funky Smell, Algae, or Slime in the Reservoir
Likely causes: warm conditions, light hitting the reservoir, stagnant water, organic debris.
Fixes:
- Clean the reservoir periodically (especially between plantings).
- Keep the fill tube capped; reduce debris entry.
- If the reservoir is exposed to light, consider an opaque outer pot or a cover.
Problem: Fungus Gnats
Gnats love consistently damp potting mix. Self-watering can help if the surface stays drierbut if your top layer is wet all the time, gnats move in.
- Let the reservoir run lower between refills so the top dries slightly.
- Use sticky traps for adults and BTI products (often sold for gnats/mosquito larvae) if needed.
- Avoid overloading the mix with rich compost indoors.
Problem: Mosquitoes Outdoors
Standing water can attract mosquitoes in some climates. Many gardeners prevent this by keeping fill openings covered and using appropriate mosquito-control products in water features. Some DIY guides mention using a small amount of oil in the reservoir, but be cautious with any additive around pets, kids, and edible plants.
Quick FAQ
Do self-watering pots prevent overwatering?
They help reduce top-watering mistakes, but they can still overwater if the potting mix stays saturated and oxygen-starved. The goal is consistent moisture, not constant swamp.
Can I leave plants alone for vacation?
Often, yesespecially with larger reservoirs. But test your refill rhythm for a week or two before you bet your peace lily’s life on it.
Can I use regular potting soil?
Use a quality container potting mix (lightweight, airy). Garden soil is usually too dense for containers and can interfere with wicking and airflow.
Real-World Experiences: Lessons Gardeners Learn the “Fun” Way (About )
Ask a group of plant people about self-watering pots and you’ll hear the same plot twistsbecause the pots are consistent, but humans are… aspirational. One of the most common stories starts with a brand-new planter, a thriving plant, and a burst of confidence that lasts exactly until the first refill. Gardeners often report that the “honeymoon week” is when everything looks perfect: the potting mix is fresh, the plant is settling in, and the reservoir feels like a magical backup generator. Then the plant starts growing faster, the weather warms up, and suddenly the reservoir empties twice as fast. The lesson: refill schedules aren’t fixed. They change with seasons, sunlight, and how much your plant is actively growing.
Another classic experience is the dry-mix fail. Someone fills the pot with bone-dry potting mix, plants their houseplant, pours water into the reservoir, and waits. The next day, the mix is still dry, the leaves are still sad, and the gardener is suspicious of modern technology. What happened? Many potting mixes need to be evenly moistened to wick properly; if the mix is too dry, it can repel water instead of drawing it upward. Gardeners who fix this usually do one simple thing: top-water thoroughly (sometimes more than once, slowly) until the mix is uniformly damp again, then the reservoir system starts behaving like the low-maintenance hero it was advertised to be.
You’ll also hear a lot about the “why is my plant hungry?” phase. Self-watering planters are great at steady moisture, which can accelerate growth and faster growth can mean faster nutrient demand. Many gardeners notice that leaves look paler after a few weeks, or flowering slows down, even though water is plentiful. That’s usually the moment they realize container plants still need a feeding plan. A light, consistent fertilizer routine (based on plant type and label directions) often turns things around quickly. Just as common is the opposite story: over-fertilizing in a constantly moist system and getting leaf-tip burn. The practical takeaway most people settle on: feed gently, and flush occasionally.
Outdoor growers have their own recurring tale: the surprise rainstorm. A self-watering pot without a reliable overflow outlet can become a bathtub in a single downpour, especially if the outer cachepot collects water. Gardeners who learn this lesson tend to switch to planters with clear overflow design, elevate pots slightly, or use drainage plugs strategically during wet periods. On the flip side, during brutal heat waves, self-watering planters can feel like a cheat codeplants stay steadier, and the gardener’s daily routine becomes “check the reservoir” instead of “perform emergency hydration.”
Finally, a surprisingly common experience is that self-watering planters teach people to pay attention to roots and airflow. When plants struggle, gardeners start looking beyond the surface: Is the mix too dense? Are roots circling and choking the pot? Is the plant in low light so it barely drinks? Self-watering pots don’t remove the need for observationthey just shift what you observe. And once people get that rhythm, the pots do what they’re best at: making plant care simpler, steadier, and a lot less guessy.
Conclusion
Self-watering pots work best when you treat them like a system: the reservoir supplies water, the wick delivers it, and the potting mix decides whether it flows smoothly or stalls. Choose the right plants, use an airy container mix, “charge” the planter with an initial top-watering, and maintain a simple refill and fertilizer routine. Do that, and your plants get consistent moisturewithout you playing daily “thirst roulette.”
Sources consulted (US): University of Maryland Extension; University of Illinois Extension; University of Minnesota Extension; Penn State Extension; UF/IFAS (University of Florida); Texas A&M AgriLife Extension (Master Gardener program); University of Kentucky Cooperative Extension; University of Vermont Extension; Better Homes & Gardens; The Spruce; Real Simple; HGTV; The Sill; Gardener’s Supply Company; Lively Root.