Table of Contents >> Show >> Hide
- Before You Transfer: 5-Minute Canvas Prep That Saves Hours
- Method 1: Transfer Paper (Graphite/Carbon Paper) Fast, Clean, Beginner-Friendly
- Method 2: The Grid Method Old-School Accuracy (and It Secretly Improves Your Drawing Skills)
- Method 3: Projector Tracing Big Canvas Energy, Minimal Guesswork
- Which Method Should You Use?
- FAQ: The Stuff Artists Google at 1:00 a.m.
- Wrap-Up: Your Canvas Doesn’t Need to Be a Guessing Game
- Experience Notes: What Artists Learn the Hard Way (So You Don’t Have To)
Painting on a blank canvas can feel like stepping onto an empty stage. It’s thrilling… until your brain whispers,
“Cool. Now put the face in the right place.” If you already have a drawing you love (on paper, printed out,
or in a sketchbook), transferring it to canvas is the fastest way to skip the “why does my cat look like a potato”
phase and get to the fun part: paint.
Below are three reliable, artist-approved methods to transfer a drawing to canvas for painting:
(1) graphite/transfer paper for speed and precision,
(2) the grid method for accurate scaling without fancy gear, and
(3) projector tracing for big canvases and big ambitions.
Before You Transfer: 5-Minute Canvas Prep That Saves Hours
A little prep makes every transfer method cleaner and easier to paint overespecially if your canvas is very textured.
(Texture is great for drama, less great for tiny eyelashes.)
-
Check your surface: Most store-bought canvases are pre-primed, but adding a thin coat of gesso can
even things out and help pencil lines behave. -
Smooth it (optional but satisfying): If you want crisp detail, lightly sand between dry gesso coats.
You’re not sanding a deckjust knocking down texture. -
Decide how visible you want the lines: For acrylics, light graphite is usually fine. For oils or heavy
blending, consider sealing your drawing (more on that below). - Keep an eraser handy: A kneaded eraser lifts graphite without shredding canvas tooth.
-
Do a tiny test: Try your transfer method on a scrap or the canvas edge first. It’s like a rehearsal,
but with fewer jazz hands.
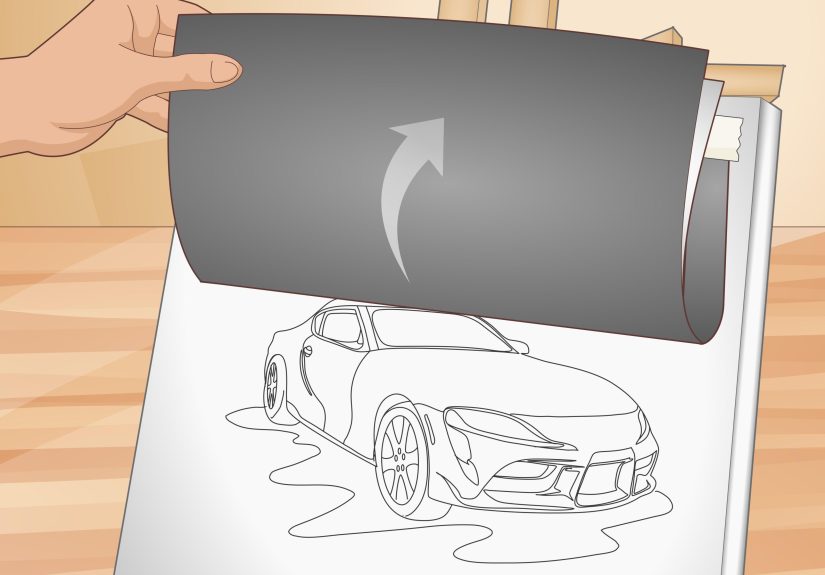
Method 1: Transfer Paper (Graphite/Carbon Paper) Fast, Clean, Beginner-Friendly
If you want the easiest “print, tape, trace, ta-da” route, transfer paper is your best friend. It’s also great when
you need accuracy but don’t want to grid your life into tiny squares.
Best for
- Line drawings, lettering, patterns, and detailed outlines
- Transferring a printed reference at the same size as your canvas
- Repeat designs (hello, commissions and series work)
What you’ll need
- Your drawing (printed or on paper)
- Graphite transfer paper (or carbon paper)
- Low-tack artist tape
- A ballpoint pen or hard pencil for tracing (so the line stays crisp)
- Kneaded eraser (optional)
Step-by-step
-
Position your drawing on the canvas. Make sure the sizing is correct (centered, level, and
emotionally prepared). -
Create a “hinge” with tape. Tape the top edge of your drawing to the canvas so you can lift it like
a flap without losing alignment. This prevents the classic “everything shifted 2 mm and now the nose is in Ohio.” -
Slide transfer paper underneath. Place transfer paper dark side down on the canvas, under your
drawing, keeping the hinge intact. -
Trace key lines. Use a ballpoint pen or hard pencil and trace the lines you actually need. You don’t
have to trace every eyelashsave details for paint or later refinement. -
Peek often. Lift the paper gently (using the hinge) to check transfer strength. If it’s too light,
go over important lines again. If it’s too dark, lighten with a kneaded eraser. -
Clean up the drawing. Erase stray marks and soften heavy outlines. Your goal is a usable roadmap, not
a final pencil rendering (unless that’s your vibe).
Pro tips that make this method look “pro”
- Use light pressure. Pressing hard can emboss the canvas and leave grooves that catch paint in weird ways.
- Work in sections. Tape the reference securely and move your transfer paper as needed so it stays flat.
-
Worried about smudging? Lightly seal the transferred lines with a workable fixative or a thin acrylic medium
(applied gently) before heavy paint handling.
Troubleshooting
- Lines are too faint: Use a fresh sheet, trace with steadier pressure, or switch to darker transfer paper.
- Lines are too dark: Lift with a kneaded eraser; don’t grind with a pink eraser like you’re trying to erase regret.
- Smudging: Keep your hand off the drawing area; rest your hand on a clean sheet of paper as you work.
Method 2: The Grid Method Old-School Accuracy (and It Secretly Improves Your Drawing Skills)
The grid method breaks an image into smaller squares so you can copy it onto a larger (or different-sized) canvas with
better proportions. It’s not “cheating.” It’s geometry lending you a hand.
Best for
- Enlarging a small sketch to a bigger canvas
- Complex compositions where proportion matters (portraits, architecture, anything with perspective)
- Artists who want accuracy without a projector
What you’ll need
- Your reference image (printed or on a tablet)
- Ruler (or straightedge)
- Pencil (HB or lighter is usually enough)
- Eraser (kneaded recommended)
- Optional: masking tape for clean grid lines
Step-by-step
-
Match the aspect ratio. If your reference is 8×10 and your canvas is 16×20, you’re golden. If not,
crop the reference (digitally or with paper) so it matches your canvas shape. -
Draw a grid on the reference. Use equal squareslike 1-inch squares on the reference. Number the rows
and columns if you want extra insurance against brain fog. -
Draw a proportional grid on the canvas. If your canvas is double the size, use 2-inch squares. The key
is keeping the same number of squares across and down. -
Transfer square by square. Focus on where major lines cross grid boundaries. Draw the big shapes first,
then refine details. -
Soften or erase the grid. Once your main drawing is in place, lighten grid lines so they don’t show through
transparent paint layers.
A quick scaling example (so your math doesn’t get paint on it)
Say your reference is 8×10 inches and your canvas is 16×20 inchesexactly double. If you draw a 1-inch grid on the reference
(8 squares across, 10 down), draw a 2-inch grid on the canvas (still 8 across, 10 down). Now every square on the reference
maps to a larger square on the canvas, keeping proportions consistent.
Pro tips
- Keep grid lines light. You want guidance, not a permanent plaid shirt under your painting.
-
Start with landmarks. Place eyes, horizon lines, and big angles first. Details behave better when the
structure is correct. -
Use “negative space” checks. Compare shapes around the subject (like the triangle between arm and torso)
to catch proportion drift early.
Troubleshooting
- Everything feels slightly stretched: Re-check aspect ratio and count squares. One missing column can wreck a portrait.
- Grid is hard to erase: You pressed too hard (it happens). Lightly paint a thin toned layer over it and redraw key lines on top.
Method 3: Projector Tracing Big Canvas Energy, Minimal Guesswork
If you want to transfer a drawing to canvas at a larger scale (or you just like the idea of technology doing the heavy lifting),
a projector is fast and accurateonce it’s set up correctly. The trick is reducing distortion and keeping the image stable.
Best for
- Large canvases, murals on canvas, and detailed images
- Artists who want speed and consistent proportions
- Transferring photos or complex references without gridding
What you’ll need
- A projector (mini digital projector or an opaque projector)
- Your image file (phone, tablet, laptop, or USBdepends on projector)
- Stable setup (tripod or solid table)
- Low-tack tape
- Pencil or paint marker (depending on your style)
Step-by-step
- Set the canvas upright if possible. A vertical canvas reduces skew and makes the projection more predictable.
- Darken the room. You don’t need a cavejust enough dimness to see the projection clearly.
-
Square up the projector. Aim it straight at the canvas (not from the side) to reduce keystone distortion.
Use keystone correction only as a final tweak, not as a miracle worker. -
Adjust size and focus. Move the projector closer/farther to fit the canvas. Lock the setup so it won’t
shift when you breathe near it. -
Trace major shapes first. Outline the biggest forms and key landmarks. Then add important interior lines.
Leave tiny textures for paintingyour future self will thank you. -
Turn off the projector and refine. Step back, check proportions, and clean up lines. Projection is great,
but your eye is still the art director.
Pro tips
- Use a simple line version of your reference. High-contrast outlines are easier to trace than a full-color photo.
-
Watch for curved “straight” lines. If straight edges bow, you’re seeing lens distortion or projector angle issues.
Reposition before tracing everything. - Keep lines light. Heavy graphite + blending paint can lead to muddy color. Light lines are easier to hide.
Bonus option for very large designs: The Pounce Method (Traditional, Surprisingly Fun)
If you’re working big and want a low-tech transfer that doesn’t require a projector, the pounce method uses a perforated pattern
and charcoal dust to “stamp” the design onto the surface. It’s a classic technique used in large-scale painting, murals, and signage.
- Make or print your design at full size.
- Perforate along the lines with a pin or pounce wheel.
- Tape the pattern to the canvas.
- Rub charcoal dust (or pounce powder) through the holes with a cloth pad.
- Remove the pattern and connect dots lightly.
Which Method Should You Use?
| Method | Speed | Accuracy | Best Use Case | Cost |
|---|---|---|---|---|
| Transfer Paper | Fast | High | Same-size patterns, clean outlines, repeat designs | Low |
| Grid Method | Medium | Very High | Enlarging sketches, training your eye, complex scenes | Very Low |
| Projector Tracing | Fast (after setup) | High | Large canvases, detailed images, time-sensitive work | Medium |
FAQ: The Stuff Artists Google at 1:00 a.m.
Will graphite smudge or bleed into my paint?
Graphite can smudge if you blend aggressively (especially with thin washes or heavy rubbing). The fix is simple:
keep lines light, erase excess, and if you’re worried, seal the drawing with a workable fixative or a thin acrylic medium
applied gently. Always spray fixatives in a well-ventilated area and follow the label.
Do I need to gesso a pre-primed canvas?
Not always. Pre-primed canvases are ready to paint, but adding gesso can improve smoothness, brightness, and how well your
transfer lines sit on the surface. If you’re doing fine detail, an extra coat (or two) can make tracing and painting easier.
What pencil should I use for the underdrawing?
HB or lighter is a solid default. Softer pencils (like 2B–6B) make darker lines but smudge more. If you’re transferring with
paper, you can often keep the tracing pressure light and still get readable lines.
How do I keep my transferred lines from showing through paint?
Keep the transfer light, erase what you don’t need, and block in early paint layers opaquely where appropriate. If your style is
thin glazing, you’ll want especially light lines and careful cleanup.
Wrap-Up: Your Canvas Doesn’t Need to Be a Guessing Game
The best method is the one that gets you painting confidently. Transfer paper is the quick-and-clean favorite, the grid method is
the accuracy champion (and a skill-builder), and projector tracing is the “go big without going blurry” option. Try one, test it,
and remember: the transfer is just the map. The painting is the adventure.
Experience Notes: What Artists Learn the Hard Way (So You Don’t Have To)
Here’s the funny thing about transferring a drawing to canvas: the technique is easy to learn, but the tiny realities
of real-life painting are where the lessons live. Artists often start with transfer paper because it feels like the most
straightforward optionand it isright up until the paper slides a hair mid-trace and suddenly your subject has two left eyes.
The “hinge with tape” trick becomes a rite of passage. After you’ve had one design drift on you, you’ll tape it like it’s
boarding a roller coaster.
Another common “first time” surprise is how textured canvas can sabotage delicate lines. On smoother surfaces (like a gessoed
panel), every line transfers beautifully. On a bouncy, toothy canvas, light pressure can skip over the weave, making dashed lines
where you wanted clean curves. Many painters end up doing a quick extra gesso coat (and sometimes a light sand) when they know the
transfer needs to be crispespecially for portraits, lettering, or anything with hard edges. The good news: even if the transferred
line looks a little broken, you can usually connect it quickly by hand once the main placement is there.
The grid method tends to create a different kind of “aha.” People expect it to be slow and annoying, then realize it’s oddly
calminglike doing a paint-by-number you invented yourself. The experience most artists report is that grids reduce the panic of
“I don’t know where to start.” You stop wrestling the whole composition and just solve one square at a time. The trade-off is that
it’s easy to get overly focused on tiny details early. Seasoned grid users often start with big landmarks (horizon, eye line, major
angles) and only add detail once the structure is locked in. That way your painting feels designed, not assembled.
Projectors come with their own lovable chaos. The first setup can feel like you’re building a tiny home theater for your canvas.
Artists frequently learn (sometimes after tracing half the image) that a slight angle creates distortionstraight lines curve, circles
become eggs, and symmetry goes on vacation. The experience-based fix is to step back often and trace only the essential framework
first. If the framework looks right with the projector turned off, the details will behave.
Then there’s the Smudge Monster: that moment when your beautifully transferred graphite turns into a gray haze because your hand
rested on it while you were working. The simplest “experienced painter” habit is to place a clean sheet of paper under your drawing
hand like a little sliding glove. Another is to lighten the drawing intentionally before paintingartists commonly erase until the
lines are “just enough,” because paint will define edges better than graphite ever will. And when someone is working with thin,
transparent layers or lots of blending, many painters discover that a light sealing step can be a sanity-saver. A gentle seal keeps
the underdrawing from mixing into paint and muddying colorespecially in highlights where clean color matters most.
Finally, experienced artists treat transferring as a tool, not a test. If a projector helps you get a complex scene onto canvas
quickly, that’s time you can spend on color, brushwork, and storytelling. If the grid method helps you learn proportion, you’re
strengthening your eye while making a better painting. If transfer paper keeps a repeated motif consistent across a series, it’s
supporting your style. The real win isn’t picking “the best” methodit’s choosing the method that keeps you excited to paint,
instead of stuck redrawing the same outline until your coffee goes cold.