Table of Contents >> Show >> Hide
- What “Softened Butter” Actually Means (and Why It Matters)
- Why Your Butter Timing Is Always “Wrong”
- Best Methods to Soften Butter (From Slow-and-Steady to “Oh No Guests Are Here”)
- 1) The gold standard: Soften butter on the counter
- 2) Fast and foolproof: Cut into cubes (or slices)
- 3) The “therapy session”: Pound it with a rolling pin
- 4) The warm-glass trick (a.k.a. the “butter sauna”)
- 5) Lukewarm water bath (sealed, controlled, and surprisingly elegant)
- 6) Microwave softening (useful, risky, and definitely watching you)
- 7) Stand mixer “pre-soften” (only if you’re already using it)
- How Softened Butter Changes the “Professional Look” of Your Baking
- Troubleshooting: If Your Butter Is Too Soft (or Too Hard)
- Food Safety and Quality Notes (Because Butter Is Confident, Not Invincible)
- FAQ: The Butter Questions Everyone Has (But Only Some Admit)
- Conclusion: Your Butter Is the Foundation of a Professional Finish
- Extra: of Butter-Softening “Experience” (a.k.a. Lessons Learned the Slippery Way)
If you’ve ever tried to “cream” rock-hard butter and sugar, you already know how this movie ends: your mixer bucks like a rodeo bull, sugar flies like confetti, and your batter looks… suspiciously like gravel. On the flip side, you can melt butter too far and accidentally bake cookies that spread into one giant, shiny pancake that screams, “I got impatient!”
Softened butter is one of those quiet baking steps that separates “tasty” from “bakery-window professional.” It affects volume, texture, crumb, spread, and even how smooth your frosting looks when you swirl it like you absolutely meant to do that. Let’s make your butter behaveon purposeso your baked goods look as good as they taste.
What “Softened Butter” Actually Means (and Why It Matters)
“Softened” is not a vibe. It’s a physical state. For many classic recipescookies, cakes, and buttercreams in particular butter needs to be pliable enough to blend smoothly, but still cool enough to hold structure. This is crucial for the creaming method, where butter and sugar are beaten to trap tiny air bubbles. Those bubbles expand in the oven and help create lift and a lighter, more even crumb. That’s the difference between a cake that slices cleanly and one that looks like it had a rough night.
The sweet spot for “properly softened” butter is often around 65–67°F (think: cool room temperature, not tropical countertop). At that range, butter is flexible, spreads easily, and creams well without turning greasy.
The quick “pro test”
- Finger press: You should be able to press a fingertip in with gentle pressure and leave a clean indent.
- Still holds shape: It shouldn’t look shiny or oily, and it shouldn’t slump like it’s giving up on life.
- Not squishy-warm: If it feels greasy or collapses, it’s too soft for creaming.
Why Your Butter Timing Is Always “Wrong”
You can follow the same method and get different results depending on:
- Kitchen temperature: A cool 68°F kitchen is not the same as a sunny 78°F kitchen.
- Butter format: Whole sticks soften slower than cubes, slices, or grated butter.
- Butterfat level: Higher-fat butters can feel softer sooner (and melt faster if you’re not careful).
- Starting temperature: Fridge-cold butter is one thing; frozen butter is a different sport entirely.
The goal isn’t to memorize one magic number of minutes. The goal is to hit the right state for your recipe. Professional bakers don’t guessthey check.
Best Methods to Soften Butter (From Slow-and-Steady to “Oh No Guests Are Here”)
Here’s a practical guide to the most reliable butter-softening methodsplus when each one makes sense. If your baked goods need to look polished, consistency matters more than speed. That said, we can absolutely do both.
| Method | Typical Time | Best For | Risk Level |
|---|---|---|---|
| Counter softening (whole stick) | 45–90 min | Cakes, cookies, buttercream | Low |
| Cut into cubes | 10–20 min | Quick creaming, frostings | Low |
| Rolling pin / pounding | 2–5 min | Fast + even softening | Low |
| Warm glass “butter sauna” | 5–15 min | Softening a stick evenly | Medium |
| Lukewarm water bath (sealed) | 5–10 min | Controlled quick softening | Medium |
| Microwave (low power, short bursts) | 15–45 sec | Emergency situations | High |
1) The gold standard: Soften butter on the counter
This is the method that gives the most consistent “professional” results because it warms butter gently and evenly. Unwrap the butter, place it on a plate (or keep it on its wrapper), and let it sit. In many kitchens, that’s about 45–90 minutes.
Pro move: If you want to speed things up without risking melt, cut the stick in half lengthwise. More surface area = faster softening, same calm energy.
2) Fast and foolproof: Cut into cubes (or slices)
If your recipe is calling your name and your butter is still doing its best impression of an ice sculpture, cube it. Cut into roughly 1/2-inch pieces and spread them out in a single layer on a plate. You’ll often get workable softened butter in 10–20 minutes.
This method is especially great for:
- Cookie dough where you want even mixing and predictable spread
- Cakes where lumps of cold butter can cause uneven texture
- Buttercream where smoothness matters (and grainy frosting is a crime)
3) The “therapy session”: Pound it with a rolling pin
Put the butter between two sheets of parchment (or in a zip-top bag), then gently pound and roll it. In 2–5 minutes, you’ll have butter that’s softened evenly without hot spots. Also, it’s weirdly satisfying. Take that, stressful Tuesday.
Why it works: You’re thinning the butter and increasing surface area fast, but you’re not introducing direct heat. That keeps the texture stable for creaming.
4) The warm-glass trick (a.k.a. the “butter sauna”)
This method warms butter more evenly than microwaving (and with less danger of surprise puddles). Here’s how:
- Fill a sturdy drinking glass with very hot water and let it sit for a minute to heat the glass.
- Pour out the water, wipe quickly, then invert the warm glass over the stick of butter on a plate.
- Wait 5–15 minutes, checking every few minutes.
Watch for: If your kitchen is warm, this can soften faster than you expect. Once the butter looks a little shiny, you’re nearing “too soft” territory.
5) Lukewarm water bath (sealed, controlled, and surprisingly elegant)
If you want quick softening with more control than a microwave:
- Place butter in a sealed zip-top bag (squeeze out excess air).
- Set it in a bowl of lukewarm water (not hot).
- Check after 5 minutes; flip and continue as needed.
This is a great method when you need softened butter for frosting or creaming but don’t want melted edges. The key is lukewarm waterhot water moves you from “softened” to “sadly melted” in a hurry.
6) Microwave softening (useful, risky, and definitely watching you)
Yes, you can microwave butter. No, you should not do it on full power unless your life goal is butter soup. The safest microwave approach is:
- Use 10–30% power (defrost/low).
- Microwave in 5–7 second bursts.
- Rotate/flip the butter between bursts.
- Stop early and let residual warmth finish the job.
Pro tip for more even results: Microwave butter after cutting it into cubes. Smaller pieces warm more evenly, making it easier to avoid half-melted, half-still-cold chaos.
Another tested trick: Some bakers microwave a stick standing upright briefly, then flip it. It can soften surprisingly evenlybut microwaves vary wildly, so treat those seconds like a countdown in an action movie.
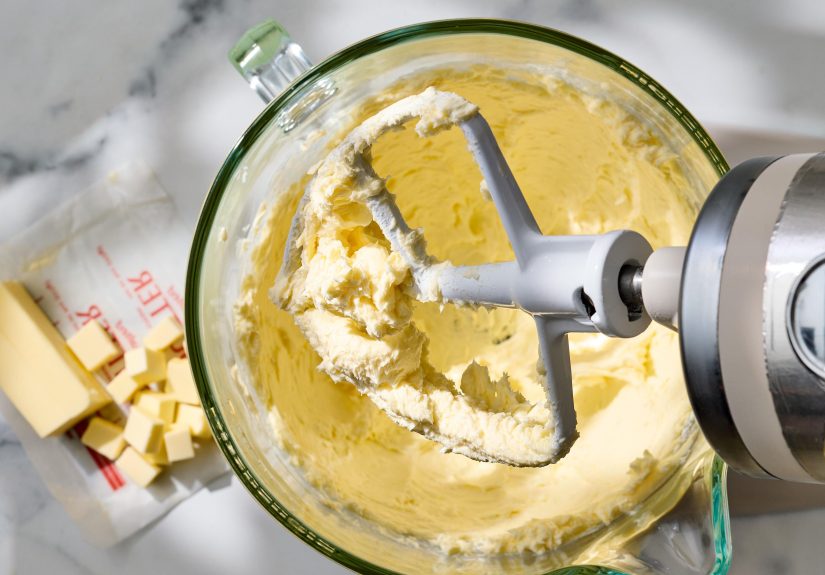
7) Stand mixer “pre-soften” (only if you’re already using it)
If your recipe calls for a stand mixer anyway, you can beat cold butter for a short time to make it more pliable. This works best when you’ll be creaming for several minutes regardless. The drawback: you might over-aerate or warm it unevenly if you go too long. Keep it short and scrape the bowl.
How Softened Butter Changes the “Professional Look” of Your Baking
Cookies: spread, thickness, and edges
Softened butter helps cookies spread predictably. Too-cold butter can lead to thicker cookies that don’t spread much, often with a denser center. Too-warm butter can cause excessive spreadthin cookies with greasy, lacey edges. If you’re chasing that bakery-style cookie with defined edges and a chewy center, butter temperature is one of your biggest levers.
Cakes: crumb texture and volume
In butter cakes, proper softening helps butter and sugar cream into a light, fluffy base. That means better rise and a finer crumb. Butter that’s too cold leaves lumps that can create uneven batter and a rougher texture. Butter that’s too warm can’t hold air well, producing a tighter, flatter cake that looks less polished when sliced.
Buttercream: smoothness and stability
Buttercream is where “softened vs. melted” really shows. Butter that’s too cold can create a frosting that looks curdled or grainy. Butter that’s too warm makes frosting loose, shiny, and difficult to pipeyour rosettes go from “wedding cake” to “soft serve” faster than you can say “this is fine.”
Troubleshooting: If Your Butter Is Too Soft (or Too Hard)
If your butter is still too firm
- Cut it smaller (cubes/slices) and wait 5–10 more minutes.
- Pound it with a rolling pin for fast, even softening.
- Use the warm-glass method for a gentle heat boost.
If your butter is too soft and looks greasy
- Refrigerate it for 10–15 minutes, then re-check.
- For creaming, slightly cool butter often performs better than overly warm butter.
- If it’s truly melty, consider switching recipes (brownies, quick breads, or melted-butter cookies).
Important reality: Once butter is fully melted and separated, it won’t behave exactly the same as properly softened butter in creaming recipes. You can cool it back down, but the structure you need for trapping air is compromised. Not ruinedjust different. (Butter has boundaries. Respect them.)
Food Safety and Quality Notes (Because Butter Is Confident, Not Invincible)
For softening butter specifically, leaving it out on the counter for a short period is common practice. General food safety guidance often recommends not leaving perishable foods out for more than about 2 hours (or 1 hour in very hot conditions). Butter is relatively low in water compared to many dairy products, and salted butter tends to keep quality longer than unsalted.
Still, if your goal is both quality and safety: soften only what you need, avoid direct sun or heat sources, and return butter to the refrigerator once you’re done measuring or mixing. Your future self (and your frosting) will thank you.
FAQ: The Butter Questions Everyone Has (But Only Some Admit)
Can I soften butter from frozen?
Yes. The most reliable approach is to grate it (like cheese) or shave thin slices, then let it sit briefly. For emergencies, microwave at very low power in short burstswatching closely.
Does salted vs. unsalted butter soften differently?
They soften similarly, but unsalted butter is often preferred for baking because it gives you full control over salt levels. Salted butter may keep flavor quality longer on the counter, but recipe precision usually favors unsalted.
What if my recipe says “room temperature” but my room is… not temperature?
Use the finger press test (or a quick thermometer check if you’re feeling fancy). “Room temperature” is shorthand, not a law of physics. Your butter should be pliable, not shiny and collapsing.
Conclusion: Your Butter Is the Foundation of a Professional Finish
If you want baked goods that look professionalcookies with tidy edges, cakes with a fine crumb, buttercream that pipes like a dream softened butter is not optional. It’s the starting line. The most consistent method is countertop softening, but cubes, rolling-pin pounding, and the warm-glass trick can save you when time is tight. Aim for butter that’s cool, pliable, and ready to creamthen let your mixing technique do the rest.
Extra: of Butter-Softening “Experience” (a.k.a. Lessons Learned the Slippery Way)
I used to think softened butter was just butter that had spent a few minutes thinking positive thoughts on the counter. If a recipe said “room temperature,” I’d glance around the kitchen, shrug, and declare, “This is a room. We have temperature. We’re good.” Spoiler: we were not good.
My first real butter mistake was the microwave “speed run.” I unwrapped a stick, tossed it on a plate, and hit 30 seconds. When I opened the door, the butter looked fineuntil I touched it and discovered the center was still cold while the bottom had melted into a shiny moat. I tried to cream it anyway. The mixer took one look and said, “Absolutely not.” The sugar clumped, the butter slipped, and the batter never became fluffy. The finished cookies tasted okay, but they spread into thin, greasy discs with edges that looked like they’d been left out in the rain.
After that, I got “organized” and started leaving butter out early. That worked… until the day I forgot it for too long. The butter wasn’t just softit was glossy, slack, and faintly smug about it. I made buttercream anyway, because confidence is free. The frosting looked smooth at first, but the second I tried piping, my beautiful swirl slowly melted into a sad blob. Imagine a rose made of pudding. That was my cake.
The turning point was learning the difference between softened and warm. When butter is properly softened, it yields to a finger press but still holds a clean edge. It creams with sugar into something pale and airy, like whipped sunshine. When it’s too warm, it turns greasy and loses the ability to trap air. Everything still tastes butterybut it won’t look polished.
My favorite “panic method” now is the rolling pin. It’s fast, it’s even, and it gives you control. I sandwich the butter in parchment, pound it a few times, then roll it until it’s flexible. No hot spots. No surprise puddles. No microwave roulette. And if I’m stressed, it doubles as a very legal way to take out my feelings.
When I need a stick softened for a last-minute batch of cookies, the warm-glass trick is my second favorite. It feels like a tiny spa day for buttersteam, warmth, calm vibes. The key is checking it early. If you forget and wander off, you’ll return to butter that’s crossed into “shiny and too soft” territory. Butter has a narrow window where it’s perfect, and it will absolutely move out without telling you.
The biggest lesson? Professional baking results aren’t always about expensive tools or secret ingredients. Sometimes it’s simply having butter at the right temperature at the right time. When you nail that, everything downstreammixing, texture, spread, crumb, frostinggets easier. And suddenly your cookies look intentional, your cakes slice cleanly, and your buttercream holds its shape like it’s proud of you. (As it should be.)