Table of Contents >> Show >> Hide
- What You’ll Learn
- Before You Start: What You Need (and What to Ignore)
- Step-by-Step: Set Up Meta Quest 2 the Clean Way
- Fit, Comfort, and Clarity: Make It Feel Good (and Look Sharp)
- Set Up Guardian: Your Anti-Wall, Anti-Lamp, Anti-Chaos Force Field
- Menus and Controls You’ll Actually Use
- Essential Settings to Turn On (Do These Early)
- Getting Apps, Games, and Media Without Falling Into a Menu Maze
- Casting: Show Your View on a TV, Phone, or PC
- PC VR on Quest 2: Two Main Options (Wired or Wireless)
- Care and Safety: Keep Your Quest 2 Comfortable and Damage-Free
- Troubleshooting: Fast Fixes for Common Quest 2 Problems
- Real-World Experiences: What Using Quest 2 Feels Like (and What People Wish They Knew)
- SEO Tags (JSON)
You’ve got a Meta (Oculus) Quest 2. Congratulationsyour living room is now a spaceport, a boxing gym,
a movie theater, and occasionally a place where you wave at your refrigerator because you forgot you
turned Passthrough on. Let’s get you set up the right way (and avoid the classic “why is everything blurry?” spiral).
This guide walks you through setup, comfort tweaks, must-do settings, everyday use, PC VR options, casting,
care, and quick troubleshootingwritten for normal humans who don’t collect HDMI cables as a personality trait.
Before You Start: What You Need (and What to Ignore)
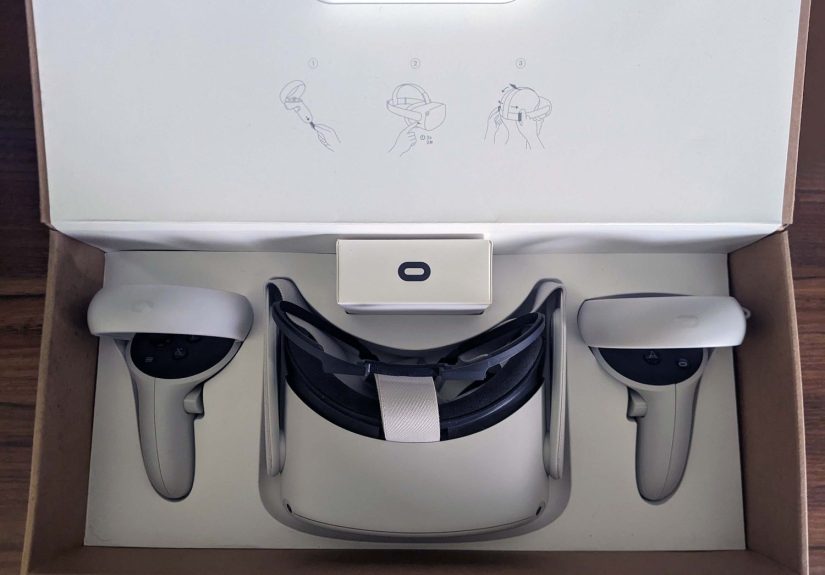
The Quest 2 setup is mostly two devices shaking hands: your headset and your phone. So before you do anything
dramatic like holding down every button at once, get the basics ready:
Quick checklist
- Charge the headset (at least enough to finish updatesVR hates dying mid-setup).
- Install the Meta Horizon mobile app on your iPhone or Android phone.
- Wi-Fi you can trust (ideally 5GHz, not “CoffeeShop_Guest_2” that disconnects every 3 minutes).
- A clear play area (no pets, no lamps, no “decorative” glass tables waiting for your controller).
You’ll also be asked to sign in with a Meta account. You can usually create one using an email,
or sign in with an Instagram or Facebook account. If you want the simplest long-term life, many experienced users
prefer a dedicated Meta account that’s not tied to a social profile you might lose access to later.
Step-by-Step: Set Up Meta Quest 2 the Clean Way
The smoothest setup path is: phone app first → headset pairing → updates → safety boundary.
Here’s the play-by-play.
1) Install the Meta Horizon mobile app and sign in
- Download Meta Horizon on your phone.
- Create/sign into your Meta account and set up your Horizon profile.
- Allow Bluetooth permissions when prompted (pairing without Bluetooth is like trying to high-five through a wall).
2) Power on the headset and follow the on-screen prompts
- Press and hold the Power button until the headset turns on.
- Select language/region and connect the headset to your Wi-Fi.
- If the headset offers an update, let it run. Keep it plugged in if possible.
3) Pair the headset to your phone (the “secret handshake” part)
In the Meta Horizon mobile app, you’ll add a device and pair your Quest 2. During pairing, you may see a
5-digit pairing code in the headset or be prompted to confirm a connection.
- Open the app → go to devices → choose Pair new headset → select Quest 2.
- Follow the prompts; enter the pairing code if asked.
- Once paired, the app becomes your “remote control” for installing apps, managing settings, and casting.
4) Let updates finish (yes, even if you’re excited)
Quest 2 updates are worth the patience because they improve tracking, features, and stability. If setup feels slow,
it’s usually downloading system updates in the background. Stay on Wi-Fi and keep the headset charged.
Fit, Comfort, and Clarity: Make It Feel Good (and Look Sharp)
Most “Quest 2 is bad” reviews are really “my strap is wrong and my lenses aren’t lined up.” Fix those two things,
and suddenly VR feels like magic instead of a scuba mask.
Adjust the strap (so the headset doesn’t slide like a banana peel)
- Loosen the side straps first, then place the headset comfortably against your face.
- Use the top strap to lift or lower where the weight sits.
- Then tighten the side straps evenly until snugnot “head in a vise,” just secure.
Set the lens spacing (IPD) for clearer visuals
Quest 2 uses three main lens spacing positions. Gently slide the lenses to the position that looks clearest.
If text looks fuzzy or you feel eyestrain quickly, your IPD setting is usually the culprit.
Glasses spacer: use it if needed
If you wear glasses, use the included spacer to reduce the chance of your frames touching the lenses.
Scratched lenses are a heartbreak you don’t need.
Set Up Guardian: Your Anti-Wall, Anti-Lamp, Anti-Chaos Force Field
Guardian is the safety boundary that shows a virtual wall when you get too close to the edge of your play space.
You can pick Stationary (standing/sitting in one spot) or Roomscale (moving around).
Best practices for a reliable boundary
- Lighting matters: normal indoor lighting helps the cameras track your space.
- Clear the floor: no cables, no toys, no “it’s fine, I’ll remember that’s there.” You won’t.
- Add buffer space: draw the boundary a little inside the real walls/furniture.
If your boundary starts acting weird later (drifting, disappearing, or forcing you to redraw constantly),
you’ll find fixes in the troubleshooting section.
Essential Settings to Turn On (Do These Early)
Quest 2 is great out of the box, but a few settings make it much easier to live with day-to-day.
1) Double-tap for Passthrough
Passthrough lets you quickly see the real world through the headset cameras. Turning on the “double-tap”
shortcut makes it effortless to grab a drink, find a controller, or confirm you’re not about to step on a cat.
2) Hand tracking (optional, but fun)
Hand tracking allows you to navigate menus using your hands instead of controllers. It’s great for browsing and
watching media. For fast-paced games, controllers are usually still king.
3) Privacy and account safety
- Review privacy options for your profile and activity sharing.
- Use a strong password and enable extra security options where available.
- If you value peace of mind, consider keeping your headset account separate from social accounts you rarely use.
4) Controller pairing basics (in case they act up)
Controllers typically pair automatically, but it’s useful to know you can re-pair them through the app or
by using the headset’s controller settings.
Getting Apps, Games, and Media Without Falling Into a Menu Maze
Once you’re set up, the Horizon Store (and your Library) is where your Quest 2 life happens.
A few tips help you avoid “I bought it… where did it go?” moments.
Install your first apps
- Start with a beginner-friendly tutorial experience (many headsets guide you through this automatically).
- Try a stationary app first if you’re new to VRyour brain will thank you.
- Explore free demos and comfort-rated experiences before jumping into intense motion games.
Manage storage and updates
If downloads fail, check available storage and Wi-Fi stability. Keeping the headset updated prevents a lot of
annoying glitchesand some feature improvements show up only after updates.
Media on Quest 2
Quest 2 is surprisingly good for watching video. If you’re planning long sessions, consider comfort upgrades
(better head strap, facial interface) and keep a cleaning cloth handy.
Casting: Show Your View on a TV, Phone, or PC
Casting lets other people watch what you see. It’s also the easiest way to help a new userbecause you can guide them
without shouting “NO, THE OTHER BUTTON!” across the room.
Cast to a phone
- Open the Meta Horizon mobile app and use the casting option.
- Make sure both devices are on the same Wi-Fi network.
Cast to a TV (often via Chromecast support)
- Turn on the TV/casting device and confirm it’s on the same Wi-Fi network as the headset.
- From the headset, go to Camera/Share and choose Cast, then select the device.
Cast to a PC browser
You can cast to a computer browser using Meta’s casting page while logged into your account. This is a great option
if you don’t have a compatible TV setup.
PC VR on Quest 2: Two Main Options (Wired or Wireless)
Quest 2 can run standalone VR apps on its own, but it can also connect to a gaming PC for PC VR titles.
The two popular methods are Link (wired) and Air Link (wireless).
Option A: Wired with a Link cable
- Install the Meta Horizon Link app on your Windows PC.
- Connect the headset to the PC using a compatible USB cable.
- Put on the headset and enable Link when prompted.
- Launch your PC VR platform (Meta PC library, SteamVR, etc.) and start playing.
Wired is typically more consistent, especially if your Wi-Fi is busy or you want fewer variables.
Option B: Wireless with Air Link
- Install the PC app (Meta Horizon Link) and confirm the PC is on a solid network connection.
- On the headset, enable Air Link and pair with your PC.
- Launch PC VR apps over Wi-Fi.
Wireless freedom feels amazing, but it’s more sensitive to router quality, distance, and network congestion.
If Air Link stutters, it’s often the network, not the headset.
Care and Safety: Keep Your Quest 2 Comfortable and Damage-Free
VR comfort (motion sickness is real, and it’s not a personal failure)
- Start with short sessions. Stop when you feel “off,” not when you feel “fully seasick.”
- Use comfort settings like snap turning or teleport movement in apps that offer them.
- A fan pointed at you can helpplus it makes you feel like you’re in a heroic action scene.
Lens care (the “don’t let the sun cook it” rule)
Avoid direct sunlight hitting the lenses. Bright light can damage the displays through the optics, and it can happen
faster than you’d expect. Store the headset in a case or shaded spot.
Cleaning (simple, gentle, effective)
- Use a dry microfiber cloth to clean lensesstart in the center and wipe gently in circles.
- Keep sweat and makeup off the facial interface as much as possible (your future self will appreciate it).
- Don’t use harsh cleaners on lenses.
Troubleshooting: Fast Fixes for Common Quest 2 Problems
Most Quest 2 issues fall into a few buckets: pairing, Wi-Fi, boundary, controllers, or updates. Here are practical fixes
that work surprisingly often.
Pairing problems (phone can’t find the headset)
- Turn Bluetooth off/on on your phone, then reopen the app.
- Restart the headset (power off fully, then power on).
- Ensure you’re using the correct 5-digit pairing code when prompted.
Wi-Fi won’t connect or keeps dropping
- Reboot the headset and your router.
- Forget the network on the headset and reconnect.
- Try moving closer to the router or using 5GHz if available.
Guardian boundary issues
- Improve lighting and remove reflective/featureless surfaces if tracking feels unstable.
- Redo the boundary from Quick Settings / Boundary options.
- If it keeps failing, a restart often clears stuck boundary behavior.
Controllers not tracking or not pairing
- Replace controller batteries (yes, even if you “just changed them” last month).
- Re-pair controllers through the app or headset controller settings.
- If pairing fails, remove the battery briefly, then retry pairing.
Last resort: Factory reset (only when you must)
If your headset is truly stuckcan’t update, can’t pair, broken setup loopa factory reset can help. It erases local
data on the headset, so use it when other fixes fail.
- Power off the headset.
- Hold Power + Volume Down until the boot menu appears.
- Use volume buttons to highlight Factory Reset and confirm with the power button.
Real-World Experiences: What Using Quest 2 Feels Like (and What People Wish They Knew)
Here’s the part most setup guides skip: the lived experience. Because after the pairing code drama and the “why does
my VR home look like a sci-fi loft?” moment, you’ll start discovering the tiny habits that make Quest 2 feel effortless.
The first big surprise is how much comfort decides your entire opinion. A slightly off strap can turn a
fun 30-minute session into a forehead complaint department. Once you get the headset sitting higher on the cheeks and
supported by the top strap, the pressure spreads out and the display snaps into focus more easily. Many people think they
need stronger Wi-Fi or better graphicswhen they really need a two-minute strap adjustment. The Quest 2 is picky that way:
it rewards small tweaks like a very polite robot.
Second: Passthrough becomes your superpower. At first it’s a novelty“Look, I can see my room in grayscale!”
Then it becomes the fastest way to live in VR without feeling trapped. Double-tap, grab water, check where the dog went,
double-tap again, back to your virtual world. It’s also the best anxiety reducer for new users. If someone feels weird in VR,
showing them they can instantly “peek” at reality makes them relax and stay longer.
Third: your play space is an ongoing relationship. Guardian feels like a one-time task, but your headset remembers
rooms differently depending on lighting, furniture changes, and where you start. If you play in a dim room one night and then in bright
daylight the next, tracking can feel like it had a little too much coffee. The fix is usually simple: consistent lighting and a tidy floor.
Also, always draw the boundary a bit inside your real obstacles. In the heat of a rhythm game, your arms will discover “extra range”
you didn’t know you had.
Fourth: if you try PC VR, expect a small learning curve. Wired Link is the “reliable friend” that shows up on time.
Air Link is the “cool friend” who insists on doing everything wirelessly and occasionally gets distracted by a neighbor’s Wi-Fi.
When Air Link is smooth, it’s magicalno cable tug, just freedom. When it stutters, the problem is usually the router, not the Quest.
A stable network (and keeping the headset close to the router) changes everything.
Finally: the Quest 2 shines when you treat it like a device you’ll use often, not a museum exhibit.
Keep a microfiber cloth nearby. Store it away from sunlight. Charge it where you’ll actually remember to charge it.
Do those boring grown-up things, and suddenly VR becomes a habit: quick fitness session, short game, a movie in a giant virtual theater,
or a chill social hangoutwithout spending the first 10 minutes wrestling with menus. And that’s the real win: less “setup energy,” more “wow.”