Table of Contents >> Show >> Hide
- Get to Know Your String of Pearls First
- Method 1: Lay Cuttings on Top of Soil
- Method 2: Plant Stem Cuttings Upright in Soil
- Method 3: Water Propagation for String of Pearls
- Light, Water, and Aftercare for New Cuttings
- Common Mistakes When Propagating String of Pearls
- Real-Life Experiences & Extra Tips for Propagating String of Pearls
If you’ve ever looked at your string of pearls and thought, “I wish I had ten more of these,”
you’re in the right place. Propagating this quirky, bead-like succulent is surprisingly simple
and honestly, kind of addictive. With just a few cuttings and a bit of patience, you can turn one
pot into a whole trailing curtain of green.
In this guide, we’ll walk through three tried-and-true methods to propagate string of pearls:
rooting cuttings on top of soil, planting cuttings upright in soil, and water propagation. Along
the way we’ll talk about the best soil, light, and aftercare, plus real-life tips that help you
avoid the two big enemies of this plant: rot and shriveling.
Get to Know Your String of Pearls First
String of pearls (botanical name Curio rowleyanus, formerly Senecio rowleyanus) is a
trailing succulent with tiny, pea-shaped “pearls” that store water. It loves bright, indirect
light, sandy, fast-draining soil, and careful wateringlet the soil dry out, then water
thoroughly. Too much water, especially in heavy soil, is the fastest way to kill it.
The good news? The same traits that make it a little dramatic about watering also make it
incredibly easy to clone. Those little pearls grow along flexible stems with tons of nodes,
and each node is a potential new root factory. Most propagation methods simply take advantage
of that natural ability.
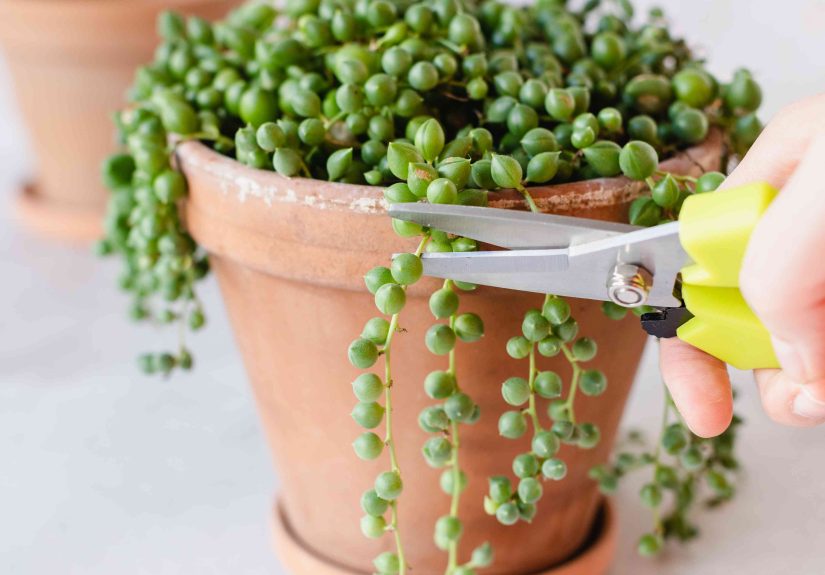
When and How to Take Cuttings
The best time to propagate string of pearls is during its active growing seasonspring through
early fall. In winter, it slows down, and your cuttings may sulk instead of root. Use clean,
sharp scissors or pruning shears and aim for:
- Healthy, firm pearls (no wrinkling, browning, or mushiness)
- Stems about 3–6 inches long for easier handling
- At least a few nodes per cutting so it can root in multiple spots
Many growers like to let thick succulent cuttings “callus” (dry at the cut end) for a day or
two before planting, which can help reduce rot risk, especially in humid climates. For string
of pearls, you can plant right away or let cut ends rest overnightit’s flexible as long as
the soil isn’t wet and cold.
Method 1: Lay Cuttings on Top of Soil
Why This Method Works So Well
Laying string of pearls cuttings flat on the soil is often the fastest, fullest-looking method.
Each node touching the soil can sprout roots, which gives you a dense, lush plant in less time
than a single rooted tip would. Many houseplant guides consider this the most efficient method
for filling a pot.
Step-by-Step: Surface Layering in Soil
-
Prep your pot and soil.
Choose a shallow pot or nursery container with drainage holes. Fill it with a gritty,
well-draining mixcactus soil mixed with perlite or coarse sand works nicely. Lightly moisten
the soil, but don’t soak it. -
Take your cuttings.
Snip several 3–6 inch pieces from the mother plant. Remove a pearl or two near the cut end
if needed so a bit of bare stem can contact the soil. -
Lay the strands down.
Coil or arrange the cuttings on top of the soil like little green necklaces. Gently press
the nodes (where pearls attach to the stem) into the soil, but keep most of the pearls on
top so they don’t rot. -
Pin them in place (optional but helpful).
Use bent paperclips, floral pins, or bits of wire to lightly secure the stems so they stay
touching the soil and don’t pop up as they dry and curl. -
Provide bright, indirect light.
Place the pot in a spot with lots of indirect lightan east- or north-facing window is
perfect. Avoid harsh afternoon sun while cuttings are rooting. -
Water lightly, but consistently.
Mist or lightly water the soil whenever the top layer dries out. You want it slightly moist,
never soggy. After a few weeks, gently tug a strand; if you feel resistance, roots have formed.
Once the roots are established (usually around four weeks), you can transition to a normal
succulent watering routine: water thoroughly, then let the soil dry almost completely before
watering again.
Method 2: Plant Stem Cuttings Upright in Soil
Great for “Refilling” a Leggy Pot
If your existing string of pearls is getting bare at the top but still has long, pretty
strands, this method is your best friend. Planting cuttings upright lets you thicken the crown
of the plant so it looks full at the top and still cascades gracefully over the edges.
Step-by-Step: Upright Cuttings in Soil
-
Refresh the pot.
Loosen or replace the top layer of soil with a fresh, well-draining succulent mix. If the
existing soil is compacted or holds water too long, consider repotting fully. -
Prepare the cuttings.
Cut several stems about 4–6 inches long. Strip off the bottom third of pearls to expose bare
stem; these exposed nodes will root in the soil. -
Dip in rooting hormone (optional).
Some growers like to dip the cut end in rooting hormone to encourage faster root formation.
It’s not required but can help if your environment is cooler or your plant is a bit finicky. -
Plant around the rim.
Insert the bare stems into the soil around the outer edge of the pot, burying about 1–2
inches. Gently firm the soil around each cutting so it stands upright, with pearls resting
on the surface. -
Water and wait.
Give the soil a gentle drink to settle it around the stems. Then place the pot in bright,
indirect light. Keep the soil just barely moist until you feel resistance when you tug on a
cuttingthat’s your signal new roots have formed.
This method is especially helpful if you’re rescuing a plant from root rot. You can trim away
unhealthy roots, take healthy top cuttings, and “replant” a fresh crown, essentially rebooting
the plant in better soil.
Method 3: Water Propagation for String of Pearls
Pros, Cons, and When to Use It
Propagating string of pearls in water is popular because it’s very satisfyingyou can literally
watch roots appear through the glass. Water-propagated roots tend to be thinner and more
delicate than soil-grown roots, so you’ll want to move them to soil sooner rather than later.
Many experienced growers still prefer soil methods for long-term strength, but water is a fun
way to start.
Step-by-Step: Water Propagation
-
Pick your container.
A small glass jar, bud vase, or shot glass works well. You don’t need much waterjust enough
to cover the bare stem. -
Prep the cuttings.
Take 3–5 inch cuttings and remove a few pearls from the bottom to expose 1–2 inches of stem.
Only the bare stem should sit in water; pearls should stay above the waterline. -
Add water and place the stems.
Fill the container with clean, room-temperature water. Set the cuttings so the bare stems
are submerged and pearls rest on the rim or slightly above. -
Give them good light.
Place the container in bright, indirect light. Avoid direct sun, which can overheat the
water and cook the roots. -
Change water regularly.
Refresh the water every 3–4 days to avoid bacteria and algae buildup. If you see any mushy
sections, trim them off with clean scissors. -
Pot them up.
Once roots are about 1–2 inches long, gently move the cuttings into a succulent potting mix.
Bury the rooted portion and treat them like freshly planted cuttingskeep soil lightly moist
at first, then slowly reduce watering.
Expect water-propagated cuttings to take a bit longer to fully adjust once they’re in soil.
They may stall or drop a few pearls before they settle in and start growing.
Light, Water, and Aftercare for New Cuttings
No matter which propagation method you choose, the aftercare is pretty similar:
- Light: Bright, indirect light is ideal. Early morning sun and filtered light the rest of the day work well.
- Temperature: Aim for 65–75°F (18–24°C). Avoid cold drafts and blasting AC vents.
- Soil moisture: For the first few weeks, keep the soil slightly moistnot bone dry, not soggy.
- Airflow: Good airflow helps prevent mold and rot, especially if you’re misting or keeping soil more moist than usual.
Once your cuttings are rooted and producing new growth, gradually shift to classic succulent
care: let the soil dry out between deep waterings, keep the plant in bright light, and use a
pot with plenty of drainage.
Common Mistakes When Propagating String of Pearls
1. Overwatering and Rot
String of pearls is infamous for rotting if it sits in wet soil. Heavy, peat-based mixes or
containers without drainage are a recipe for disaster. When in doubt, choose a grittier mix
and water less often. If pearls are turning mushy and translucent, stop watering, let the soil
dry out, and rescue healthy strands to restart in fresh, well-draining mix.
2. Not Enough Light
Leggy, stretched stems and small, widely spaced pearls are signs your plant needs more light.
While fresh cuttings shouldn’t be roasted in hot direct sun, they do need plenty of brightness
to root and grow. If you’re propagating indoors in a darker space, a small grow light can make
a big difference.
3. Not Using Enough Cuttings
A single cutting will rootbut it might look a little sad and scraggly for a long time. For a
fuller, more dramatic pot, use multiple cuttings arranged like a wreath around the rim or
coiled on the surface of the soil. You’ll get that lush “green waterfall” effect much sooner.
4. Rushing the Process
Rooting usually takes a few weeks. It can be tempting to poke, dig, or move the cuttings every
couple of days to “check” them, but that only disturbs tender new roots. Instead, use the
gentle tug test: if a cutting doesn’t slide out easily, roots are formingcongratulations, you
can stop worrying.
Real-Life Experiences & Extra Tips for Propagating String of Pearls
Talk to any string of pearls lover and you’ll hear the same confession: once they learned how
easy it was to propagate, they started cutting their plant like a hairstylist before a big
makeover. Here are some experience-based tips and stories that can help you skip the trial and
error (or at least some of it).
One common discovery: surface-layering is surprisingly forgiving. Even gardeners who consider
themselves “plant killers” often succeed with this method. The key is contact. The nodes need
to actually touch the soil. If your cuttings keep springing up, gently pinning them down with
bent paperclips makes a huge difference. It feels a bit like pegging tiny green laundry, but
it works.
Another shared experience is that patience pays off far more than perfection. Many people
report that their cuttings looked exactly the same for two or three weeksno new growth, no
obvious roots, nothing. Then, almost overnight, the pot suddenly seemed fuller, with tiny new
pearls forming at the nodes. Behind the scenes, roots had been establishing quietly the whole
time. So if your cuttings look “stuck,” don’t panic; as long as they’re firm and not rotting,
they’re probably busy rooting.
Growers in humid climates often find that letting cut ends callus for a day or two is worth
the wait, especially when planting upright cuttings. In drier climates, some people skip this
step entirely and still get great results. The trick is to adjust watering to your conditions:
in dry air, you might mist or lightly water a bit more frequently; in damp air, you’ll want to
be stingy with water and rely more on ambient humidity.
Water propagation also has its fan club, mostly among visual learners. Watching roots appear in
a small jar can be incredibly satisfyingand motivating when you’re just getting into
propagation. However, many people notice that those water-grown roots can be a little shocked
when they move to soil. That’s normal. Baby the plant for a few weeks afterward by keeping the
soil just barely moist and providing consistent, bright light. Once it sends out new growth,
you can ease into a typical succulent watering schedule.
A neat trick shared in houseplant communities is “bridge” propagation. If you have a healthy
mother plant and an empty pot of fresh soil, you can drape a long strand from the old pot into
the new one, lightly pinning the middle section to the new soil. While still attached to the
mother plant, that middle section will begin to root in the new pot. After a few weeks, you
can snip the connection andvoilàinstant second plant with minimal stress.
Many growers also use propagation as plant insurance. If you’ve ever lost a treasured string
of pearls to root rot or a surprise cold snap, you know how heartbreaking it can be. Once you
have a healthy plant again, make it a habit to root a few cuttings every season. You’ll have
backup plants, gifts for friends, and material to experiment with different propagation
methods. Worst case, if something goes wrong with the original, you’ve got successors ready to
trail on.
Finally, don’t underestimate the styling side of propagation. Because it’s so easy to root,
people get very creative: hanging spheres, multi-layer shelves of trailing vines, mixed
succulent planters with string of pearls spilling over the sides like green jewelry. Once you
realize you can remake your plant as often as you like, propagation becomes less of a chore
and more of a design tool. You’re not just keeping the plant aliveyou’re shaping how it
drapes, how full it looks, and how it fits your space.
The big takeaway from all these experiences? Start with solid basicsfast-draining soil, bright
indirect light, gentle wateringand then experiment. Try surface layering in one pot, upright
cuttings in another, and a few water-propagated strands in a sunny window. Within a month or
two, you’ll have more pearls than you know what to do withand you’ll wonder why you ever felt
nervous about taking that first cutting.