Table of Contents >> Show >> Hide
- Why Leaf Prep Matters More Than People Admit
- The Best Cabbage for Stuffed Cabbage Rolls
- How to Prepare Cabbage Leaves for Stuffed Cabbage Rolls
- How to Roll the Leaves After Prep
- Common Mistakes to Avoid
- Helpful Tips for Better Stuffed Cabbage Rolls
- Can You Prepare Cabbage Leaves Ahead of Time?
- Final Thoughts
- Kitchen Experience and Real-Life Lessons from Making Cabbage Rolls
Stuffed cabbage rolls are one of those dishes that look wildly impressive and slightly intimidating, like they require a grandmother, an apron, and emotional resilience. The truth is much kinder. The hardest part is not the filling, the sauce, or the rolling. It is preparing the cabbage leaves so they are soft enough to bend, sturdy enough to hold their shape, and cooperative enough to stop behaving like crunchy little suitcases.
If you have ever tried to roll raw cabbage leaves, you already know the result: cracks, tears, chaos, and one leaf that somehow flings itself across the cutting board like it has opinions. The good news is that learning how to prepare cabbage leaves for stuffed cabbage rolls is simple once you understand what the leaves need. They need heat, a little trimming, and a bit of patience. That is it.
In this guide, you will learn exactly how to choose the right cabbage, soften the leaves, trim them properly, and get them ready for beautiful stuffed cabbage rolls that actually roll instead of staging a vegetable rebellion. Whether you are making classic beef-and-rice rolls, vegetarian cabbage rolls, or a family recipe that has been protected like a state secret, these steps will make the prep easier and the final dish much better.
Why Leaf Prep Matters More Than People Admit
The leaf is not just packaging. It is part of the dish. A properly prepared cabbage leaf becomes tender, slightly sweet, and silky after cooking. It wraps around the filling like a blanket instead of a legal dispute. A badly prepared leaf, on the other hand, splits when rolled, stays chewy after baking, or refuses to lie flat in the pan.
Good cabbage leaf prep does three jobs at once. First, it makes the leaves flexible enough to roll. Second, it removes the thick stem section that can make the roll bulky and uneven. Third, it helps the rolls cook more evenly, because every leaf starts at the right texture before it hits the sauce.
That is why experienced home cooks do not skip this step. They know the filling may be the heart of the recipe, but the leaf is the engineering.
The Best Cabbage for Stuffed Cabbage Rolls
Green Cabbage: The Classic Choice
Green cabbage is the traditional pick for many stuffed cabbage roll recipes. It is affordable, easy to find, and sturdy enough to hold hearty fillings like ground beef, pork, rice, mushrooms, or lentils. Its leaves are tightly packed, which means you usually need to soften them with boiling water before peeling them away.
Choose a head that feels heavy for its size and has crisp outer leaves. A larger cabbage is usually easier to work with because it gives you more big outer leaves, and those are the real VIPs of cabbage-roll night.
Savoy Cabbage: The Tender Overachiever
Savoy cabbage has crinkly, looser leaves and a more delicate texture. It is often easier to separate and roll, which makes it excellent for beginners or anyone who has been emotionally injured by regular cabbage. It also has a slightly sweeter flavor and softens quickly.
If you want the easiest rolling experience, Savoy is a great option. If you want the old-school, classic look and structure, green cabbage is still the champion.
How to Prepare Cabbage Leaves for Stuffed Cabbage Rolls
Step 1: Clean and Inspect the Cabbage
Start by peeling off any damaged, wilted, or dirty outer leaves. Rinse the cabbage under cool running water and pat it dry. Do not soak it like a beach towel. Just make sure it is clean and ready for the next step.
If the outer leaves are still in good condition, save them. They can be used to line the bottom of the baking dish or Dutch oven, which helps keep the cabbage rolls from sticking and adds extra flavor.
Step 2: Remove the Core
Set the cabbage stem-side up on a cutting board. Use a small sharp knife to cut around the core in a cone shape, then pull it out. This step is important because it helps hot water or steam reach the inner leaves more easily. It also makes it easier to loosen the leaves without tearing them.
Think of the core as the cabbage’s stubborn center manager. Once it is gone, everybody else becomes easier to work with.
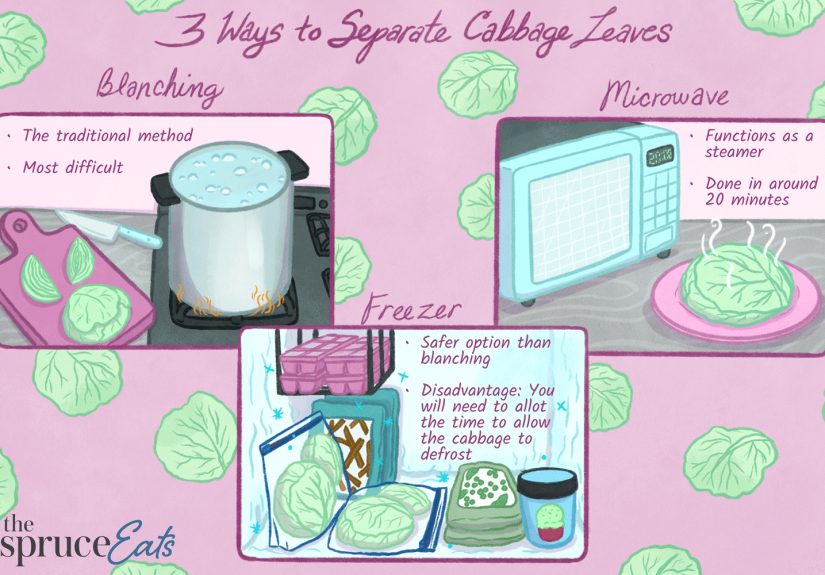
Step 3: Soften the Leaves
There are three reliable methods for softening cabbage leaves. One is the classic favorite, one is the patient person’s method, and one is for people who looked at the clock and made a face.
The Boiling Method
Bring a large pot of salted water to a boil. Carefully lower the cored cabbage head into the water. After a few minutes, the outer leaves will begin to loosen and soften. Use tongs to peel them away one at a time as they become flexible. Transfer each leaf to a tray or colander to cool.
If you prefer, you can separate the leaves first and boil them in batches for about 2 to 4 minutes, just until softened. This is a great approach if some leaves have already come off during coring or if you are working with a smaller cabbage.
This method is the gold standard because it softens the leaves evenly and gives you the best control over texture.
The Freezer Method
Freeze the whole cabbage head, then thaw it completely in the refrigerator. As it defrosts, the leaves soften and become flexible enough to peel away. This method is convenient because it avoids a large pot of boiling water, but it takes planning and usually produces leaves that are a little wetter.
It is handy, but it is not a miracle. You still need to handle the leaves gently and sometimes blot them dry before filling.
The Microwave Method
Place the cored cabbage in a microwave-safe dish with a little water, cover loosely, and microwave until the outer leaves soften. Remove a few leaves, then continue as needed. This method works in a pinch, but it can heat unevenly, so some leaves may be perfect while others are still auditioning for coleslaw.
For most cooks, boiling remains the easiest and most dependable way to prepare cabbage leaves for stuffed cabbage rolls.
Step 4: Cool the Leaves Slightly
Once the leaves are softened, let them cool just enough to handle comfortably. You do not want them steaming-hot when you start trimming, but you also do not want them to dry out. A warm, pliable leaf is easier to shape than a cold leaf that has been ignored on the counter for half an hour.
Step 5: Trim the Thick Rib
This is the step that changes everything. Lay one cabbage leaf flat on a cutting board. You will see a thick central rib or stem running along the bottom portion. Use a paring knife to shave down the thickest part of that rib so the leaf lies flatter. Do not cut all the way through unless the rib is especially massive and dramatic.
The goal is to reduce bulk, not destroy the leaf. A flatter leaf rolls more neatly, seals more easily, and looks much better in the pan. If the leaf is very large, trimming also helps the filling sit more evenly in the center.
Step 6: Pat Dry if Needed
If the leaves are dripping wet, gently pat them dry with paper towels. They should be moist and supple, not slippery. Too much surface water can make the filling slide around and can dilute the sauce in the early stage of cooking.
Step 7: Sort by Size
Spread the leaves out and separate them by size. Large leaves are perfect for standard cabbage rolls. Medium leaves work well for smaller rolls or lighter fillings. Tiny leaves can be chopped and added to the sauce, tucked between the rolls, or used to patch tears in a larger leaf.
This simple organizing step saves time later and keeps you from trying to fit a heroic amount of filling into a leaf the size of a business card.
How to Roll the Leaves After Prep
Once the leaves are ready, place the leaf flat with the trimmed rib area facing you. Add the filling near the bottom center. Fold the sides inward, then roll upward tightly but not aggressively. You want the roll secure, not strangled. Place each cabbage roll seam-side down in the baking dish or pot so it stays closed as it cooks.
If a leaf tears a little, do not panic. Overlap a smaller leaf over the weak spot or use that leaf for the bottom of the pan. Stuffed cabbage is home cooking, not architectural glasswork.
Common Mistakes to Avoid
Using Raw Leaves
Raw cabbage leaves are too stiff to roll neatly. They crack, split, and generally act offended.
Overcooking the Leaves
If the leaves become mushy before you even fill them, they may fall apart in the pan. Soften them until pliable, not limp and exhausted.
Skipping the Rib Trim
This is one of the biggest reasons cabbage rolls end up bulky and awkward. Trimming the thick rib gives you cleaner, tighter rolls.
Overfilling the Rolls
A giant mound of filling may feel generous, but it makes rolling harder and increases the chance of splitting. Leave yourself enough leaf to fold and seal.
Throwing Away Extra Leaves
Those extra leaves are useful. Line the pan, layer them between rolls, or chop them into the sauce. Waste less, cook smarter, feel mildly superior.
Helpful Tips for Better Stuffed Cabbage Rolls
If your cabbage head is especially tight, boiling the whole cored head works better than trying to pull off raw leaves first. If your leaves are smaller than expected, make mini rolls instead of forcing them into a full-size job they did not apply for. If your cabbage has a few torn leaves, save them for layering under the rolls or covering the top before the sauce goes on.
Another smart move is to prep the leaves ahead of time. You can soften, trim, and refrigerate them until you are ready to fill and roll. This breaks the recipe into manageable parts and makes stuffed cabbage far more realistic on a busy day.
Can You Prepare Cabbage Leaves Ahead of Time?
Yes, and it is a great idea. Once the leaves are softened and trimmed, stack them with paper towels between layers if needed, place them in an airtight container, and refrigerate for a day or two. When you are ready to use them, let them sit at room temperature for a short time so they become more flexible again.
This make-ahead approach is especially helpful if you are cooking for a holiday, meal-prepping, or trying to make stuffed cabbage without turning your kitchen into a steam-filled obstacle course on a Tuesday night.
Final Thoughts
Learning how to prepare cabbage leaves for stuffed cabbage rolls is one of those kitchen skills that pays off immediately. Once you know how to core, soften, trim, and sort the leaves, the whole recipe becomes much less intimidating. Suddenly the dish feels comforting instead of complicated, and homemade instead of high-maintenance.
The best part is that this technique works across many versions of stuffed cabbage. Traditional Polish-style rolls, savory Eastern European cabbage recipes, vegetarian cabbage rolls, and modern twists all rely on the same leaf-prep basics. Get the leaves right, and the rest of the recipe becomes dramatically easier.
So the next time you bring home a head of cabbage, do not underestimate it. Beneath that stubborn, tightly wrapped exterior is dinner potential of the highest order. Give it some hot water, trim its dramatic bits, and turn it into rolls worthy of a second helping.
Kitchen Experience and Real-Life Lessons from Making Cabbage Rolls
Anyone who has made stuffed cabbage more than once will tell you the same thing: the first batch teaches you the recipe, and the second batch teaches you the cabbage. On paper, the process looks straightforward. In real life, every head of cabbage has a personality. Some are generous and loosen their leaves like they were born for this moment. Others cling to their layers with the determination of a toddler holding a snack.
One of the most useful real-world lessons is that bigger cabbages are usually easier, not harder. At first, many cooks buy a medium head because it seems more manageable. Then they discover that the outer leaves are too small, the inner leaves are too tight, and suddenly every roll looks like a lumpy envelope. A larger cabbage gives you room to work and lowers the stress level immediately.
Another common experience is realizing that the leaves do not all finish at the same time. The outer leaves soften first, and that is perfectly normal. Instead of waiting for the entire cabbage to become uniformly tender, experienced cooks remove the leaves one by one as they loosen. This keeps the outer leaves from turning mushy while the inner ones catch up. It also feels oddly satisfying, like peeling off edible wrapping paper in slow motion.
Many home cooks also learn, usually after one messy attempt, that trimming the rib is not optional. It looks like a minor detail until you skip it. Then the roll refuses to lie flat, the seam pops open, and the filling escapes into the sauce like it has found a better opportunity. Once you shave down that thick stem, the same leaf suddenly becomes flexible, obedient, and much easier to roll.
There is also a practical lesson about expectations. Not every leaf will be perfect, and that does not matter nearly as much as people think. Some leaves tear a little. Some are too small. Some need to be overlapped. Real kitchens are full of minor imperfections, and cabbage rolls are forgiving food. In fact, they often taste better when they look homemade instead of machine-made.
Another thing people discover through experience is that cabbage rolls are easier when broken into stages. Prep the leaves first. Make the filling later. Roll when you have the counter space and the patience. Trying to do everything at once is how you end up with a boiling pot, raw meat, tomato sauce, and one escaped cabbage leaf all demanding attention at the exact same moment.
Finally, there is the emotional truth of the dish: stuffed cabbage is slow food in the best sense. It asks you to pay attention, but it gives back comfort, aroma, and a pan full of tender rolls that feel far fancier than the ingredients suggest. Once you get comfortable preparing the leaves, the whole recipe becomes less about wrestling a vegetable and more about building a meal that feels generous, practical, and deeply satisfying.