Table of Contents >> Show >> Hide
- Quick Quinoa Basics (So You Don’t Accidentally Grow “Sad-noa”)
- Step 1: Choose the Right Quinoa Variety (Yes, It Matters)
- Step 2: Pick the Best Site (Sun, Soil, and “Not a Swamp”)
- Step 3: Timing Your Planting (Beat the Heat, Avoid the Freeze)
- Step 4: How to Plant Quinoa Seeds (Small Seed, Big Dreams)
- Step 5: Watering Quinoa (More in the Beginning, Less in the End)
- Step 6: Fertilizing Quinoa (Don’t Overfeed the Drama Plant)
- Step 7: Weed Control (The Make-or-Break Phase)
- Step 8: Staking and Support (When Your Quinoa Gets Top-Heavy)
- Step 9: Pests and Diseases (The Unwanted Season Finale)
- Step 10: When Quinoa Flowers (And Why Heat Can Ruin the Party)
- Step 11: Harvesting Quinoa (The Crunch Test and the Dry-Down)
- Step 12: Removing Saponins (Because Bitter Is Cute Only in Coffee)
- Step 13: Growing Quinoa in Containers (Yes, It’s Possible)
- Common Problems (and Fast Fixes)
- Real-World Growing Experiences (500+ Words of “What Gardeners Learn the Hard Way”)
- 1) The Early-Weed Battle Is the Whole Game
- 2) Crowding Feels Efficient… Until It Becomes a Mildew Party
- 3) Heat Timing Can Matter More Than Perfect Soil
- 4) Wind + Tall Seed Heads = Surprise Yoga Poses
- 5) Harvest Is More About Drying Than Cutting
- 6) The “Foam Test” Makes You Feel Like a Backyard Scientist
- 7) The Hidden Win: Leaves You Can Eat
- Conclusion: Your Quinoa Plan (Simple, Repeatable, Successful)
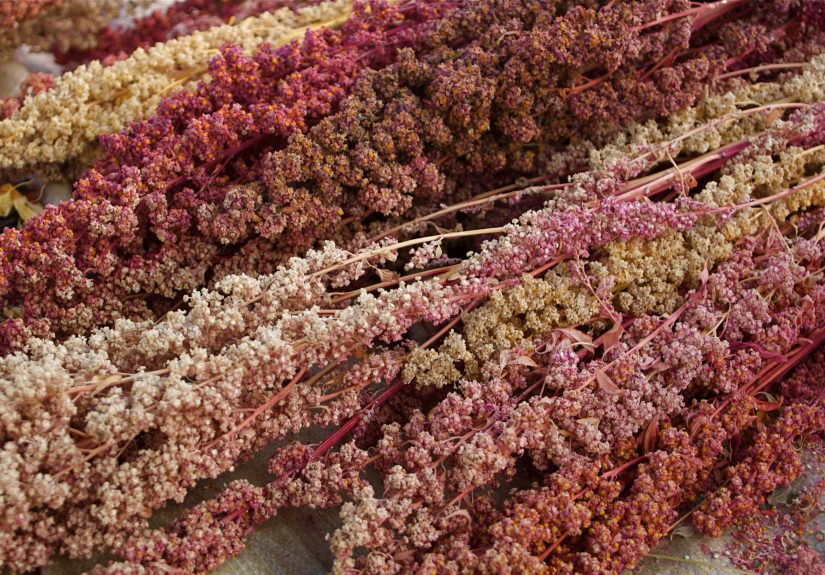
Quinoa (pronounced keen-wah) has a reputation for being “fancy rice,” but in the garden it’s more like a
dramatic, colorful cousin of spinach that decided to become a grain. It grows tall, throws a confetti of seed heads,
andwhen you do it rightrewards you with a homegrown harvest that makes store-bought quinoa feel a little… basic.
This guide walks you through quinoa from seed to storage with practical steps, real-world troubleshooting, and a few
gentle jokes to keep your gardening confidence hydrated. Let’s grow.
Quick Quinoa Basics (So You Don’t Accidentally Grow “Sad-noa”)
- Type: Annual broadleaf “pseudo-grain” (not a true cereal grain).
- Best climate vibe: Sunny days, cooler nights, low-to-moderate humidity.
- Big warning label: High heat during flowering can reduce or ruin seed set.
- Bonus: The young leaves are edible like spinach.
- Time to harvest: Usually about 3–4 months depending on variety and conditions.
Step 1: Choose the Right Quinoa Variety (Yes, It Matters)
Quinoa varieties can behave differently based on day length and temperature. In many U.S. regions, varieties that
are day-neutral or adapted to long summer days are easier to manage than types bred for short-day
conditions. For home gardeners, start with varieties sold specifically for your region or by reputable seed sources
that mention adaptation to U.S. growing conditions.
Can I Plant Grocery Store Quinoa?
Sometimes it sprouts, but it’s a gamble you don’t need. Store quinoa may be from varieties not suited to your day
length, and it may be processed, heat-treated, or simply poorly adapted. If you want a predictable harvest, buy
seed meant for planting (your future self will thank you).
Step 2: Pick the Best Site (Sun, Soil, and “Not a Swamp”)
Sunlight
Quinoa likes full sunaim for at least 8 hours of direct light. More sun generally helps with sturdy growth
and seed head development.
Soil
Quinoa is fairly tolerant, but it performs best in well-drained soil with a fine seedbed. Heavy clay that stays
wet can lead to poor emergence and disease. If your soil holds water like a bathtub, quinoa will not be amused.
Raised Beds vs. In-Ground
Raised beds can be excellent for quinoa because they warm earlier and drain bettertwo things quinoa appreciates
deeply, even if it never writes you a thank-you note.
Step 3: Timing Your Planting (Beat the Heat, Avoid the Freeze)
The goal is simple: get quinoa flowering before your hottest weather. In many areas, that means sowing in spring
once the soil is workable and major freezes are fading.
- Cooler regions: Plant in spring after the risk of hard frost drops.
- Milder regions: You may be able to plant earlier (late winter to early spring), depending on local conditions.
Quinoa can tolerate light frosts once established, but seedlings are still seedlingstiny, brave, and not made of steel.
If a surprise cold snap shows up, cover young plants with row cover or light fabric.
Step 4: How to Plant Quinoa Seeds (Small Seed, Big Dreams)
Seedbed Prep
Quinoa seeds are small, so they prefer a fine, crumbly surface. Remove rocks, break up clods, and lightly rake
the top layer. Add compost if your soil is low in organic matter.
Planting Depth
Plant shallow. Think “sprinkle with intention,” not “bury like treasure.” A shallow planting depth improves emergence.
Spacing
Quinoa can be grown like a small grain in rows or as a garden patch. A practical home-garden approach:
- Rows: Space rows about 12–24 inches apart for access and airflow.
- In-row: Sow seeds close, then thin later so plants end up about 10–12 inches apart.
Germination and Thinning
Keep the soil lightly moist during germination. Once seedlings are a few inches tall, thin them so each plant has room
to branch and form fuller seed heads. Thinning feels mean for 6 seconds, and then you remember you like harvests.
Step 5: Watering Quinoa (More in the Beginning, Less in the End)
Quinoa is fairly drought-tolerant once established, but the early stages are critical.
Watering Schedule That Actually Works
- Weeks 1–3: Keep evenly moist (not soggy) to support germination and root development.
- Vegetative growth: Water when the top couple inches of soil dry out.
- Seed fill to maturity: Moderate watering, but avoid soaking the seed heads as they mature.
Near harvest, too much moisture can encourage sprouting or mold issues in maturing seed heads. At that point, quinoa
wants to dry downnot audition for a pool party.
Step 6: Fertilizing Quinoa (Don’t Overfeed the Drama Plant)
Quinoa can grow in relatively lean soil, but balanced fertility improves vigor. For most home gardens:
- Work in compost before planting.
- If your soil is very poor, consider a light, balanced organic fertilizer at planting.
- Avoid heavy nitrogen feeding latetoo much lush growth can increase lodging and delay maturity.
Step 7: Weed Control (The Make-or-Break Phase)
Quinoa seedlings can be slow starters and don’t love competition. Weeds are the uninvited guests who eat all the snacks
and sit on your good pillows.
Simple Strategies
- Shallow cultivation: Light hoeing early (carefullyroots are still forming).
- Mulch between rows: Helps suppress weeds and hold moisture.
- Hand weeding: Especially important during the first month.
Step 8: Staking and Support (When Your Quinoa Gets Top-Heavy)
Some varieties grow tall with large seed heads and can lodge (lean or topple), especially with wind, rich soil, or
dense planting. If your quinoa starts leaning like it’s trying to hear gossip, add support:
- Stake individual plants in windy gardens.
- Use a simple string-and-stake “corral” around a patch.
- Thin properly so stems develop strength.
Step 9: Pests and Diseases (The Unwanted Season Finale)
Common Pests
Quinoa’s natural bitter coating helps discourage some pests, but leaves can still attract typical garden troublemakers.
Watch for aphids, leaf miners, and flea beetles. Many gardeners manage minor infestations with:
- Strong water spray to knock off aphids
- Encouraging beneficial insects (lady beetles, lacewings)
- Neem oil or insecticidal soap when needed (follow label directions)
Downy Mildew (The Big One)
In wetter or humid conditions, downy mildew can become the most serious quinoa disease. You’re more likely to see it
when plants are crowded, leaves stay wet, or irrigation is excessive.
Prevention That Helps
- Spacing and airflow: Thin plants and avoid overly tight rows.
- Water smart: Water at the base; avoid soaking foliage late in the day.
- Clean garden habits: Remove heavily infected leaves; don’t compost diseased plant material if you’re unsure it will fully break down.
- Variety selection: Some lines show better tolerance than others.
Step 10: When Quinoa Flowers (And Why Heat Can Ruin the Party)
Flowering is the “make it or break it” moment. If temperatures spike during flowering and early seed fill,
quinoa may abort flowers or fail to set seed well. Plan your planting so flowering avoids the hottest stretch of summer.
Practical Example: Timing in a Warm-Summer Region
If your area regularly hits the mid-90s°F in July and August, aim to plant early enough that flowering happens in
late spring or early summer. If you plant too late, you’ll grow a gorgeous plant… that politely refuses to give you grain.
Step 11: Harvesting Quinoa (The Crunch Test and the Dry-Down)
Signs It’s Ready
- Leaves yellow and drop
- Seed heads look dry
- Seeds are hard and not “milky” inside
- The seed coat resists a fingernail dent
How to Harvest
- Cut seed heads (or entire stalks) on a dry day.
- Dry thoroughly in a well-ventilated placehang bundles or lay heads on screens.
- Thresh by rubbing seed heads over a clean tarp or in a bin.
- Winnow to remove chaff (a box fan on low can help; just don’t donate your harvest to the neighborhood).
Step 12: Removing Saponins (Because Bitter Is Cute Only in Coffee)
Many quinoa varieties have saponinsa natural bitter coating. Some seed is sold “pre-rinsed,” but homegrown quinoa
often needs cleaning.
Simple Home Method
- Rinse in cold water, stirring the seeds.
- Drain and repeat until the water runs clearer and less foamy.
- Dry the cleaned quinoa completely (spread thinly on trays) before storage.
Once dry, store quinoa in airtight containers in a cool, dry place. Treat it like the valuable pantry treasure it is
not like a half-open bag of chips.
Step 13: Growing Quinoa in Containers (Yes, It’s Possible)
If you’re short on space, quinoa can grow in large containers, but it needs stability and enough soil volume to avoid
drying out too fast.
- Container size: Aim for large pots (think 10 gallons or more) for best results.
- Support: Stake or cage plantscontainer quinoa can get top-heavy.
- Water: Containers dry quickly, so check moisture more often.
Common Problems (and Fast Fixes)
Problem: Plants Look Great, But Seed Heads Are Sparse
- Likely cause: Heat during flowering or variety not suited to your day length.
- Fix: Plant earlier next season, choose adapted varieties, and avoid stressing plants during bloom.
Problem: Leaves Have Yellow Patches or Grayish Growth Underneath
- Likely cause: Downy mildew.
- Fix: Improve airflow, remove infected leaves, avoid overhead watering, and thin plants more aggressively.
Problem: Seed Heads Mold or Sprout
- Likely cause: Wet weather or late irrigation near maturity.
- Fix: Harvest earlier during dry windows, dry indoors with airflow, and reduce watering late in the season.
Real-World Growing Experiences (500+ Words of “What Gardeners Learn the Hard Way”)
The instructions above are the “official playbook,” but quinoa has a way of teaching lessons that don’t fit neatly
into bullet points. Here are experience-based takeawayscommon patterns gardeners notice after a season or two.
Think of this as the friendly post-game interview, minus the sports microphone and the awkward sponsor shout-outs.
1) The Early-Weed Battle Is the Whole Game
Many gardeners report that quinoa’s first month is deceptively slow. It’s not lazy; it’s just building roots and
settling in. Meanwhile, weeds act like they trained for this moment. If quinoa gets shaded early, it may stay spindly,
branch less, and yield fewer seed heads. The “experience” fix is to plan ahead: pre-weed the bed, use a light mulch
between rows, and do quick, frequent weeding sessions early. Ten minutes now beats two hours later.
2) Crowding Feels Efficient… Until It Becomes a Mildew Party
The temptation is real: quinoa seed is tiny, and it feels natural to sow thickly “just in case.” But crowded quinoa can
trap humidity and reduce airflow, which is exactly what leaf diseases want. Gardeners in wetter summers often notice
that thinning isn’t optionalit’s disease management. A patch thinned to comfortable spacing may look “too empty” for
a week, and then the plants explode with branching and healthier growth.
3) Heat Timing Can Matter More Than Perfect Soil
People often assume soil fertility is the biggest yield driver. With quinoa, timing and temperature can outrank
everything. Gardeners in hot-summer areas commonly see beautiful plants with disappointing seed set when flowering
overlaps with heat waves. The lesson: you can’t compost your way out of bad heat timing. Plant earlier, pick earlier
maturing varieties, or try a second planting window only if your region cools down before flowering.
4) Wind + Tall Seed Heads = Surprise Yoga Poses
Quinoa can grow tall and top-heavy, and gardeners are often caught off guard when plants start leaning dramatically
after a windy storm. Even if plants don’t snap, lodging can make harvest messy and increase risk of seed head
moisture problems. Experienced growers often stake earlybefore the plant is hugebecause “later” becomes a wrestling
match with a 5-foot salad-grain chandelier.
5) Harvest Is More About Drying Than Cutting
First-time quinoa growers sometimes cut seed heads and assume they’re done. Then they discover that drying and cleaning
are the real work. The most useful habit is to set up a drying routine ahead of time: screens, paper bags, a dry garage,
or a protected porch with airflow. Once the seed heads are properly dry, threshing becomes easy and oddly satisfying
like popping bubble wrap, but you can eat the results.
6) The “Foam Test” Makes You Feel Like a Backyard Scientist
When rinsing quinoa, the water can foam from saponins. Gardeners learn to trust their senses: rinse, swish, drain,
repeat. The water becomes less cloudy and less foamy. Then the quinoa tastes clean instead of bitter. The experience
tip is to dry the rinsed grain thoroughly before storing; even slightly damp quinoa can clump or spoil.
7) The Hidden Win: Leaves You Can Eat
A lot of gardeners end up loving quinoa leaves as much as the grain. You can harvest a few young leaves early (don’t
go wildleave enough for the plant to grow), sauté them like spinach, or toss tender ones into mixed greens. That
edible-leaf bonus makes quinoa feel like a “two-in-one” crop, especially when the grain harvest is modest in the first
season.
Conclusion: Your Quinoa Plan (Simple, Repeatable, Successful)
To plant and grow quinoa successfully, focus on four things: choose an adapted variety, plant early enough to
avoid high heat at flowering, keep weeds under control early, and harvest when seed heads are truly dry.
Do that, and quinoa stops being a trendy pantry item and becomes a proud garden accomplishmentone you can literally
cook for dinner.