Table of Contents >> Show >> Hide
- Plumeria Basics (So You Don’t Accidentally Treat It Like a Fern)
- Pick the Right Spot (Or the Right Pot)
- How to Plant Plumeria in the Ground (Warm-Climate Method)
- How to Grow Plumeria in Pots (The Best Choice for Most People)
- Watering: The #1 Way People Accidentally Unalive Their Plumeria
- Soil and Drainage: Make It Fast, Make It Airy
- Fertilizing for Flowers (Without Turning It Into a Leaf Factory)
- Pruning and Shaping (The “Bloom Tip” Reality Check)
- Overwintering: How to Keep Plumeria Alive When Your Weather Stops Being Cute
- Pests and Diseases: What to Watch For (and What to Do)
- How to Propagate Plumeria from Cuttings (More Plants, Same Great Smell)
- Bloom-Boosting Checklist (AKA “Where Are My Flowers?”)
- Quick FAQ
- Conclusion: Grow the Vacation Vibes
- Experience-Based Tips and Stories Gardeners Commonly Report (500+ Words)
- 1) “It was doing great… then it dropped every leaf. I thought it died.”
- 2) “I watered more because it looked sad. It looked even sadder.”
- 3) “Full sun helped… but my leaves got crispy in extreme heat.”
- 4) “I fertilized like a champion… and got the world’s greenest plant. Zero flowers.”
- 5) “I pruned it for shape… and then waited forever for blooms.”
- 6) “Cuttings sounded easy… until I learned the word ‘callus.’”
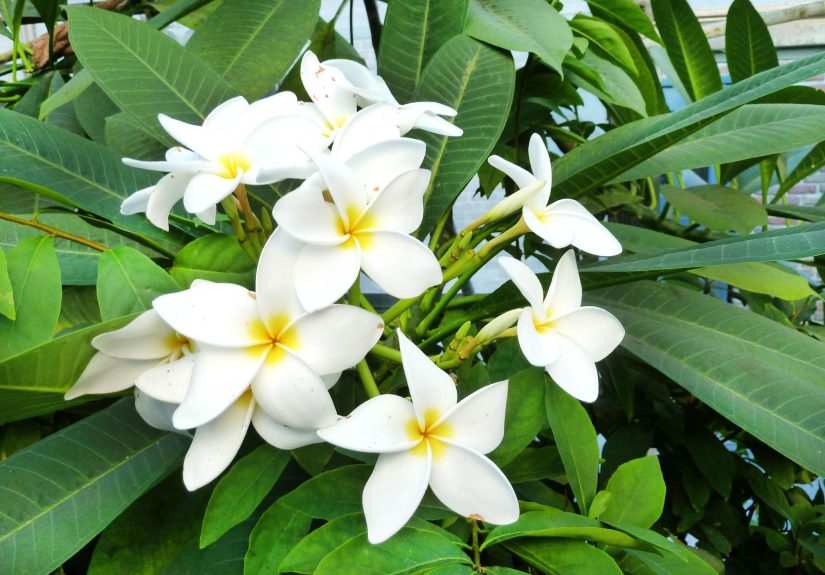
Plumeria (aka frangipani) is the plant equivalent of a tropical vacation: glossy leaves, sculptural branches, and blooms that smell like sunshine with a side of “who opened a bottle of fancy perfume?” The best part: it’s not difficult to grow once you understand its one big rule plumeria hates soggy roots more than a cat hates bath time.
This guide walks you through planting, potting, watering, feeding, pruning, overwintering, and propagation so you can grow a healthy plant and actually get those famous fragrant flowers (not just a leafy stick with dreams).
Plumeria Basics (So You Don’t Accidentally Treat It Like a Fern)
Plumeria is a tropical, flowering small tree/shrub known for waxy, five-petaled blooms in whites, yellows, pinks, reds, and sunset blends. In warm climates, it can live outdoors year-round and become a small tree. In most of the U.S., it’s grown as a container plant that spends summer outside and winter indoors or in protected storage.
What plumeria needs to bloom
- Bright light: ideally 6+ hours of direct sun for best flowering.
- Fast-draining soil: “wet feet” invites rot.
- Warmth: it slows down when temperatures drop and may go dormant.
- Smart feeding: too much nitrogen = lots of leaves, fewer flowers.
- Patience: blooms often form at branch tips, and young plants may take time to hit their stride.
Pick the Right Spot (Or the Right Pot)
If you’re planting in the ground
Outdoor, in-ground plumeria is best for truly warm regions where frost is rare. If your winters routinely dip into “why do I live here?” temperatures, plumeria belongs in a potno debate, no appeals court.
Sunlight: the bloom switch
Plumeria can survive in partial sun, but it blooms best with strong light. Aim for full sun, especially morning-to-midday sun. In extremely intense heat, some gardeners give light afternoon shade to prevent leaf scorchthink “sun-kissed,” not “sunburned.”
Wind and microclimates
Plumeria branches are sturdy but can be top-heavy. If you live in a windy area, place the plant where it’s protected (near a wall, fence, or patio corner) and stake young plants until the trunk thickens.
How to Plant Plumeria in the Ground (Warm-Climate Method)
Planting is easiest when the weather is reliably warm. In many warm areas, planting works well from spring through early fall. Avoid planting right before a cold snapplumeria does not enjoy surprises.
Step-by-step planting
- Choose a sunny location with excellent drainage (slopes and raised areas are your friends).
- Test drainage by watering the spot. If it stays soggy, choose another area or plant in a raised mound/bed.
- Dig a hole roughly the same depth as the root ball and a bit wider.
- Set the plant at the same depth it was in its nursery pot (don’t bury the trunk).
- Backfill with native soil improved for drainage if needed (coarse sand, pumice, or perlite-type amendments help). Go easy on rich, heavy compost if it makes the soil hold water.
- Water deeply once to settle soil, then let the top portion dry before watering again.
- Mulch lightly (keep mulch a few inches away from the trunk) to buffer heat and reduce weeds.
Pro tip: If your yard soil is clay-ish or slow to drain, skip the stress and grow plumeria in a large container. Most plumeria heartbreak stories start with “So my soil is kind of… dense…”
How to Grow Plumeria in Pots (The Best Choice for Most People)
Container growing lets you control drainage and move the plant when temperatures drop. Plumeria has a relatively compact root system compared to its top growth, so it can thrive in potsjust don’t drown it.
Choosing the right container
- Drainage holes are non-negotiable. More is better.
- Size: choose a pot that fits the root ball with a little room to grow. Huge pots stay wet longerrot risk.
- Material: terracotta breathes (dries faster); plastic holds moisture longer (water more carefully).
The potting mix formula (aka “fast-draining magic”)
Use a cactus/succulent-style mix or make your own by combining a quality potting mix with plenty of drainage material (such as perlite/pumice/coarse sand). The goal is soil that holds some moisture but never stays swampy.
Potting steps
- Add a small layer of mix at the bottom (no rocks needed; they don’t improve drainage like people think).
- Set the plant so the trunk sits at the same level it did before.
- Backfill, firm gently, and water once to settle.
- Place in bright light and avoid frequent watering until you see active growth.
Watering: The #1 Way People Accidentally Unalive Their Plumeria
Plumeria stores water in its thick stems, so it tolerates dryness better than constant wetness. During the warm growing season, it likes a “soak and dry” routine: water thoroughly, then allow the mix to dry partway before watering again.
A simple watering rhythm
- Spring to early fall (active growth): water when the top couple inches of soil are dry. In hot, sunny weather, that may be weekly (or more often in small pots).
- Cool weather / dormancy: reduce sharply. If the plant drops leaves, watering needs drop dramaticallysometimes close to zero in storage.
How to tell you’re overwatering
- Yellowing leaves outside of normal seasonal leaf drop
- Soft, squishy branches (a big red flag)
- Musty smell from the potting mix
- Soil that never dries
If you’re torn between “water” and “wait,” choose wait. Plumeria forgives mild dryness. Root rot is less forgivingit’s the botanical version of “we need to talk.”
Soil and Drainage: Make It Fast, Make It Airy
Whether planted in the ground or in a pot, drainage is the foundation. Think of plumeria roots as people at a party: they want water and snacks, but they also need air. If the soil stays waterlogged, roots can’t breathe and disease moves in.
Quick drainage upgrades
- In the ground: plant on a mound or raised bed in heavy soils.
- In pots: use a cactus-style mix and avoid oversized containers.
- Always: empty saucers after watering so the pot doesn’t sit in water.
Fertilizing for Flowers (Without Turning It Into a Leaf Factory)
Plumeria can grow without heavy feeding, but consistent nutrition during active growth helps with vigor and flowering. The key is not overdoing nitrogen (the first number on fertilizer labels).
What to use
- For blooms: a “bloom booster” style fertilizer with higher middle number (phosphorus) can encourage flowering.
- For balanced growth: a complete fertilizer with micronutrients can work well if you’re not going heavy-handed.
When and how often
Feed during the warm growing season (when you see new leaves and active growth). Many gardeners feed lightly and regularly (for example, every few weeks) rather than dumping a big dose at once. Stop or greatly reduce feeding when the plant slows down for cooler weather.
Fertilizer is not a substitute for sun. If your plumeria isn’t blooming, the most common fix is more light, not more food.
Pruning and Shaping (The “Bloom Tip” Reality Check)
Plumeria blooms form near branch tips, so heavy pruning can delay flowering on the pruned branches until new growth develops. That said, pruning can also encourage branching (more tips later = more potential bloom sites).
Best time to prune
Many gardeners prune in late winter or early spring, before strong new growth begins. Use clean, sharp tools.
How to prune smartly
- Remove dead, damaged, or diseased branches anytime you see them.
- For shape: make cuts above a fork/junction to encourage branching.
- Don’t “top” the plant repeatedly if you want fast bloomsbalance shape with flowering goals.
Safety note
Plumeria’s milky sap can irritate skin and is considered toxic if ingested. Wear gloves, avoid touching your face, and keep cuttings away from pets and small children.
Overwintering: How to Keep Plumeria Alive When Your Weather Stops Being Cute
If your area gets chilly, your job is to prevent freezing and keep the roots from sitting cold and wet. Plumeria can be overwintered in a few ways, depending on your space and how much you want it to keep growing.
Option A: Bright indoor growth
Bring the plant inside before frost. Place it in the sunniest window you have (or under a strong grow light). Water less than in summerindoor light is weaker, and growth slows.
Option B: Cool, dry dormancy (garage/storage method)
Many growers store plumeria in a protected space where temperatures stay above freezing. The plant may drop leaves and rest. In dormancy, watering is minimal. Think “just enough to keep it from shriveling,” not “weekly spa day.”
Option C: Hybrid approach
Start indoors in bright light, then shift to cooler storage if space/light is limited. The goal is steady survival without cold, wet roots.
Pests and Diseases: What to Watch For (and What to Do)
Common pests
- Mealybugs and scale: cottony clusters or bumps on stems/leaves; treat with insecticidal soap or horticultural oil.
- Whiteflies: tiny flying insects when you disturb leaves; use sticky traps and soap sprays.
- Spider mites: stippled leaves and fine webbing, often in hot/dry indoor air; rinse leaves and treat with soap.
Plumeria rust (the yellow-orange “powder” problem)
Rust often shows as yellow-orange spots or powdery patches, especially on the undersides of leaves, and can cause leaf drop. Sanitation helps a lot: remove and trash infected leaves (don’t compost them). Improving airflow and avoiding overhead watering can reduce spread. In persistent, evergreen situations, some gardeners use appropriate fungicide options labeled for rustalways follow the label.
Root rot
Root rot is typically linked to soil staying wet too longespecially in cool weather. If you suspect it, reduce watering immediately, improve drainage, and consider repotting into fresh, fast-draining mix after trimming any mushy roots.
How to Propagate Plumeria from Cuttings (More Plants, Same Great Smell)
Plumeria is famously easy to propagate from cuttingsif you respect the “callus first” rule. Planting a fresh, wet cutting is the fastest route to rot.
Cutting propagation steps
- Take a cutting from a healthy branch (often 12–18 inches long).
- Let it dry and callus in a warm, shaded place for several days to (often) a couple of weeks until the cut end is sealed.
- Optional but helpful: dip the callused end in rooting hormone.
- Pot it up in a very fast-draining mix (cactus-style mix plus extra drainage material).
- Water lightly at first, then wait. Overwatering before roots form is the classic mistake.
- Warmth matters: keep the pot warm and bright. New leaves can appear after rooting begins, but timing varies.
Once rooted and actively growing, gradually increase sun exposure and shift toward a normal “soak and dry” watering routine.
Bloom-Boosting Checklist (AKA “Where Are My Flowers?”)
- More sun: move it to the brightest spot you can.
- Drainage check: soil should not stay wet for days and days.
- Water timing: deep watering, then let it dry partway.
- Right fertilizer: avoid high-nitrogen programs; feed during active growth only.
- Don’t panic-prune: heavy pruning can delay blooms.
- Respect dormancy: cool + wet is a bad comboreduce watering when it slows down.
Quick FAQ
Can plumeria grow indoors year-round?
It can, but it needs very bright light to thrive and bloom. Without strong sun (or a good grow light), it may survive but flower sparsely.
Why did my plumeria drop its leaves?
Leaf drop is common during cooler seasons or low-light periods (dormancy). It can also happen from stress such as overwatering, sudden temperature changes, or pests. Look at the timing and conditions before you assume disaster.
How long until a cutting blooms?
It varies. Some cuttings bloom sooner than expected; others take a couple of seasons. Sun, warmth, and overall plant maturity matter.
Experience-Based Tips and Stories Gardeners Commonly Report (500+ Words)
If you ask a handful of plumeria growers what surprised them most, you’ll hear the same themesusually told with a laugh, a sigh, and a dramatic reenactment of The Great Overwatering Incident. Here are a few real-world patterns gardeners commonly experience, plus what they learn from them.
1) “It was doing great… then it dropped every leaf. I thought it died.”
Many first-time owners panic the first time their plumeria goes bare. The plant looks like a bundle of sticksno leaves, no flowers, no evidence of joy. But in many climates (and even indoors when light drops), plumeria can enter a resting phase. Growers often learn to judge the plant by the branches: firm branches usually mean it’s fine; soft branches are a warning sign. The lesson: a leafless plumeria doesn’t automatically mean a dead plumeria. Sometimes it’s just… taking a nap.
2) “I watered more because it looked sad. It looked even sadder.”
Plumeria has an unfair talent: it can look thirsty even when the soil is too wet. The thick stems store moisture, so it doesn’t always show classic “wilting” the way other plants do. Growers often report that their big turnaround moment came when they stopped guessing and started checking the potting mix before watering. Once they let the mix dry partway between soakings, growth became sturdier and leaf color improved. The lesson: the schedule is not the boss; the soil is the boss.
3) “Full sun helped… but my leaves got crispy in extreme heat.”
Plumeria loves sun, but in regions with intense summer heat, some gardeners notice leaf scorchespecially when plants are moved abruptly from indoor light to blazing outdoor sun. A common experience is that plumeria does best with a “sun training program”: a few days of bright shade or morning sun first, then gradually more direct sun. Some growers also prefer a spot with afternoon shade during peak heat waves. The lesson: yes to sunjust avoid sudden, extreme light jumps.
4) “I fertilized like a champion… and got the world’s greenest plant. Zero flowers.”
This is a classic. Gardeners often assume “more fertilizer = more flowers,” then accidentally feed high nitrogen and end up with lush foliage. They learn that bloom-focused feeding is different: moderate feeding during active growth, and avoiding nitrogen-heavy routines. Another common discovery is that fertilizer can’t compensate for low light. If a plumeria is indoors in a dim corner, it might stay alive while refusing to bloom out of pure principle. The lesson: flowers are built from sunlight first, fertilizer second.
5) “I pruned it for shape… and then waited forever for blooms.”
Many growers share the story of giving their plumeria a haircut and then wondering why the blooms disappeared. Because flowers form on branch tips, removing tips can delay flowering on those branches until new growth matures. Over time, gardeners learn a compromise: prune strategically (not constantly), time it before strong growth, and accept that shaping and blooming sometimes take turns. The lesson: pruning is a tool, not a punishmentand timing matters.
6) “Cuttings sounded easy… until I learned the word ‘callus.’”
A lot of propagation attempts fail because people plant fresh cuttings immediately and keep them wet “to help rooting.” Experienced growers often describe the moment they learned to let cut ends dry and seal before planting in fast-draining mix. Once they switched to callusing first, rot problems dropped dramatically. The lesson: for plumeria cuttings, dry-first is the secret handshake.
In the end, the most common “experienced grower” mindset shift is simple: treat plumeria like a sun-loving, drought-tolerant tropical plant, not a thirsty houseplant. When you do, it stops being mysterious and starts being wonderfully predictablerewarding you with steady growth and that unforgettable fragrance.