Table of Contents >> Show >> Hide
- Why Old Maps Make a Great Lampshade Material
- Before You Start: Safety and Map-Legal Basics
- Supplies and Tools
- Choose Your Approach
- Papier Mache Paste Options
- Prep Work (Do This and Your Future Self Will Thank You)
- Option A Tutorial: Papier Mache Maps Onto an Existing Lampshade
- Option B Tutorial: Build a Papier Mache Shade From Scratch (Balloon/Mold Method)
- Design Ideas That Look Intentional (Even If You Improvised)
- Troubleshooting: Fixes for the Most Common Map-Lampshade Problems
- Care and Cleaning
- Quick Safety Checklist (Read This Like It’s a Recipe Step)
- FAQ
- Real-World Experiences (What People Usually Learn Making a Map Papier Mache Lampshade)
Old paper maps are basically time machines you can cut up with scissors. One minute it’s “Interstate 5,” the next it’s
“Wow, why did we ever think folding a road map in the car was a good idea?”
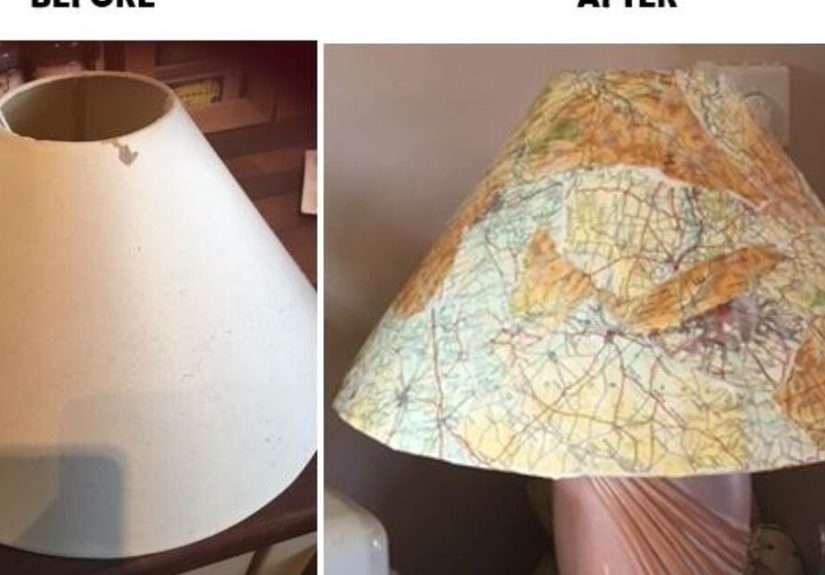
Turning those worn atlases and forgotten route guides into a papier mache lampshade is an easy, high-impact DIY: it adds warm,
travel-inspired character to a room, costs very little, and rescues paper that might otherwise live forever in a junk drawer.
Bonus: when someone asks where you bought your lampshade, you get to say, “From 1997.”
Why Old Maps Make a Great Lampshade Material
- They diffuse light beautifully: Most map paper is thin enough to glow, especially with lighter-colored areas.
- They’re visually “busy” in a good way: Place names, contour lines, and typography create built-in texture.
- They’re forgiving: A wrinkle here or an overlap there reads as “vintage charm,” not “oops.”
- They’re customizable: Highlight a city, a favorite road trip, or your hometown and make the shade a conversation piece.
Before You Start: Safety and Map-Legal Basics
Lampshades sit near heat, so the number-one rule is: keep things cool and give the bulb breathing room.
Use an LED bulb, follow the lamp’s maximum wattage label, and make sure the shade can’t touch the bulb.
(Paper is great at many things. Being fireproof is not one of them.)
Also: many modern maps are copyrighted. For a project you plan to publish or sell, consider
public-domain or vintage maps, or use personal maps you own with permission. When in doubt, “old atlas from a thrift store”
is your friend.
Supplies and Tools
Core supplies
- Lampshade base: either an existing shade (recommended for beginners) or a balloon/mold for building from scratch
- Old maps: atlas pages, road maps, travel brochures, or copies printed on matte paper
- Papier mache adhesive: choose one paste option below
- Soft brush or foam brush (2 are nice: one for paste, one for smoothing)
- Scissors and/or craft knife
- Mixing bowl and whisk
- Drop cloth or old shower curtain (because paste has a social life and wants to meet your furniture)
- Painter’s tape (optional, for clean edges)
- Fine sandpaper (optional, for smoothing once dry)
- Clear sealer (recommended): water-based clear coat or decoupage topcoat
Nice-to-have upgrades
- Bias tape, ribbon, or trim for the top/bottom edge
- Acrylic paint (white or cream) if your base shade is dark or patterned
- Clips or clothespins to hold edges while drying
- Disposable gloves if you hate sticky fingers (valid)
Choose Your Approach
Option A: Cover an existing lampshade (fast, sturdy, beginner-friendly)
This method uses a store-bought or thrifted shade as your structure. You’ll papier mache map strips or panels right on top.
It’s the quickest way to get a polished shape without engineering a frame.
Option B: Build a shade from scratch (best for pendant shades and sculptural shapes)
If you want a custom shape (round, oval, “slightly chaotic but artistic”), you can build layers over a balloon or mold,
then remove it and add/attach a fitting. This takes longer but offers more creative control.
Papier Mache Paste Options
Pick one. They all workthe best one depends on your patience, humidity, and how much you fear mold.
Paste #1: No-cook flour paste (classic, cheap)
- 1 part all-purpose flour
- 2 parts water
- Optional: a pinch of salt (helps slow spoilage a bit)
Whisk until smooth, like pancake batter that’s trying to behave. If it’s lumpy, keep whisking.
If it’s too thick, add water a tablespoon at a time.
Paste #2: Cooked flour paste (smoother, stronger hold)
Cooked paste can be silkier and grabs paper well. Stir constantly, cool completely before using,
and aim for a smooth, gel-like consistency.
Paste #3: Glue + water (lower mold risk, dries clear)
Mix white school glue with a bit of water until it brushes easily. This option dries clearer and can be great for shades
where you want the map colors to pop.
Prep Work (Do This and Your Future Self Will Thank You)
1) Prep the lampshade base
- Unplug the lamp and remove the shade.
- If the shade has trim, peel it off carefully and set it aside if you want to reuse it.
- Dust the shade. If it’s grimy, wipe gently with a barely damp cloth and let dry fully.
-
If the shade is glossy or slick, lightly scuff it with fine sandpaper so paste can grip.
(No need to sand like you’re refinishing a canoe.) -
If your shade is dark or patterned, consider painting it white/cream first so the map reads clearly when lit.
Let paint dry completely.
2) Prep your maps
- Choose pages with the colors you want to glow. Light backgrounds shine; dark oceans look moodier.
-
Cut the map into strips (easy to curve) or panels (fewer seams).
A good starter size is 1–2 inches wide strips. -
Do a quick “wrinkle test”: brush a small scrap with your paste. If it turns to tissue-level fragile,
switch to glue paste or use slightly thicker paper.
Option A Tutorial: Papier Mache Maps Onto an Existing Lampshade
Step 1: Protect edges you want crisp (optional)
If you want a clean top and bottom edge, apply painter’s tape along the rim.
You can remove it while the last layer is still slightly damp for a neat line.
Step 2: Start the first layer
- Brush paste onto a small section of the shade (about the size of your hand).
- Lay a map strip onto the pasted area.
-
Brush paste over the strip, working from center outward to push out bubbles.
Think “gentle windshield wipers,” not “scrub a frying pan.” -
Overlap strips slightly. On curves, overlap helps prevent gaps.
If a strip buckles, snip a tiny relief cut and smooth it down.
Step 3: Keep seams intentional
For a clean look, align map strips vertically from top to bottom.
For a collage vibe, rotate pieces and mix regionsjust avoid placing all the most dramatic text in one clump.
Step 4: Add strength layers (recommended)
If your maps are thin or you want a sturdier shade, add one base layer first (plain kraft paper or newspaper),
then add the map layer on top once the base is tacky-dry. More layers = stronger shade, but also longer dry time.
Step 5: Dry completely
Let the shade dry in a warm, ventilated spot. Rotate it occasionally so one side doesn’t hog all the airflow.
Rushing this step is how people end up with “modern art” instead of “functional lighting.”
Step 6: Smooth and seal
-
Once fully dry, lightly sand any sharp ridges or crusty drips (optional).
Use a light touchmap paper is not armor plating. -
Apply a clear, water-based sealer or decoupage topcoat in thin layers.
This helps durability and makes dusting easier. - Add trim back to the top/bottom edges with craft glue if you want a finished look.
Option B Tutorial: Build a Papier Mache Shade From Scratch (Balloon/Mold Method)
This is best for pendant lights or when you want a custom globe-ish shade.
You’ll build layers over a balloon or mold, then remove it and reinforce the opening.
Step 1: Create your form
- Inflate a balloon (round) or use a beach ball (bigger, sturdier).
- Set it in a bowl so it won’t roll away mid-project like it has an appointment elsewhere.
-
Decide where the opening will be (top for pendant fitting, bottom for bulb clearance).
Mark a circle with a pen.
Step 2: Build structure layers
- Apply 2–3 layers of plain paper strips (newspaper or kraft) with paste for strength.
- Avoid covering your marked opening circle completelykeep it lightly layered so it’s easier to cut later.
- Let it dry until it feels firm, not cool or tacky.
Step 3: Add the map “beauty layer”
- Apply map strips/panels as your outermost layer.
-
Smooth carefullyouter layers show everything. If you want a clean graphic look, use larger panels.
If you want a handmade vibe, go with strips and overlaps.
Step 4: Remove the balloon and refine the opening
- When fully dry, pop or deflate the balloon and remove it.
- Cut out the opening neatly with scissors or a craft knife.
-
Reinforce the opening with extra strips around the rim (like making a paper “hem”).
Let dry again.
Step 5: Add a safe fitting
For pendant lights, use a proper lampshade ring or fitting designed for your cord kit.
If you’re unsure about hardware, ask a knowledgeable adult at a hardware store or use a pre-made pendant shade kit.
The goal is: stable attachment, plenty of bulb clearance, and nothing rubbing against wiring.
Design Ideas That Look Intentional (Even If You Improvised)
- Destination spotlight: Place a favorite city right at eye level, front and center.
- Color-blocked maps: Use ocean-heavy pieces on the bottom, land-heavy on top for an ombré feel.
- Patchwork atlas: Mix different map styles (topographic + road map + vintage typography) for texture.
- “Aged” look: Lightly tint your topcoat with a tiny bit of warm paint for a vintage glaze effect (test first).
- Compass rose moment: Place one big graphic element as your “feature panel.”
Troubleshooting: Fixes for the Most Common Map-Lampshade Problems
Wrinkles everywhere
Some wrinkling is normal. To reduce it, use thinner paste layers, smooth from the center out, and switch from strips to panels
only after you’ve mastered curves. Small wrinkles often relax as the paper dries.
Bubbles or lifting edges
Add a bit more paste underneath, press gently, and brush over the top. If an edge keeps fighting you, it may need a tiny snip
so it can overlap instead of bunching.
Paste is too thick (lumps, streaks)
Thin with water a little at a time. You want brushable paste that doesn’t leave chunky trails.
Whisk like you mean it.
It smells… off
Flour paste can spoil in warm, humid conditions. Work in small batches, dry the shade quickly with good airflow,
and consider switching to a glue-based paste if humidity is high.
The shade feels flimsy
Add another structure layer (plain paper) inside or outside and seal again. Strength comes from layers and full drying,
not from dumping on more paste.
Care and Cleaning
Treat your map shade like a fancy paper object that happens to glow. Dust it regularly with a soft duster or gentle vacuum brush
attachment. Spot-clean only with a barely damp cloth if sealed; never soak or submerge a paper shade.
Quick Safety Checklist (Read This Like It’s a Recipe Step)
- Use an LED bulb (cooler operation than incandescent/halogen).
- Follow the lamp’s max wattage marking/label and never exceed it.
- Maintain clearance: the shade should not touch the bulb anywhere, even if bumped.
- Avoid halogen bulbs near paper shades.
- Check stability: the shade should sit straight and not wobble on the harp or fitting.
- Let all coatings cure fully before use so you’re not heating fresh adhesives.
FAQ
Can this be done on a plastic-lined shade?
Yes, but scuff-sand lightly and test adhesion first. Some slick plastics reject water-based pastes.
A glue-based paste or decoupage medium may grip better than flour paste.
Will the light be too dim?
If you use very dark maps or many thick layers, it can get moody fast. To keep it bright, use lighter pages, fewer layers,
and a higher-lumen LED bulb (within your lamp’s limits).
Is sealing required?
Not required, but strongly recommended. Sealing adds durability, helps resist fingerprints, and makes dusting less stressful.
Real-World Experiences (What People Usually Learn Making a Map Papier Mache Lampshade)
The first surprise most DIYers run into is that map paper has opinions. Some pages behave beautifullysmooth, flexible, eager to
curve around a drum shade like they were born for interior design. Others wrinkle the second paste touches them, as if they’re
personally offended by moisture. That’s why a quick scrap test saves a lot of sighing later: brush paste onto a small offcut,
wait thirty seconds, and see if the paper stays strong enough to smooth without tearing. If it turns fragile, switching to a
glue-based mixture (or using slightly thicker paper) can make the whole project feel calmer.
Another common “aha” moment is learning how much paste is enough. Beginners often go heavy because they want the paper to stick,
but too much paste creates bubbles, sliding strips, and glossy streaks that dry like tiny fossilized rivers. A thin, even coat
underneath the paper plus a smoothing coat on top is usually the sweet spot. If the strip looks like it’s swimming, it’s too wet.
If the brush drags and pulls fibers, it’s too dry. The goal is “well-moisturized,” not “just survived a monsoon.”
People also discover that overlaps aren’t the enemyrandom overlaps are. Overlapping strips is how paper curves without gaps,
but if all the seams land in one vertical line, the shade can look like it has a zipper. A simple trick is to stagger seams like
brickwork: start one strip slightly higher, the next slightly lower, and rotate around the shade. Suddenly the surface looks
intentional and textured instead of patched in a hurry.
Drying time is where patience gets tested. Papier mache looks dry on the outside long before it’s fully dry in the layers.
Many makers learn this the hard way by sealing too soon and trapping moistureleading to soft spots, warping, or that faint “old
lunchbox” smell. Good airflow is the quiet hero of this project: rotating the shade, letting it dry near (not on) a fan, and
keeping layers thin tends to produce a stronger, cleaner result. It’s also why working in smaller sessions can feel easier:
one layer today, detail work tomorrow, sealing the next day.
Finally, there’s the design joy factor. Once the first few pieces stick, people often start “composing” without meaning to:
centering a favorite place name, lining up a coastline, or placing a compass rose where it catches the most light. That’s when a
craft project turns into a story objectsomething that doesn’t just match your decor but also says, “Yes, someone here loves maps.”
And even if the shade ends up slightly wonky, it’s the charming kind of wonky: handmade, one-of-one, and impossible to duplicate.
In a world of identical home goods, that’s basically luxury.