Table of Contents >> Show >> Hide
- Decide What Kind of Kitchen Shelves You’re Making
- Plan Before You Cut
- Choose the Best Wood for Kitchen Shelves
- Tools and Materials Checklist
- Build the Shelves
- Finish the Shelves for Kitchen Reality
- Install the Shelves
- Kitchen-Specific Design Tips That Make Shelves Look “Built-In”
- Common Mistakes (and How to Avoid Them)
- Quick Example Builds
- Real-World Lessons and Tips From Kitchen Shelf Projects (Extra Detail)
- Lesson 1: Walls are rarely as straight as your level wants them to be
- Lesson 2: Shelf depth is where confidence goes to die (if you overdo it)
- Lesson 3: The “I’ll just use anchors” idea ages poorly
- Lesson 4: Long shelves need a sag plan (not a hope)
- Lesson 5: Finishing is not the place to rush (kitchens punish shortcuts)
- Lesson 6: Styling is easier when you build with it in mind
Open wood kitchen shelves can make a kitchen feel bigger, brighter, and more “I definitely have my life together”
(even if the snack cabinet says otherwise). The trick is building shelves that are straight, strong,
and sealed enough to handle steam, splatters, and the occasional olive oil incident.
This guide walks you through planning, choosing the right wood, building shelves that won’t sag, and installing them
safelyplus a longer “real-world lessons” section at the end so you can skip a few classic DIY mistakes that love to
show up uninvited.
Decide What Kind of Kitchen Shelves You’re Making
“Wood kitchen shelves” can mean a few different builds. Pick the style that matches your skill level, wall situation,
and how many cast-iron pans you plan to park up there.
1) Bracketed open shelves (easiest + strongest)
Wood boards sit on visible metal or wood brackets. These are forgiving to install, easy to level, and great for
heavier loads (cookbooks, small appliances, stacks of plates).
2) Floating shelves (clean look, trickier install)
Hardware is hidden, so the shelf “floats.” The look is sleek, but the build needs tighter measurements and sturdier
attachmentespecially in kitchens where shelves get used hard.
3) Shelf standards and brackets (adjustable)
Vertical standards mount to studs, and brackets hook in wherever you want them. Not as “Pinterest pretty,” but
incredibly practical if you like flexibility.
Plan Before You Cut
The planning stage is where you save time, money, and your ability to feel joy.
Check the wall: studs, plumbing, and surprises
- Find studs and plan to fasten into them for reliable strength.
- Avoid hazards: kitchens often hide plumbing vents, supply lines, and wiring.
- Know your wall type: drywall over studs is common; plaster or tile adds complexity.
Pick shelf length, depth, and thickness
In kitchens, a common sweet spot is 10–12 inches deep (dinner plates fit, and you’re less likely to
bonk your head). Depth beyond that can feel bulky and increases leverage on the wall.
Thickness is where strength lives. A shelf that looks “fine” can still sag if it spans too far without support.
If you want a clean, chunky look, thicker shelves help in both style and stiffness.
Think about sag now, not later
Sag happens when shelves span too far between supports, carry more weight than expected, or use less-stiff materials.
As a practical rule: long shelves need either more support points or more stiffness (thicker material,
front edging, or a built-up construction).
Choose the Best Wood for Kitchen Shelves
Kitchens are humid, messy, and full of heat swings. Pick materials that are stable and finish well.
Solid wood (classic, beautiful, moves with seasons)
- Oak, maple, birch: strong, durable, great for shelves.
- Walnut, cherry: gorgeous, typically pricier, still strong.
- Pine: budget-friendly and easy to work, but dents more easily.
Solid wood expands and contracts across the grain. That’s normal. Your job is to build and mount it in ways that
don’t fight wood movement (more on that below).
Plywood (stable, strong, excellent for painted or edge-banded shelves)
Cabinet-grade plywood (like birch/maple) is a favorite for shelves because it’s stable, strong, and resists warping.
If you don’t love the exposed edge, you can add solid wood edging or iron-on edge banding.
What to avoid (especially in kitchens)
- Low-grade plywood with voids: weaker and can look rough at edges.
- Untreated MDF near sinks or steam: it swells if it gets wet.
- Twisty boards: no amount of “positive thinking” will make a warped board install straight.
Tools and Materials Checklist
Tools
- Tape measure, pencil, painter’s tape
- Stud finder (and a small finish nail to confirm if needed)
- Level (2′ or longer is helpful)
- Drill/driver, drill bits, countersink bit
- Miter saw or circular saw + guide (or have the store cut boards)
- Sander or sanding block (80/120/180/220 grit)
- Clamps (if adding edging)
Materials
- Wood boards or plywood cut to shelf size
- Brackets (or floating shelf hardware)
- Screws appropriate for studs and bracket holes
- Wood glue (if edging or building up thickness)
- Wood filler (optional), stain (optional), protective topcoat
Build the Shelves
Step 1: Measure the space (twice), then choose shelf layout
Mark your shelf heights with painter’s tape so you can “see” the finished layout. In kitchens, consider:
- Clearance above countertops: leave enough room for small appliances and daily use.
- Avoiding the stove zone: grease and heat can be brutal on open shelving.
- Upper shelf reach: if you can’t comfortably reach it, it becomes a decorative dust museum.
Step 2: Cut your boards cleanly
Cut shelves to length. If you’re using plywood, a track saw or circular saw with a guide helps avoid tear-out.
If you’re using solid boards, inspect for bowing/cupping before cutting.
Step 3: Add edging (recommended for plywood)
If your shelves are plywood and you want a finished look:
- Quick option: iron-on edge banding.
- Best option: glue a solid wood strip (3/4″ thick is common) to the front edge for strength and beauty.
Bonus: a solid front edge can also help reduce sag on longer spans because it stiffens the shelf like a tiny beam.
Step 4: Sand like you mean it
Sand through grits (typically 120 → 180 → 220). Ease the front edges slightly so they feel good to the touch and
don’t splinter when someone grabs a plate like it’s a game show.
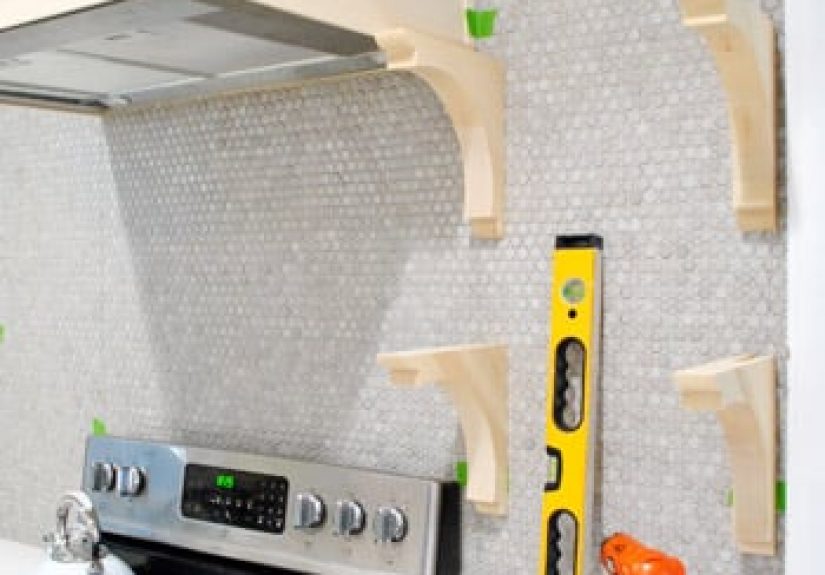
Step 5: Build thicker shelves (optional but great for long spans)
If you want a thicker “statement shelf” without buying expensive thick lumber, you have options:
- Laminate two layers (e.g., two 3/4″ plywood pieces) to create a 1-1/2″ thick shelf.
- Create a hollow build-up (box construction) for a thick floating shelf look that’s lighter.
- Add a front “beam”: a taller front edge strip adds stiffness with less material.
Finish the Shelves for Kitchen Reality
Kitchens aren’t gentle. A good finish protects from moisture, fingerprints, and “mystery splatter.”
Pick a finish that fits your look and tolerance for fumes
- Water-based polyurethane / polycrylic: clearer finish, lower odor, faster dry times.
- Oil-based polyurethane: warmer amber tone, very durable, stronger odor and longer dry.
- Hardwax oils: beautiful, easy spot repair, but choose a product rated for your use and be strict about curing time.
Apply the finish (general method)
- Remove dust (vacuum + tack cloth or microfiber).
- Apply thin, even coats (brush, foam brush, or wipe-on product).
- Lightly sand between coats once dry (usually 220 grit), then remove dust again.
- Add 2–3 coats for a kitchen shelf that will actually get used.
Important: “Dry” isn’t the same as “fully cured.” Dry means you can touch it carefully; cure means it’s reached
full hardness. For anything that will hold dishes and see daily use, respect the cure window listed on the can.
Install the Shelves
Option A: Bracketed shelves (recommended for first-timers)
This method is strong, adjustable, and less likely to end with you whispering “why is it crooked” into your drill.
- Mark stud locations across the shelf area.
- Draw a level reference line for the top (or bottom) of your bracket placement.
- Position the first bracket on a stud mark, level it, and mark screw holes.
- Pre-drill pilot holes to prevent splitting and make driving screws easier.
- Fasten bracket into the stud with appropriate screws.
- Set the shelf board on the brackets, confirm level, and fasten the shelf to brackets from below (if your bracket design allows).
Spacing tip: Longer shelves need more brackets. If you’re planning a shelf that will hold heavy items, add a center bracket
or use a beefier bracket style.
Option B: Floating shelves (clean look, precise execution)
Floating shelves usually mount to a steel bracket or rod system that must be anchored wellideally into studs.
Then the shelf slides onto the hardware.
- Find studs and mark them clearly.
- Mount the floating bracket level and square, using pilot holes and sturdy fasteners.
- Transfer hardware locations to the shelf back (measure carefully).
- Drill holes/mortises in the shelf to match the hardware system.
- Slide the shelf on and lock it (set screws or hidden fasteners, depending on system).
Floating shelves are unforgiving: if the bracket is even slightly out of level or the holes are off, the shelf may rock,
tilt, or refuse to slide on. Measure slowly. Celebrate later.
Kitchen-Specific Design Tips That Make Shelves Look “Built-In”
Match your shelf thickness to your kitchen scale
A thin shelf can look a little “afterthought,” while a thicker shelf reads more custom. If your cabinets are chunky,
consider a thicker shelf or a built-up edge.
Finish the underside too
You will see the underside every day. Sand and finish it like it mattersbecause it does.
Use consistent bracket spacing
Even if the studs aren’t perfectly placed, you can often choose a bracket style and shelf length that makes spacing look intentional.
If studs force weird spacing, consider a continuous cleat or a shelf-standard system.
Common Mistakes (and How to Avoid Them)
- Skipping studs for heavy shelves: drywall anchors alone are not the move for dishware loads.
- Underestimating weight: plates + bowls + mugs add up fast.
- Going too deep: shelves that are too deep feel bulky and can be head-bump hazards.
- Rushing the finish: the shelf looks done long before it’s actually cured.
- Ignoring sag: a long shelf needs stiffness or extra support points.
Quick Example Builds
Example 1: Budget bracketed shelves (weekend project)
Materials: 1×12 pine boards, 3–4 sturdy brackets per shelf, water-based clear coat.
Why it works: Easy install, affordable, and the visible brackets handle load confidently.
Example 2: “Custom” plywood shelves with hardwood edging
Materials: 3/4″ cabinet-grade birch plywood, 1×2 hardwood front edging, stain + durable topcoat.
Why it works: Stable shelves, clean look, and edging improves strength and hides ply layers.
Example 3: Thick floating shelves for a modern kitchen
Materials: built-up shelf construction (laminated or hollow), heavy-duty floating hardware, careful measuring.
Why it works: Minimalist look with enough thickness to resist sagwhen installed into studs properly.
Real-World Lessons and Tips From Kitchen Shelf Projects (Extra Detail)
If you’ve ever watched a shelf installation video and thought, “Wow, that looks easy,” you’re not wrong… you’re just
missing the blooper reel. Here are the most common real-life “experience” takeaways that show up when people build
and install wood kitchen shelvesespecially in older homes and heavily used kitchens.
Lesson 1: Walls are rarely as straight as your level wants them to be
In real kitchens, drywall can bow, studs can vary slightly, and corners can be… optimistic. A shelf can be perfectly
level and still look “off” if it follows a wavy wall line. Many DIYers fix this by choosing one visual reference
point (often the countertop or upper cabinet line) and aligning shelves to that, then using small shims behind brackets
if the wall has dips. The goal isn’t mathematical perfectionit’s “looks right when you’re standing in the kitchen holding coffee.”
Lesson 2: Shelf depth is where confidence goes to die (if you overdo it)
People often pick deep shelves because “more storage!” Then they discover: (1) deep shelves make the room feel tighter,
(2) reaching the back becomes a daily mini-workout, and (3) your forehead becomes intimately familiar with the shelf corner.
A lot of successful kitchens land in the 10–12 inch range because it fits plates and bowls without turning the wall into a
wooden overhang.
Lesson 3: The “I’ll just use anchors” idea ages poorly
Drywall anchors can be fine for light decor shelves in a hallway. Kitchens are different. A stack of plates, a row of mugs,
and a couple cookbooks can become surprisingly heavy. Experienced installers typically treat studs as non-negotiable for
serious kitchen shelves. If stud placement is awkward, people often switch strategies: use shelf standards mounted into studs,
add a continuous cleat that hits multiple studs, or redesign the shelf length so supports land where structure exists.
Lesson 4: Long shelves need a sag plan (not a hope)
A shelf that looks straight on install day can slowly develop a gentle smile over timeespecially if it spans wide distances
and carries weight in the center. DIYers who’ve done this once tend to become “thickness people” forever after. They’ll either
go thicker, add a front hardwood edge that acts like a stiffener, or add an extra bracket. If your design calls for a long span,
it’s often smarter to overbuild slightly than to stare at a sagging shelf every morning like it personally betrayed you.
Lesson 5: Finishing is not the place to rush (kitchens punish shortcuts)
In a kitchen, shelves get wiped down, bumped, steamed, and occasionally splashed. The difference between “looks nice” and
“holds up” is usually the finish schedule and cure time. A common real-world win is applying multiple thin coats, sanding lightly
between them, and letting the shelves cure fully before loading them up. People who rush often end up with shelves that feel tacky,
scratch easily, or show water marksthen they get to do the project twice (which is only fun if you really love sanding).
Lesson 6: Styling is easier when you build with it in mind
The most satisfying finished shelves usually follow a simple rule: heavy things low, light things high. Daily dishes and bowls go on
the lower shelf where you can reach them without acrobatics; decorative items and rarely used pieces go higher. Also: leaving a little
empty space makes shelves look intentional and calm, not like a kitchen supply store on restock day.
Bottom line: the best wood kitchen shelves aren’t just “boards on a wall.” They’re a small systemstructure, stiffness, finish,
and layout working together. Build them like they’ll be used every day (because they will), and they’ll look custom for years.