Table of Contents >> Show >> Hide
- Choose Your Build: What Kind of Wolverine Claws Are You Making?
- Cosplay Safety Basics (The Stuff That Keeps You Welcome at Events)
- Materials & Tools Checklist
- Method 1: How to Make Wolverine Claws with EVA Foam (Best All-Around Cosplay Build)
- Step 1: Make a simple template that fits your hand
- Step 2: Build thickness by stacking layers
- Step 3: Shape the claws (the “Oh wow, it’s starting to work” moment)
- Step 4: Carve and sand for a “blade” profile (without making it dangerous)
- Step 5: Attach claws to a hand plate
- Step 6: Mount the plate to a glove (the comfort-and-control upgrade)
- Step 7: Seal, prime, and paint (where foam becomes “adamantium-ish”)
- Method 2: How to Make Wolverine Claws with a 3D Printer (Clean, Repeatable, and Very Satisfying)
- Method 3: Budget-Friendly Wolverine Claws (Cardboard/Craft Foam Version)
- Make Them Look More Real: Shape, Scale, and Styling Tips
- Troubleshooting: Fix the Common Problems
- Convention and Public Wear Tips (Because Real Life Has Rules)
- Builder Notes and Shared Experiences (What People Usually Learn the Hard Way)
- Conclusion: Your Claws Should Look Dangerous, Not Be Dangerous
Important safety note: This guide is for costume-safe, non-functional Wolverine claws (cosplay props). That means: lightweight materials, blunt tips, no sharpened edges, and nothing made to cut, stab, or injure. If your goal is “real claws,” stop herethis article is about looking cool, not becoming a headline.
Wolverine claws are one of those cosplay accessories that instantly scream, “Yep, that’s the character,” even if the rest of the costume is jeans, boots, and a suspiciously committed haircut. The trick is making claws that look fierce but behave like responsible adults in publiccomfortable to wear, safe around other humans, and durable enough to survive photos, high-fives, and accidental doorframe betrayals.
This article breaks down three practical ways to make Wolverine clawsEVA foam (the cosplay classic), 3D printing (the repeatable option), and a budget-friendly craft build (fast and beginner-safe). Along the way, you’ll get pro tips on shaping, painting, mounting, and keeping everything convention-friendly.
Choose Your Build: What Kind of Wolverine Claws Are You Making?
Before you cut, glue, or accidentally attach yourself to your workbench, decide what you want your claws to do (spoiler: “nothing dangerous”) and how you want them to look.
| Build Type | Best For | Pros | Cons | Skill Level |
|---|---|---|---|---|
| EVA Foam Claws | Most cosplay events, lightweight wear | Easy to shape, safe, cheap, repairable | Needs sealing/painting for “metal” look | Beginner → Intermediate |
| 3D Printed Claws | Crisp lines, identical sets, upgrades later | Repeatable, detailed, strong if designed well | Post-processing time, needs printer access | Intermediate |
| Craft Foam/Cardboard | Quick Halloween, kids’ costumes, testing shapes | Fast, cheap, forgiving | Less durable, less “realistic” up close | Beginner |
Cosplay Safety Basics (The Stuff That Keeps You Welcome at Events)
1) Keep them blunt and flexible
Your claws should have rounded tips and no rigid knife-like edges. Even if you’re just posing for photos, sharp props are a quick way to get stopped at entry or asked to return them to your carwhere they will sit sadly, like a grounded teenager.
2) Use good ventilation with adhesives and sprays
Many cosplay glues and paints produce fumes. Work in a well-ventilated area, keep away from open flames, and follow the safety directions on the product label (and its Safety Data Sheet if available). If you’re using strong solvent-based contact cement or spray paint, proper respiratory protection can matter.
3) Check your destination’s prop rules
Even “safe” props can be restricted depending on the venue. Many events allow foam or plastic props but still ban sharp points, heavy items, or anything that could be used as a striking object. Plan to carry your claws safely and be ready to “peace-bond” them if required (usually a zip tie or tape tag from security).
Materials & Tools Checklist
Pick your method first, then gather supplies. Here are the most common essentials.
Common tools (all methods)
- Ruler or measuring tape
- Pencil/marker
- Scissors and/or craft knife (use fresh blades for clean cuts)
- Sandpaper (variety of grits) or sanding sponge
- Painter’s tape
- Safety gear: eye protection; dust mask for sanding; gloves when needed
EVA foam method
- EVA foam sheets (2mm–10mm mix is handy)
- Foam-safe adhesive (contact cement or hot glue; follow safety instructions)
- Heat gun (for shaping and smoothing foam)
- Sealer/primer (foam sealer, brush-on sealant, or flexible primer)
- Acrylic paints and/or spray paints (use in ventilated area)
- Optional: foam clay for smoothing seams
3D printing method
- 3D printer access (or a printing service)
- Filament (PLA is easiest; PETG can be tougher)
- Sandpaper, filler/primer, and paint
- Mounting hardware: Velcro, elastic straps, or a glove/bracer mount
Budget craft method
- Cardboard or craft foam
- Hot glue or strong tape
- Paper mache, lightweight filler, or extra layers for strength
- Paint (acrylic is easiest)
Method 1: How to Make Wolverine Claws with EVA Foam (Best All-Around Cosplay Build)
EVA foam claws are popular because they’re lightweight, comfortable, and easy to “metal-ify” with paint. You can make them look sharp while keeping the actual edges safe.
Step 1: Make a simple template that fits your hand
Start by deciding where the claws will sit. For a comfortable build, mount them to a small “claw plate” on the back of your hand (like a mini bracer) rather than attaching them directly to fingers.
- Put on the glove you plan to wear (or wrap your hand in paper as a stand-in).
- Mark a rectangle/plate area on the back of your hand: big enough to anchor three claws but not so big that it limits wrist movement.
- Sketch three claw shapes on paper: slightly curved, tapering, and blunt at the tip (you’ll paint them sharp-looking later).
Design tip: If you want a movie-style look, keep the claws long and sleek. For a comic vibe, go a little broader and more dramatic. Either way, a mild curve looks more “alive” than perfectly straight spikes.
Step 2: Build thickness by stacking layers
Foam claws look best when they have volumelike a blade shape rather than a flat cutout.
- Trace each claw onto foam and cut out multiple identical pieces per claw (usually 2–4 layers depending on foam thickness).
- Glue the layers together, aligning edges carefully.
- Once stacked, you should have a chunky claw blank that looks like a foam popsicle stick with ambition.
Step 3: Shape the claws (the “Oh wow, it’s starting to work” moment)
Use a heat gun to gently warm the foam, then bend it into a subtle curve. Hold the shape until it cools. Repeat gradually rather than overheating in one go.
- Warm the foam until it becomes slightly flexible (don’t scorch it).
- Curve it over a rounded object (like a bottle) for consistency.
- Let it cool fully before moving on.
Step 4: Carve and sand for a “blade” profile (without making it dangerous)
Now you turn the foam chunk into something that reads as “metal.”
- Use a sharp blade to bevel the edges (think: a long triangular slope), but keep the edge rounded.
- Sand the bevels smooth. A sanding sponge makes it easier to keep curves consistent.
- Round the tip so it’s clearly blunt to the touch, even if it looks pointy in photos.
Reality check: The paint job creates the illusion of sharpness. Your foam should remain safe.
Step 5: Attach claws to a hand plate
Cut a foam plate for the back of the hand. Then attach claws on top with adhesive. For extra stability, you can create shallow grooves in the plate where each claw sits, increasing contact area and reducing wobble.
Step 6: Mount the plate to a glove (the comfort-and-control upgrade)
Here are two reliable mounting styles:
- Velcro mount: Sew or glue Velcro to the glove and the underside of the plate. This lets you remove the claws for transport.
- Elastic strap mount: Attach elastic straps to the plate and slide your hand throughlike a tiny claw harness.
Comfort tip: Add a thin foam pad under the plate so it doesn’t dig into your knuckles during long wear.
Step 7: Seal, prime, and paint (where foam becomes “adamantium-ish”)
Unsealed foam can look porous and drink paint like it’s at an open bar. Sealing helps get a smoother finish.
- Seal: Apply a foam-friendly sealer/primer in thin coats, allowing each coat to dry.
- Base coat: Paint a dark base (black or charcoal) to add depth.
- Metal coat: Add metallic paint in light layers. Avoid a single heavy coat that hides details.
- Weathering: Add subtle scratches with a lighter metallic dry brush; add grime with a thin black/brown wash wiped back.
Photo trick: A darker base plus bright highlights sells “metal” better than pure silver everywhere.
Method 2: How to Make Wolverine Claws with a 3D Printer (Clean, Repeatable, and Very Satisfying)
If you want crisp edges and a consistent set every time, 3D printed Wolverine claws are a strong optionespecially if you plan to upgrade your costume over time. The key is designing/choosing a file that’s intended for cosplay props and keeping tips rounded.
Step 1: Choose a cosplay-safe claw model
Look for files described as “cosplay claws” or “prop claws.” Avoid designs meant to be sharp, metal, or weapon-like. If the model has an aggressive point, modify the tip to be blunt (many basic modeling tools let you round the end easily).
Step 2: Print orientation that prioritizes strength
Printing long thin shapes can create weak layers if oriented poorly. Many makers print claws so the layers support the length rather than snapping like a cracker during your first dramatic pose.
Step 3: Sand and fill for a smooth finish
After printing:
- Sand layer lines (start medium grit, move finer).
- Use filler/primer for a smoother surface.
- Repeat as neededyes, this is the “trust the process” part.
Step 4: Paint like metal, not like a toy
Use the same paint logic as foam: dark base, metallic layers, then highlights and weathering. A little restraint goes a long way.
Step 5: Mount to a glove or bracer
Most printed claws work best when attached to a hand plate or bracer system. Velcro and elastic straps are your best friends heresecure, removable, and adjustable for comfort.
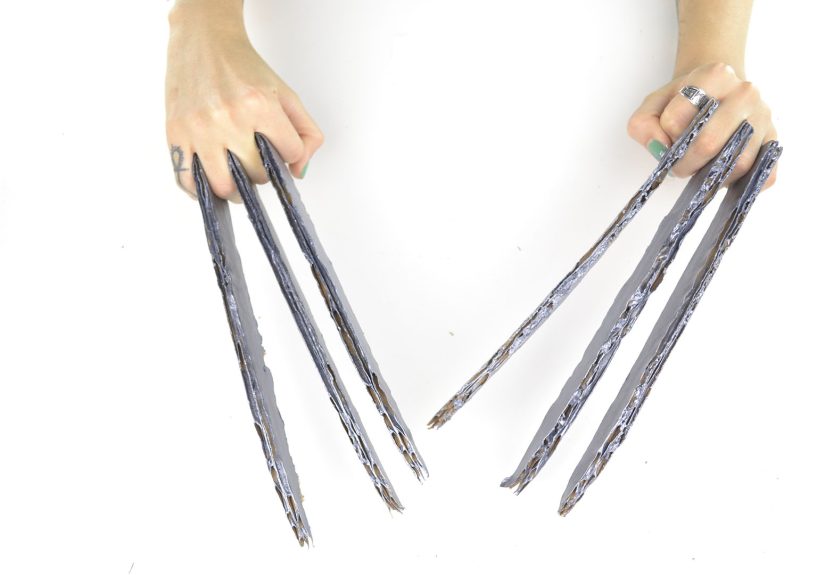
Method 3: Budget-Friendly Wolverine Claws (Cardboard/Craft Foam Version)
If you need something fast for Halloween, a party, or a quick costume test, this method gets you there without special tools.
Quick build steps
- Cut three claw shapes from cardboard or craft foam.
- Layer two pieces per claw for stiffness.
- Wrap with tape or add a thin layer of glue to reduce fuzz and add durability.
- Paint: dark base + metallic top coat.
- Mount to a glove using Velcro or a simple taped hand plate.
Pro tip: Even cheap claws look better with weathering. Add a little dark wash near the base and a brighter highlight along the edge.
Make Them Look More Real: Shape, Scale, and Styling Tips
Use asymmetry on purpose
Realistic props often have tiny variations. Add slight differences in scratch patterns or grime so they don’t look like cloned plastic knives (also: we’re not making knives).
Balance matters
If the claws feel front-heavy, the plate may slide around. Make sure your mount distributes weight across the back of the hand and wrist. A small wrist strap can dramatically improve stability.
Comfort wins long events
If you’re wearing these for hours, your knuckles will file a complaint. Pad pressure points, keep edges smooth under the plate, and test mobility: can you hold a phone, open a door, and accept a snack without launching it across the room?
Troubleshooting: Fix the Common Problems
Problem: The claws wobble
- Increase the glue surface area (add a base tab at the bottom of each claw).
- Create grooves in the plate so claws “seat” into place.
- Add a second anchor point (like a thin foam ridge behind the claws).
Problem: Foam looks porous or bumpy after paint
- Use more thin sealer coats instead of one thick coat.
- Sand lightly between coats if your sealer supports it.
- Finish with a light matte or satin clear coat (gloss can look toy-like unless you’re going for “fresh forged”).
Problem: Paint scratches easily
- Use a flexible primer/sealer appropriate for foam.
- Let paint fully cure before handling heavily.
- Add a protective clear coat suitable for your paint type.
Convention and Public Wear Tips (Because Real Life Has Rules)
Even safe cosplay claws can draw attention. A few practical habits keep you from getting stoppedor accidentally poking someone while turning around.
- Transport smart: Carry claws in a bag until you’re inside the venue or ready for photos.
- Mind your spacing: Claws extend your personal bubble. Rotate carefully in crowds.
- Be cooperative with security: If they ask you to zip-tie or peace-bond props, do it. It’s not personal; it’s crowd safety.
Builder Notes and Shared Experiences (What People Usually Learn the Hard Way)
Cosplay builds have a funny pattern: the first version teaches you what you should have done, and the second version is the one you bring proudly to photos. Wolverine claws are no exception. Makers who build claws for the first time often start with the big dreamsleek, intimidating, perfectand then discover a few reality checks after wearing them for more than five minutes.
The biggest “aha” moment is comfort. Claws look best when they sit exactly where your hand wants to move… which is to say, not where your first sketch put them. Builders commonly report that mounting claws too far forward makes everything awkward: you bump into tables, you can’t safely gesture, and suddenly you’re asking a friend to open your water bottle like you’ve lost all fine motor skills. The fix is usually simple: shift the claw plate slightly back on the hand and stabilize it with a wrist strap or better Velcro placement. The goal is a prop that feels like part of your costume, not a weird third-party attachment trying to escape.
Second lesson: “lightweight” is a superpower. People often assume heavier claws will look more realistic, but the opposite tends to happen in practice. Heavy claws sag, twist the glove, and make your hands tired. Light claws stay aligned, photograph better, and don’t turn your wrists into a complaint department. Foam builders especially love the moment they realize paint can do 80% of the realism. A good metallic finish with thoughtful shading will beat “heavy but sloppy” every time.
Third: adhesives and finishing are where patience pays off. Many makers start strongclean cuts, solid shapesthen rush the sealing and painting stage. That’s how you get bubbles, sticky fingerprints, and a finish that looks like it survived a tornado before you even wore it. Experienced builders tend to use thin coats, let things dry properly, and accept that sanding is not a punishment; it’s a lifestyle. It’s also normal to do a tiny test piece first. A scrap of foam with your sealer + paint combo can save you from repainting the whole set.
And then there’s the “public space learning curve.” Even blunt cosplay claws can make strangers nervous in tight crowds. Builders often share that the best habit is simply “claws down” when walkingkeep your hands relaxed at your sides rather than waving dramatically. Dramatic is for photos. Practical is for hallways. Also, doorframes are the natural predator of Wolverine claws. If you’ve never caught a claw on a doorway and done an accidental cartoon spin, are you even crafting?
Finally: your first set doesn’t have to be perfect. In fact, many builders intentionally treat Version 1 as a prototype. Wear it around the house. Try grabbing a phone. Try sitting down. Try posing. You’ll quickly learn whether your claws need better mounting, more padding, or a slight shape tweak. The best part? Each rebuild gets faster because you already solved the “what am I even doing” stage. And that’s the true cosplay victory: not flawless claws on day one, but claws that look awesome, feel comfortable, and survive an entire event without falling off and taking your dignity with them.
Conclusion: Your Claws Should Look Dangerous, Not Be Dangerous
Making Wolverine claws is a perfect cosplay project: it’s creative, satisfying, and instantly recognizable. Whether you go with EVA foam claws, 3D printed Wolverine claws, or a quick craft version, the winning formula is the samesafe shape, solid mounting, and a paint job that does the heavy lifting. Keep the tips blunt, keep the materials lightweight, and focus on comfort so you can actually enjoy wearing them. After all, Wolverine has healing powers. Your fingers do not.