Table of Contents >> Show >> Hide
- Why Oversized DIY Bats Are the Perfect Halloween Decor
- Planning Your Giant Bat Project
- Tools and Supplies Checklist
- Step-by-Step: Oversized Foam or Cardboard Bats
- How to Make Big Felt Bats for Outdoor Decor
- Styling Ideas for Your Oversized DIY Bats
- Real-Life Tips and Experiences from Making Oversized DIY Bats
- Conclusion
If you’ve ever looked at your Halloween decorations and thought, “This is cute, but I want dramatic movie-level spooky,” oversized DIY bats are your new best friend. These giant, swooping shapes are bold enough to transform a plain wall, garage door, or porch into a full-on bat cavewithout draining your budget or your sanity.
In this guide, you’ll learn how to make large Halloween bats from foam board, cardboard, or felt, how to hang them safely, and how to style them so they look like they flew straight out of a haunted forest. We’ll also dig into real-life lessons learned from crafters who’ve gone “batty” before you, so you can skip the mistakes and go straight to the spooky fun.
Why Oversized DIY Bats Are the Perfect Halloween Decor
Oversized bats hit that sweet spot of Halloween decorating: they’re bold, lightweight, and surprisingly easy to make. Compared to bulky props, they store flat, can be reused year after year, and work both indoors and outdoors.
- High impact, low cost: With a few sheets of foam board, cardboard, or felt, you can create several large bats that cover big areas like garage doors, fences, or empty walls.
- Flexible materials: Crafters often use black foam project boards, large cardboard boxes, or black felt yardage to cut big bat silhouettes that hold their shape and stand up to breezes.
- Customizable style: You can go classic and spooky with matte black bats, add white highlights for a more illustrated look, or attach googly eyes and smiles for a kid-friendly version.
- Versatile placement: Hang them in flocks across a porch, cluster them over a mantel, or line a hallway so guests feel like they’re walking through a bat tunnel.
And the best part? Once you create or print a bat template, you can scale it up or down as needed and repeat the project in future years with minimal effort.
Planning Your Giant Bat Project
Before you start cutting, take a minute to plan. Oversized decor takes up more space than you think, so a little strategy up front will save you from chaotic last-minute rearranging.
Choose Where Your Bats Will Go
First, decide on the main “stage” for your bats:
- Front porch or entry: Great for greeting trick-or-treaters. Bats can climb up your door frame, across the ceiling, or along railings.
- Garage door or exterior wall: Perfect for big, bold silhouettes visible from the street.
- Indoor focal wall: Above the sofa, behind a food table, or along a staircase for party photos.
Measure the area roughly and decide how wide you want your largest bat. A wingspan of 3–4 feet works well for indoor spaces; outdoors, some makers go as large as 6–7 feet for a real “wow” moment.
Pick the Best Material for Your Space
The right material depends on where your bats will live and how long you want them to last:
- Foam board or project board: Lightweight, rigid, and easy to cut with a utility knife. Great for large indoor bats or covered porches. Many crafters create 6–7 foot bats using two joined project boards.
- Cardboard: Ideal for recycling big shipping boxes into decor. You can curve or score the wings slightly for extra movement.
- Black felt by the yard: Weather-friendly and flexible, felt is excellent for outdoor bats on fences, garage doors, or siding. It doesn’t fray and can be cut in large shapes easily.
For outdoor use, pair your chosen material with weather-aware hardware and, if needed, a light protective sealer, especially in rainy or windy climates.
Tools and Supplies Checklist
Here’s a simple list to get you started. Adjust based on your chosen material.
- Large sheets of black foam board, cardboard, or black felt
- Printable bat template or hand-drawn bat outline (you can scale up any standard bat template by printing it larger, tiling pages, or tracing from a smaller pattern).
- Pencil or white chalk (for marking on dark surfaces)
- Scissors (for felt) and/or sharp utility knife with a cutting mat (for foam board or cardboard)
- Black acrylic or spray paint (for cardboard/foam) and optional gray or white paint for highlights
- Adhesive hooks, removable wall strips, outdoor clips, or zip ties for hanging
- Clear fishing line or strong string for hanging bats from ceilings or branches
- Optional: clear sealer spray for outdoor weather protection, googly eyes, and craft glue for fun details
- Safety gear: craft gloves and a mask if you’re spray painting
Step-by-Step: Oversized Foam or Cardboard Bats
Step 1: Create or Print Your Bat Template
You have two main options for your template:
- Use a printable template: Download a classic bat template and enlarge it. You can:
- Print it at poster size so your printer tiles it across multiple pages, then tape the pages together.
- Trace it onto a piece of cardboard to make a more durable master template you can reuse.
- Draw your own bat: Fold a large sheet of paper in half, sketch half a bat along the fold, then cut it out and open it up for a perfectly symmetrical shape. This is the same basic approach many bat craft tutorials use, just on a bigger scale.
Step 2: Trace and Cut the Bat Shapes
- Lay your foam board or cardboard flat on a protected surface.
- Position the template and trace around it with pencil or chalk.
- For extra-large bats, overlap two boards and tape them together on the back before tracing.
- Cut along the outline:
- Use sharp scissors for thinner cardboard or felt.
- Use a utility knife and cutting mat for foam board, cutting in several light passes rather than one deep slice.
Take your time on the wing tipsclean points make the final bat silhouette look much more professional.
Step 3: Add Dimension to the Wings
Large, completely flat bats can look a little static. To give them a sense of movement, score and slightly bend the wings:
- Lightly score a line where the wings meet the body or where the wing naturally “folds.”
- Bend along the scored line so the wings angle forward or back, making them appear as if they’re mid-flight.
- This trick is commonly used on cardboard bat crafts to create depth and a more realistic effect.
Step 4: Paint and Detail Your Bats
If you used black foam or felt, you may not need paint. For cardboard or white foam board, paint makes a huge difference.
- Apply 1–2 coats of matte black acrylic or spray paint to both sides for an even finish.
- Once dry, add a few quick gray or white brushstrokes on the wings and body to mimic highlightsthis is similar to the way some crafters add milk-paint accents to bat decor for extra texture.
- If your bats will hang outside, consider sealing them with a light coat of clear, outdoor-safe sealer to help them resist moisture.
Step 5: Hang Your Bats Safely and Securely
Now for the fun part: making your bats “fly.” But first, keep safety and your home’s surfaces in mind.
- Indoors: Use removable adhesive strips or hooks that are designed not to damage walls. Arrange bats in swooping patterns across a wall, up a staircase, or over a mantel.
- Outdoors: Use light clips, zip ties, or outdoor-rated hooks on gutters, railings, and fences. Avoid nails or screws where possible.
- Safety checks: Make sure bats don’t block entrances or exits, hang too low over walkways, or interfere with steps where people could bump into them. Walk your property at night to check for tripping hazards and visibility.
For hanging from ceilings or trees, punch small holes near the top of each wing or in the body, thread fishing line through, and tie to hooks or branches so the bats can gently sway.
How to Make Big Felt Bats for Outdoor Decor
Felt bats are a great option if you want something soft, durable, and easy to store. Many crafters cut oversized bats from black felt by the yard and hang them along garages and fences for a high-impact look that withstands mild weather.
Basic Method for Large Felt Bats
- Buy black felt by the yard; 1 yard can often yield several large bats depending on their size.
- Use your paper template to trace bat shapes onto the felt with chalk or a washable marker.
- Cut out the shapes with sharp fabric scissors for clean edges.
- For extra sturdiness, you can lightly fuse interfacing to the back or double-layer the felt.
- Add small reinforced holes or grommets where you’ll attach hooks, zip ties, or clips.
Felt bats drape and move differently from rigid foam batsthey can flutter a bit in the breeze, which adds to the spooky effect when paired with dramatic lighting.
Styling Ideas for Your Oversized DIY Bats
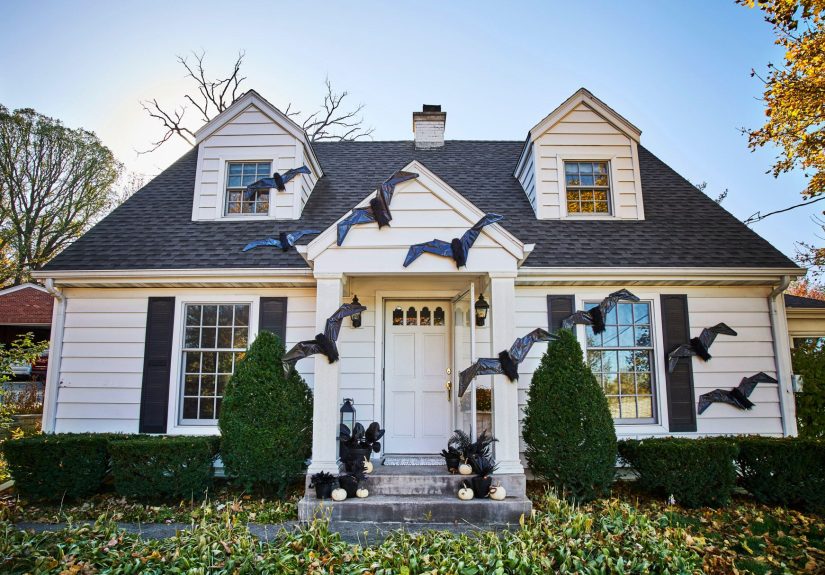
Porch and Entryway Bat Cave
Turn your front porch into a bat-filled tunnel:
- Cluster several large bats around the front door, with smaller bats trailing outward along the siding or ceiling.
- Use spotlights or string lights to cast sharp shadows of the bat shapes for extra drama. Lighting angled from below or from the side can triple the perceived spookiness of even simple cut-outs.
- Pair with a simple doormat and a few pumpkins to keep the focus on the bats.
Indoor Party Backdrop
Oversized bats also make a fantastic photo wall:
- Cover part of a blank wall with bats flying in one direction, as if they’re bursting out of a hidden cave.
- Mix in a few smaller paper bats to add depth and a “swarm” effect, similar to classic hanging bat wall projects.
- Set up a snack table or drink station in front so guests get a built-in photo backdrop.
Kid-Friendly Bat Variations
If you’re decorating for younger kids or a classroom, you can soften the spooky factor:
- Add big googly eyes or hand-drawn cartoon eyes to your bats. Many simple bat crafts use this trick to make bats look more goofy than menacing.
- Use colored cardstock or felt in purple or dark blue instead of strictly black.
- Let kids decorate smaller bat cutouts with glitter, stickers, or chalk before you hang them alongside the giant bats.
Real-Life Tips and Experiences from Making Oversized DIY Bats
Once you’ve made your first set of giant bats, you learn a few things that most tutorials don’t tell you. Here are some “experience-based” insights you’ll be glad to know before you start cutting a 6-foot wingspan on your dining table.
Start Slightly Smaller Than You Think
When people hear “oversized,” they sometimes jump straight to “as big as the garage.” In reality, a 3–4 foot wingspan looks huge once it’s on a wall or door. Anything larger than that is amazing, but it’s also harder to cut, carry, and store. Many crafters report that their first bat was almost comically big and didn’t fit where they planned to hang itso consider making one test bat at a medium-large size first.
Plan for Storage from Day One
Oversized decorations are fun on October 31 and a puzzle on November 1. If your bats are made from foam or cardboard, think about where they’ll live in the off-season: behind a closet door, under a bed, or in the garage rafters. Flat designs stack easily; if you add a lot of 3D detail, you might need to dedicate a whole shelf to your bat brigade.
Wind Is the Real Villain
Outdoors, wind does not care how long you worked on your decor. Large, lightweight bats can act like sails. To avoid waking up to a bat faceplanted in your neighbor’s yard:
- Use multiple attachment pointstwo or three hooks, clips, or ties per bat, especially on the wings.
- Angle bats slightly so the wind has less surface to push against.
- Consider adding small, discreet weights at the tips of felt bats to keep them from flipping over completely.
These tricks echo general Halloween decor advice: secure props firmly and double-check them before the big night.
Test-Hang Before the Party
Another lesson crafters quickly learn is the value of a “trial run.” Hang one bat a week or two before Halloween in the exact spot you plan to use. This helps you see how it looks in real light, how it handles weather or indoor drafts, and whether it interferes with doors, walkways, or curious pets. If something sags, swings too low, or keeps bonking people in the head, you can fix it calmly instead of five minutes before guests arrive.
Work in Layers of Time, Not One Marathon Session
Cutting and painting a big flock of bats can be wonderfully satisfying, but it’s easier if you break it into stages: one evening for templates and tracing, another for cutting, another for painting, and a final session for hanging and styling. This “batching” approach also helps you adjust as you goif your first bat feels too big or too small, you can tweak the remaining ones.
Let Kids Help with the Fun Parts
If you’re crafting with children, assign them the steps that are safely within their skill level: tracing templates, adding facial expressions, or decorating smaller bats with chalk and stickers. Leave the utility knife, ladder-work, and outdoor wiring to adults. This way, kids get to claim part of the project, and you still keep things safe and structurally sound.
Lighting Makes Your Bats Look “Pro-Level”
The difference between “Nice bats, cool idea” and “Whoa, that’s amazing” often comes down to lighting. A simple floodlight or string of warm white lights aimed at the bats can turn a basic silhouette into a dramatic scene of flying shadows. Position lights so they cast long, angled shadows across walls or ceilingsthis is a favorite trick in pro decorating guides because it multiplies the effect of even simple props.
In short, oversized DIY bats are one of those projects that look complicated but are actually extremely doable once you break them into steps. With a little planning, some sturdy materials, and a few smart safety and styling tricks, you can turn your home into the best kind of bat cavefun, spooky, and totally Instagram-worthy.
Conclusion
From foam board silhouettes to soft felt shapes, oversized DIY bats are a budget-friendly way to give your Halloween decor instant impact. You’ve learned how to plan the size and placement, choose materials, cut and paint your bats, hang them safely, and layer in real-life tips to make the project smoother.
Whether you’re going full haunted house or just want something bold over the front door, these giant bats can be customized to your style and reused year after year. Start with one or two big bats this season, and before you know it, you’ll have a whole colony returning every October.