Table of Contents >> Show >> Hide
- Why Make Your Own Ikea Floor Lamp?
- What You’ll Need for an Ikea Floor Lamp DIY
- Step-by-Step: How to Make an Ikea-Inspired Floor Lamp
- Ikea Lamp Hack Design Ideas to Try
- Safety Tips for Your DIY Floor Lamp
- How to Style Your Ikea Floor Lamp DIY at Home
- Real-Life Experiences: Lessons from DIY Ikea Floor Lamp Projects
- Final Thoughts
Every home has that corner. You know the one: too dark for reading,
too bright for doomscrolling on your phone, and just awkward enough that
every store-bought lamp either looks tiny, crooked, or way too expensive.
That’s where an Ikea floor lamp DIY swoops in like a budget-friendly
superhero.
If you’ve ever walked through Ikea, fallen in love with a sleek floor lamp
like YPPERLIG or VIDJA, and thought, “I could totally make that,” this guide
is for you. We’ll walk through how to build (or makeover) an Ikea-inspired
floor lamp, how to hack existing Ikea pieces, and how to do it safely,
stylishly, and without blowing your décor budget.
Below you’ll find a step-by-step plan to create your own Ikea-style floor
lamp DIY, plus real-life tips, design ideas, and extra experience-based
advice to help you avoid the “oops, I tilted my lamp into a giraffe” look.
Why Make Your Own Ikea Floor Lamp?
A DIY floor lamp isn’t just about saving money (though that part is
delightful). It’s about getting a custom piece of lighting that fits your
room, your style, and your personality. When you build or hack an Ikea floor
lamp, you get:
- Budget savings: You can often build a designer-looking lamp for a fraction of the retail price.
- Custom style: Choose your own finishes, lamp shade, color temperature, and silhouette.
- Upcycling power: Old bases, thrifted shades, or retired Ikea lamps get a new life instead of heading to the landfill.
- Bragging rights: “Oh this lamp? I made it.” Instant conversation starter.
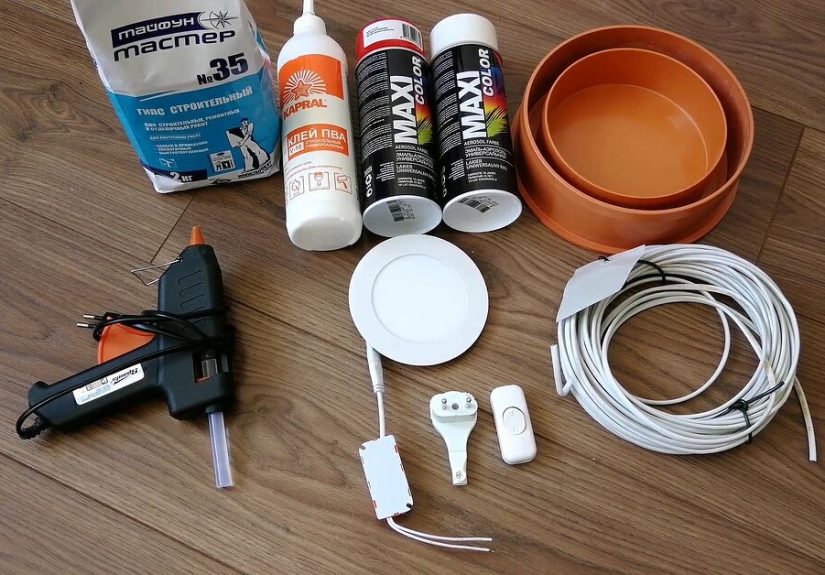
What You’ll Need for an Ikea Floor Lamp DIY
Exact materials will depend on your design, but here’s a generic shopping
list you can tweak. You can either:
- Hack an existing Ikea floor lamp (like BARLAST, VIDJA, or a metal base), or
- Build a lamp from scratch using Ikea-inspired parts and simple hardware.
Core Electrical Components
- Pre-wired lamp cord with plug and inline switch (UL-listed if possible)
- Lamp socket (E26 screw base is standard in the U.S.)
- Compatible LED bulb (soft white 2700–3000K for cozy light)
- Cable clips or cord covers for a clean finish
Base and Support Structure
- Floor lamp base (existing Ikea lamp base, or a heavy metal plate, or a concrete planter)
- Vertical pole: wood dowel, metal pipe, or a stack of Ikea components you want to reuse
- Mounting hardware: screws, brackets, washers
- Optional: wood filler, sandpaper, primer, and paint or stain
Shade and Style
- Ready-made drum or cylinder shade, or
- DIY shade materials: rice paper, rattan, fabric, veneer, or vinyl decals
- Hot glue gun and glue sticks
- Fabric scissors or craft knife
Tools & Safety Gear
- Screwdrivers (Phillips and flathead)
- Drill with wood/metal bits
- Measuring tape and pencil
- Wire stripper (if you’re modifying wiring)
- Safety glasses and work gloves
Important note: if you’re not comfortable working with electrical components,
stick to pre-wired lamp kits and simple assemblies, or ask a licensed
electrician to check your work before regular use.
Step-by-Step: How to Make an Ikea-Inspired Floor Lamp
Step 1: Choose Your Design & Height
Start by deciding what vibe you’re going for. Minimal Scandi? Japandi with a
paper shade? Industrial with a metal pipe? Look at Ikea floor lamps you like
and pull design cues: slim lines, neutral colors, and simple, clean shapes.
Most floor lamps are between 60 and 65 inches tall. If you
plan to place your lamp behind a sofa or next to a reading chair, test
heights using a broom handle or tape measure. This quick mockup helps you
avoid building a lamp that lights your ceiling but not your book.
Step 2: Prep or Build the Base
A good floor lamp stands on a solid base. Whether you’re hacking an Ikea
base or making your own, the rule is simple: heavier is safer.
-
Using an existing Ikea lamp: Disassemble the old lamp,
keeping the metal base, internal rod, and wiring you plan to reuse. Wipe
everything down and lightly sand if you’re painting. -
Making a new base: Use a heavy metal plate, a concrete
paver, or a small planter filled with concrete. Embed a pipe or threaded
rod in the center while the concrete is still wet so you can securely
attach your lamp post.
Add felt pads or a rug-friendly layer to the bottom of the base to protect
your floors and make repositioning easier.
Step 3: Build the Lamp Post
The lamp “post” is that sleek vertical line we all love in Ikea designs.
This can be:
- A wooden dowel (or two pieces joined with a coupler)
- A metal pipe (black iron or brass looks great in modern interiors)
- A repurposed Ikea component, like a shelf support or table leg
Drill a centered hole through the top of the post for the lamp cord if it
will run inside. If threading inside is too tricky, simply run the cord
neatly down the outside and secure with cord clips; once painted the same
color as the post or wall, it becomes almost invisible.
Attach the post securely to the base using screws, brackets, or a threaded
rod and nut system. Give it a firm wiggle test: if it feels flimsy now,
it’ll feel terrifying once the shade and bulb are on.
Step 4: Add the Lamp Socket and Shade Support
At the top of the post, you’ll need a way to hold the lamp socket and shade.
Most lamp kits include a socket with a threaded neck and a harp or bracket
for attaching a standard shade.
- Center the socket at the top of the post and secure it according to the kit instructions.
- If you’re using a drum or cylinder shade, make sure the shade ring fits the socket.
- Leave extra cord at the top while you test shade placement and height.
Before you finalize anything, place the shade on temporarily and step back
to see if the proportions look right. Think “calm designer lamp,” not
“spotlight in an interrogation room.”
Step 5: Wire and Test the Lamp (Safely)
If you’re using a pre-wired cord-and-socket kit, this step is usually
straightforward: follow the manufacturer’s instructions carefully. Keep
these basics in mind:
- Always unplug the cord while assembling or adjusting wiring.
- Match the wires according to the instructions provided with your kit.
- Make sure all connections are snug and fully enclosed inside the socket housing.
- Use an LED bulb within the recommended wattage limit for your socket.
After assembly, plug in the lamp, stand clear, and switch it on. If anything
flickers, buzzes, or smells hot, unplug it immediately and recheck
connections or consult a professional.
Step 6: Create a Custom Ikea-Style Shade
This is where the Ikea lamp hack magic really happens. Some ideas:
-
Paper cylinder shade: Inspired by classic Ikea rice paper
lamps, wrap a wire or bamboo frame with rice paper, tracing paper, or
parchment-style material. Keep it clear of the bulb by at least a couple
of inches. -
Fabric drum shade: Wrap a drum frame with linen, cotton,
or canvas. Light neutrals give that soft Scandinavian glow; darker fabric
creates a cozy, moody corner. -
Rattan or veneer shade: For a Japandi or organic-modern
look, use thin wood veneer or woven rattan. These still let light through
while adding warm texture. -
Graphic decal shade: Apply removable vinyl decals, maps,
or subtle patterns to a plain white shade. When lit, the design glows
softlyperfect for kids’ rooms or creative studios.
Attach the finished shade to your socket hardware, then test the light again
in a dark room to see how the pattern and brightness feel.
Step 7: Finish, Style, and Hide the Cord
Give your lamp a final sanding, paint, or stain if you haven’t already.
Matte black, warm oak, or soft white are all very “Ikea showroom” and easy
to blend into most interiors.
- Run the cord down the back of the post and secure it with clips.
- Use a cord cover or paintable raceway to hide wires along the wall.
- Add a smart plug or smart bulb so you can turn the lamp on with your phone or voice.
Step back, turn the light on, and enjoy your new Ikea floor lamp DIY moment.
Ikea Lamp Hack Design Ideas to Try
1. Japandi Paper Glow Lamp
Start with a slim pole and a simple base, then add an oversized rice paper
cylinder shade for that “cloud of light” look. Pair it with wood tones, a
neutral rug, and a simple armchair to create a reading nook that feels like
a little spa.
2. Concrete and Wood Studio Lamp
Use a concrete planter or cast concrete base with a natural wood pole and a
fabric shade. This style is perfect for modern lofts, creative studios, or
any room where you want a lamp that looks like functional sculpture.
3. Map-Covered Shade for Travelers
Wrap a plain shade with a paper map (or photocopy) of your favorite city or
country. Seal lightly with a clear, heat-safe topcoat on the exterior.
When the lamp is on, it becomes a softly glowing globe of memories.
4. Reversible Pattern Shade
Use removable decals or magnetized panels around a drum shade so you can
change the look with the seasons: florals for spring, geometrics for fall,
and a minimal solid for everyday. This mirrors some of the reversible Ikea
hack ideas DIYers love.
5. Shelf + Lamp Combo
Mount a small wooden tray halfway up the post to act as a tiny shelf for a
plant or a book. You get the functionality of a side table and the charm of
a floor lamp in one compact footprintperfect for small spaces.
Safety Tips for Your DIY Floor Lamp
Lighting may look simple, but safety always comes first. Keep these in mind:
- Stability: The base should feel heavy and solid. If kids or pets run by, the lamp shouldn’t wobble.
- Heat clearance: Keep fabric, paper, or wood shades a safe distance from the bulb. Use LEDs, which run cooler.
- Correct wattage: Follow the socket’s maximum wattage rating. When in doubt, choose a lower-watt LED bulbit can still be very bright.
- Quality components: Use UL-listed or equivalent lamp parts and avoid mixing random old electrical pieces unless you’re qualified.
- Dry environments: DIY floor lamps are best used in dry indoor areas, not bathrooms or damp basements, unless rated and installed properly.
How to Style Your Ikea Floor Lamp DIY at Home
Once your lamp is built, the fun continuesnow it’s time to style it. A few
placement ideas:
- Next to a reading chair: Place it slightly behind and to the side so the light falls over your shoulder.
- Behind a sofa: Use a slimmer profile lamp with a high shade to cast soft, indirect light while watching TV.
- In an empty corner: Combine the lamp with a tall plant and a small stool or basket to create a mini vignette.
- Home office: Use a lamp with a diffused shade so you don’t get harsh glare on your screen.
Swap bulbs between warm and cool color temperatures to see how the lamp
changes the mood of your room. A single floor lamp can make a space feel
cozy, crisp, dramatic, or calmjust by changing the bulb.
Real-Life Experiences: Lessons from DIY Ikea Floor Lamp Projects
The first time many DIYers try an Ikea floor lamp makeover, the project
feels almost too simpleuntil they realize the details are what make it look
truly polished. Here are some experience-based tips drawn from common
successes (and mistakes) when hacking or building floor lamps.
1. Don’t Underestimate the Base
It’s tempting to think, “This base is heavy enough,” but once the tall post
and shade go on, real-world physics start talking back. People often report
that their “almost heavy enough” base wobbles when someone bumps the cord or
brushes past the lamp. Going slightly heavier than you think you need pays
off long-term, especially in homes with pets, kids, or narrow walkways.
Many DIYers find that repurposing a concrete planter, a thick metal plate, or
a weighted Ikea base results in a lamp that feels like a store-bought
product, not a wiggly science experiment.
2. Cord Management Makes or Breaks the Look
One of the biggest giveaways that a lamp is homemade (in a bad way) is a
messy cord situation. Long loops snaking across the floor or twisted wires
climbing the pole can make even a gorgeous shade look cheap.
Experienced DIYers swear by:
- Running the cord inside the pole when possible.
- Using paintable cord covers along walls.
- Securing the cord down the back of furniture to keep it out of sight.
A five-minute cord tidy at the end can elevate your lamp from “craft
project” to “high-end designer piece.”
3. Test the Light Before Final Assembly
Another common experience: the lamp looks perfect in daylight, but at night
the light is either blinding or disappointingly dim. Before you lock in your
shade and hardware, turn off other lights in the room and test your lamp
after dark.
Swap bulbs with different lumen levels and color temperatures. A warm 800–900
lumen LED often works beautifully for a reading corner, while lower output
might be nicer for pure ambiance. It’s easier to adjust now than after your
shade is fully finished.
4. Shade Materials Matter More Than You Think
Many people start with whatever fabric or paper they have on hand, only to
realize it blocks too much light or looks uneven when lit. Thin, even
materialslike rice paper, linen, or cottontend to diffuse light softly.
Very thick or heavily patterned fabrics can create dark patches or strange
shadows.
A good trick is to hold the material over a flashlight or phone screen in a
dark room before committing. If the glow looks pretty and even, it will
likely make a flattering lamp shade.
5. Think About Maintenance and Dust
Floor lamps live at eye level, which means dust and smudges are surprisingly
visible. DIYers often report that ultra-textured shades or very dark colors
show dust quickly. If you’re not a fan of constant dusting, choose materials
that are easy to wipe or vacuum with a brush attachment, and avoid anything
too fussy or hard to clean.
6. Photographing and Sharing Your Project
Since this project is inspired by Hometalk-style DIYs, you might want to
share your lamp online. To show it at its best:
- Take photos in natural daylight and again with the lamp turned on at night.
- Capture close-ups of the shade texture, base details, and hardware.
- Include a before-and-after shot if you hacked an old Ikea lamp.
Not only is it satisfying to document your work, but these photos can help
others replicate your Ikea floor lamp DIY and avoid the same learning
curves.
Final Thoughts
Making an Ikea floor lamp DIY isn’t just about copying a product from the
showroom. It’s about taking that clean, modern, affordable design language
and bending it to fit your home, your budget, and your creativity. With a
sturdy base, a simple pole, a well-chosen shade, and safe electrical
components, you can build a floor lamp that looks like it cost a small
fortunebut didn’t.
Whether you’re reviving an old Ikea lamp, crafting a brand-new piece from a
pre-wired kit, or experimenting with paper, rattan, or fabric shades, this
project delivers big visual impact for surprisingly little money. And every
time you switch it on, you’ll get that quiet little thrill of knowing:
“Yep, I made that.”