Table of Contents >> Show >> Hide
- Why a Vertical Bookshelf Is a Smart DIY Project
- Step 1: Plan Your Vertical Bookshelf
- Step 2: Gather Tools and Hardware
- Step 3: Cut the Main Pieces
- Step 4: Build the Base
- Step 5: Lay Out and Attach the Shelves
- Step 6: Secure the Bookshelf to the Wall
- Step 7: Sand, Finish, and Style
- Alternative Vertical Bookshelf Ideas
- Styling Your Vertical Bookshelf
- Real-Life Experiences & Pro Tips for Making a Vertical Bookshelf
- Conclusion
If your books are currently living in a wobbly stack on the floor, we need to talk. A vertical bookshelf is one of the easiest, most space-saving DIY projects you can build. It can squeeze into a corner, next to a sofa, or beside a desk, and it instantly makes your home look more intentional and less “I moved in yesterday.”
The good news: you don’t need a full woodshop to make one. With a few basic tools and some lumber, you can build a sleek vertical book tower or slim bookcase that looks like it was custom-ordered from a fancy design store. In this guide, you’ll learn how to plan your project, choose the right materials, build a simple vertical book tower, and customize it with finishes and styling tricks that fit your space.
Why a Vertical Bookshelf Is a Smart DIY Project
Vertical bookshelves are basically the overachievers of storage. They use height instead of floor space, which makes them perfect for:
- Small apartments or studios where every square inch matters.
- Awkward corners that are too narrow for traditional furniture.
- Hallways and beside-door areas that need extra storage but can’t fit a deep bookcase.
- Kids’ rooms where you want books at eye level without bulky furniture.
Many pro builders and DIY sites point out that tall, narrow bookcases and vertical “book towers” can be built from a single sheet of plywood or MDF, plus a few boards and trim, which keeps costs down while still giving you a sturdy storage solution.
Step 1: Plan Your Vertical Bookshelf
Before you start cutting wood, take a few minutes to plan. This saves you from the classic DIY heartbreak of “why does this not fit where I wanted it?”
Choose Your Style
“Vertical bookshelf” can mean a couple of different designs. Here are popular options inspired by common DIY plans and tutorials:
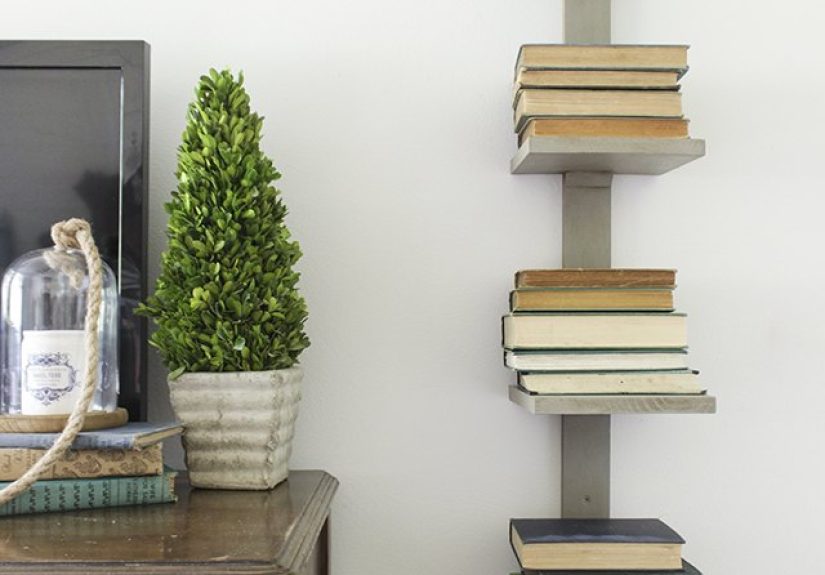
- Vertical book tower: A single tall “spine” with small shelves that make books look like they’re floating. HGTV popularized this style using a central board with cutouts or brackets for shelves.
- Leaning ladder shelf: A tall frame that leans against the wall with shelves that get shallower as they go up. It’s visually light and great for decor plus books.
- Wall-mounted vertical shelf: A series of shelves running straight up the wall, attached with brackets or hidden hardware. Ideal if you want a super clean, “built-in” vibe.
- Creative hacks: Some DIYers even use wooden dish racks mounted vertically to hold paperbacks like an “invisible” bookshelffun, cheap, and surprisingly stylish.
In this guide, we’ll focus on a simple, freestanding vertical book tower you can customize. Once you understand the basics, it’s easy to adapt the steps for other designs.
Measure Your Space
Grab a tape measure and note:
- Height: Measure from floor to ceiling. A good target for a vertical tower is around 72–84 inches (6–7 feet). Many tall bookcase plans sit in this range.
- Width: Most vertical towers are 10–16 inches wide. Narrower looks more sculptural; wider gives more storage.
- Depth: A depth of 10–12 inches is enough for most books without hogging floor space.
Sketch your bookshelf with rough dimensions. It doesn’t need to be art-studio perfectjust accurate enough so you know how much lumber to buy.
Pick Your Materials
For a sturdy vertical bookshelf, common choices include:
- Plywood: 3/4-inch plywood is strong, stable, and widely recommended for bookcases and shelving.
- MDF: Smooth and great for painting, but heavier. A good option if you’re going for a sleek painted finish.
- Solid wood boards: Pine, poplar, or oak give a classic furniture look. They cost more but can be beautiful with stain.
- Hardware: Wood screws, angle brackets, wall anchors, and corner braces to reinforce the structure.
If you’re new to woodworking, plywood or pine boards are forgiving and easy to cut.
Step 2: Gather Tools and Hardware
Here’s a basic checklist for building a vertical book tower:
- Measuring tape and pencil
- Circular saw or miter saw (many home centers can make straight cuts for you)
- Drill/driver and drill bits
- Wood screws (1 1/4" to 2", depending on thickness)
- Sandpaper (120–220 grit) or a sanding block
- Wood glue (optional but helpful)
- Stud finder, level, and wall anchors/brackets
- Paint or stain, plus brushes or rollers
- Safety gear: eye protection, ear protection, dust mask
Step 3: Cut the Main Pieces
For a straightforward vertical book tower, you’ll build around one tall “spine” board with a base at the bottom and small shelves spaced up the length.
A simple example cut list (adjust to your dimensions):
- Spine: 1 piece, 10–12" wide x 72–80" tall
- Base: 1 piece, about 15–18" wide x 15–18" deep
- Shelves: 6–8 pieces, 8–10" deep x 10–12" wide
Mark your boards carefully, then cut slowly and safely. If straight cuts make you nervous, many large home improvement stores will cut your sheet goods to size for free or a small fee.
Prep and Sand
After cutting, sand all surfaces and edges to remove splinters and saw marks. Many DIY shelf projects recommend a quick pass with 120-grit followed by a finer 180–220-grit for a smooth finish.
Step 4: Build the Base
The base keeps your vertical bookshelf from feeling like a tipsy Jenga tower. You can keep it very simple:
- Cut a square or rectangular base slightly larger than the spine width (for example, a 16" x 16" base for a 12" spine).
- Center the bottom of the spine on the base and mark its outline.
- Pre-drill holes through the base into the bottom of the spine (three or four evenly spaced).
- Add wood glue (optional), then screw the spine to the base from underneath.
If you want a more “furniture-grade” look, you can add simple trim pieces around the base, similar to the way tall bookcase plans dress up edges with molding.
Step 5: Lay Out and Attach the Shelves
This is where your bookshelf becomes more than a fancy plank.
Mark Shelf Positions
Decide how many shelves you want and how far apart they should be. A common spacing is 10–12 inches between shelves, which fits most standard books. Mark horizontal lines across the spine at each shelf height, starting somewhere above the base so you have room for larger books on the bottom.
Choose Your Attachment Method
Advanced builders sometimes cut shallow notches (dados) in the spine so shelves slide in and are supported on three sidesa method used in some vertical book tower builds. If you’re not ready for dado cuts yet, you have easier options:
- Angle brackets: Install small L-brackets on the spine; rest the shelf on top and screw it in from underneath.
- Pocket-hole screws: Drill angled holes in the shelves and screw them into the spine from below or above, similar to many ladder bookshelf plans.
- Cleats: Attach short support strips to the spine and wall, then rest the shelf on them and screw through the top.
Install the Shelves
- Pre-drill holes to avoid splitting the wood.
- Start with the lowest shelf so you can use it as a work surface for the next one.
- Use a level to make sure each shelf is perfectly horizontal.
- Repeat up the spine until all shelves are installed.
At this point, your bookshelf is technically functional. But we’re not stopping at “functional”; we’re going for “wow, where did you buy that?”
Step 6: Secure the Bookshelf to the Wall
Any tall, narrow furniture should be anchored to the wallespecially in homes with kids or pets. Floating bookshelf and tall bookcase guides consistently stress this step for safety.
- Use a stud finder to locate studs behind the bookshelf.
- Install metal L-brackets or anti-tip furniture straps at the top of the spine.
- Screw through the bracket into the wall stud (or use heavy-duty anchors if you can’t hit a stud).
- Double-check that the bookshelf doesn’t rock or lean.
This step takes just a few minutes and gives you a huge safety upgrade.
Step 7: Sand, Finish, and Style
Now the fun, slightly messy step: making your vertical bookshelf look finished.
- Final sanding: Go over everything with 180–220-grit sandpaper for a smooth touch, especially edges where hands and books will slide.
- Stain and clear coat: For a wood-forward look, apply stain, wipe off the excess, and seal with polyurethane or a similar protective finish. Many DIYers prefer satin for a soft, modern sheen.
- Paint: If you used MDF or prefer color, apply a primer and then two coats of paint. Soft whites, charcoal, or bold colors all work well on vertical towers.
Let everything dry completely before loading books. (Yes, waiting is hard. No, your bookshelf does not want a “tacky paint plus heavy books” challenge.)
Alternative Vertical Bookshelf Ideas
Once you’ve built one vertical shelf, you’ll start seeing new possibilities everywhere. Here are a few spins on the theme:
- Leaning ladder bookshelf: Build two long side rails and attach shelves between them, angling the bottom so the unit leans securely against the wall. Plans from multiple DIY sources show how to cut the angled legs and arrange shelves that get shallower as they rise.
- Pipe-and-wood vertical shelf: Combine wood shelves with metal pipes or fittings to create an industrial style wall-mounted vertical bookshelf. These designs often run from floor to ceiling with shelves anchored to the wall.
- Wall-mounted floating column: Use floating shelf brackets stacked vertically along one narrow wall, then mount short shelves on each bracket. This gives you a floor-clear, modern vertical library and works well with hidden hardware techniques used in floating bookshelf guides.
- Dish-rack hack: Mount wooden dish racks vertically with strong adhesive hooks or screws, then slide paperbacks into the slots like plates. It’s budget-friendly, quirky, and ideal for renters who want something light and fun.
Styling Your Vertical Bookshelf
Once your vertical bookshelf is built, it’s time to dress it up. A few styling tricks:
- Mix books and decor: Combine upright books with small plants, framed photos, or bookends so the tower feels curated, not cluttered.
- Play with color: Group books by color for a gradient effect, or keep spines neutral for a calm, minimal look.
- Vary orientation: Stack a few books horizontally on some shelves; this creates visual breaks and extra surfaces for small objects.
- Leave breathing room: Every shelf doesn’t have to be full. A little empty space makes the whole piece feel lighter and more intentional.
Real-Life Experiences & Pro Tips for Making a Vertical Bookshelf
Over and over, DIYers who build their own vertical bookshelves share the same reaction: “That was easier than I thoughtand now I want to build three more.” Still, there are a few lessons that tend to show up in real-world projects, and they can save you time, money, and unnecessary “oops” moments.
The first big takeaway is that planning beats improvising. Most people who are happy with their finished shelf started with a clear sketch and some simple measurements. They knew how tall the tower would be, roughly how many shelves they wanted, and which books or objects they planned to store. The folks who skip this step often discover, halfway through, that their tallest art book doesn’t fit anywhere or the top shelf is awkwardly high. Spend just 10–15 minutes measuring a few representative books and marking heights on your drawingit makes the build go smoother and the final shelf much more practical.
Another common lesson: don’t underestimate weight. Books are heavier than they look. Builders who use very thin boards, light-duty brackets, or minimal anchoring sometimes notice sagging shelves or a wobbly frame after a few months. The happier stories usually come from people who chose 3/4-inch plywood or solid boards, used sturdy hardware, and anchored the tower firmly to wall studs. A vertical bookshelf doesn’t have a big footprint, so it relies heavily on the wall connection for stability. Treat the wall anchor step with the same respect you’d give to hanging a heavy cabinet.
Finish choices also show up a lot in people’s experiences. Many DIYers start out thinking, “I’ll just slap some paint on this,” and then discover that prep work matters. A quick round of sanding, plus primer on bare wood or MDF, makes the final paint job smoother and more durable. If you’re on the fence between stain and paint, think about how the shelf fits into the room: stain tends to feel warmer and more classic, while paint can disappear into the wall color or make a bold design statement. Some builders even mix finishesfor example, a painted spine with stained shelvesto give the vertical tower more presence without overwhelming the room.
There’s also the “tools and confidence” factor. Many people are surprised to find that a vertical bookshelf is a very approachable first project. You’re mostly dealing with straight cuts, basic drilling, and some careful measuring. If you don’t have a saw, you can often get the store to cut your boards. If you don’t own a sander, a sanding block and a little patience will still get you there. The value of this project isn’t just the shelf itself, but the DIY confidence you gain. After building one vertical tower, it feels much less intimidating to tackle a matching second shelf, a media console, or even a full wall of built-ins later.
Finally, the most satisfying stories usually involve some personalization. Builders add a pop of color at the back of each shelf, install a small LED strip along the spine for a gentle glow, or use the bottom shelves for baskets that hide everyday clutter. Some people design their shelf around a specific collection: cookbooks in a kitchen corner, graphic novels in a teen’s room, or art books in a home office. When you build the piece yourself, you’re not stuck with standard dimensionsyou can size everything perfectly for your favorite things. That combination of custom fit, good planning, and a bit of creativity is what turns a simple vertical bookshelf into one of your favorite pieces in the house.
Conclusion
Making a vertical bookshelf is one of those projects that looks impressive but is completely doable with beginner-friendly tools and materials. By planning your dimensions, choosing solid materials, anchoring everything safely, and taking a little extra time with sanding and finishing, you end up with a tall, slim storage piece that looks like it came from a design catalogbut fits your space and your style perfectly.
Whether you go for a clean vertical book tower, a leaning ladder shelf, or a creative wall-mounted hack, the basic steps are the same: measure, cut, assemble, secure, and enjoy. A few hours of work can turn your leaning book piles into a space-saving, head-turning feature you’ll use every day.