Table of Contents >> Show >> Hide
- What You’re Making (In Plain English)
- Supplies and Tools
- Step 1: Pick the Right Felt (So Your Skirt Doesn’t Act Weird)
- Step 2: Measure Like a Person Who Wants This to Fit
- Step 3: Do the Circle-Skirt Math (It’s Less Scary Than It Sounds)
- Step 4: Cut the Felt Circle Skirt (AKA, The Donut Phase)
- Step 5: Add the Waistband (Choose Your Adventure)
- Step 6: Make the Poodle Appliqué (The Star of the Show)
- Step 7: Add the Leash (Because the Poodle Needs a Dramatic Entrance)
- Optional Upgrades That Make It Look Store-Bought (In a Good Way)
- Fit Check: Do a Quick Wear Test Before You Declare Victory
- Care and Storage (So It Doesn’t Become a Sad, Wrinkly Pancake)
- Troubleshooting (Because Crafting Is Basically Problem-Solving With Glitter)
- FAQ
- Experience-Based Tips: What Usually Happens in Real Life (And How to Win Anyway)
- Conclusion
If you’ve ever wanted an outfit that says, “I’m here to jitterbug,” without requiring a fashion degree (or emotional
support scissors), a felt poodle skirt is your moment. It’s the ultimate 1950s-inspired classic: a swishy circle skirt,
a sassy little appliqué dog, and enough twirl power to make your ceiling fan nervous.
The best part? Felt is beginner-friendly. It doesn’t fray, it holds its shape, and it’s forgiving if your “circle”
looks more like a “confident oval.” This guide walks you through a clean, wearable skirt base and three ways to attach
your poodle (from quick-and-easy to “I actually own matching thread”).
What You’re Making (In Plain English)
A traditional poodle skirt is basically a giant fabric donut:
a big circle for the skirt, a smaller circle cut out for the waist, and a waistband to hold it all up. Then you add a
poodle decoration near the hem, plus a “leash” (usually rickrack or cord) that curls up toward the waistband.
Supplies and Tools
Felt + Notions
- Felt fabric (often 72″ wide). Most adults need about 2 yards; plus sizes or longer lengths may need more.
- Contrasting felt for the poodle (black or white is classic, but neon green poodles are welcome here).
- 2″ wide elastic (soft waistband elastic is comfy) OR waistband strip + closure (Velcro/snap/button).
- Rickrack, cord, braid, or ribbon for the leash detail.
- Optional: small pom-pom or felt circle for the nose, rhinestones/sequins for sparkle, a little felt bow for “poodle personality.”
Tools
- Tape measure
- Fabric scissors (sharp onesyour felt deserves respect)
- Marking tool (chalk, washable marker, or a pencil on light felt)
- Safety pins or straight pins
- Sewing machine (optional, but nice) and matching thread
- Fabric glue or tacky glue (if going no-sew for appliqués)
- Iron + pressing cloth (if using fusible web / iron-on adhesive)
- String + a pin (optional “giant compass” for drawing circles)
Step 1: Pick the Right Felt (So Your Skirt Doesn’t Act Weird)
You’ll see two common felt categories in U.S. craft stores:
craft felt (usually acrylic/polyester) and wool blend felt (more durable, smoother, often nicer to sew).
Craft felt works for costumes and one-night sock hops. Wool blend feels more “real garment” and holds up better if you
plan to wear it more than once (or if your life includes enthusiastic dancing and/or sticky cupcakes).
Width matters. Many poodle skirt tutorials assume a 72″ wide felt bolt. That wide width makes it easier to cut
a big circle without seams. If your felt is narrower, you can still do thisyou’ll just cut the skirt in panels
(two half-circles is the usual fix).
Step 2: Measure Like a Person Who Wants This to Fit
Take two measurements
-
Waist measurement (W): Measure where you want the waistband to sit. A classic poodle skirt sits at the natural waist.
Keep the tape snug but not “I can’t eat nachos” tight. -
Skirt length (L): Measure from your waist down to where you want the hem. Traditional is just below the knee,
but you do youmini, midi, “almost max-i,” whatever matches your vibe.
A quick example
Let’s say your waist is 28 inches and you want a skirt length of 25 inches.
We’ll use that in the math step so you can see how the “donut” happens.
Step 3: Do the Circle-Skirt Math (It’s Less Scary Than It Sounds)
The waist opening is a circle. The circumference of that circle is your waist. So we solve for the radius:
Waist radius (R) = W ÷ (2 × π)
If you like decimals: R ≈ W ÷ 6.28
For our example: 28 ÷ 6.28 = 4.46 inches. Round to something practical like 4 1/2″.
Next, you need the hem radius:
Hem radius (HR) = R + L.
Example: 4.5 + 25 = 29.5 inches.
Fit tip: add a whisper of wiggle room
Felt has very little give. If you’re doing a pull-on elastic waistband, you’ll want the waist opening to work with your waistband method.
Many makers prefer building the skirt to the actual waist and letting the elastic do the holding. If you’re doing a structured waistband
with a closure (Velcro/zipper), give yourself a tiny bit of ease (about 1/2″ overall) so it’s comfy.
Step 4: Cut the Felt Circle Skirt (AKA, The Donut Phase)
Option A: Cut a full circle (best if you have wide felt)
- Fold your felt in half, then in half again (you’ll have a “square” with four layers and one corner that’s all folds).
-
From that folded corner, measure out your waist radius (R) and mark several dots in an arc.
Connect the dots into a smooth curve. - From the same corner, measure your hem radius (HR) and mark another arc the same way.
- Cut along the hem arc first, then cut out the waist arc.
-
Unfold and admire the twirl potential. You now have a circle skirt.
(If your circle looks slightly “handmade,” congratulationsyou are making something handmade.)
Option B: Cut two half-circles (best if your felt isn’t wide enough)
If your felt width can’t fit the full hem radius when folded, cut the skirt in two half-circles:
you’ll have two pieces that look like giant rainbows. Sew the side seams, then proceed like normal. This adds a seam,
but it’s still very wearableand honestly, most people will be staring at the poodle anyway.
Edge note
Felt typically doesn’t fray, so you can leave the hem raw. If you want a more finished look, you can topstitch around the hem,
add bias tape, or do a decorative zigzag. But for a classic poodle skirt? Raw edge is totally acceptable.
Step 5: Add the Waistband (Choose Your Adventure)
Your waistband choice determines how “costume quick” or “wearable real” the skirt feels.
Here are two reliable methods.
Method 1: Sew an exposed elastic waistband (beginner-friendly and comfy)
- Cut elastic: Measure your waist and cut elastic about 1–2 inches longer (you’ll overlap ends).
- Join elastic: Overlap the ends by about 1″ and stitch a sturdy box (or zigzag back and forth).
- Quarter-mark: Divide the elastic into four equal sections and mark with pins or chalk.
- Quarter-mark the skirt waist opening the same way.
-
Pin elastic to skirt: Match quarter marks, then pin in between.
The elastic will be smaller than the openingthat’s normal. -
Sew: Stretch elastic gently to fit the felt as you sew around.
Sew once near the top edge, then again near the bottom edge of the elastic for stability.
Method 2: Waistband strip + closure (best for a classic “flat front” look)
This method uses a waistband strip (felt or sturdy fabric) and closes with Velcro, snaps, or a button/hook.
It’s especially nice if you want the skirt to look crisp in photos.
- Cut waistband strip: About 3–4 inches wide and long enough to go around your waist plus overlap (2–3 inches).
- Stabilize (optional but helpful): Add interfacing if using fabric; felt usually doesn’t need it.
- Attach strip to waist opening: Sew the strip to the skirt opening, right sides together, then fold up and topstitch.
- Add closure: Velcro is easiest; snaps look cleaner; a zipper is most “garment-like.”
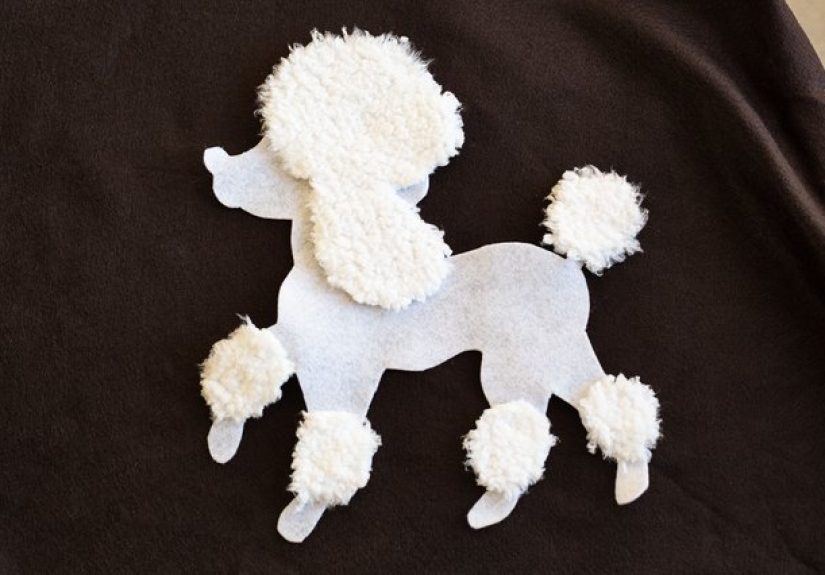
Step 6: Make the Poodle Appliqué (The Star of the Show)
Pick a poodle style
You can:
(1) print a poodle template,
(2) trace from an image on a screen (place paper over it and tracevery low-tech, very effective),
or (3) freehand a simple silhouette.
Classic poodles have a curly tail and fluffy ankle/ear tufts, but a minimalist “cool dog outline” also works.
Cut your pieces
- Cut the main poodle body from contrasting felt.
- Cut small “tuft” pieces if you want that fluffy 50s look.
- Optional: add a tiny bow, collar, or heart tag.
Placement that looks “right”
Traditional placement is on the front-left area near the hem (so it’s visible while dancing).
Aim for the poodle’s feet to sit a few inches above the hem so it doesn’t look like it’s falling off the world.
Attach the poodle (3 options)
-
Fabric glue: Fast and beginner-friendly. Use a thin, even layerthick glue can show through felt.
Slide parchment paper inside the skirt so you don’t accidentally glue the front to the back. (Ask me how I know… actually don’t.) -
Fusible web (iron-on adhesive): Great hold and a clean finish. Use a pressing cloth and follow the adhesive instructions.
Let it cool before moving it so the bond sets. -
Sew it down: A simple straight stitch close to the edge works. You can also do a small zigzag for extra security.
Sewing wins if you want the skirt to survive repeated wear.
Step 7: Add the Leash (Because the Poodle Needs a Dramatic Entrance)
The leash is usually a wavy line of rickrack, cord, braid, or ribbon that starts at the poodle’s collar and curls up toward the waistband.
The key is gentle curvesthink “playful swirl,” not “spaghetti crime scene.”
- Dry-place the leash first (no glue yet) and adjust until it looks balanced.
- Attach with glue, fusible web, or a quick topstitch.
- Add a collar detail (tiny strip of felt, rhinestones, or a mini bow).
Optional Upgrades That Make It Look Store-Bought (In a Good Way)
Add a crisp hem detail
- Ribbon hem: Stitch ribbon around the bottom edge for a polished finish.
- Scalloped hem: Trace a repeating scallop pattern and cut carefully.
- Contrast band: Add a wide felt band along the hem for extra drama.
Swap the motif
“Poodle skirt” is basically a genre. You can swap the poodle for:
a flamingo, a record, a classic car, a milkshake, or even a silhouette of your actual dog.
The method stays the same: appliqué + leash/line detail.
Fit Check: Do a Quick Wear Test Before You Declare Victory
- Sit test: Can you sit without the waistband biting? If not, loosen elastic slightly or adjust the closure overlap.
- Twirl test: The hem should swing freely without catching on your legs. If it does, shorten the skirt a bit.
- Balance test: If the poodle looks off-center while worn, shift it slightly toward the front.
Care and Storage (So It Doesn’t Become a Sad, Wrinkly Pancake)
Felt is happiest when treated gently. If it’s a one-time costume, you can usually spot-clean and call it a day.
For repeated wear, avoid aggressive washingfelt can pill or warp depending on fiber content.
- Spot clean with a damp cloth and mild soap.
- Air dry flat.
- Store flat or hang from the waistband to keep the circle shape.
- De-lint with a lint roller if needed (especially on dark felt).
Troubleshooting (Because Crafting Is Basically Problem-Solving With Glitter)
My waist hole is too small
Carefully trim the waist opening a little at a time, testing as you go. If you’re using exposed elastic, remember the elastic can gather the felt,
so you don’t want the hole tinyjust reasonably close to your waist measurement.
My skirt won’t fit on my felt width
Do the two-half-circle method (add side seams), or make a three-quarter circle skirt for less fullness and less fabric requirement.
You still get swishjust slightly less “wind turbine.”
The glue soaked through and looks shiny
Use less glue, spread it thinly, and choose a glue meant for fabric. Test on scraps first. Felt is forgiving, but glue can be… enthusiastic.
The poodle edges are lifting
Add a few discreet hand stitches around high-stress areas (tail, legs). Even three or four little stitches can save the day.
FAQ
Can I make a poodle skirt without a sewing machine?
Yes. The skirt base can be no-sew if you use a waistband strip with Velcro or if you glue/hand-stitch the waistband carefully.
The appliqué is also easy to glue. If you’re aiming for durability, a little hand stitching is worth it.
How much felt do I really need?
Many adult tutorials use about 2 yards of 72″ wide felt. If you’re taller, want a longer skirt, or need a larger radius,
plan for more (or use the two-half-circle method).
What’s the fastest way to make it look “authentic”?
Go for a solid-color felt skirt, a high waist, a fluffy poodle silhouette, and a rickrack leash. Add bobby socks and saddle shoes (or sneakersno costume police here).
Experience-Based Tips: What Usually Happens in Real Life (And How to Win Anyway)
Let’s talk about the parts nobody mentions in the “easy DIY” headlinethe real-life moments that show up when you’re making a felt poodle skirt
the night before a school spirit day, a Halloween party, or a themed dance where you suddenly remember you promised to bring snacks.
These tips come straight from common maker mishaps and the fixes that actually work.
First: cutting a perfect circle is overrated. What you want is a smooth-looking hem.
If you cut in little choppy snips, the skirt can look jagged when it hangs. The trick is to cut slowly with long, confident scissor strokes,
rotating the felt as you go. If you already cut it and it’s a little wavy, don’t panicput the skirt on and look in a mirror from a few feet away.
Most “imperfections” disappear the second the skirt starts moving.
Second: the waistband is where comfort lives or dies. A waistband that’s too tight will make you fidget all night.
One that’s too loose will make you hold your skirt like a nervous waiter. If you’re using elastic, the sweet spot is “snug enough to stay up,
loose enough to breathe.” People often cut elastic to their exact waist measurement and then wonder why it feels intenseelastic needs a little overlap,
but it also needs realistic comfort. When in doubt, test-pin it into a loop, try it on, and adjust before sewing anything permanently.
Third: glue has a personality. Some glues dry stiff, some dry shiny, and some pretend to work until the moment you start dancing.
If you’re gluing the poodle and leash, use a fabric-friendly glue, apply it thinly, and press it down evenly. A super practical move:
slip parchment paper or scrap cardboard inside the skirt so you don’t glue the front and back together. This is the kind of mistake that turns a skirt into a “felt tube”
and forces you to invent a new costume on the spot.
Fourth: placement is everything. Poodles look cutest when they’re not stuck directly on the side seam or hiding behind your arm.
A reliable placement is slightly forward on the left side, near knee height. Before attaching, put the skirt on and tape the poodle in place.
Walk around, sit down, do a quick twirl. If the poodle disappears in motion, move it a bit toward the front.
Finally: accessories do half the storytelling. Even a simple felt circle skirt becomes instantly “poodle skirt” with three details:
the poodle silhouette, the leash line, and one sparkly or contrasting accent (a rhinestone collar, a bow, or a tiny heart tag).
If you’re short on time, prioritize those. You can always add more flair later, but those three elements are what make people say,
“Oh wowsock hop energy!” before you even speak.
Conclusion
A felt poodle skirt is one of the rare DIY projects that’s genuinely beginner-friendly and genuinely adorable.
You get a classic silhouette, a fun customization moment, and a finished piece that’s built for movementwhether you’re dancing,
dressing up for a theme day, or just living your best retro fantasy in the kitchen.
Measure carefully, cut confidently, choose a waistband that feels comfortable, and attach your poodle with whatever method matches your schedule
and patience level. Then take it for a spinbecause a poodle skirt’s true purpose is to twirl at least once. That’s not a rule, it’s physics.