Table of Contents >> Show >> Hide
- Before You Start: Resin Safety That Isn’t a Buzzkill
- What You’ll Need (And What You Can Skip)
- Step 1: Choose the Right Keycap Shape and Compatibility
- Step 2: Prep Your Flowers Like You Mean It
- Step 3: Prep the Mold (Your Keycap’s “Stage”)
- Step 4: Mix Resin Without Summoning a Bubble Army
- Step 5: The “Floral Sandwich” Pour (Clean Depth Without Chaos)
- Step 6: Cure Properly (Don’t Rush the Magic)
- Step 7: Demold Like a Pro (No Drama, No Cracks)
- Step 8: Finish and Polish for That “Boutique Artisan” Look
- Troubleshooting: Fix the Usual Resin Keycap Problems
- Design Ideas That Look Expensive (But Aren’t)
- Conclusion: Your Keyboard, But Make It a Tiny Garden
- Extra: Real-World Maker Experiences (About )
- SEO Tags
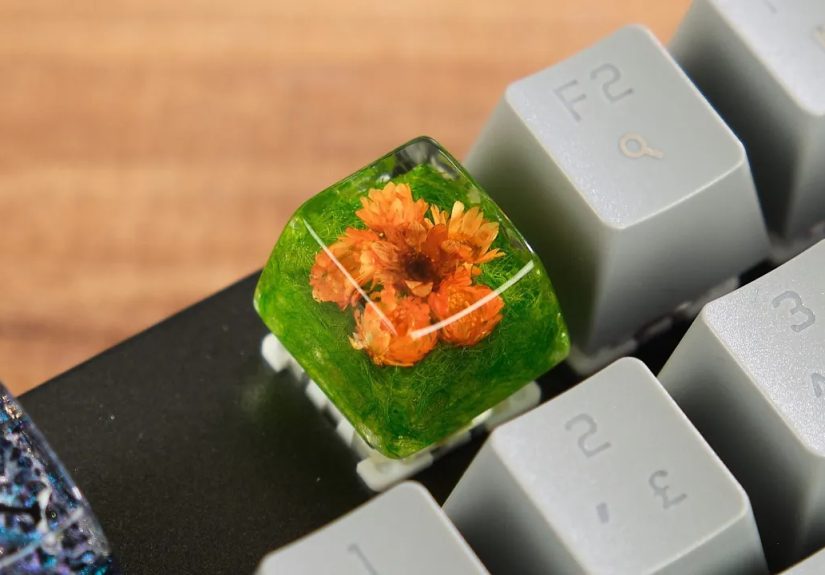
If you’ve ever looked at your mechanical keyboard and thought, “This is nice… but what if it had a tiny enchanted garden on the Escape key?”
congratulationsyou are exactly the kind of person who should make a floral resin keycap.
Resin keycaps (often called “artisan keycaps”) are small, glossy, custom key tops that fit on many MX-style mechanical switches. By embedding dried
flowers inside clear resin, you can create a wearable (well… typable) little terrarium that turns your keyboard into a desk accessory with main-character energy.
And the best part: you don’t need a full workshop to get a clean, professional lookjust the right materials, a patient pour, and a plan for bubbles (because
bubbles are the uninvited guests of the resin world).
Before You Start: Resin Safety That Isn’t a Buzzkill
Resin crafting is fun. Uncured resin on your skin is not. Epoxy resins and hardeners can irritate skin and may cause allergic sensitization over time, which is
a fancy way of saying “your body can decide it hates this forever.” The safest approach is simple: prevent skin contact, protect your eyes, and work with good ventilation.
Also, cured resin is generally much safer to handle, but sanding/cutting can create dustso treat finishing like a mini safety moment, too.
Quick safety checklist
- Gloves: Wear chemical-resistant gloves. Many resin guides recommend nitrile, but always check your resin’s SDS for glove compatibility.
- Eye protection: Splashes happen fast and don’t ask permission.
- Ventilation: Work in a well-ventilated area. If you’re indoors, open windows and use airflow.
- Cleanups: Wash exposed skin promptly with soap and water if you get uncured resin on you (don’t “solve” it with harsh solvents on skin).
- Finishing: If you sand, avoid breathing dustuse appropriate protection and clean up carefully.
What You’ll Need (And What You Can Skip)
Core supplies
- Keycap mold (MX-compatible): Silicone molds made for artisan keycaps are the easiest path.
- Resin: UV resin (fast, convenient for small molds) or two-part epoxy resin (more working time, classic casting option).
- Flowers: Fully dried flowers, petals, or tiny leaves (pressed or silica-dried).
- Fine tweezers: For placing petals like a tiny interior designer.
- Mixing cups and stir sticks: Disposable, because resin cleanup is a lifestyle.
- A toothpick or silicone “poke tool”: For nudging flowers and popping surface bubbles.
Highly recommended upgrades
- A small UV lamp (if using UV resin).
- Heat source for surface bubbles: A brief pass with warm air can help release surface bubbles (use carefully and follow your resin’s guidance).
- Pressure pot (advanced): Great for bubble-free clarity, but only if you already know how to use one safely and correctly.
Decor options (choose your vibe)
- Mica powder for shimmer backgrounds (think “fairy dust,” but legal).
- Alcohol inks or resin dyes for transparent tints.
- Micro-glitter for sparkle without turning your keycap into a disco ball.
- Gold foil flakes for a luxe botanical look.
Step 1: Choose the Right Keycap Shape and Compatibility
Resin keycaps come in different profiles (height/shape), and your mold determines what you’ll get. For a beginner-friendly floral keycap, stick to a standard
1U key (the size of a letter key). Profiles like Cherry and OEM are common “daily driver” shapes; taller profiles like SA are dramatic and gorgeous, but they
also magnify tiny flaws and bubbleslike HD television for your crafting mistakes.
Compatibility matters: most artisan molds are made for Cherry MX-style stems, which fit many popular mechanical switches and clones. If your board uses a
different system (like Topre), you’ll need an adapter or a different stem style.
Step 2: Prep Your Flowers Like You Mean It
Fresh flowers are full of moisture, and moisture inside resin can lead to browning, trapped bubbles, or a cloudy “why does my keycap look like soup?” effect.
Drying is non-negotiable for good results.
Best flower types for keycaps
- Baby’s breath: Tiny clusters that look delicate and fill space beautifully.
- Mini petals: Rose, daisy, or hydrangea petalstrim to fit the mold.
- Fern bits or small leaves: Great for a woodland vibe and nice structure.
Drying methods that work well
- Pressing: Flatten petals/leaves in a flower press or between paper (takes time but looks clean and elegant).
- Silica gel drying: Preserves more 3D shape and detail (great for tiny blossoms).
Seal the flowers to protect color (yes, really)
Many crafters seal dried flowers before embedding. A common approach is light coats of clear acrylic spray sealer, fully dried before casting. This helps reduce
color shift and makes delicate petals easier to handle. If spray sealer isn’t available, some makers use a thin coat of clear-drying glue and let it dry completely
but always test on a spare petal first.
Pro tip: If you’re using pressed flowers, trim them with small scissors so they don’t press against the mold walls. Flowers that touch the sides tend to
“telegraph” edges and look messy in clear resin.
Step 3: Prep the Mold (Your Keycap’s “Stage”)
Clean mold cavities matter. Dust, lint, and fingerprints show up like they’re auditioning for a starring role. Wash and dry the mold if needed, and make sure it’s
fully dry before any resin goes in.
Optional: create a “base layer” design
Want your flowers to float above a dreamy background? Add a tiny first pour: clear resin with a whisper of mica powder or transparent tint. Cure that layer,
then place flowers on top. This gives depth and helps keep the flowers from sinking awkwardly.
Step 4: Mix Resin Without Summoning a Bubble Army
If you’re using UV resin
UV resin is popular for keycaps because it cures quickly in small molds. Pour slowly, avoid whipping air in, and cure in stages. Deep pours can cure unevenly if you
try to blast everything at once, so thinner layers are your friend.
If you’re using two-part epoxy resin
Two-part resin requires careful measuring and thorough mixing. Follow the brand’s exact ratio and scrape the sides/bottom of the cup while stirring. Mix slowly
fast stirring is basically bubble cardio.
Bubble control basics (works for both types)
- Pour slowly in a thin stream to reduce trapped air.
- Let resin rest briefly after mixing so bubbles rise (time depends on product).
- Pop surface bubbles with a toothpick or gentle warm airflow if the resin allows it.
- Consider venting (advanced mold technique) if your mold shape traps air in tight corners.
Step 5: The “Floral Sandwich” Pour (Clean Depth Without Chaos)
Here’s the method that tends to produce the prettiest results for floral keycaps: build the keycap in layers, like a tiny clear lasagnaexcept way cuter and less
likely to stain your shirt.
Layer plan
- Layer 1 (thin base): Pour a small amount of resin into the moldjust enough to cover the bottom.
- Place flowers: Use tweezers to position petals/leaves. Press gently so they adhere to the base layer.
- Lock-in cure: Partially cure (UV) or allow to gel slightly (epoxy, depending on working time) so flowers stay put.
- Layer 2 (fill): Slowly top off the mold to the final level.
- Final bubble check: Look closely along edges and corners. Poke stubborn bubbles free.
Design tip: Place your most “beautiful side” facing outward (toward the top of the keycap). In many molds, the top surface becomes the face you see when installed.
If your flowers have one side that looks better, make that the star.
Step 6: Cure Properly (Don’t Rush the Magic)
Curing is where good keycaps are madeor ruined. Follow your resin’s cure times and temperature recommendations. Cold rooms can slow cure and increase cloudiness for
some systems. UV resin needs proper exposure; epoxy needs time, stable temperature, and a dust-free spot.
Common curing mistakes
- Overheating: Too much heat can cause warping or yellowing depending on resin type.
- Under-curing: Leaves tacky surfaces that attract dust like it’s their soulmate.
- Moving too soon: Vibrations can shift flowers and make them “float” crooked.
Step 7: Demold Like a Pro (No Drama, No Cracks)
Once fully cured, gently flex the silicone mold to release the keycap. Don’t yank. If it feels stubborn, give it more timeespecially with epoxy resins that may
be “hard” but not fully cured.
Check the stem
The stem (the part that presses onto the switch) should be fully formed and clean. If your stem area has bubbles or voids, your keycap may feel loose or wobble.
For that reason, many makers focus on slow pouring and careful bubble checks around the stem zone.
Step 8: Finish and Polish for That “Boutique Artisan” Look
If your keycap comes out perfect, congratulationsyou are the chosen one. If it has a slightly rough edge or tiny overflow (“flash”), you can trim and polish it.
Go slowly and don’t over-sand; resin can heat up, and you want a smooth finish without haze.
Finishing options
- Trim flash: Use a craft blade carefully on fully cured resin.
- Wet sanding: Progress through fine grits to restore clarity (if needed).
- Polish: Use plastic polish or resin-friendly polishing compound for a glossy surface.
Small but mighty tip: If the top is slightly matte after sanding, polishing is what brings it back to “glass.” Think of sanding as smoothing and polishing as
returning the shine.
Troubleshooting: Fix the Usual Resin Keycap Problems
Problem: Bubbles trapped near the flower
Solution: Use thinner pours and “wet” the flower with a tiny amount of resin first. Place it, then fill. Slow pouring helps bubbles escape.
Problem: Flower turns brown or translucent
Solution: Flowers must be fully dried and often benefit from sealing before casting. Test different flowerssome hold color better than others.
Problem: Cloudy resin
Solution: Mix slowly, avoid moisture contamination, and cure at the recommended temperature range. Cloudiness can also come from aggressive sanding without polishing.
Problem: Sticky surface
Solution: Under-cure (UV) or incorrect ratio/mixing (epoxy) are common culprits. Follow the product instructions carefully and allow full cure time.
Design Ideas That Look Expensive (But Aren’t)
- Pressed petal “confetti”: Scatter tiny petal pieces for a dreamy floral snow-globe feel.
- Single statement bloom: One tiny flower centered looks modern and clean.
- Botanical gradient: Tint resin lightly from clear to blush or pale green, then place flowers in the “fade.”
- Gold foil + white petals: Instant “fancy stationery” aesthetic.
- Night garden: Dark-tinted base + bright petals = dramatic contrast.
Conclusion: Your Keyboard, But Make It a Tiny Garden
A floral resin keycap is a small project with big personality: part craft, part design, part “I made this with my own hands and now my keyboard feels like a custom build.”
The key to a beautiful result is simple: fully dried (and often sealed) flowers, slow bubble-friendly pours, and patient curing. Once you nail the basics, you can experiment
with color washes, shimmer backgrounds, and layered botanical compositions that look like miniature art piecesbecause that’s exactly what they are.
Extra: Real-World Maker Experiences (About )
If you ask a group of resin keycap makers what the process feels like, you’ll hear the same theme: the first attempt is exciting, the second attempt is humbling,
and the third attempt is where things start getting dangerously good. The learning curve isn’t steep because it’s complicatedit’s steep because resin is extremely honest.
It will faithfully preserve every tiny choice you made, including “I stirred like I was whisking pancake batter” and “I totally thought this flower was dry enough.”
One common experience: discovering that tiny flowers behave like drama queens. Baby’s breath looks perfect… until it floats up, flips over, and tries to become
the lid of your keycap instead of a design element inside it. That’s why so many makers fall in love with layer casting. Once you pour a thin base and partially cure it,
placing botanicals becomes more like arranging than rescuing. You get control, and the flowers stop auditioning for a role in “Chaos: The Musical.”
Another shared lesson is about color. Some petals keep their shade beautifully, while others go translucent or shift tone the moment resin touches them. Makers often keep
a “test flower stash” just for experimentsone spare petal in a small resin puddle can tell you whether a particular bloom is going to stay vibrant or turn into a ghost.
Sealing flowers is frequently described as the difference between “cute for a week” and “wow for months.” It’s an extra step, but it pays off.
Bubbles are the big character arc. Early on, people assume bubbles are random. Then they realize bubbles have favorite hiding places: along the stem area, in sharp corners,
and under curled petals. The moment you start checking those spots on purpose, your success rate jumps. Many makers develop a ritual: pour slowly, pause, tap the mold lightly,
scan the edges like a detective, and poke the suspicious dots with a toothpick. It sounds fussyuntil you demold a crystal-clear cap and feel like you just unlocked an achievement.
Finishing is its own mini journey. Lots of people sand too aggressively at first and panic when the top turns matte. Then they discover polishing is basically “restore the shine”
mode, and everything is okay again. Over time, makers learn to aim for fewer fixes: cleaner pours, less overflow, and better mold prep. The most satisfying experience isn’t
polishing foreverit’s demolding a cap that needs almost nothing.
Finally, there’s the moment every keycap maker remembers: installing the finished cap on a keyboard and realizing it’s not just “a craft.” It’s a tiny functional art object
you’ll see and touch every day. And once you make one floral keycap that looks like a miniature garden trapped in glass, you start looking at every spare key like it’s a blank
canvas. (This is how collections happen. You have been warned.)