Table of Contents >> Show >> Hide
- What a Transfer Switch Does (and Why It Matters)
- Transfer Switch Options: Manual vs. Automatic (and the Interlock Question)
- Before You Install: Planning That Saves You Time, Money, and Regret
- Tools and Materials (Typical List)
- How to Install a Manual Transfer Switch (Portable Generator Setup)
- Step 1: Choose the mounting location
- Step 2: Plan and mark the circuits you’ll back up
- Step 3: Install the generator power inlet box outside
- Step 4: Shut down power safely and open the panel
- Step 5: Route the transfer switch wiring into the main panel
- Step 6: Connect each selected circuit (one at a time)
- Step 7: Handle neutrals/grounds correctly
- Step 8: Label everything (your future self will thank you)
- Step 9: Test the system
- How to Install an Automatic Transfer Switch (Standby Generator Setup)
- Common Mistakes (and How to Avoid Them)
- Maintenance and Testing: Make It Boring on Purpose
- Quick FAQ
- Final Thoughts: Safe Backup Power Is a System, Not a Hack
- of Real-World Experience (What Homeowners Commonly Run Into)
If power outages were uninvited guests, a generator transfer switch would be the friend at the door with the guest list and a firm “nope.” It’s the device that lets you run backup power without doing anything exciting like accidentally energizing the neighborhood (a.k.a. backfeeding) or turning your electrical panel into a DIY science experiment.
This guide explains how to install a transfer switch in a practical, homeowner-friendly waywhat to choose, how to plan, what the steps generally look like, and where the “call a licensed electrician” line should be drawn in permanent marker. You’ll get the why, the how, and the “please don’t do that” all in one place.
What a Transfer Switch Does (and Why It Matters)
A transfer switch is listed transfer equipment that safely routes power from one source at a time: either the utility grid or your generator. It prevents both from being connected simultaneously, which is the big safety issue during outages.
Why you can’t “just plug the generator into the house”
Backfeeding happens when generator power flows backward through your electrical system into utility lines. That can seriously injure utility workers, damage equipment, and bypass normal protection in your panel. A proper transfer switch (or a properly listed interlock setup, where allowed) is designed to prevent this.
What a transfer switch helps you do
- Power selected circuits (fridge, lights, Wi-Fi, sump pump) from a portable generator
- Power most or all of the home (with load management) using a standby generator and automatic transfer switch
- Keep your setup code-aligned, insurable, and far less stressful during storms
Transfer Switch Options: Manual vs. Automatic (and the Interlock Question)
Manual transfer switch (most common for portable generators)
A manual transfer switch is typically a small switch box mounted next to your main electrical panel. You choose which circuits to power, start the generator, plug it into an inlet, then flip the selected circuits from “LINE” to “GEN.” Simple, reliable, and much cheaper than whole-house automation.
Automatic transfer switch (ATS) for standby generators
An automatic transfer switch monitors utility power. When the grid fails, it signals the standby generator to start and then transfers the load automatically. When utility power returns and stabilizes, it switches back. This is the “lights barely flicker” option.
Interlock kit vs. transfer switch: what’s the difference?
A generator interlock kit is a mechanical device that prevents the main breaker and a generator backfeed breaker from being ON at the same time. In many areas, a properly listed interlock kit (designed for your exact panel) is accepted; in others, it may be restricted or require a particular configuration and inspection. Either way, it’s not a universal DIY shortcutit must match your panel and be installed correctly, with a proper outdoor inlet and generator cord.
Bottom line: whether you choose a manual transfer switch, an ATS, or an interlock method, your goal is the sameno parallel connection between generator and utility.
Before You Install: Planning That Saves You Time, Money, and Regret
1) Check local rules (yes, permits are a thing)
In many U.S. jurisdictions, connecting a generator to home wiring requires a permit and inspection. Some places are strict about service equipment, disconnect requirements, and where a switch can be placed. Even if you’re comfortable with tools, permitting is not just paperworkit’s part of making sure the system is safe and legal.
2) Decide what you actually need to power
Most portable generator setups use a transfer switch to power a handful of critical circuits, not your entire home. Make a “blackout priority list,” such as:
- Refrigerator/freezer
- Heating system blower or boiler controls
- Some lighting circuits
- Internet router/modem
- Sump pump
- Garage door opener (because manually lifting it is a full-body workout)
3) Size the switch to your generator (and your inlet)
Transfer switches and inlets are commonly paired with a 30-amp or 50-amp generator connection (120/240V), but the right choice depends on your generator’s output and your load plan. The transfer switch’s amp rating should align with the generator connection method and the intended loadnot “whatever was on sale.”
4) Do a simple load calculation
You don’t need to be an electrical engineer to avoid overload. Add up running watts for the circuits you want, then account for startup surge on motors (fridge compressors, sump pumps). If your generator is 7,500 running watts, you can’t ask it to run the entire home and also your neighbor’s holiday inflatable collection. (Nice try, though.)
5) Know the “neutral” and multi-wire circuit gotchas
Some homes have multi-wire branch circuits that share a neutral between two hot legs. If you move or reconfigure circuits incorrectly, you can create overheating hazards or nuisance tripping. This is one of the big reasons many manufacturers strongly recommend professional installation or, at minimum, professional review.
Tools and Materials (Typical List)
Exact parts vary by system, but most installations involve:
- Transfer switch kit (manual) or automatic transfer switch matched to the generator
- Outdoor power inlet box (generator inlet) and correct generator cord
- Conduit/whip and fittings (often included with manual switch kits)
- Correct breakers (sometimes a dedicated generator breaker for interlock setups)
- Labels for circuits and operating instructions near the panel
- Basic electrical tools (screwdrivers, torque driver, wire stripper, voltage tester)
Important note: your main panel can contain live parts even with the main breaker OFF. If you don’t know exactly what stays energized and why, that’s your cue to bring in a licensed electrician.
How to Install a Manual Transfer Switch (Portable Generator Setup)
This is a high-level overview of the usual process so you understand the workflow and can plan, hire, or supervise confidently. Exact steps vary by switch brand, panel layout, and local code.
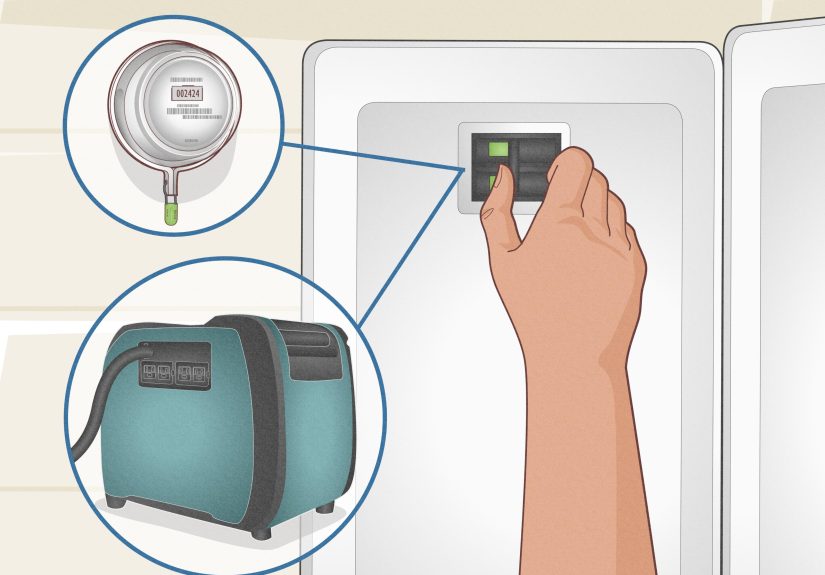
Step 1: Choose the mounting location
Manual transfer switches are typically mounted on the wall right next to the main electrical panel so the prewired conduit/whip can reach a knockout. The goal is a short, neat run with minimal bends.
Step 2: Plan and mark the circuits you’ll back up
You’ll identify which branch circuits in the main panel will be routed through the transfer switch. Many kits support 6–10 circuits. Choose the ones you truly need, not the ones you “might want if you start baking sourdough during a hurricane.”
Step 3: Install the generator power inlet box outside
A proper setup uses an outdoor inlet (often 30A or 50A) connected to the transfer switch. The inlet is mounted outside, then wired back to the transfer switch using appropriately rated cable/conduit. This avoids extension-cord chaos and reduces temptation to do unsafe backfeeding.
Step 4: Shut down power safely and open the panel
Power is shut off to work in/near the panel, and a work light is usually needed becausesurprisethe lights won’t work. Even then, certain conductors may remain energized. Professionals follow strict verification procedures with testers before touching anything.
Step 5: Route the transfer switch wiring into the main panel
Most manual transfer switches have labeled wires for each circuit. Those wires are routed through the conduit into the main panel, then connected so the transfer switch can feed the selected circuits during an outage.
Step 6: Connect each selected circuit (one at a time)
Each chosen branch circuit is moved/connected per the manufacturer’s methodtypically so utility power feeds the circuit in normal mode, and the generator can feed it when switched. Unused circuit wires are capped, secured, and left protected inside the enclosure.
Step 7: Handle neutrals/grounds correctly
Neutral and grounding conductors must be landed correctly according to the instructions and your panel’s configuration. This is not a “close enough” situation. Proper torque matters, toomany pros use a torque driver because electrical connections are not the place for “hand tight plus vibes.”
Step 8: Label everything (your future self will thank you)
Label the transfer switch circuits clearly (“Kitchen fridge,” “Living room lights,” “Sump pump”). Post the operating instructions next to the switch. In an outage, you want a calm checklist, not a scavenger hunt.
Step 9: Test the system
Testing typically includes:
- Starting the generator outdoors in a safe location
- Plugging the generator into the inlet with the correct cord
- Switching selected circuits to generator power
- Confirming loads run properly and the generator isn’t overloaded
- Switching back to utility power when done
How to Install an Automatic Transfer Switch (Standby Generator Setup)
Whole-home standby systems are more complex because the transfer switch may become part of your service equipment, and it must coordinate with the generator, utility feed, and sometimes load management modules.
Typical ATS installation flow
- Site planning: choose ATS location near the service entrance and main panel, considering clearances and outdoor rating.
- Permits and utility coordination: some installs require utility disconnect scheduling or meter pull.
- Mount and route conductors: utility, load, and generator conductors are routed to the ATS per manufacturer specs.
- Neutral switching and bonding considerations: depends on generator type, service configuration, and ATS design.
- Control wiring: generator start/transfer signals and monitoring connections are installed.
- Commissioning: the system is programmed and testedautomatic start, transfer, retransfer, and exercise cycles.
Because ATS installations can involve service conductors and utility coordination, they’re commonly handled by licensed electricians and generator dealers. If your install requires a service-rated switch, that’s another strong signal to go pro.
Common Mistakes (and How to Avoid Them)
“I’ll just use a dryer outlet and a special cord.”
That’s the infamous backfeed scenario. It can energize utility lines, put people at risk, and create liability nightmares. Use a transfer switch or a properly listed interlock setup with a dedicated inlet.
Overloading the generator
If the generator bogs down, trips, or fluctuates, you may be running too much. Keep a circuit plan. Rotate loads if neededrun the microwave, then turn it off before starting the sump pump. Outages are not the time for “everything everywhere all at once.”
Choosing a random interlock kit
Interlocks must be designed and listed for your exact panel model and breaker configuration. Universal “close enough” parts are how you end up with a setup that doesn’t reliably prevent parallel connection.
Skipping labels and instructions
In the dark, in a storm, with your phone at 12% battery, your brain becomes a minimalist. Labels are a power-outage superpower.
Maintenance and Testing: Make It Boring on Purpose
A transfer switch should be the most boring thing you ownbecause boring means it works when you need it.
- Test twice a year: run the generator and transfer a few circuits to confirm operation.
- Inspect cords and inlet: look for heat damage, corrosion, cracked insulation, loose fittings.
- Practice the sequence: utility OFF → generator ON → transfer circuits → manage loads → return to utility.
- Keep instructions nearby: include a “do not run generator indoors” reminder for anyone helping.
Quick FAQ
Do I need a transfer switch if I only run extension cords?
If you’re powering appliances directly via heavy-duty outdoor-rated cords (not house wiring), a transfer switch may not be requiredbut it’s usually more convenient and safer for running multiple circuits. The moment you want generator power tied into home wiring, transfer equipment becomes the safer route.
Can a transfer switch power 240V circuits?
Many can, depending on the switch design and how it’s configured. Common 240V needs include well pumps, some HVAC equipment, and certain sump setups. This is an area where planning and correct circuit pairing matters.
How much does installation typically cost?
Costs vary widely by region, panel access, and whether you’re doing manual vs. automatic. Manual transfer switch installs are generally much less than ATS installs for standby generators, which may involve service work and utility coordination.
Final Thoughts: Safe Backup Power Is a System, Not a Hack
Installing a transfer switch is less about “adding a box” and more about creating a safe, repeatable backup power routine. The best setup is one you can operate calmly, without guesswork, without risky shortcuts, and without creating hazards for your household or utility crews.
If you’re handy and want to understand the process, this guide gives you a clear roadmap. But if anything here makes you think, “Wait… which part stays energized even when the main breaker is off?”that’s your sign. Call a licensed electrician. Your generator can keep your fridge cold; your electrician can keep your whole life from flashing before your eyes.
of Real-World Experience (What Homeowners Commonly Run Into)
Here’s what people tend to learn the hard wayusually while standing in the kitchen at 2 a.m., holding a flashlight in their teeth like a pirate with a mortgage.
First: almost everyone overestimates what their generator can run. The plan starts out noble“Just the essentials!”and then slowly becomes “fridge, freezer, Wi-Fi, a few lights, the TV because morale matters, the microwave because morale matters more, and the coffee maker because society.” The fix isn’t to buy a bigger generator immediately; it’s to make a simple load strategy. Many homeowners end up creating a “rotation list” taped inside the transfer switch cover: Run sump pump + fridge together; don’t run microwave at the same time; wait for compressor to cycle off before starting anything with a motor. Once that list exists, outages get dramatically less chaotic.
Second: labels are everything. People who label circuits clearly tend to look like calm professionals during an outage. People who don’t label them tend to play “breaker roulette,” flipping things and hoping the right lamp turns on. A surprisingly common upgrade after the first outage is a neat little circuit map: “Kitchen fridge,” “Family room outlets,” “Furnace,” “Sump,” “Garage.” It takes 15 minutes, and it saves you from guessing while your food slowly becomes a biology project.
Third: the generator location lesson. Many homeowners report they initially place the generator “somewhere convenient,” then realize convenience and safety are not the same. The safe habit is to run the generator outdoors with plenty of ventilation and distance from doors, windows, and garage openingsand to keep it dry without enclosing it. People who practice setting it up once (on a nice day) don’t waste the first hour of an outage looking for the cord, hunting for the inlet cover, or discovering the generator won’t start because the fuel is old.
Fourth: inspections aren’t the villain. Homeowners often worry a permit will be a headache, but many who go through it say the opposite: the inspection forces a clean, code-aligned install, and it can uncover issues like an undersized inlet, mislabeled circuits, or a panel configuration that needs a different approach. If you ever sell the house, that paper trail can also prevent awkward “So… what’s this mystery switch?” conversations.
Finally: the biggest emotional win is confidence. The first time you run a full testgenerator starts, inlet connects, transfer switch flips over, the fridge hums, the lights behaveyou get a quiet feeling of competence. Outages stop being a mini-crisis and become a routine. And if you can turn a storm outage into a routine, you’ve basically unlocked homeowner-level wizardry.