Table of Contents >> Show >> Hide
- Why Proper Toilet Installation Matters
- Before You Install a Toilet: What to Check First
- Tools and Materials You Will Need
- How to Install a Toilet Step by Step
- Step 1: Turn off the water and empty the old toilet
- Step 2: Disconnect the supply line and remove the old toilet
- Step 3: Clean the flange area thoroughly
- Step 4: Set the new closet bolts
- Step 5: Install the wax ring or wax-free seal
- Step 6: Lower the toilet bowl into place
- Step 7: Tighten the base nuts carefully
- Step 8: Attach the tank if your toilet is two-piece
- Step 9: Connect the water supply line
- Step 10: Turn the water on and test the toilet
- Step 11: Caulk around the base
- Common Toilet Installation Mistakes to Avoid
- Should You Call a Plumber Instead?
- How to Choose a Better New Toilet While You Are at It
- Final Thoughts
- Real-World Experiences and Lessons from Toilet Installation Projects
Installing a toilet is one of those home projects that sounds terrifying right up until you realize it is mostly a matter of careful lifting, patient tightening, and resisting the ancient human urge to “just crank it harder.” In other words, this is a very doable DIY job for many homeowners. If you can follow instructions, use a wrench without turning it into modern art, and tolerate a little bathroom awkwardness, you can probably handle it.
This guide walks you through how to install a toilet step by step, whether you are replacing an old unit or putting in a new one after a bathroom update. We will cover the tools, the prep work, the actual installation, the common mistakes, and the little details that separate a solid install from a toilet that wobbles like it has stage fright.
Why Proper Toilet Installation Matters
A toilet is not a complicated fixture, but it is one that absolutely refuses to forgive sloppy work. Install it correctly, and you get years of reliable flushing, fewer leaks, better hygiene, and a bathroom that feels finished. Install it poorly, and you might end up with rocking, sewer odors, damaged flooring, surprise drips, or the deeply humbling experience of reinstalling the thing you already “finished” once.
The good news is that the basic process is straightforward. The even better news is that most of the mistakes are preventable. Slow down, follow the sequence, and do not treat porcelain like a truck lug nut.
Before You Install a Toilet: What to Check First
1. Confirm the rough-in measurement
Before you buy or unbox anything, measure the rough-in. This is the distance from the finished wall to the center of the toilet flange bolts. In most homes, the standard rough-in is 12 inches, though 10-inch and 14-inch rough-ins also exist. If your new toilet does not match the rough-in, your “simple install” turns into a very educational mistake.
2. Inspect the flange and floor
The flange is the fitting that connects the toilet to the drainpipe and anchors it to the floor. If it is cracked, badly corroded, too low, or loose, installing a new toilet on top of it is like putting fancy tires on a shopping cart. The floor around the flange should also be solid. Soft, stained, or rotted flooring usually means there has been a leak, and that should be fixed before the new toilet goes in.
3. Read the manufacturer instructions
Most toilets follow the same general installation sequence, but some one-piece models, skirted bowls, and dual-flush units have specific mounting hardware or slightly different steps. The box paperwork may not be thrilling bedtime reading, but it can save you from head-scratching halfway through the job.
Tools and Materials You Will Need
- New toilet
- Wax ring or wax-free toilet seal
- Closet bolts and caps
- Adjustable wrench
- Screwdriver
- Putty knife
- Sponge or towels
- Bucket
- Level
- Utility knife
- Toilet shims if the floor is uneven
- New water supply line if the old one is worn or does not fit
- Bathroom-safe caulk
- Rubber gloves
Some toilet kits include bolts, caps, and a seal. Some do not. This is a great thing to discover before you have the old toilet removed and your bathroom temporarily starring in a plumbing suspense film.
How to Install a Toilet Step by Step
Step 1: Turn off the water and empty the old toilet
Shut off the water supply valve behind the toilet. Flush until the tank empties, then hold the handle down to drain as much water as possible. Use a sponge or towels to remove any remaining water from the tank and bowl. This part is not glamorous, but it makes the toilet lighter and far less messy to remove.
Step 2: Disconnect the supply line and remove the old toilet
Disconnect the water supply line from the tank. If you have a two-piece toilet, you can remove the tank first to make lifting easier. Pop off the bolt caps at the base, loosen the nuts, and gently rock the bowl to break the old seal. Lift the toilet straight up and set it on a tarp, towel, or cardboard.
Once the toilet is out, stuff a rag into the drain opening. This helps block sewer gas and also prevents you from accidentally dropping hardware into the pipe, which is the kind of mistake that creates an instant side quest.
Step 3: Clean the flange area thoroughly
Use a putty knife to scrape away the old wax ring and any old caulk or debris around the flange. Cleanliness matters here. The new seal needs a flat, stable surface to do its job. This is also the moment to inspect the flange for cracks, broken bolt slots, looseness, or height problems.
If the flange is damaged, repair it before moving on. If it sits too low relative to the finished floor, you may need a flange extender or a thicker approved seal. If the subfloor feels soft, stop and fix the floor first. A toilet should sit on a stable surface, not on the memory of what the floor used to be.
Step 4: Set the new closet bolts
Insert the new closet bolts into the flange slots. The bolts should sit roughly at the three o’clock and nine o’clock positions. Some bolts come with plastic retainers to keep them upright, which is helpful because wandering bolts are surprisingly good at wasting your afternoon.
Step 5: Install the wax ring or wax-free seal
You can place the seal on the flange or on the toilet outlet, depending on the product and the manufacturer instructions. A traditional wax ring creates a seal by compression. A wax-free seal can be cleaner and easier for some DIYers. Either way, the key is alignment. Once a wax ring is compressed, you should not lift the toilet and try again with the same ring. Wax does not do second chances well.
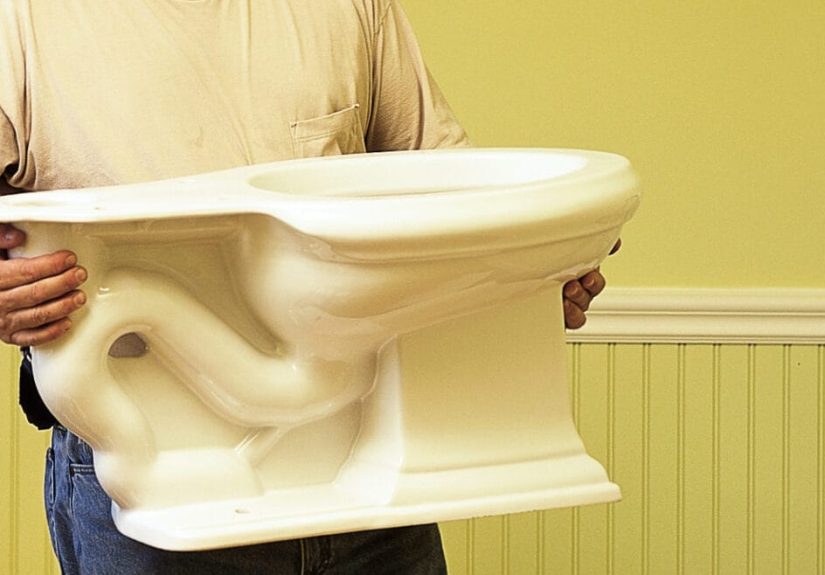
Step 6: Lower the toilet bowl into place
This is the big moment. Lift the toilet and lower it straight down over the closet bolts. Go slowly and keep it as level as possible. Do not twist, tilt, or rock it excessively while setting it. The goal is one clean landing that compresses the seal evenly.
Once the bowl is down, press firmly with your body weight to help seat it. Check that the base is resting evenly on the floor. If the toilet rocks because the floor is uneven, use toilet shims to stabilize it before tightening the nuts fully.
Step 7: Tighten the base nuts carefully
Install washers and nuts on the closet bolts and tighten them gradually, alternating from side to side. This keeps pressure even. Do not overtighten. Porcelain can crack, and toilets are not cheap enough to make that lesson enjoyable. Tight enough to hold the toilet securely in place is the goal, not “I can bench-press plumbing.”
Once secure, trim excess bolt length if needed and snap on the caps.
Step 8: Attach the tank if your toilet is two-piece
If you are installing a two-piece toilet, place the tank gasket as directed, set the tank on the bowl, and insert the tank bolts. Tighten the bolts evenly from side to side until the tank sits level and stable. Again, gentle and even wins. Overdoing it with tank bolts is a classic way to crack porcelain and invent new vocabulary.
Step 9: Connect the water supply line
Attach the supply line to the fill valve under the tank and to the shutoff valve on the wall. If the old line is worn, rusty, or a poor fit, replace it. This is a small, inexpensive upgrade that can prevent future leaks. Hand-tighten first, then snug it gently with a wrench if needed.
Step 10: Turn the water on and test the toilet
Open the shutoff valve slowly and let the tank fill. Watch the supply connection, the tank bolts, and the base of the toilet for leaks. Flush several times. If you see dripping at the supply line or tank, tighten that connection slightly. If you see water around the base after flushing, the seal may not have seated correctly and the toilet may need to be reset with a new seal.
Step 11: Caulk around the base
Many installers caulk around the toilet base for a cleaner look, easier cleaning, and added stability. Run a neat bead around the front and sides of the base, smoothing it with a finger or caulking tool. Some people leave a small gap at the back so any hidden leak becomes visible instead of staying trapped. It is a practical move, and bathrooms appreciate practical moves.
Common Toilet Installation Mistakes to Avoid
Using the wrong rough-in size
If the toilet does not fit the bathroom layout, no amount of enthusiasm will fix it. Measure first.
Reusing old bolts or the old wax ring
This is not the place to save a few dollars. Fresh hardware and a new seal are cheap insurance.
Ignoring a damaged flange
A broken flange can lead to rocking, leaks, and repeat repairs. Fix the foundation before installing the fixture.
Overtightening the nuts
Porcelain cracks do not heal, apologize, or become less expensive over time.
Skipping the leak test
A toilet that looks great but drips slowly is basically a sneaky flooring demolition tool. Always test with multiple flushes.
Should You Call a Plumber Instead?
DIY toilet installation makes sense when the flange is in good condition, the supply shutoff works, the floor is solid, and the project is a standard swap. You should think twice about doing it alone if you find a broken flange, a rotted subfloor, stubborn corroded hardware, unusual plumbing, or signs of previous leakage that damaged the structure.
There is no shame in calling a plumber. The true DIY skill is knowing when the job is a straightforward Saturday project and when it is auditioning for a disaster movie.
How to Choose a Better New Toilet While You Are at It
If you are replacing a toilet, this is also a good time to choose a model that fits your bathroom and your water bill. Look for the right bowl shape, seat height, flush style, and rough-in size. Water-saving toilets with EPA WaterSense labeling use 1.28 gallons per flush or less and can reduce water use without sacrificing performance.
For many households, comfort-height toilets are easier to use, elongated bowls feel more spacious, and one-piece toilets are simpler to clean. Two-piece toilets, however, are often easier to move and install. The best toilet is the one that fits your space, meets your needs, and does not make future maintenance more annoying than it needs to be.
Final Thoughts
Learning how to install a toilet is less about brute strength and more about preparation, patience, and precision. Measure the rough-in, inspect the flange, use a new seal, lower the bowl carefully, tighten everything evenly, and test thoroughly. That is really the whole story.
Once the toilet is secure, level, leak-free, and caulked neatly, you are done. You can step back, admire your work, and enjoy the rare household upgrade that is both useful and impossible for guests to politely ignore.
Real-World Experiences and Lessons from Toilet Installation Projects
Across real DIY bathroom projects, the same experiences show up again and again. First, almost everyone underestimates how heavy and awkward a toilet feels once it is off the floor. A toilet is not impossibly heavy, but it is bulky, slippery, and shaped like it was designed specifically to make carrying it weird. That means the smartest installers clear plenty of floor space first, lay down towels or cardboard, and think through the lift before grabbing the bowl like a hero in a commercial.
Another common experience is that the old toilet often tells the truth about the bathroom long before the floor does. A homeowner may start the day thinking, “I am just swapping toilets,” and by noon discover old wax residue, a loose flange, or flooring damage hidden under the base. That is not a failure. It is actually one of the benefits of the project. Pulling a toilet gives you a rare look at a part of the bathroom that is usually out of sight, and sometimes you catch a problem early enough to avoid a much more expensive repair later.
Many people also discover that the most stressful part is not removing the old toilet but setting the new one down perfectly the first time. There is a strange little moment where you are hovering over the bolts, trying not to bump the wax ring, trying not to twist your back, and trying not to think about how annoying it will be if you miss. That is why experienced DIYers often say that toilet installation is easier with two people, even if only for the “lower it straight and steady” part.
One lesson that comes up often is that rushing the tightening stage creates more problems than it solves. People see a tiny wobble and instinctively reach for more force. In reality, the better fix is usually checking the floor, adding a shim if needed, and tightening gradually and evenly. The installers who get the best results are usually the ones who move slowly, use a level, and treat every turn of the wrench like a deliberate adjustment instead of a competitive sport.
There is also the emotional experience nobody talks about enough: the tiny burst of joy when the tank fills, the flush works, and no water appears where it should not. It is one of the most satisfying moments in DIY because the result is immediate and obvious. The toilet either works properly or it very dramatically lets you know that it does not. When it does work, the sense of payoff is real. You fixed or upgraded something essential, saved money, and gained confidence for the next home project.
In the end, toilet installation tends to teach the same practical lesson every time: the boring details matter most. Measuring, cleaning the flange, using new hardware, making careful adjustments, and testing for leaks may not sound exciting, but those are the things that make the whole job successful. The actual install is only part of the project. The real skill is respecting the process from start to finish.