Table of Contents >> Show >> Hide
- What Makes a Lotus Look Like a Lotus?
- Supplies (Traditional and Digital)
- Step 1: Sketch the Bowl Shape and a Center Guide
- Step 2: Draw the First Three Front Petals
- Step 3: Add the Second Layer (Side Petals That Peek Out)
- Step 4: Build the Outer Petals (The “Bloom” Tier)
- Step 5: Define the Center (Stamens/Seed Pod Area)
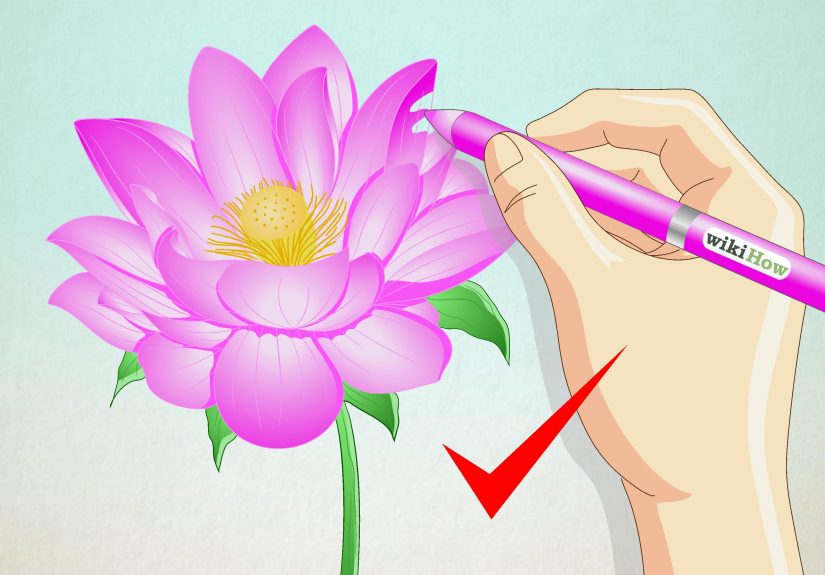
- Step 6: Clean Up Shapes and Commit to Confident Lines
- Step 7: Shade and Add Detail (Optional, But So Worth It)
- Make Your Lotus Look Finished
- Common Mistakes (and Fast Fixes)
- Lotus Variations You Can Try
- A Simple 10-Minute Practice Plan
- Conclusion
- of Real-World Drawing Experiences
A lotus flower looks peaceful, balanced, and effortlessly elegantlike it wakes up every morning, stretches its petals,
and whispers, “I’m symmetrical.” Your job as the artist is to capture that calm vibe… while your brain is doing math
about curved lines. Don’t worry: this tutorial breaks lotus drawing into seven friendly steps that work for beginners,
kids, and “I swear I can draw, I just panic around petals” adults.
What Makes a Lotus Look Like a Lotus?
A lotus is basically a bouquet of layered teardrops arranged in a tidy, radial pattern. The center is compact and
the petals flare outward in tiers. Your drawing will feel “lotus-like” if you nail three things:
(1) a clear center, (2) overlapping petal layers, and (3) confident, clean curves.
Quick Reality Check: You Don’t Need Perfect Symmetry
Nature isn’t a copy-paste machine. A believable lotus is slightly imperfectone petal curves a touch more, another sits
a little higher. Aim for consistent structure, not robotic perfection.
Supplies (Traditional and Digital)
Traditional
- Pencil (HB for sketching; 2B for darker lines and shading)
- Eraser (kneaded eraser is great for softening guidelines)
- Fine liner or gel pen (optional, for clean outlines)
- Paper with a little tooth (sketchbook paper is perfect)
- Colored pencils/markers/watercolor (optional for finishing)
Digital
- Any drawing app with layers (Procreate, Photoshop, Clip Studio, etc.)
- A pressure-sensitive brush (or a brush with size taper)
- At least two layers: one for sketch, one for line art
Tip: whether you’re on paper or a tablet, “line weight” (thin vs. thick lines) is your secret weapon for depth.
Thicker lines can push a petal forward; lighter lines can tuck petals back. It’s like stage lighting, but for ink.
Step 1: Sketch the Bowl Shape and a Center Guide
Start lightthink “whisper lines,” not “permanent decision.” Draw a shallow bowl or cup shape: two gentle curves that
rise toward the sides. This is the base that holds the lotus. Then add a faint vertical centerline to keep your petals
from drifting into another zip code.
Checkpoint
- Is the bowl wider than it is tall? (Most lotus views are.)
- Is your centerline straight and subtle?
Step 2: Draw the First Three Front Petals
In the middle of the bowl, draw a tall, rounded teardrop shape (the main front petal). Then add two slightly shorter
petals on each side, overlapping the center petal just a little. Keep the tops softly pointedlike a teardrop wearing
a tiny crown.
Make It Work
If your petals look like pointy shark fins, round the shoulders near the top. Lotus petals are elegant, not aggressive.
Step 3: Add the Second Layer (Side Petals That Peek Out)
Behind those first petals, add two to four “peekaboo” petals. These should be slightly wider and sit behind the front
trio. Draw them by starting at the base and arcing upward, letting their tops appear between the front petals.
Overlap is important: it tells the viewer, “Yes, these are layers. Yes, I planned this.”
Checkpoint
- Do the back petals appear behind the front ones (not glued to them)?
- Are the gaps between petals varied (not evenly spaced like a paper fan)?
Step 4: Build the Outer Petals (The “Bloom” Tier)
Now widen the flower. Add a ring of outer petals that extend beyond the bowl shape. These petals are broader and can
tilt outward slightly. Draw them with longer curves and let a few overlap each other. If you want a fuller lotus,
increase the number of petals; if you want a simpler lotus, keep it minimal and clean.
Easy Depth Trick
Make the petals closest to the viewer a bit larger and clearer. Petals farther back can be slightly thinner and lighter.
That small change sells perspective.
Step 5: Define the Center (Stamens/Seed Pod Area)
Depending on your style, you have two good options:
- Simple style: draw a small oval or rounded “button” in the center with a few short lines radiating upward.
- More realistic style: sketch a rounded center with tiny, short stamen lines (like soft, upward strokes) clustered together.
Keep the center compact. If it gets too big, your lotus starts looking like it’s wearing a giant hat.
Step 6: Clean Up Shapes and Commit to Confident Lines
This is where your lotus stops being a “collection of guesses” and becomes a drawing. Erase stray guidelines and refine
each petal edge. Smooth out wobbles by drawing longer, confident strokes (even if it takes a couple tries).
If you’re inking, use thinner lines for petals in the background and slightly thicker lines for the foreground petals.
Line Weight Rule of Thumb
- Foreground edges: slightly thicker
- Background edges: lighter/thinner
- Overlaps: add a tiny thickness bump where one petal crosses in front of another
Step 7: Shade and Add Detail (Optional, But So Worth It)
To shade a lotus, imagine a light source (top left is a classic). Petal bases are usually darker because they tuck under
layers and curve inward. Add soft gradients from dark (near the base) to light (toward the tip). Use gentle strokes that
follow the petal’s curvethis makes the petal feel 3D instead of flat.
Texture Without Overdoing It
Lotus petals can have subtle veins. Add a few faint lines from base to tipdon’t turn the petal into a barcode.
Make Your Lotus Look Finished
Add a Stem and a Hint of Water
A simple stem (a slightly curved vertical line thickened into a tube) makes the flower feel grounded. If you want a pond
vibe, add a couple of curved ripple lines below. Keep it minimal so the lotus stays the star.
Color Ideas That Stay Realistic
- Pink lotus: pale pink tips, warmer pink mid-petals, yellow-ish center
- White lotus: cool gray shading, warm yellow center
- Golden lotus (stylized): warm yellows with orange shadows
Common Mistakes (and Fast Fixes)
“My Lotus Looks Like a Cabbage”
Cabbage drawings happen when petals become too round and layered without a clear center structure. Fix it by sharpening
the petal tips slightly and re-emphasizing the front three petals.
“My Petals Are All the Same Size”
Variety creates realism. Make outer petals broader, inner petals narrower, and let a few petals sit higher or lower.
“It Feels Flat”
Add overlap (petals crossing) and use line weight. Then shade the petal bases just a bit more. Depth will show up fast.
Lotus Variations You Can Try
1) Top-Down Lotus (Mandala-Friendly)
Draw a small circle for the center and build petals in rings around it. Keep spacing even for a calm, geometric look.
2) Side-View Lotus Bud
Start with an oval, then wrap a few long petals around it like overlapping shells. Add a curved stem and you’re done.
3) Cartoon Lotus (Kid-Friendly)
Use fewer petals, bigger shapes, and minimal shading. Bold outlines do most of the work.
A Simple 10-Minute Practice Plan
- 2 minutes: draw five quick bowl shapes and centerlines.
- 4 minutes: add front petals + one back layer (no shading).
- 3 minutes: do one “best attempt” lotus with clean overlaps.
- 1 minute: circle what you like and write one fix for next time.
Conclusion
Drawing a lotus flower is less about magical talent and more about layering simple shapes with confidence. Start with a
light structure, build petals in tiers, emphasize overlaps, and use line weight and shading to create depth. If your first
lotus looks a little oddcongrats, you’re officially doing art. Make a second one. Your third will surprise you.
of Real-World Drawing Experiences
If you ask a room full of beginners what happened the first time they tried a lotus, you’ll hear a familiar story:
“It looked fine… until I added more petals.” That’s because lotus drawings are a classic “layering challenge.” The first
three petals feel manageable, almost relaxing. Then the second layer shows up like a surprise group project, and suddenly
you’re negotiating overlaps, spacing, and symmetry like you’re managing a very delicate flower-shaped spreadsheet.
A common experience is the “too-many-teardrops” phase. People keep adding petals of the same size and angle, and the flower
becomes a dense, puffy ball. The fix usually arrives as an “aha”: petals need hierarchy. Inner petals are slimmer and stand
more upright; outer petals are wider and open outward. Once artists start intentionally changing size and tilt, the lotus
stops looking like a pom-pom and starts looking like a bloom.
Another shared moment is discovering that line quality matters more than detail. Many artists try to “save” the drawing by
adding veins, extra center lines, or heavy outlines everywhere. But the lotus often improves when you do the opposite:
erase more, simplify more, and draw longer, smoother curves. It’s weirdly satisfying to watch the flower become cleaner
and more elegant just because your strokes got calmer.
Shading brings its own set of experiencesespecially the first time someone shades a petal base and realizes, “Oh. That’s
depth.” The easiest wins come from tiny gradients: darker near overlaps, lighter toward tips. People also notice that
shading doesn’t have to be dramatic. A lotus can look dimensional with soft, quiet shadows, like the drawing is politely
stepping into 3D rather than kicking down the door.
Finally, there’s the confidence boost that shows up around lotus number three or four. The first attempt is mostly learning
where petals go. The second is learning overlap. The third is learning line weight. And somewhere in that sequence, artists
start making creative choices: adding a stem, suggesting ripples, changing the petal count, experimenting with color. That’s
the real experience of learning to drawmoving from “Can I copy this?” to “How do I want this to look?”