Table of Contents >> Show >> Hide
- What Is a Stock Tank Pool (and Is It Right for You)?
- Planning Your DIY Stock Tank Pool
- Site Setup: The Secret to a Pool That Doesn’t Look “Sad and Slanted”
- Installation: Setting the Tank, Testing for Leaks, and Getting Ready to Swim
- Filtration and Plumbing: From “Refill Often” to “Actually Swimmable All Summer”
- Water Care 101: Keep It Clean Without Turning It Into a Chemistry Final
- Electrical and Safety Basics (Non-Negotiable, Sorry)
- Design and Landscaping: Make It Look Intentional (Not Like a Trough That Escaped)
- Cost Breakdown Example (Typical DIY Range)
- Maintenance and Seasonal Care
- Common Mistakes (So You Don’t Become a Backyard Legend for the Wrong Reason)
- Real-World Lessons: Experiences DIYers Share After Building a Stock Tank Pool
- Conclusion
Stock tank pools (aka “cowboy pools”) are the backyard equivalent of ordering takeout and still calling it “cooking.” You get the fun partcool water, sunny afternoons, and that smug I built this feelingwithout the giant bill (or giant hole) of an in-ground pool.
But here’s the truth: a DIY stock tank pool is only “easy” if you treat the boring parts (leveling, water care, safety, and basic planning) like they matter. Because they do. A tank that isn’t level becomes a wonky, bulging metal pancake. Water that isn’t sanitized becomes a science project. And a pool without safety basics becomes a risk you don’t want.
This guide walks you through site setup, installation, filtration and water care, and design ideaswith practical tips and a few “learn from other people’s mistakes” moments baked in.
What Is a Stock Tank Pool (and Is It Right for You)?
A stock tank pool is a large livestock water troughusually galvanized steel or poly/plasticrepurposed as a small, above-ground soaking pool. Most are about 2 feet deep, which means: perfect for lounging, splashing, and cooling off… and absolutely not for diving, cannonballs, or pretending you’re training for the Olympics.
Why People Love Them
- Budget-friendly: You can often build one for a fraction of traditional pool costs.
- Small-space friendly: Great for compact yards, patios, and “my lawn is basically a hallway” situations.
- Fast gratification: With good prep, you can go from “idea” to “pool day” quickly.
- Design-flexible: Rustic, modern, farmhouse, bohostock tank pools can play dress-up.
What to Be Honest About
- They still require maintenance: Water care doesn’t disappear just because the pool is cute.
- They’re heavy: Water is not lightweight. A common 8-foot tank can hold around 700 gallonsover 5,800 pounds of water.
- Metal tanks can corrode: Especially if you choose the wrong sanitizer approach or ignore leaks.
- Rules may still apply: Some areas treat any pool over a certain depth as requiring barriers or other safety measures. Always check local requirements.
Planning Your DIY Stock Tank Pool
Pick Your Tank: Galvanized Steel vs. Poly
Galvanized steel is the classic look: shiny, rustic, “Texas ranch chic.” It’s sturdybut it can rust over time, especially if water chemistry is off or salt is introduced.
Poly/plastic stock tanks don’t rust and are often lighter, which can be a big win for longevity. The look is more “practical farm supply,” but you can dress it up with cladding, decking, or paint-friendly wraps.
Choose the Size That Fits Your Life (and Your Yard)
Most DIY builds land in the 6–8 foot range. An 8-foot round tank is popular because it comfortably fits a couple adults (or one adult and a dramatic floating beverage situation).
Think Through the “Three Utilities”
- Water source: A garden hose works, but plan how long fills take and where overflow goes.
- Drainage: Where will you dump water without flooding your foundation or annoying your neighbor?
- Power: If you’re running a pump, you’ll need a safe, outdoor-appropriate, GFCI-protected setup. If that sentence feels fuzzy, hire a licensed electrician.
Permits, HOA, and the “Surprise Rules” Problem
Many stock tank pools are considered portable, but local rules can still apply based on depth, location, and how long it stays up. Before you build, check your city/county guidance and HOA requirements. It’s way more fun than removing a pool you just filled. (Yes, that’s sarcasm.)
Site Setup: The Secret to a Pool That Doesn’t Look “Sad and Slanted”
If you only do one thing right, do this: make the base flat and stable. Stock tank pools don’t forgive sloppy leveling.
Step 1: Choose the Best Spot
- Flat-ish ground (or at least a spot where you can make it flat)
- Good sun exposure if you want warmer water (or partial shade if you hate hot water)
- Away from trees if you don’t want your pool doubling as a leaf compost bin
- Clear of low spots where water naturally collects after rain
- Not on a raised deck unless a pro confirms the structure can handle the load
Step 2: Mark the Footprint and Remove Sod
Mark the tank’s footprint (string + stake works for circles). Remove sod and organic material so your base won’t settle unevenly as the grass decomposes.
Step 3: Build a Solid Base (Options)
Pick one of these approaches based on your soil and how permanent you want the pool:
Option A: Crushed Stone + Sand (Most Stable DIY Choice)
- Lay landscape fabric to discourage weeds.
- Add a few inches of compactable crushed stone (often called paver base).
- Compact thoroughly (hand tamper works; plate compactor is faster).
- Top with a thin layer of leveling sand.
Option B: Pavers (Clean Look, Great for Design)
- Best if you want a hardscape “patio moment.”
- Requires careful leveling and a proper paver base.
- Often paired with a decorative gravel border.
Option C: Concrete Pad (Most Permanent)
- Very stable, very permanent.
- Usually requires more planning and may trigger local rules depending on your area.
Step 4: Check Level Like You Mean It
Use a long level or a straight board + level. Check across multiple directions. Take your time. This is the difference between “Instagram oasis” and “tilted wash tub.”
Step 5: Add a Protective Layer
Many DIYers add a foam pad or heavy-duty underlayment beneath the tank to protect the bottom from rocks and friction. It’s inexpensive insurance against tiny punctures and long-term wear.
Installation: Setting the Tank, Testing for Leaks, and Getting Ready to Swim
Step 1: Place the Tank and Confirm Level (Again)
Set the tank on the prepared base. Check level in multiple directions. If it’s off, fix it nowbefore 700 gallons of water show you why physics always wins.
Step 2: Inspect Seams and the Drain Plug
Look for sharp edges, rough seams, and any gaps. Most tanks are built to hold water, but you’re repurposing a farm product into a hangout zoneso it’s smart to inspect carefully.
Step 3: Water Test for Leaks
Fill the tank partway and watch the seams and plug area. If you see leakage, drain and address it before moving forward. For minor seepage, many DIYers use waterproof sealants designed for wet environments. If the tank has a consistent seam leak, consider returning it or upgrading to a different model.
Step 4: Plan Your Drain Strategy
At minimum, you want an easy way to empty or partially drain the pool for cleaning. Many tanks include a threaded drain plug that can connect to a standard hose fitting. This makes draining more controlled (and less like releasing a small inland sea).
Filtration and Plumbing: From “Refill Often” to “Actually Swimmable All Summer”
You have two realistic approaches:
Approach 1: Simple Setup (No Pump)
This works best if you use the pool occasionally and don’t mind refilling.
- Use a cover when not in use.
- Skim debris daily (a small skimmer net is your best friend).
- Drain, scrub, and refill as needed.
Approach 2: Pump + Filter (Recommended for Regular Use)
If you want clear water without constant draining, you’ll want circulation and filtration.
Common Pump/Filter Options
- Small cartridge filter pump: Budget-friendly and simple, good for smaller volumes.
- Small sand filter system: Often stronger filtration and less frequent media changes.
How Most DIY Plumbing Works (High-Level)
Many builds use above-ground pool-style hoses and fittings and create two ports:
- Intake/skimmer line: Pulls water from the pool into the pump.
- Return line: Sends filtered water back into the pool.
Important safety note: Adding ports usually involves drilling/cutting into the tank. If you’re not comfortable with that, use a purpose-built kit or hire help. Wear eye protection and gloves, and keep kids/pets away from tools and metal shavings.
Skimmer or No Skimmer?
A true skimmer helps pull off surface debris (bugs, leaves, pollen) before it sinks and turns into “pool tea.” For small pools, even a simple surface intake can helpbut dedicated skimmers often improve results and reduce manual skimming.
Run Time: How Long Should the Pump Run?
There isn’t one magic number. Many owners run small systems several hours per day, increasing run time during hot weather or heavy use. The goal is clear water and stable sanitizer levelsnot bragging rights for your electric bill.
Water Care 101: Keep It Clean Without Turning It Into a Chemistry Final
Yes, it’s “just a small pool.” And yes, small pools can get gross faster because there’s less water to dilute sunscreen, sweat, and whatever mystery substance shows up after a backyard barbecue.
Test First, Then Adjust
Use pool test strips or a drop test kit to check the basics. For home pools, health guidance commonly targets:
- pH: roughly 7.0–7.8
- Free chlorine: at least 1 ppm for pools (more may be needed depending on stabilizer use and conditions)
Small Pool, Small Doses
Because a stock tank pool holds far fewer gallons than a typical pool, chemical additions should be measured carefully. The easiest way to avoid overcorrecting is to:
- Add a small amount
- Circulate
- Retest
- Repeat as needed
Quick Safety Rules for Pool Chemicals
- Follow label directions exactly.
- Never mix chemicals together.
- Add chemicals to water (not water to chemicals) when dissolving.
- Store chemicals locked up, dry, and away from heat.
Can You Do Saltwater in a Stock Tank Pool?
If your tank is galvanized steel, saltwater systems are commonly discouraged because salt can accelerate corrosion and shorten the tank’s life. If you want a “saltwater feel,” a poly tank is often the safer long-term choice, or you’ll need a protective liner strategy and realistic expectations.
Electrical and Safety Basics (Non-Negotiable, Sorry)
Water and electricity are a terrible duo. If you add a pump or lighting, safety matters more than aesthetics.
Electrical Best Practices
- Use a GFCI-protected outlet.
- Keep cords and equipment away from splash zones.
- Use outdoor-rated covers and weather protection.
- If you need new wiring or a dedicated circuit, hire a licensed electrician.
Backyard Pool Safety Layers
Even small pools can be dangerous, especially for children. Safety guidance often recommends “layers of protection,” like barriers, alarms, supervision, and swimming skills. At minimum:
- Never leave kids unattended near watereven for a minute.
- Use barriers or covers when the pool isn’t in use.
- Keep rescue equipment nearby (and learn CPR if possible).
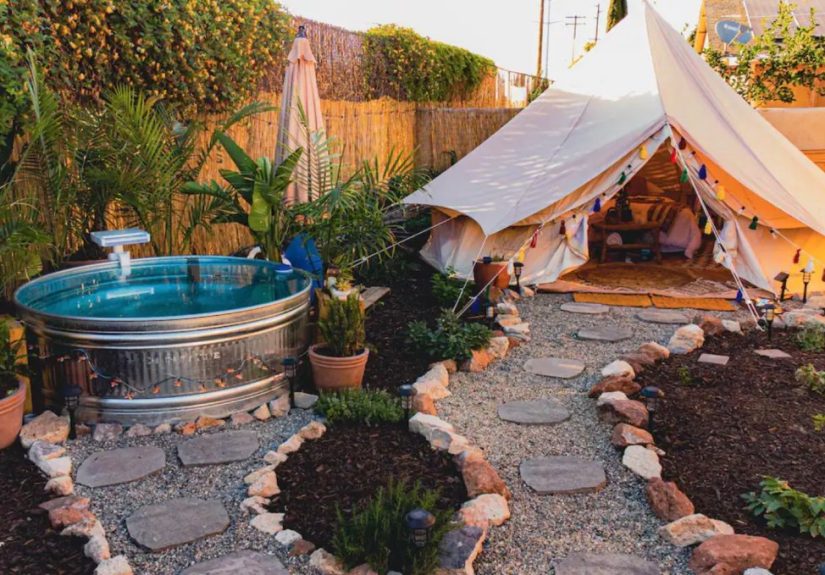
Design and Landscaping: Make It Look Intentional (Not Like a Trough That Escaped)
1) Surrounds and Bases That Look Finished
- Pea gravel border: Easy, drains well, and feels “resort casual.”
- Paver patio ring: Clean lines, great for chairs and planters.
- Mini deck platform: Adds seating, a step-up entry, and major “built-in” vibes.
2) Privacy and Shade
- Shade sail for modern style and sun relief
- Patio umbrella for flexible shade
- Slatted privacy wall to block views and add a design feature
3) Steps and Entry
Most tanks are around 24 inches deepstill high enough that stepping in can feel like climbing into a giant soup pot. Add:
- A sturdy step stool or small pool ladder
- Non-slip mats around the pool
- A bench or platform for towels and sandals
4) Styling Ideas That Work
- Farmhouse: Natural wood surround + string lights + simple planters
- Modern: Dark stain or painted surround + minimal furniture + clean edging
- Boho: Bamboo screening wrap + patterned outdoor rug + lantern lighting
Cost Breakdown Example (Typical DIY Range)
Costs vary based on tank size, filter system, and how fancy your surround gets. Here’s a realistic starter breakdown:
| Item | Typical Range | Notes |
|---|---|---|
| Stock tank | $150–$800 | Material and size drive price |
| Base materials | $50–$200 | Stone/sand/pavers vary widely |
| Pump + filter | $100–$350 | Cartridge vs. sand filter |
| Fittings/hoses | $30–$120 | Depends on plumbing approach |
| Cover + skimmer tools | $25–$100 | Huge payoff in cleanliness |
| Design extras | $0–$1,000+ | Decking, screens, lighting, furniture |
Maintenance and Seasonal Care
Weekly “Keep It Nice” Routine
- Skim debris and wipe the waterline
- Test pH and sanitizer
- Clean or backwash filters as needed
- Inspect fittings for drips (small leaks can become corrosion spots)
End-of-Season Tips
- Drain and rinse thoroughly.
- Let the tank dry completely before covering or storing.
- Store pump, hoses, and accessories out of freezing temperatures.
- If you keep it outdoors, use a snug cover and keep water from pooling on top.
Common Mistakes (So You Don’t Become a Backyard Legend for the Wrong Reason)
- Skipping proper leveling: The pool will look off, feel off, and stress the tank.
- Placing it too close to the house: Splash + drainage can create moisture problems.
- Ignoring safety barriers: Small pools still require big responsibility.
- Over-chemically correcting: Tiny pools need tiny doses.
- Using salt with galvanized steel: Corrosion risk goes up.
- No draining plan: Eventually, you’ll need to empty itdon’t improvise at midnight.
Real-World Lessons: Experiences DIYers Share After Building a Stock Tank Pool
If you read enough build notes, watch enough backyard makeovers, or chat with anyone who’s lived with a stock tank pool for more than a weekend, a few consistent “experience-based truths” show up. Consider this the part of the guide that saves you from learning everything the hard way.
The first surprise is how fast the “cute idea” becomes a “site prep project.” People often start with the fantasy: a tank, some water, a float, and a cold drink. Then they set the tank down and realize the ground that looked flat is actually an optical illusion created by optimism. The moment you add water, even a small tilt becomes obvious. DIYers frequently describe the leveling phase as the most annoying partright up until they realize it’s also the most important part. Many say the smartest move they made was slowing down, rechecking level from multiple angles, and compacting the base until it felt boringly solid.
The second surprise is how quickly small water gets “used up.” A stock tank pool doesn’t have the massive buffer of a full-size pool. Sunscreen, sweat, dust, lawn clippings, and even heavy rain can change water quality faster than you’d expect. A common experience is thinking, “It’s tinymaintenance will be nothing,” then discovering the water turns cloudy after a busy weekend. The best advice DIYers repeat is simple: cover it when you’re not using it, skim often, and test more regularly than you think you need to. Once people build the habit, the pool becomes easy again.
Third: filtration is a quality-of-life upgrade, not just a luxury. Plenty of folks start without a pump, planning to drain and refill. That can workuntil they get tired of the time and water use. Many describe the moment they added a basic pump and an intake/return setup as the point the pool finally felt “real.” Clearer water, less scrubbing, and fewer full drains. Even DIYers who keep plumbing simple tend to say the same thing: circulation makes the whole experience calmer and more reliable.
Fourth: design is where people either get hooked or get frustrated. The tank alone can look a little like you borrowed farm equipment and forgot to return it. DIYers who love their final result usually did one design move that made it feel intentional: a gravel border, a paver ring, a small platform deck, or a privacy screen. These touches aren’t just prettythey also reduce mud, prevent slippery walkways, and create a place to put towels and shoes. The “I’m proud of this” version of a stock tank pool almost always includes a clean perimeter and a plan for entry/exit.
Finally: people underestimate the “grown-up” partssafety and electricity. Anyone who adds a pump eventually runs into the reality of outdoor power. The best stories are the ones where someone planned ahead: GFCI protection, tidy cord routing, and no sketchy shortcuts. And on the safety side, the most experienced DIYers sound like a broken record (in a good way): layers of protection, consistent supervision, and barriers when the pool isn’t in use. It’s not the fun part, but it’s the part that lets the fun happen safely.
In other words: the best stock tank pool experiences come from treating it like a real pooljust smaller, faster, and way more charming.
Conclusion
A DIY stock tank pool can be a genuinely smart backyard upgrade: affordable, stylish, and refreshingly doable. But it works best when you respect the basicsbuild a level base, plan for filtration, maintain clean water, and take safety seriously. Do that, and your “farm trough” becomes a backyard oasis that feels intentional, not improvised.