Table of Contents >> Show >> Hide
- Before You Start: Disable the Key or Just the Shortcuts?
- Method 1: Use Your Keyboard’s Built-In Win Lock or Gaming Software
- Method 2: Disable the Windows Key with Microsoft PowerToys
- Method 3: Turn Off Windows Key Shortcuts with Group Policy
- Method 4: Permanently Disable the Windows Key in the Registry
- Method 5: Disable the Windows Key with AutoHotkey
- Which Method Should You Choose?
- Common Mistakes to Avoid
- Real-World Experiences: What It’s Like to Disable the Windows Key
- Final Thoughts
The Windows key is one of those little keyboard heroes that can open Start, launch shortcuts, and make you look weirdly efficient in front of coworkers. It is also one of those little keyboard villains that can instantly throw you out of a game, interrupt a fullscreen presentation, or pop open a menu right when your fingers were finally behaving. In other words, the Windows key is a helpful roommate until it starts eating your leftovers.
If you want to stop accidental presses, the good news is that Windows gives you several ways to tame it. The better news is that you do not need to take a screwdriver to your keyboard or wrap the key in tape like it owes you money. You can disable the Windows key with built-in settings, Microsoft tools, registry changes, scripting, or keyboard software, depending on how temporary or permanent you want the fix to be.
In this guide, you will learn how to disable the Windows key using five practical methods. Some options turn off only Windows key shortcuts like Win+R and Win+E, while others disable the physical key itself. That distinction matters, so we will keep it simple, clear, and free of techno-mystery.
Before You Start: Disable the Key or Just the Shortcuts?
Before jumping into the five methods, decide what kind of result you want:
Disable the entire Windows key
This stops the key from opening the Start menu or triggering shortcuts at all. This is usually what gamers, kiosk admins, and people with accidental-thumb syndrome want.
Disable only Windows key shortcuts
This blocks combinations like Win+R, Win+E, and Win+D, but the key itself may still open Start when pressed alone. This is useful in work environments where shortcuts are the problem, not the key itself.
If you want the fastest recommendation, here it is: PowerToys is the easiest method for most people, while the Registry Editor method is the most permanent. Group Policy is great for business PCs, and AutoHotkey is excellent if you like flexible, reversible tweaks.
Method 1: Use Your Keyboard’s Built-In Win Lock or Gaming Software
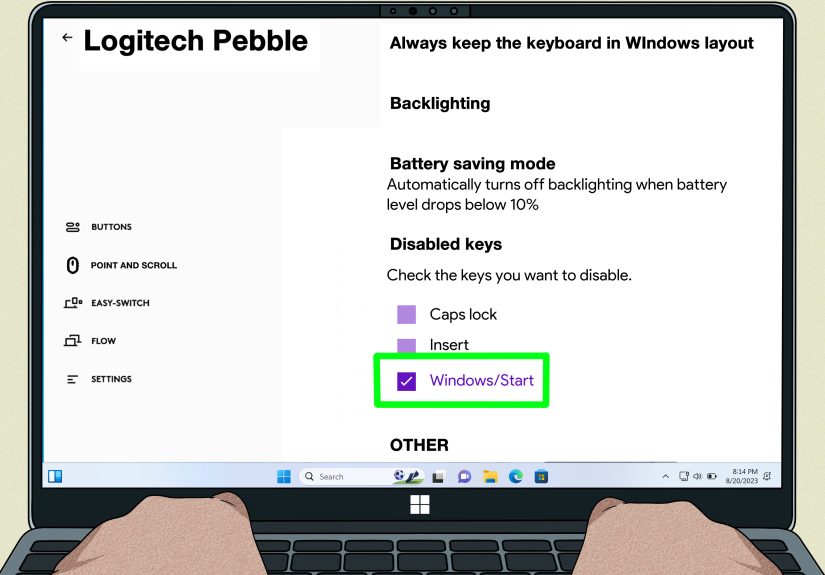
If you have a gaming keyboard or a laptop with a gaming control app, this may be the easiest fix of all. Many keyboards and OEM utilities include a Windows key lock, Game Mode, or a setting that disables Windows hot keys while you play. In some cases, there is even a dedicated button that exists solely to save you from accidental desktop visits in the middle of a boss fight.
How it works
Instead of changing Windows itself, the keyboard firmware or companion software blocks the Windows key. The exact location varies by brand, but common places include performance settings, gaming profiles, or key customization menus.
Good examples
- Gaming keyboards with a physical Win Lock or Game Mode key
- OEM apps such as gaming hubs or booster tools on laptops
- Keyboard software that lets you disable individual keys per profile
Pros
- Fastest method
- No registry editing
- Easy to toggle on and off
- Great for games and fullscreen apps
Cons
- Not available on every keyboard
- May only work while a profile or app is active
- Settings vary a lot by brand
Best for: gamers, streamers, and anyone with a keyboard that already has this feature. If your keyboard came with RGB software that looks like a spaceship dashboard, there is a decent chance the Windows key lock is hiding in there somewhere.
Method 2: Disable the Windows Key with Microsoft PowerToys
If you want a clean, modern, user-friendly option, Microsoft PowerToys is usually the best choice. Its Keyboard Manager tool lets you remap a key to Disable, which means you can turn off the left Windows key, right Windows key, or both without digging into the registry first.
Steps to disable the Windows key in PowerToys
- Install and open Microsoft PowerToys.
- In the left sidebar, select Keyboard Manager.
- Make sure Keyboard Manager is turned on.
- Click Remap a key.
- Click Add key remapping.
- Under Select, choose the Left Win key.
- Under To send, choose Disable.
- Repeat the process for Right Win if you want both disabled.
- Click OK to save.
Why people like this method
PowerToys applies changes quickly, does not feel like a secret backdoor from 2003, and is easy to reverse. You can also use it to disable only one Windows key, which is handy if you still want one side active.
Things to know first
- PowerToys must keep running in the background for the remap to stay active.
- It is convenient, but it is not as permanent as a registry remap.
- Some games and elevated apps may not always behave the same way with remapped keys.
Best for: most home users who want the easiest and safest way to disable the Windows key.
Method 3: Turn Off Windows Key Shortcuts with Group Policy
This method is often misunderstood, so here is the plain-English version: Group Policy disables Windows key hotkeys, not necessarily the Windows key itself. So if your real problem is Win+R, Win+E, Win+D, or similar shortcuts, this is a strong option. If your problem is pressing the Windows key by itself and opening Start, use PowerToys, the Registry, or AutoHotkey instead.
Steps in Local Group Policy Editor
- Open Start and search for Edit group policy.
- Go to:
User Configuration > Administrative Templates > Windows Components > File Explorer - Find Turn off Windows Key hotkeys.
- Double-click it.
- Select Enabled.
- Click Apply, then OK.
- Restart your PC or sign out and back in.
What this actually blocks
This setting is designed to turn off Windows key combinations tied to common shell features. That includes shortcuts such as opening File Explorer, the Run dialog, and other Win-based commands. It is especially useful in school, office, and managed-device environments where consistency matters more than customization.
Pros
- Built into supported Windows editions
- Good for shared or managed PCs
- Easy to deploy in business environments
Cons
- Usually not available on Windows Home
- Disables hotkeys, not always the standalone key
- Less useful if you want the physical key completely dead
Best for: office PCs, shared systems, and people who want to stop Win-based shortcuts without fully killing the key.
Method 4: Permanently Disable the Windows Key in the Registry
If you want the Windows key truly, deeply, unapologetically disabled, the Registry Editor method is the heavyweight option. It uses a Scancode Map, which tells Windows how to interpret certain key presses at a low level. In plain English: you are telling the operating system to ignore the key before it can cause trouble.
This method is more advanced, but it is also one of the most reliable ways to disable the Windows key system-wide.
Important warning
Back up the registry or create a restore point before making changes. The steps are simple, but the registry is not the place for random confidence.
Steps to disable both Windows keys
- Press Win + R, type regedit, and press Enter.
- Go to:
HKEY_LOCAL_MACHINESYSTEMCurrentControlSetControlKeyboard Layout - Right-click the right pane and choose New > Binary Value.
- Name it Scancode Map.
- Double-click it and enter the following value:
This disables both the left and right Windows keys.
Registry file version
If you prefer using a .reg file, save the following as something like disable-windows-key.reg and run it as administrator:
Finish the process
Restart your computer. The change will not fully apply until you reboot.
How to undo it
Go back to the same registry location, delete Scancode Map, and restart again. Once removed, the Windows key should work normally.
Pros
- Permanent and system-wide
- No background app required
- Excellent for dedicated gaming or kiosk setups
Cons
- More advanced than the other methods
- Requires a restart
- Easier to mess up if you rush
Best for: power users, IT admins, and anyone who wants a long-term fix without leaving extra software running.
Method 5: Disable the Windows Key with AutoHotkey
If you like flexible solutions, AutoHotkey is a smart choice. It lets you block the Windows key with a tiny script, and you can turn the behavior on or off just by running or exiting the script. That makes it perfect for people who want a temporary setup for games, presentations, or focused work sessions.
Simple AutoHotkey script
Create a new script and paste in this code:
Save the file, then run it. As long as the script is active, both Windows keys are disabled.
Why this method is useful
You can build on it. For example, you can disable the Windows key only while gaming, only in specific apps, or only during certain hours. AutoHotkey is like giving your keyboard a part-time manager.
Pros
- Very flexible
- Easy to toggle on and off
- Great for custom workflows
Cons
- Requires installing AutoHotkey
- The script must be running
- Not as beginner-friendly as PowerToys
Best for: advanced users, gamers, and anyone who wants temporary control without editing the registry.
Which Method Should You Choose?
- Want the easiest option? Use PowerToys.
- Want the most permanent option? Use the Registry Editor.
- Want to disable only Windows shortcuts? Use Group Policy.
- Want a reversible script? Use AutoHotkey.
- Have a gaming keyboard? Check for Win Lock or Game Mode first.
For most users, the winning order is simple: check keyboard software first, then try PowerToys, then move to Group Policy or the Registry only if you need more control.
Common Mistakes to Avoid
Confusing the key with the hotkeys
This is the biggest one. Group Policy can turn off Windows key shortcuts, but it may not stop the key from opening Start by itself. If you need the physical key completely disabled, use PowerToys, AutoHotkey, or the registry.
Forgetting the right Windows key
Some people disable only the left Windows key and then wonder why the right one is still pulling stunts. If you want both gone, disable both explicitly.
Not rebooting after registry changes
Registry-based scancode changes usually need a restart. No reboot, no magic.
Leaving yourself without an easy way back
Before making permanent changes, know how to undo them. Screenshots, restore points, and exported registry backups are your friends.
Real-World Experiences: What It’s Like to Disable the Windows Key
In real-world use, disabling the Windows key usually feels less dramatic than people expect and more useful than they planned. Gamers are the obvious group here. If you have ever been in a multiplayer match, reached for Ctrl or Alt in a panic, and smashed the Windows key instead, you already know the exact flavor of regret involved. The game minimizes, your desktop appears like an uninvited guest, and by the time you get back in, the round is over and your teammates have developed opinions about you. For that crowd, disabling the key can feel less like a tweak and more like basic emotional self-defense.
But it is not only about gaming. A lot of office users benefit from this too. People working in spreadsheets, CAD software, video editors, or remote desktop sessions often hit the Windows key by accident when moving fast. It interrupts flow, opens menus, changes focus, or launches shortcuts that make no sense in the middle of concentrated work. Once the key is disabled, many users report that the keyboard just feels calmer. Fewer surprise pop-ups. Fewer accidental shortcuts. Less “why is File Explorer open again?” energy in the room.
There is also a difference in how each method feels over time. PowerToys tends to be the favorite for casual users because it feels modern and reversible. You disable the key, test it, and if you hate the change, you undo it in a few clicks. Registry edits feel more serious. They are great when the device has a single purpose, such as a gaming PC, kiosk, or shared station, but they can be overkill if you are still experimenting. AutoHotkey has a loyal following because it lets people treat the Windows key like a situational problem instead of a permanent enemy. Some only block it while gaming. Others block it in one app and leave it alone everywhere else.
Another common experience is that people do not realize how much they actually use the Windows key until it is gone. At first, they celebrate. No more accidental Start menu. No more Win+D ambushes. Then, three days later, they try to open Settings with Win+I or lock the PC with Win+L and discover they have trained their hands around shortcuts they barely noticed before. That is why the best setup is often not the most extreme one. If shortcuts are the issue, disabling only hotkeys may be enough. If the key itself is the issue, a full remap makes sense.
In the end, the experience is usually positive when the method matches the problem. Disable too much, and you may miss useful shortcuts. Disable too little, and the key still causes chaos. The sweet spot is choosing the lightest fix that solves the interruption. That way, your keyboard keeps the helpful parts of Windows and quietly retires the part that keeps trying to ruin your day.
Final Thoughts
If you have been wondering how to disable the Windows key, the good news is that you have options for every comfort level. You can flip a built-in gaming switch, use PowerToys for a user-friendly fix, apply Group Policy to block hotkeys, edit the registry for a permanent system-level change, or run an AutoHotkey script for flexible control.
The best method depends on what annoys you most. If accidental shortcuts are the issue, disable the hotkeys. If the key itself keeps launching Start at the worst possible time, disable the entire thing. Either way, the result is the same: fewer interruptions, fewer accidental desktop detours, and one less reason to glare at your keyboard like it just betrayed the team.