Table of Contents >> Show >> Hide
- What “Deep Cleaning” a Mattress Actually Means
- Before You Start: Supplies and Setup
- The 13-Step Deep Clean
- Step 1: Check the mattress type and game plan
- Step 2: Air out the room like you mean it
- Step 3: Strip the bed completely
- Step 4: Wash bedding and the mattress protector the right way
- Step 5: Vacuum the surface slowly (yes, slowly)
- Step 6: Vacuum seams, piping, and edges (the crumb headquarters)
- Step 7: Identify stains and choose the right approach
- Step 8: Spot-clean stains with minimal moisture
- Step 9: “Rinse” by blotting with a clean, barely damp cloth
- Step 10: Deodorize with baking soda (lightlyyour vacuum will thank you)
- Step 11: Vacuum againthoroughly
- Step 12: Flip or rotate, then repeat the key steps (when possible)
- Step 13: Clean the bed frame area and rebuild your “clean sleep” setup
- How Often Should You Deep Clean a Mattress?
- Pro Tips for a Mattress That Stays Cleaner Longer
- When Cleaning Isn’t Enough
- FAQ
- Real-World Experiences: What People Learn After Deep Cleaning a Mattress
Your mattress is basically the world’s biggest sponge that you’re voluntarily face-planting into every night.
It quietly collects sweat, skin flakes, dust, and mystery crumbs that have absolutely no business being near your dreams.
The good news: you don’t need a hazmat suit (or a brand-new mattress) to make it fresh again.
With the right approachand a little patience while things dryyou can deep clean a mattress in one afternoon and sleep easier tonight.
This guide walks you through a true deep clean: removing debris, tackling stains, neutralizing odors, and reducing allergens,
without soaking the mattress or turning your bedroom into a swamp. Grab a vacuum, a few basics, and your best “I am an adult now” attitude.
What “Deep Cleaning” a Mattress Actually Means
Deep cleaning isn’t just spraying something that smells like “Ocean Breeze” and calling it a day.
A proper deep clean has four goals:
- Remove dry debris (dust, hair, crumbs) so you’re not rubbing it deeper into fabric.
- Lift stains with minimal moisture (mattresses hate being drenched).
- Deodorize by absorbing oils and moisture trapped near the surface.
- Dry completely to help prevent musty smells and mold risk.
Before You Start: Supplies and Setup
Supplies you’ll want
- Vacuum with upholstery attachment (a HEPA-filter vacuum is a bonus)
- Clean microfiber cloths or white towels
- Spray bottle (or two)
- Mild dish soap
- Baking soda
- White vinegar (optional, good for some odors)
- 3% hydrogen peroxide (optional, for certain stains; spot-test first)
- Enzyme cleaner (helpful for urine, sweat, and other protein-based stains)
- Soft brush (optionalgo gentle)
- Fans and/or a dehumidifier (highly recommended for faster drying)
Quick safety/quality checks
- Read the care tag if your mattress has one. Some materials (especially foam) don’t like extra moisture.
- Spot-test any cleaner on a hidden area (edge or underside) and wait a few minutes.
- Go light on liquids: you’re cleaning fabric, not pressure-washing a driveway.
- If you suspect bed bugs (tiny rust-colored stains, persistent bites, visible bugs), pause and contact a professionaldeep cleaning won’t solve an infestation.
The 13-Step Deep Clean
-
Step 1: Check the mattress type and game plan
Is it memory foam, hybrid, or traditional innerspring? Foam tends to trap moisture, so you’ll use less liquid and focus on blotting and airflow.
If your mattress is flippable, you can clean both sides; if it’s one-sided (many modern mattresses are), you’ll rotate instead of flipping. -
Step 2: Air out the room like you mean it
Open windows, turn on fans, and aim for a dry environment. Dry air speeds everything up.
If it’s humid outside, close windows and run a dehumidifier. Your goal is to keep moisture moving away from the mattress, not marinating in it. -
Step 3: Strip the bed completely
Remove sheets, pillowcases, blankets, and any mattress topper. Take off the mattress protector too.
This is also the moment to confront that missing sock you’ve been blaming on the dryer. -
Step 4: Wash bedding and the mattress protector the right way
Wash your sheets and pillowcases while you clean the mattressotherwise you’re putting yesterday’s grime right back on your fresh work.
Follow care labels, but in general, washing bedding regularly helps reduce allergens and buildup.
Many protectors can be washed (often monthly or every 1–2 months, and immediately after spills). -
Step 5: Vacuum the surface slowly (yes, slowly)
Vacuum the entire top in overlapping passes using the upholstery attachment.
Don’t rushslow vacuuming gives the tool time to lift fine dust and debris. Pay special attention to where your body rests most. -
Step 6: Vacuum seams, piping, and edges (the crumb headquarters)
Seams and edges trap hair, dust, and whatever snack you swore you never ate in bed.
Run the vacuum nozzle along stitching, tufted areas, and around labels. If you have a crevice tool, use it carefully along seams. -
Step 7: Identify stains and choose the right approach
Different stains respond to different tactics:
- Sweat/yellowing: mild detergent solution or enzyme cleaner; baking soda helps with odor.
- Urine/pet accidents: enzyme cleaner is your best friend (it breaks down proteins).
- Blood: cold water first; avoid hot water (it can set protein stains).
- Food/coffee: mild soap solution; blot, don’t scrub like you’re sanding a deck.
If the stain is old and set-in, plan on repeating the process rather than soaking the area.
The mattress should get cleaner with each roundlike a responsible glow-up. -
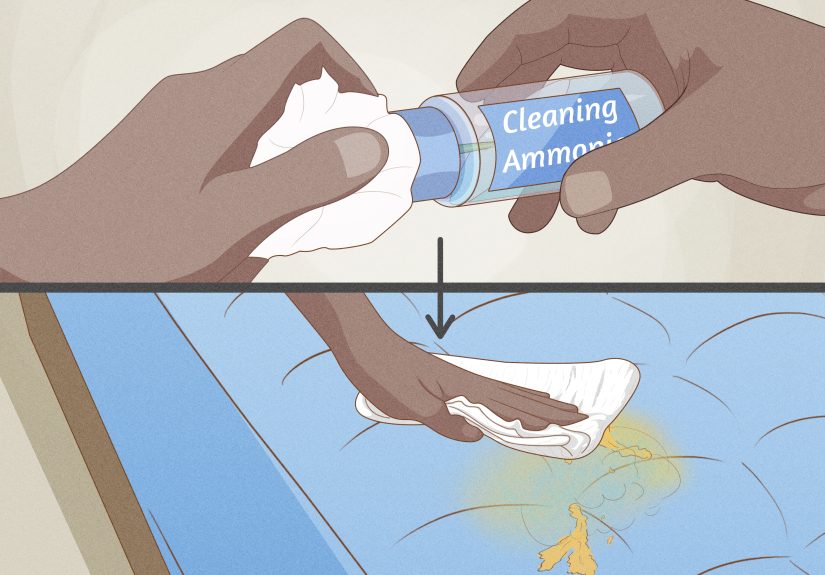
Step 8: Spot-clean stains with minimal moisture
Start with the gentlest method:
-
Mild soap mix: Combine a small amount of dish soap with warm water (think: a few drops, not a bubble bath).
Lightly mist a cloth (not the mattress) and blot the stain. - Vinegar mix (optional): A light vinegar-and-water solution can help with some odors or stains. Apply sparingly and blot.
-
Hydrogen peroxide mix (optional): For certain stains, a diluted peroxide solution is sometimes usedspot-test first to avoid discoloration.
Use a light spritz and blot thoroughly. - Enzyme cleaner: Follow the label instructions. Typically, you apply a small amount, let it work, then blot.
The golden rule: blot, don’t scrub. Scrubbing can push stains deeper and rough up the fabric.
-
Mild soap mix: Combine a small amount of dish soap with warm water (think: a few drops, not a bubble bath).
-
Step 9: “Rinse” by blotting with a clean, barely damp cloth
You don’t want cleaner residue sitting in the fabric (hello, sticky dirt magnet).
Lightly dampen a clean cloth with plain water and blot the treated area to lift leftover soap/cleaner.
Then blot again with a dry cloth to remove as much moisture as possible. -
Step 10: Deodorize with baking soda (lightlyyour vacuum will thank you)
Sprinkle a thin, even layer of baking soda over the entire mattress top.
Baking soda helps absorb odors and surface moisture. Let it sit at least 30 minutes, but a few hours is even better for deeper deodorizing.A quick reality check: dumping a mountain of baking soda on your mattress might look dramatic on social media, but it can clog filters
and stress some vacuums. A light dusting is usually enough to do the job. -
Step 11: Vacuum againthoroughly
Vacuum up every trace of baking soda. Go slowly and use overlapping passes again.
If you still see powder, keep going. The goal is a mattress that feels cleannot one that “poofs” when you sit down. -
Step 12: Flip or rotate, then repeat the key steps (when possible)
If your mattress is flippable, carefully flip it and vacuum the second side. If it’s not designed to flip, rotate it head-to-foot.
This helps even out wear and gives you a chance to clean edges and sides you might ignore otherwise.Drying matters: Keep fans running and let the mattress air out until it’s completely dry.
If you used any liquid at all, give it extra time. Going to bed on a damp mattress is basically inviting musty smells to move in and unpack.Optional note on steam: some people use steam for surface refreshes, but too much moisture (especially on foam) can backfire.
If you choose to steam, keep it minimal and focus on rapid drying afterward. -
Step 13: Clean the bed frame area and rebuild your “clean sleep” setup
A deep-cleaned mattress on a dusty frame is like washing your hands and then immediately high-fiving a sticky doorknob.
Vacuum the bed frame, headboard (especially upholstered headboards), slats, and the floor under the bed.
Then put the mattress protector back on (once the mattress is fully dry) and remake the bed with clean bedding.
How Often Should You Deep Clean a Mattress?
A good baseline is about twice a year, plus quick spot-cleaning as soon as accidents happen.
If you have allergies, pets, kids, or you’re a “coffee in bed” person (bold choice), you may want to vacuum monthly and deep clean more often.
Pro Tips for a Mattress That Stays Cleaner Longer
- Use a washable mattress protector as your first line of defense against spills, sweat, and allergens.
- Wash sheets weekly to keep skin oils and allergens from building up.
- Keep humidity in check. Dust mites and musty odors love damp environments.
- Vacuum the mattress monthly if allergies are a problem or pets sleep with you.
- Handle spills immediately. Fresh stains are dramatically easier than “I’ll deal with it next weekend” stains.
When Cleaning Isn’t Enough
Sometimes the most adult decision is admitting defeat.
Consider replacing the mattress (or getting professional help) if:
- There’s visible mold or a persistent musty smell that returns quickly after drying.
- You suspect bed bugs or another infestation.
- The mattress stays damp for a long time after cleaning (risk increases fast).
- Stains and odors are deeply set and impacting sleep quality.
FAQ
Can I use bleach on a mattress?
It’s not recommended. Bleach can discolor fabric, break down materials, and leave strong fumes.
Stick to gentler spot treatments and always spot-test first.
Is baking soda safe for all mattresses?
Generally yes in small amounts for deodorizing, but use a light layer and vacuum thoroughly afterward.
Avoid turning it into a powder snowstormyour vacuum may not be thrilled.
What if my mattress is memory foam?
Use minimal moisture, avoid soaking, and prioritize airflow and blotting. Foam holds water longer than you think.
When in doubt, follow the manufacturer’s care guidance.
Real-World Experiences: What People Learn After Deep Cleaning a Mattress
If you’ve never deep cleaned a mattress before, the first time can feel oddly personallike the mattress is being judged for its life choices.
And honestly? It kind of is. But it’s also one of those chores where the “before” and “after” can be surprisingly satisfying.
Here are common, very real experiences people run into (and what usually works best).
1) The “I swear I don’t eat in bed” crumb situation.
People often start vacuuming and immediately discover crumbs along the seamsespecially near the head of the bed where snacks mysteriously migrate.
The lesson: seams and edges are the main event, not an optional side quest. Using the upholstery attachment slowly, then following with a crevice tool
along piping, tends to pull out way more debris than expected. Many people also realize this is a great time to vacuum the bed frame and under the bed,
because the dust under there has been building a tiny civilization.
2) The “why is this spot yellow?” moment.
Sweat and body oils can gradually yellow fabricespecially in warm climates or for hot sleepers.
A gentle approach usually wins: light spot-cleaning with a mild soap solution, careful blotting, then baking soda to deodorize.
What surprises people is how much better the mattress can smell afterward, even if faint discoloration remains.
Deep stains often improve in rounds rather than disappearing instantly, which is normal.
3) Pet accidents and the enzyme-cleaner redemption arc.
When urine is involved, many people try “whatever cleaner is under the sink” first and end up with a faint lingering odor.
Enzyme cleaners are commonly the turning point because they’re designed for protein-based messes.
The big learning here: don’t flood the mattress. Apply a controlled amount, let it work, then blot thoroughly and dry aggressively with fans.
People who rush the drying step often report the smell “coming back,” which is usually moisture plus residuenot the universe being petty.
4) The viral baking soda trend… and the vacuum regret.
A lot of folks see videos where someone dumps half a box of baking soda on a mattress like they’re seasoning a giant lasagna.
Then they vacuum it up and act like it’s magic. In reality, heavy baking soda can clog filters and reduce suction in some vacuums.
People who use a thin layer tend to get the same deodorizing effect with less cleanup drama.
The practical takeaway: you want a dusting, not a blizzard.
5) The “I can’t believe I waited this long” sleep upgrade.
After a full deep cleanespecially if bedding and the protector are washed toomany people report the bed feels fresher and more comfortable.
It’s not placebo; removing debris and odors can genuinely improve the overall sleep environment.
The biggest habit shift is maintenance: once someone experiences how much better “clean bed energy” feels, they’re more likely to vacuum monthly,
wash bedding consistently, and keep a protector on year-round. Boring? Yes. Effective? Also yes.
Bottom line: the most common “experience” is realizing a mattress doesn’t need to look filthy to benefit from cleaning.
Deep cleaning is less about perfection and more about reducing buildup, odors, and allergens so your bed stays a place for sleep
not a long-term storage unit for dust.