Table of Contents >> Show >> Hide
- Why a DIY Halloween Skull Fountain Is the Ultimate Yard Showstopper
- Step 1: Plan Your Skull Fountain Layout
- Step 2: Gather Your Supplies and Tools
- Step 3: Build and Paint the Skull Base
- Step 4: Turn Your Skulls into a Working Fountain
- Step 5: Add the “Blood” and Lighting Effects
- Step 6: Safety, Maintenance, and Weather-Proofing
- Creative Variations to Make Your Skull Fountain Unforgettable
- Real-World Lessons from Building a Skull Fountain
- Wrap-Up: Your New Halloween Showstopper
If you’ve ever walked past a neighbor’s Halloween display and thought, “Wow, my plastic pumpkin is seriously underachieving,” this DIY Halloween skull fountain is your answer. The good news? You don’t need a movie prop budget or a special effects team. With a few plastic skulls, a small fountain pump, and some clever paint, you can build a spine-chilling water feature that looks like it crawled out of a haunted graveyard and into your yard.
This project pulls inspiration from classic DIY skull fountains that use plastic birdbaths, garden pond pumps, and red-tinted water, plus those over-the-top skeleton fountains you see on haunted house forums and craft blogs. The result is a Hometalk-style tutorial: approachable, affordable, and totally customizable to your space.
Why a DIY Halloween Skull Fountain Is the Ultimate Yard Showstopper
There are plenty of ways to decorate for Halloween, but a skull fountain does something a string of lights and a cardboard tombstone just can’t: it moves. Flowing water instantly adds life (or afterlife) to your display. The quiet trickle, the gleam of light on “blood,” the hollow-eyed skull staring back at your guestsit’s creepy in the best possible way.
Beyond the drama, this project is also:
- Budget-friendly: Most of the supplies can be found at dollar stores, craft stores, or big-box home improvement retailers.
- Outdoor-ready: Using a basic pond or fountain pump plus weather-resistant paint means you can run it night after night.
- Customizable: Keep it subtle and eerie, or go all in with glowing red water, fog, and sound effects.
- Reusable: Store it after Halloween and bring it back every year as your signature yard feature.
Step 1: Plan Your Skull Fountain Layout
Before you start gluing skulls together like an overcaffeinated mad scientist, take a moment to plan your layout. Think about where the water will flow, where the pump will hide, and how people will view the fountain.
Choose the Perfect Location
Look for a spot that:
- Is near a GFCI-protected outlet for safety.
- Has a level surface so your fountain doesn’t rock, tip, or send water cascading across your porch.
- Is visible from the sidewalk or main walkway so guests get the full effect as they approach.
Pick Your Fountain Style
Most DIY Halloween skull fountains fall into one of these simple styles:
- Birdbath of Skulls: A plastic or resin birdbath becomes the base, with multiple small skulls around the rim and a larger skull as the water spout.
- Single Feature Skull: One oversized skull “spits” water (or “blood”) into a basin below.
- Stacked Skull Tower: Several skulls stacked like a macabre totem with water flowing from the top down.
- Tabletop Skull Fountain: A scaled-down version for porches, entry tables, or indoor Halloween parties.
In this guide, we’ll walk through a classic birdbath-style skull fountain, which is easy to build and dramatic enough to anchor your whole yard display.
Step 2: Gather Your Supplies and Tools
Here’s a basic shopping list for a birdbath-style DIY Halloween skull fountain. Feel free to adjust quantities based on the size of your display.
Core Materials
- 1 plastic or resin birdbath or shallow basin (lightweight and affordable).
- 1 large hollow plastic skull for the main spout.
- 6–10 smaller plastic skulls or skull halves to decorate the rim and base.
- 1 small submersible fountain or pond pump (often labeled for tabletop fountains or small ponds).
- Flexible vinyl tubing that fits snugly on the pump outlet.
- Waterproof epoxy, construction adhesive, or outdoor-rated hot glue sticks.
- Red food coloring or non-staining fountain dye (for a “blood” effect).
Paints and Finishes
- Plastic-safe spray primer.
- Stone-textured or “river rock” style spray paint to fake a concrete or stone look.
- Flat black and dark brown spray paint or acrylics for aging and shadows.
- Optional: clear matte sealer for extra durability.
Extras for Maximum Creep Factor
- Submersible LED puck or strip lights (red, purple, or green look especially spooky).
- Plastic chains, faux moss, rubber snakes, or spiders for added texture.
- A small fog machine nearby if you really want people to question your sanity (in a good way).
Tools
- Drill with spade or step bits for cutting holes in plastic.
- Utility knife for trimming plastic edges.
- Gloves, safety glasses, and a dust mask for drilling and spraying.
Step 3: Build and Paint the Skull Base
Prep the Birdbath or Basin
- Clean the surface. Wash the birdbath with mild soap and water, then let it dry completely. Any dust or oils will keep the paint from sticking.
- Lightly scuff glossy plastic. A quick pass with fine-grit sandpaper helps the primer grip better.
- Prime the entire piece. Spray a thin, even coat of plastic-safe primer and let it dry according to the can instructions.
Attach the Decorative Skulls
- Arrange the small skulls around the rim and pedestal. Aim for an uneven, organic lookas if they’ve been piled up over time.
- Glue each skull in place with waterproof adhesive. Press and hold until secure. For heavier pieces, support them with painter’s tape while the glue cures.
- Add a few skulls or bones along the base to hide seams and make the whole piece feel more “built-in.”
Paint for a Stone-Tomb Finish
- Spray a stone-textured base coat over the entire fountain: birdbath, skulls, pedestal, everything. Light passes prevent drips and give a more realistic stone effect.
- Shade and age the details. Once dry, lightly mist or dry-brush black around eye sockets, cracks, and recessed areas. A little dark brown adds a “dirty graveyard” vibe.
- Seal with a matte clear coat if your fountain will live outdoors in damp or rainy conditions.
Step 4: Turn Your Skulls into a Working Fountain
Create the Water Path
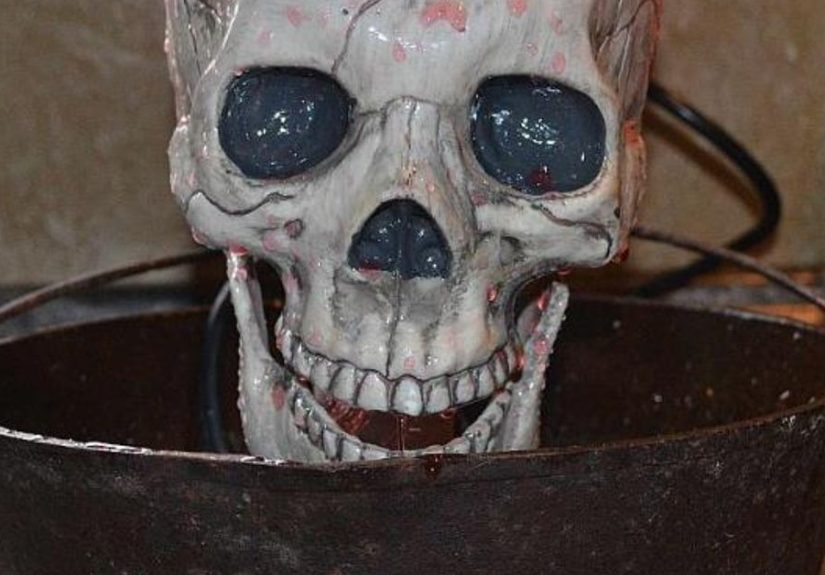
The main large skull is your “spitter” or source of the water. You’ll route the tubing through this skull so the water flows from its eyes or mouth.
- Decide where the water will come out. Classic options include:
- Both eye sockets
- Open mouth
- One eye and the mouth for an extra chaotic look
- Drill or widen the openings. Use a drill bit or utility knife to carefully enlarge the holes so the water can flow freely without splashing back too hard.
- Drill an inlet hole in the back or base of the skull for the tubing. The hole should be just large enough for the hose to pass through.
Install the Pump and Tubing
- Place the pump in the center of the birdbath or basin. It should sit level so it doesn’t tip when water is added.
- Attach the tubing securely to the pump outlet. Push the tubing on as far as it will go for a tight fit.
- Run the tubing up to the skull. Feed the hose through the inlet hole and position the open end behind the eyes or mouth where you want the water to appear.
- Secure the skull. Glue or screw the skull to the basin so it hides the pump and looks naturally “anchored” in place.
- Hide the cord and tubing. Route the power cord out the back of the birdbath and disguise it with moss, leaves, or faux stones.
Step 5: Add the “Blood” and Lighting Effects
Mix Your Spooky Water
- Fill the basin with enough water to fully submerge the pump but not so much that it splashes over the edge when running.
- Add red food coloring or fountain dye. Start with just a few drops, stir gently, and test. You want a rich red that still lets light pass through.
- If you’re worried about staining, use distilled water and a small amount of color, or skip the dye and rely on red LED lighting instead.
Light It Like a Haunted Graveyard
- Drop a submersible LED light into the basin, angled toward the falling water and skull.
- Experiment with red, purple, or blue lighting. Red makes the water look like blood; purple and blue feel ghostly and cold.
- Turn off your porch lights and test the effect in the dark so you can tweak the angle and brightness.
Step 6: Safety, Maintenance, and Weather-Proofing
Even the scariest decorations should be boringly safe behind the scenes.
- Always plug the pump into a GFCI outlet. This is non-negotiable when water and electricity meet.
- Keep cords out of walkways. Use outdoor-rated extension cords and cord covers to prevent tripping.
- Check the water level daily. Pumps can burn out if they run dry. Top off as needed, especially in warm or windy weather.
- Strain out leaves and debris. A simple kitchen strainer or your gloved hand can remove anything that could clog the pump.
- Bring the pump indoors after Halloween. Clean off any slime or dye, let it dry, and store it in a labeled box for next year.
If you live where temperatures drop below freezing, either drain and cover the fountain on cold nights or move it under cover to prevent cracking or pump damage.
Creative Variations to Make Your Skull Fountain Unforgettable
The Catacomb Birdbath
Cover the entire pedestal and basin in dozens of tiny skulls to mimic an underground catacomb. Dry-brush highlights onto the skulls so all the details pop in low light. Add faux moss and tattered cheesecloth to make it look ancient and abandoned.
The Endless Drinking Skeleton
Attach a full or half skeleton so it appears to be endlessly drinking from the skull fountain. Route the tubing through a bottle, cup, or cauldron the skeleton “holds,” letting the water pour back into the basin. It’s darkly funny and instantly memorable.
Family-Friendly Glowing Slime Fountain
If you want spooky but not nightmare fuel, skip the blood and go for neon “slime.” Use green or purple lighting and keep the skull count lower. Surround the base with cartoonish pumpkins, silly ghosts, and friendly tombstones.
Indoor Tabletop Skull Fountain
Scale everything down: use a small resin skull, a tabletop fountain pump, and a ceramic bowl or planter as the basin. Stick to clear water and colored LEDs onlyno dyeto avoid stains. It’s perfect for a Halloween party buffet or fireplace mantel.
Real-World Lessons from Building a Skull Fountain
On paper, a DIY Halloween skull fountain sounds straightforward: glue skulls, add pump, done. In reality, there are a few “learned the hard way” moments that seasoned Halloween decorators will warn you aboutconsider this your cheat sheet.
Test everything with plain water first. It’s tempting to go straight to bright red “blood,” but testing with clear water lets you see how the fountain behaves. You’ll quickly spot issues like water splashing over the edge, dribbling down the back of the skull instead of the front, or pooling in weird places. It’s much easier to adjust the tubing angle or drill a slightly larger outlet hole before you’ve dyed the water.
Plan for splashes and drips. Even a small fountain can spray more than you expect, especially if the water falls from a height or hits a hard surface. Put a plastic tarp, outdoor rug, or spare pavers under the fountain the first night you run it. If you’re using red dye, this step can save your porch or patio from mysterious red stains that linger long after Halloween.
Hide the “backstage” as much as possible. Nothing kills the mood faster than a glowing skull with a clearly visible tangle of cords behind it. Once your fountain is running correctly, step back to sidewalk distance and take a photo. Your phone will “see” cords and tubing you might ignore in person. Use faux foliage, moss, small tombstones, or even a strategically placed pumpkin to hide the functional parts.
Think about sound as well as visuals. The quiet trickle of water adds atmosphere, but a too-powerful pump in a small basin can create a loud gurgle or splashing noise that drowns out everything else. If the sound is too intense, reduce the pump flow (many models have a small dial) or add a rock or shard of faux stone under the falling stream to soften the impact.
Mind kids, pets, and curious guests. People will want to get close to your skull fountainsome will want to touch it, and kids may try to play with the water. Make sure nothing has sharp edges, the fountain is stable and hard to tip, and any dye or additives you use are safe for incidental contact. Consider posting a playful sign like “Cursed WatersDo Not Drink” as both a joke and a gentle reminder.
Document your setup for next year. Once you finally get the tubing angle, lighting, and placement perfect, take photos from every side and jot down quick notes: pump size, dye brand, number of skulls, and anything you’d change. Next Halloween, you’ll be able to rebuild your signature fountain in a fraction of the timeand maybe upgrade it with more skulls, better lights, or a matching cemetery scene.
With a little planning and these lessons in your back pocket, your DIY Halloween skull fountain won’t just workit will become the thing people ask about every October: “Are you doing the skull fountain again this year?”
Wrap-Up: Your New Halloween Showstopper
A skull fountain is one of those DIY Halloween projects that looks complicated but is totally doable once you break it into steps. You start with inexpensive materialsplastic skulls, a birdbath, a small pumpand end up with a moving, glowing, gurgling centerpiece that defines your whole display.
Whether you go for subtle spooky ambiance or full-on “haunted catacombs,” this project lets you customize the look, sound, and mood of your yard. And once you’ve built it, you can tweak and expand it year after year, adding more skulls, props, and effects until your home is the one the neighborhood talks about.
Grab your skulls, plug in that pump, and prepare to turn your yard into a spine-chilling Halloween spectacle.