Table of Contents >> Show >> Hide
- Why stovetop steak works (and sometimes beats a grill)
- Choose the right steak for the skillet
- What you need (and what you really don’t)
- Prep: the “boring” steps that make the steak amazing
- The core method: pan-sear + butter-baste (step-by-step)
- Steak doneness temperatures (use these, not vibes)
- Timing examples (realistic scenarios)
- Common stove top steak problems (and how to fix them)
- Optional upgrade: make a quick pan sauce (because you deserve nice things)
- Conclusion
- of Real-World “Stove Top Steak” Experiences (the kind people actually have)
You don’t need a grill, a backyard, or a dramatic apron that says “Kiss the Cook” (unless you already own oneno judgment).
You need a stove, a good pan, and the confidence to let a piece of beef sizzle loudly without panicking and flipping it like a nervous pancake.
Cooking steak on the stove top is one of the fastest ways to get a restaurant-style crust with a juicy centerespecially when you use the
classic move: pan-sear, then butter-baste. This guide walks you through exactly how to do it, with specific temps, timing examples,
and fixes for the most common “why is it doing THAT?” moments.
Why stovetop steak works (and sometimes beats a grill)
The stove top is basically a crust machine. A properly heated skillet gives you steady, direct contactmeaning you can build a deep brown exterior
(hello, flavor) while keeping the inside tender. You also get control: you can lower the heat, add butter and aromatics, and steer your steak toward
your preferred doneness instead of hoping the grill gods are feeling generous.
Choose the right steak for the skillet
Best cuts for stove top cooking
You can cook almost any steak on the stove, but these are especially friendly:
- Ribeye: Rich, forgiving, and flavorful thanks to marbling.
- New York strip: Beefy and structured, with a great crust payoff.
- Top sirloin: Leaner but still tasty (great with butter-basting).
- Filet: Very tender; benefits from basting and a gentle finish.
- Flank/skirt (thin steaks): Cook fast and slice against the grain for best tenderness.
Thickness matters more than people admit
The “easiest” stove top steak is usually about 1 to 1.5 inches thick. Thin steaks cook so fast they can go from “wow” to “why is it chewy”
in the time it takes to open a drawer for salt. Very thick steaks can be done on the stove, but they may need a slightly lower-heat approach and more
frequent flipping (or a short finish in a low ovenoptional, not required).
What you need (and what you really don’t)
Essential gear
- Heavy skillet: Cast iron is the classic. Heavy stainless steel also works great.
- Tongs: For flipping and standing the steak on its edges to render fat.
- Instant-read thermometer: The cheat code for consistency.
- Paper towels: Dry steak = better crust.
Ingredients
- Steak (obviously), preferably 1–1.5 inches thick
- Kosher salt and black pepper
- High-heat oil (avocado, canola, grapeseed, or refined vegetable oil)
- Butter (unsalted is easiest to control)
- Aromatics (optional but glorious): smashed garlic cloves, thyme, rosemary, shallot
Prep: the “boring” steps that make the steak amazing
1) Dry the surface like you’re preparing it for a photoshoot
Moisture is the enemy of browning. Pat the steak dry thoroughly with paper towels. If you have time, set it on a rack (or plate) in the fridge
uncovered for a few hours to help dry the surface even more. But even a good towel-dry right before cooking is a big upgrade.
2) Salt with strategy
If you can, salt the steak at least 40 minutes before cooking (or up to overnight). This helps the salt dissolve, move into the meat, and
season more deeply. If you don’t have that time, salt right before cookingjust don’t do the awkward middle window (like 10–30 minutes before), when
the salt has pulled moisture out but hasn’t reabsorbed yet. That can slow browning.
3) Room temperature: helpful, not magical
Letting steak sit out for 20–30 minutes can help it cook a bit more evenly, especially if it’s thick. But it’s not required. If your kitchen is warm and
you’re busy, don’t turn “room temp” into a side quest that derails dinner.
The core method: pan-sear + butter-baste (step-by-step)
This method is built for a steak that’s roughly 1–1.5 inches thick. If yours is thinner or thicker, don’t worryscroll to the timing examples after the steps.
-
Preheat the pan.
Put a dry skillet over medium-high heat for 3–5 minutes. You want it hot enough that the steak sizzles immediately. (A faint wisp of smoke is normal.) -
Add oil, then add steak safely.
Add 1–2 teaspoons of high-heat oil and swirl to coat. Lay the steak in the pan gently, placing the edge closest to you down last so any hot oil splashes go away from you. -
Sear the first side until it releases.
Cook 3–5 minutes without moving it much. When a crust forms, the steak will release more easily from the pan.
If it feels “glued,” it probably needs another minute. -
Flip and sear the second side.
Flip and cook another 2–4 minutes. If your steak has a fat cap, use tongs to stand it on that edge for 20–40 seconds to render and brown. -
Lower the heat and add butter + aromatics.
Reduce heat to medium or medium-low. Add 1–2 tablespoons of butter, plus garlic/herbs if using.
As the butter melts and foams, tilt the pan so butter pools on one side. -
Baste like you mean it.
Spoon the melted butter over the top of the steak repeatedly for 30–90 seconds. This adds flavor, helps brown, and gently finishes the interior.
(If butter starts to smell burnt, lower the heat immediately.) -
Check temperature early and often.
Insert an instant-read thermometer into the thickest part from the side (aiming for the center).
Pull the steak about 5°F below your final targetcarryover cooking will finish the job during rest. -
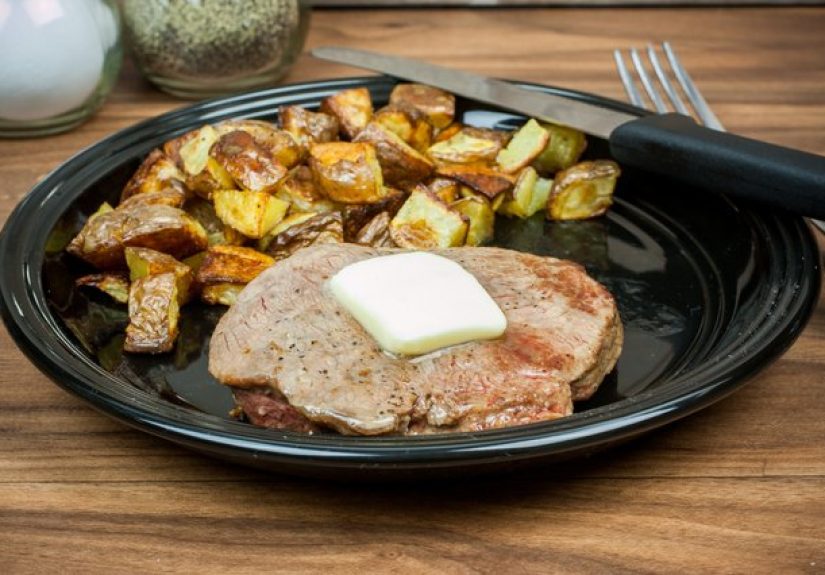
Rest.
Transfer to a plate and rest 5–10 minutes. Resting helps juices redistribute and prevents “all the juice on the cutting board” sadness. -
Slice (optional) and serve.
If slicing, cut against the grain. Finish with flaky salt if you want the steakhouse vibe.
Steak doneness temperatures (use these, not vibes)
Times vary. Thickness varies. Stove burners vary wildly (some run like jet engines).
Temperature is the one thing that doesn’t lieunless you’re measuring the edge instead of the center.
| Doneness | Pull From Pan (°F) | Finish After Rest (°F) | Center Look |
|---|---|---|---|
| Rare | 120–125 | 125–130 | Cool red |
| Medium-rare | 125–130 | 130–135 | Warm red / pink |
| Medium | 130–140 | 135–145 | Pink |
| Medium-well | 140–150 | 145–155 | Faint pink |
| Well-done | 150+ | 155+ | Brown through |
Food-safety note: Many food-safety authorities recommend cooking whole steaks to a higher minimum internal temperature than medium-rare.
If you’re serving someone pregnant, immunocompromised, elderly, or very youngor if you’re unsure whether the meat has been mechanically tenderized
consider cooking to the recommended minimum and resting time for safety.
Timing examples (realistic scenarios)
Example A: 1-inch ribeye, medium-rare
- Preheat skillet: 3–5 minutes over medium-high
- Sear first side: ~4 minutes
- Flip, sear second side: ~3 minutes
- Lower heat, butter-baste: 45–60 seconds
- Pull at: ~128–130°F, rest to finish around 130–135°F
Example B: 1.5-inch strip steak, medium
Thicker steaks benefit from more frequent flipping after the initial crust starts to form. This helps the interior heat more evenly while the
exterior continues to brown.
- Preheat skillet: 4–6 minutes
- Sear first side: 2 minutes
- Flip: 2 minutes
- Then flip every 1–2 minutes until the thermometer reads ~135–138°F
- Lower heat, butter-baste at the end: 60–90 seconds
- Pull at: ~140°F, rest to finish around 145°F (medium)
Example C: Thin steak (skirt, flank, or a thin-cut sirloin)
Thin steaks cook fastso fast you can’t “fix it later.” Use high heat and short time.
- Preheat pan: 3–5 minutes
- Sear: 1–2 minutes per side (sometimes less)
- Optional: quick butter baste for 15–30 seconds at the end
- Rest briefly: 3–5 minutes
- Slice thinly against the grain
Common stove top steak problems (and how to fix them)
“My kitchen looks like a smoke machine.”
- Use a high-smoke-point oil and keep the amount small.
- Dry the steak thoroughly (surface water increases sputtering and steam).
- Preheat properly, then reduce heat after the crust forms.
- Turn on the vent fan, open a window, and consider moving the smoke alarm’s feelings into a separate room.
“The outside browned, but the inside is raw.”
- Steak may be too thick for constant high heat. Use frequent flipping after initial sear.
- Lower the heat sooner and finish with basting.
- Use a thermometerdon’t wait until you “think it’s done.”
“My steak is gray and sad.”
- The pan wasn’t hot enough, or the steak was wet. Dry it more and preheat longer.
- Overcrowding cools the pan. Cook one or two steaks at a time with space around them.
- Try a heavier pan (thin pans lose heat fast when the steak hits).
“The butter burned.”
- Add butter only after lowering the heat.
- Use a mix of oil + butter (oil helps buffer butter from scorching).
- Add aromatics late; garlic burns easily.
“It stuck to the pan.”
- Sticking often means the crust isn’t ready. Give it another 30–60 seconds and try again.
- Make sure the pan is properly preheated before the steak goes in.
- Don’t move the steak constantly during the first searcontact builds crust.
Optional upgrade: make a quick pan sauce (because you deserve nice things)
After the steak rests, you’ll have browned bits in the pan (flavor gold). You can turn them into a sauce in 2 minutes:
- Pour off excess fat, leaving about 1 tablespoon.
- Add a splash of broth, wine, or even water and scrape up browned bits.
- Simmer 30–60 seconds.
- Whisk in a small knob of butter off heat to make it glossy.
- Taste, salt if needed, and spoon over steak.
Conclusion
Cooking a steak on your stove top is less about secret chef tricks and more about a few reliable fundamentals:
dry steak, hot pan, smart salting, a thermometer, and a short rest. Once you’ve done it a couple times, you’ll stop Googling “how long per side”
and start cooking with calm confidenceplus the smug satisfaction of knowing you just made steakhouse-level dinner without paying steakhouse prices.
of Real-World “Stove Top Steak” Experiences (the kind people actually have)
The first time many people try stove top steak, the loudest surprise is the noise. A proper sear sounds aggressivelike the pan is applauding you, but also
mildly threatening. That sound is useful feedback: it usually means the pan is hot enough to start browning immediately. The second surprise is how fast the
whole thing can go. On a weeknight, it’s easy to assume steak is an “event” that requires an hour and a ceremony. In reality, once the pan is hot, a 1-inch steak
can be beautifully done in under ten minutes of actual cooking.
Another common experience: people discover the difference between “brown” and “burnt” in real time. The first crust attempt might be too pale because the steak
was damp, or the pan wasn’t fully preheated. The next attempt might run a little smoky because the heat was cranked like a jet engine. The sweet spot tends to
be a hot pan that you’re willing to adjusthigh heat to begin the crust, then slightly lower heat once the steak is seared and you’re aiming for precision.
This is where butter-basting becomes a fan favorite: it feels fancy, it smells incredible, and it gives you something to do with your hands besides poking the steak
and asking it emotional questions like “Are you done yet?”
Many home cooks also report a turning point the day they use a thermometer and stop guessing. It’s not that guessing never works; it’s that guessing is
stressful, and steak is expensive enough to deserve less stress. Once someone realizes they can pull the steak a few degrees early and let carryover cooking
finish it during rest, a lot of steak anxiety disappears. Resting, by the way, is another “experience lesson”: cut too soon and you’ll watch juices run out like
you just opened a water balloon. Rest five to ten minutes and the steak slices cleaner, stays juicier, and tastes more like it came from a restaurant.
And then there’s the experience of discovering personal preference. Some people fall hard for medium-rare because it’s tender and juicy. Others genuinely prefer
medium because they like a firmer bite, especially on fattier cuts. The best part of stove top steak is that it’s repeatable: once you learn your preferred pull
temperature and your pan’s personality, you can hit the same result again and again. Soon the “steak night” routine becomes easy: salt ahead when you can, dry it
well, preheat the skillet, sear confidently, baste briefly, rest, slice, and enjoy the very specific joy of saying, “Wait… I made this?”