Table of Contents >> Show >> Hide
- Why Reclaimed Wood Works So Well for This Project
- Choose Your Version First: Bench or Coffee Table?
- Tools and Materials You Will Need
- How to Pick Safe, Usable Reclaimed Wood
- Step 1: Clean and Prep the Wood
- Step 2: Mill the Boards Without Losing Their Personality
- Step 3: Build the Top
- Step 4: Build a Strong Base
- Step 5: Attach the Top Correctly
- Step 6: Sand, Ease the Edges, and Finish
- Best Styling Ideas for a Reclaimed Wood Bench or Coffee Table
- Common Mistakes to Avoid
- Final Thoughts
- Real-World Experiences and Lessons From Reclaimed Wood Builds
If you have ever looked at an old board and thought, “You used to be a fence, but today you become furniture,” congratulations: you already have the correct attitude for this project. Building a reclaimed wood bench or reclaimed wood coffee table is one of those rare DIY wins that checks every box. It is practical, stylish, budget-friendly, eco-conscious, and just rustic enough to make people think you own at least one flannel shirt on purpose.
The beauty of this project is flexibility. Build it a little taller and narrower, and you have a bench for an entryway, dining nook, mudroom, or bed end. Build it lower and a little wider, and now you have a coffee table that can hold books, remotes, mugs, and the decorative bowl everyone pretends not to need. The basic construction stays almost the same; the final dimensions and finish are what change.
This guide walks you through the entire process, from choosing salvaged boards to building a sturdy base and applying a finish that looks polished without sanding away all the character that made reclaimed wood worth using in the first place.
Why Reclaimed Wood Works So Well for This Project
Reclaimed wood has the one thing brand-new lumber cannot fake very well: history. It often comes with nail holes, saw marks, weathering, color variation, and grain patterns that make a simple bench or table feel custom. Instead of looking like it came flat-packed from a giant cardboard maze, it looks like it has a story.
It is also a smart material for a beginner-friendly woodworking project because benches and coffee tables tend to celebrate character. A tiny knot, a subtle crack, or a worn edge can feel like intentional design instead of a defect. That said, “character” is not the same thing as “structural disaster.” If a board is rotted, crumbly, twisted like a potato chip, or hiding loose fasteners, it belongs in the firewood pile, not your living room.
Choose Your Version First: Bench or Coffee Table?
Before you cut anything, decide how the piece will be used. That one decision affects nearly every measurement that follows.
For a reclaimed wood bench
A bench usually needs a narrower top and a taller overall height. A common DIY range is about 16 to 18 inches deep and roughly 18 inches high, though you can go longer depending on the room. This version is ideal for an entry, a mudroom, the end of a bed, or extra dining seating.
For a reclaimed wood coffee table
A coffee table is generally lower and wider. Think of it as the horizontal overachiever of the living room. A practical build might land around 17 to 19 inches high, with a width and length that fit your sofa area. A good rule of thumb is to keep it visually balanced with nearby seating rather than making it look like a wooden aircraft carrier parked in front of the couch.
If you want one design that can swing both ways, aim for a simple rectangular build and customize the leg height. Same soul, different job title.
Tools and Materials You Will Need
Basic tools
- Tape measure
- Combination square or speed square
- Circular saw, miter saw, or table saw
- Drill/driver
- Clamps
- Orbital sander
- Pry bar, pliers, and metal detector or strong magnet for reclaimed wood inspection
- Safety glasses, hearing protection, and dust mask or respirator
Materials
- Reclaimed wood boards for the top
- Lumber for the base or legs
- Wood screws or lag screws
- Wood glue
- Optional pocket-hole screws or metal brackets
- Sandpaper in coarse, medium, and fine grits
- Wood filler, if needed
- Stain, clear sealer, wax, or polyurethane
- Optional casters for a factory-cart coffee table look
- Optional steel legs for a modern farmhouse style
How to Pick Safe, Usable Reclaimed Wood
This step matters more than people think. The fastest way to ruin a project is to fall in love with a board before confirming it is actually usable. Reclaimed wood can come from barns, pallets, old decking, fencing, doors, shelving, or torn-out interior trim. Some pieces are gold. Some are just splintered lies.
What to look for
- Boards that feel dry, solid, and heavy for their size
- Interesting grain, patina, knots, and saw marks
- Minimal rot, mold, or insect damage
- Edges that can be trimmed straight if necessary
- Enough thickness to stay stable after cleaning and sanding
What to avoid
- Soft, punky wood that crumbles under pressure
- Boards with deep internal cracks or severe warping
- Lumber contaminated by oils, chemicals, or mystery stains
- Hidden nails, staples, screws, and metal fragments
Also, be careful with painted reclaimed wood. If it may have come from an older surface, especially pre-1978 material, treat it cautiously. Sanding or cutting suspect coatings without proper precautions is a bad idea. When in doubt, use unpainted stock or get the material properly assessed before aggressive sanding. Rustic charm is lovely. Hazardous dust is not.
Step 1: Clean and Prep the Wood
Start by removing all nails, staples, screws, and metal bits. Check once, then check again. Reclaimed wood has a sneaky sense of humor, and saw blades are expensive.
Brush off dirt and debris first. If the boards are grimy, lightly clean them without soaking the wood. The goal is to remove surface junk, not give old lumber a spa day. Let everything dry fully before moving on.
Next, inspect each board and decide how much character to keep. Some DIYers want every scar visible. Others want reclaimed wood that still looks civilized enough to live indoors. Both are valid. Usually, the best result lands in the middle: remove splinters, flatten problem spots, and keep the visual texture.
Step 2: Mill the Boards Without Losing Their Personality
This is where you make reclaimed wood usable without sanding it into boring modern lumber. Trim away split ends, square up one usable edge if needed, and cut boards to rough length. If you are joining multiple planks for the top, arrange them before final cuts.
Lay the boards side by side and play with the order. Mix tones, vary grain direction thoughtfully, and avoid putting two awkwardly similar defects next to each other unless you are going for “intentional chaos.” A good tabletop looks natural, but not random. Think curated rustic, not lumberyard accident.
If one or two boards are slightly cupped or bowed, you may still be able to use them if the defects are minor and the base will help pull the assembly together. But do not expect hardware to perform miracles. A board with serious movement will keep trying to win that argument forever.
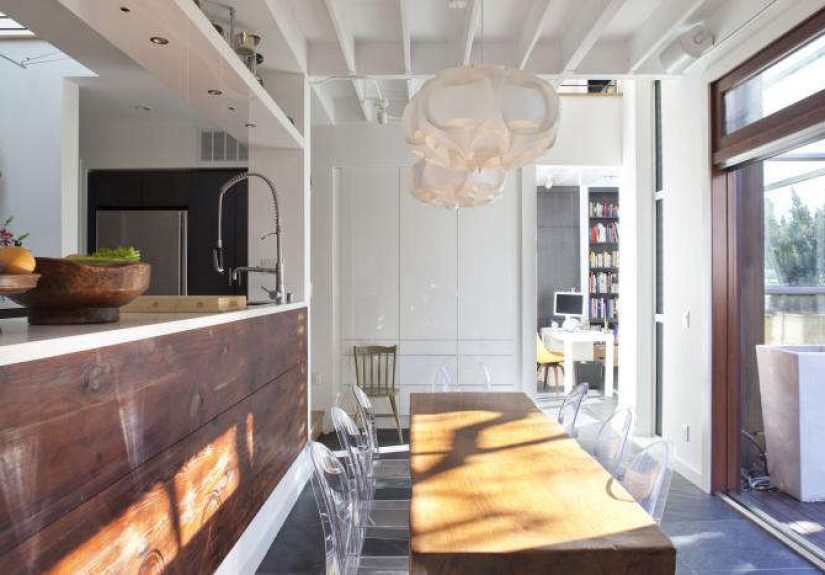
Step 3: Build the Top
The top is the star of the show. For a bench, a narrower top made from two to four boards often looks clean and balanced. For a coffee table, you may use more boards or slightly wider stock.
Simple top assembly method
- Cut all boards to the same finished length.
- Dry-fit them in your chosen order.
- Apply wood glue to clean joining edges if the boards mate well.
- Clamp the boards together.
- Reinforce the underside with battens, figure-eight fasteners, pocket-hole joinery, or a properly designed apron/frame.
If the edges are not perfect, do not panic. Reclaimed builds often benefit from a little forgiveness. You can use a base design that supports individual planks from beneath, or you can trim the assembled panel after glue-up for a cleaner final shape.
Once assembled, sand the top enough to make it touch-friendly. Focus on removing sharp edges, snaggy splinters, and dramatic height differences between boards. Keep the saw marks, weathering, and patina where possible. Nobody builds reclaimed furniture because they want it to look like a laminated office desk from 2009.
Step 4: Build a Strong Base
You have plenty of freedom here. The easiest options are a four-leg frame, a pair of chunky end panels, metal legs, or a simple trestle base. Your style choice changes the look more than the overall difficulty.
Option 1: Straight-leg farmhouse base
This is one of the easiest and most versatile builds. Use four sturdy legs connected by aprons or stretchers. It works beautifully for either a bench or a rustic coffee table. It is balanced, stable, and forgiving for beginners.
Option 2: Trestle or plank-leg base
This gives the piece more weight and visual presence. It is great when your reclaimed top is thick and dramatic. A trestle design also suits longer benches.
Option 3: Steel leg base
If you want modern farmhouse or industrial style, a reclaimed top with black steel legs is an easy win. It makes the wood the focal point while simplifying the base construction.
Whichever route you choose, dry-fit the base before attaching the top. Set it on a flat surface and check for wobble. Tiny misalignments have a magical way of becoming extremely obvious once the furniture is in your house and your coffee cup starts sliding toward the edge.
Step 5: Attach the Top Correctly
Wood moves with humidity. Reclaimed wood is no exception. That means you should attach the top securely but intelligently. Avoid trapping a solid wood top so tightly that seasonal expansion has nowhere to go.
Depending on your design, you can use tabletop fasteners, slotted screw holes, or figure-eight fasteners. For a simpler rustic build, screws from underneath through elongated holes in the support rails can work well. Just make sure the top stays centered and the fastening method does not invite splitting.
Step 6: Sand, Ease the Edges, and Finish
Finishing is the moment when your pile of “interesting wood” finally starts acting like furniture. Sand in stages, but do not go overboard. Many builders stop around a furniture-friendly smoothness rather than chasing a glass-flat surface that erases the reclaimed appeal.
Good finish options
- Clear matte polyurethane: durable, practical, and good for coffee tables that will actually be used
- Hardwax oil: lower-sheen, touchable, natural look
- Wax over sealed wood: soft luster, best for lighter-use pieces
- Light stain plus topcoat: helpful if you want more color unity while still showing grain
For high-use surfaces, multiple thin coats of protective finish usually beat one heavy coat every time. Sand lightly between coats when needed, remove dust carefully, and let the finish cure fully. Rushing the last step is the DIY equivalent of baking a cake and eating the batter off the cooling rack.
Best Styling Ideas for a Reclaimed Wood Bench or Coffee Table
Bench ideas
- Entryway bench with baskets underneath
- Dining bench paired with painted chairs
- Bed-end bench with a folded throw
- Window bench layered with cushions
Coffee table ideas
- Factory-cart style with casters
- Modern farmhouse table with black metal legs
- Chunky rustic table with thick plank top
- Storage-friendly version with a lower shelf
One of the best things about reclaimed wood furniture is that it plays nicely with many styles. It can lean farmhouse, industrial, cottage, cabin, rustic modern, or even minimalist if the silhouette stays clean.
Common Mistakes to Avoid
- Skipping metal checks: hidden fasteners destroy blades and patience.
- Using unstable boards: warped wood rarely becomes less warped out of kindness.
- Over-sanding: do not sand away all the weathering that made the wood special.
- Building without room measurements: a beautiful table that blocks traffic is still a problem.
- Ignoring finish durability: a wax-only finish on a hard-use coffee table may disappoint you fast.
- Forgetting wood movement: tops need attachment methods that respect seasonal changes.
Final Thoughts
A reclaimed wood bench or coffee table is one of the most satisfying furniture builds you can tackle because it combines straightforward construction with high visual payoff. You do not need elaborate joinery or a professional woodshop to make something impressive. You need a thoughtful plan, stable materials, careful prep, and the discipline not to sand away all the soul.
In the end, the best piece is not the one that looks machine-perfect. It is the one that feels sturdy, useful, and full of character. A knot here, a weathered edge there, a little color variation across the top: those details are not flaws. They are the whole point.
So yes, build the thing. Turn that forgotten wood into a hardworking bench or a coffee table that actually deserves the center of the room. And when someone asks where you bought it, you get to smile and say the three sweetest words in DIY: “I made it.”
Real-World Experiences and Lessons From Reclaimed Wood Builds
One of the most common experiences people have with a reclaimed wood bench or coffee table is that the project changes halfway through. Not because the plan was bad, but because reclaimed lumber tends to reveal its opinions one board at a time. A plank that looked perfect at the salvage yard suddenly shows a hidden crack after trimming. Another piece that seemed too rough becomes the best-looking board in the whole top after a light sanding. That is normal. In fact, learning to adapt is part of what makes reclaimed wood projects feel more personal than cookie-cutter builds from new lumber.
Many first-time builders are surprised by how long prep work takes. They imagine the “real” build starts with the drill and screws, but the real magic usually happens earlier. Pulling nails, trimming ends, arranging boards by color, and deciding which marks to keep all take time. The upside is that good prep makes the final assembly far easier. Once the boards are clean, stable, and laid out in the right order, the rest of the project often feels pleasantly straightforward.
Another shared experience is the moment you realize reclaimed wood looks wildly different under finish. Dry boards can seem dull, dusty, or mismatched. Then a clear topcoat goes on and suddenly the grain wakes up, old saw marks become design details, and subtle color differences start looking intentional. That reveal is one of the great rewards of the entire project. It is also why many builders recommend testing your finish on an offcut first. What looks like a soft natural brown on one board may pull warm honey, cool gray, or rich amber on another.
People also learn quickly that perfection is not the goal. If you try to make reclaimed wood behave exactly like brand-new lumber, you may end up frustrated. But when you work with the material instead of against it, the project gets easier and the result gets better. Slight variation in board texture, tiny gaps that do not affect strength, and a few visible patches of weathering can make the finished bench or coffee table feel richer and more authentic.
There is also a practical lesson that comes up again and again: sturdy matters more than fancy. A simple base that is square, level, and well-fastened will outperform a complicated design built in a rush. Many successful DIYers keep the joinery modest and put their effort into getting the proportions right. That is especially true for coffee tables, where daily use exposes every wobble, and for benches, where even one unstable leg becomes memorable for all the wrong reasons.
Finally, people tend to remember these builds because they carry a sense of transformation. A board that once lived outdoors, held up a shelf, or came from a discarded structure becomes something useful again. That gives the furniture a different emotional weight. It is not just décor. It feels earned. And that may be the best part of building with reclaimed wood: the finished piece does more than fill a room. It tells a story without saying a word.